I have been imaging with my ASI1600MM Pro camera for almost three years now and I was completely blown away by the high-quality images of the ASI1600MM Pro from the start. But I decided to upgrade to the newer (and more expensive) ASI2600MM Pro for various reasons: The new ZWO ASI2600MM Pro offers a large field of view with a 26-megapixel APS-C format sensor, a Full-Well depth of 50Ke, a 91% QE peak and other extras like a dew heater and a back-illuminated camera that eliminates any kind of amp-glow we were used to seeing on a CMOS sensor. All this comes at a price. Below, I’ll discuss each of these specs in more detail and compare them to my older (and cheaper) ASI1600MM Pro.
I loved my old ASI1600MM Pro camera from the start. I managed to get high-quality pictures of the night sky and I even managed to get a NASA Astronomical Picture of the Day Award with this camera from my light-polluted backyard, so that was absolutely more than I ever expected. However, it has been over three years and ZWO, the company that produced this camera, hasn’t been sitting on its hands. They developed many new astrocameras among which this 2600MM Pro they released last year in 2021. In this blog, I’ll compare the ZWO ASI2600MM Pro to the ZWO ASI1600MM Pro in terms of specifications and explain why I decided to upgrade. I hope this blog will help you to make your own decision about what camera is best suited for you. Let’s go!
What both cameras have in common
Let me first start by mentioning what both the ASI1600MM Pro and the ASI2600 MM Pro cameras have in common. They both have a built-in cooling system for deep-sky astrophotography. For those who are new to this hobby, remember that with a monochrome camera, you’ll need to buy additional filters to image the night sky in order to produce a color image. Read this blog if you want to find out more about the pros and cons of imaging with a color versus a monochrome camera. Another thing these two cameras have in common is that they both have a cooling system with which you can cool the camera sensor down to 35 degrees below ambient temperature. This helps you to cool the CMOS sensor down and reduce hot pixels that are often produced by these CMOS sensors to a minimum. Finally, both cameras have a USB3 cable to connect the camera to your favorite hardware (laptop, ASIair, or computer), a power output to power the cooling system and 2 USB outputs to power other astrophotography gear which I always use to connect my filterwheel and guide camera. Now let’s talk about the main differences between the two cameras.
Resolution and Pixel Size
The first major difference between the ASI1600MM Pro and the ASI2600MM Pro is the resolution. The ASI1600MM Pro has a 16MP four-thirds sensor whereas the ASI2600MM Pro has a 26MP APS-C format sensor. So with the ASI1600, you’re getting 4656×3520 pixels whereas 2600 offers a whopping 6248*4176 pixels. Both cameras have about the same pixel size; the asi1600MM Pro has a pixel size of 3.8 mu whereas the asi2600MM Pro has a Pixel Size of 3.76 mu. So let me show you what this all means in practice. This is the field of view you’ll be getting with the ASI 1600MM Pro when imaging the Andromeda Galaxy, and this is the field of view you’ll be getting with the ASI2600MM Pro when pairing these cameras with a 480mm focal length telescope.
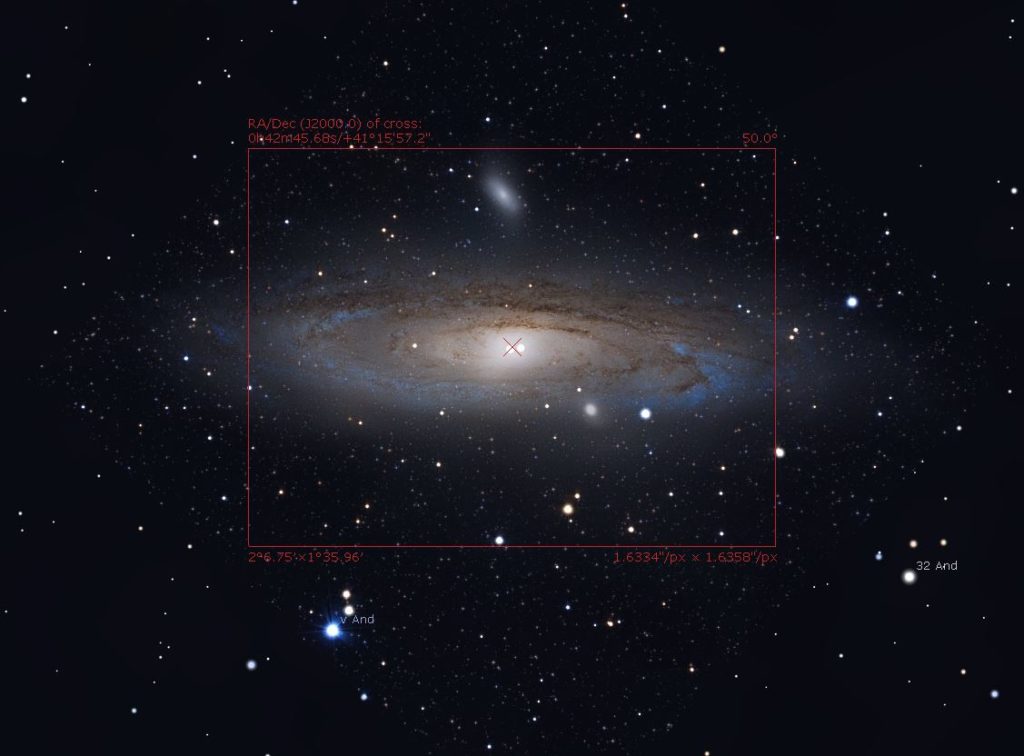
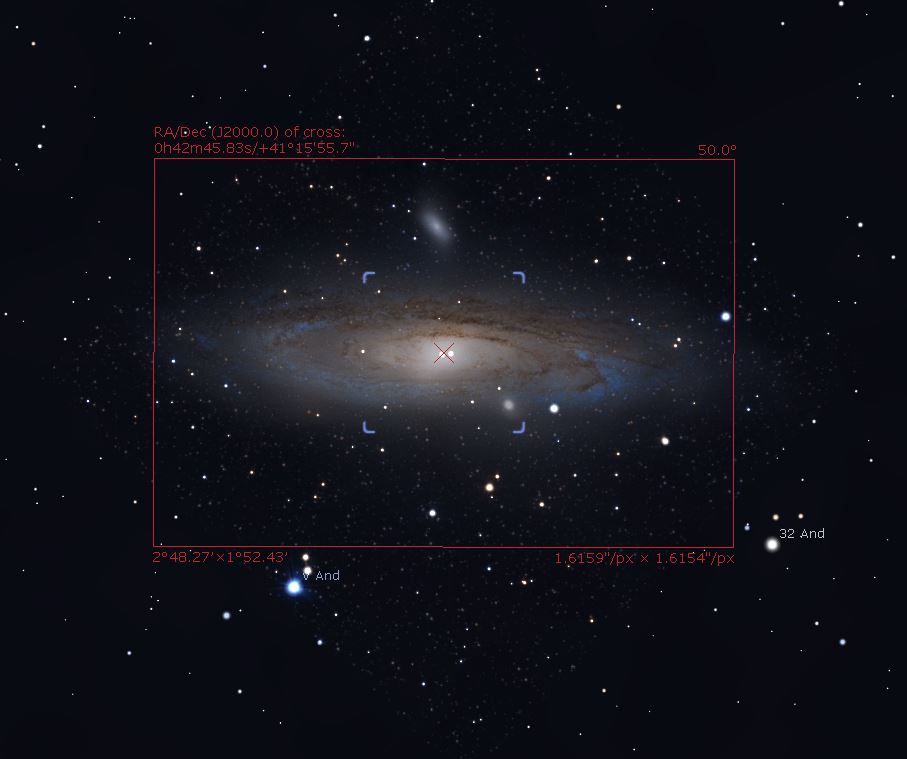
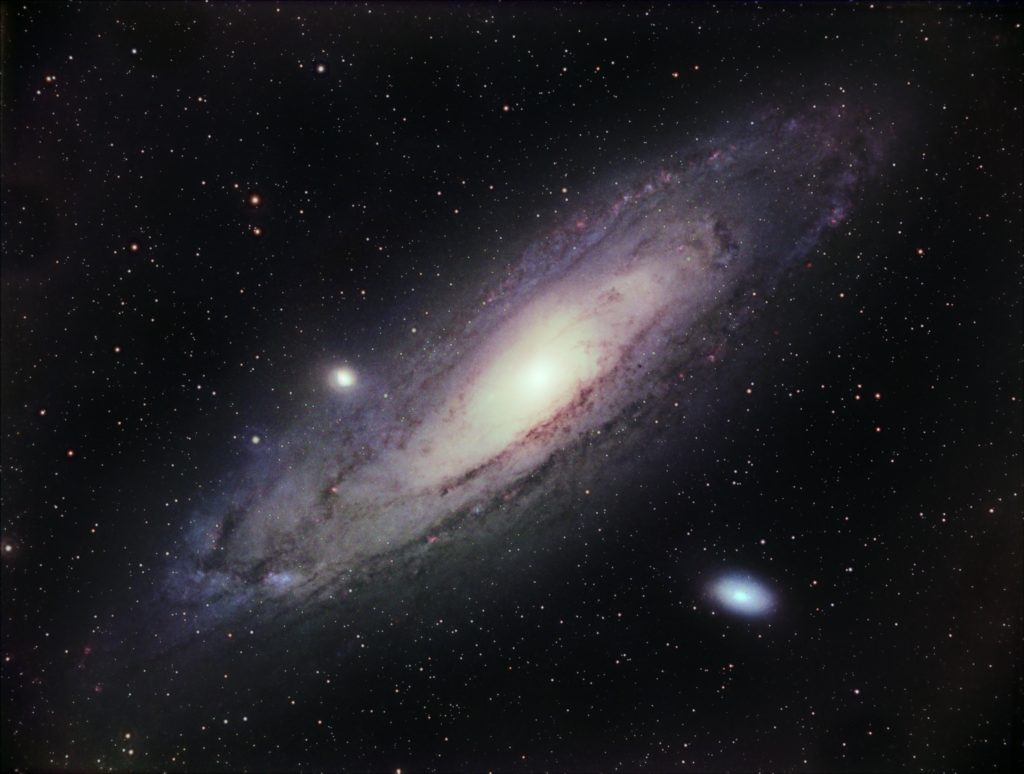
You can clearly see that the ASI2600MM Pro offers a larger field of view as compared to the ASI1600MM Pro. Now, the above pictures are generated by a software program called Stellarium, so let me also show you an actual picture I was able to take of the Andromeda Galaxy from my backyard in the city with my ZWO ASI1600MM Pro. I turned the camera so that I could image the Andromeda galaxy at a 45-degree angle and it fitted the field of view of the camera, but only just. What often happens is that you’ll take many pictures of the same deep-sky object, especially when using different filters in combination with a mono camera across different nights. Despite your best efforts, you will always end up with the object shifting a bit across the many pictures you’ll take of that same image, often across different nights. As this happens, you often end up cropping your final image. So it is super useful to have a larger field of view, especially with large objects like the Andromeda galaxy, as you’ll have more space to image the object and crop your final picture.
Full-well depth: 20k-e vs 50k-e
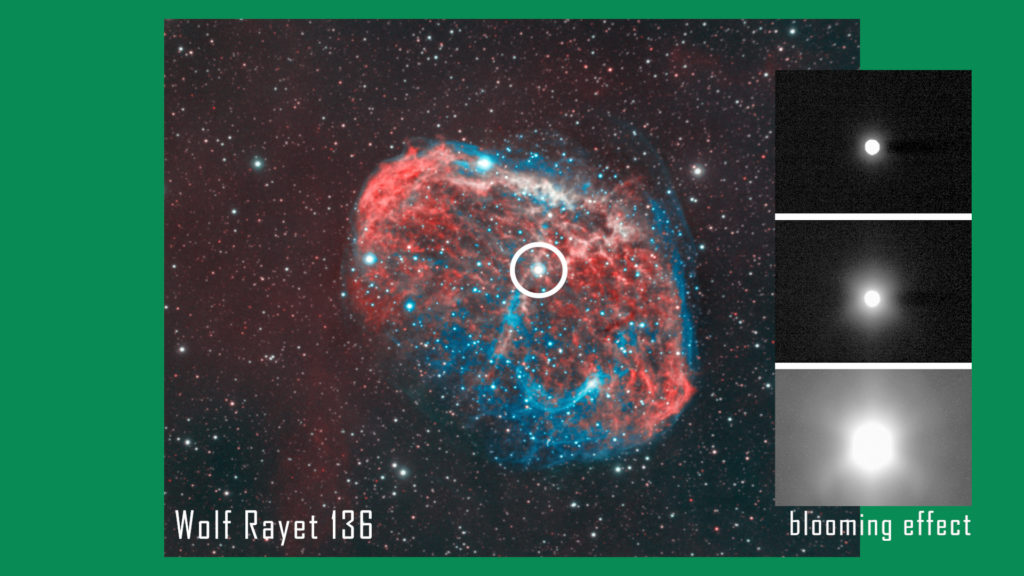
So let’s also talk about full-well depth and quantum efficiency. The ASIi1600MM pro has a Full well depth of 20.000 electrons whereas the ASI2600 offers a full well depth of 50.000 electrons. Now, Full well depth refers to the amount of charge that can be stored within an individual pixel without the pixel becoming saturated. Saturation is a phenomenon that occurs when an individual pixel is no longer able to store any more charge. OK, so what does this mean in practice? Well, let me show you this picture I took of the Cresent Nebula with my ASI1600MM Pro. At the center of the Crescent nebula, you see a very bright star named Wolf-Rayet 136. This star is about 600.000 times brighter than the sun as it reaches its end of life. The star is obviously very bright in comparison to the much darker crescent nebula. As I was interested in imaging the faint light from the darker nebula, I took many exposures of 5 minutes each. During those five minutes, the pixels that are imaging the Wolf Rayet star in the middle of the nebula are bound to be saturated. When this happens, the camera will use neighboring pixels to register the light of that star. This leads to a blooming effect where the star becomes bloated and looks more like a blob than a pinpoint star. You want to avoid this, and a pixel well that is 2.5 times deeper helps to prevent this blooming effect.
Quantum efficiency
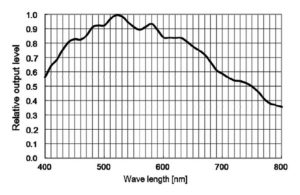
Quantum efficiency (QE) refers to the effectiveness of an imaging device to convert photons into electrons. QE refers to the efficiency with which your camera converts light from space into a signal that is registered on your camera as an electron and appears in your picture. When looking at the specs, ZWO reports that the ASi1600MM Pro has a Quantum Efficiency peak of 60% whereas, with the ASI2600MM Pro, they state a QE peak of over 90%. So at first glance, it appears that the ASI2600MM Pro has about a 30% higher QE as compared to the ASI1600MM Pro. Let’s dive in a little bit deeper and show you the Quantum Efficiency graphs ZWO has published for both cameras on website. Let’s start with the asi2600MM Pro. The graph shows the wavelengths of different colors of light in nanometers on the x-axis, whereas the quantum efficiency of the camera is reported on the y-axis at different wavelengths. The ASI2600MM pro shows a rise from 70% to over 90% in the 400 to the 500-nanometer range which corresponds with purple and blue light. It then shows a slight decline from 91% to 70% in the 500 to 600nm range, which is the range of green and orange light. Finally, you can see it drops from 70% to just under 50% in the 600 to 700nm range, which is where the red photons are registered. Now, when looking at the ASI1600MM Pro, the graph shows a rather similar curved line. Unfortunately, the ASI1600MM Pro graph released by ZWO refers to relative and not objective output. ZWO states that the max (1.0) peak of the ASI1600MM Pro lies around 60% QE. As such, this graph is a bit hard to interpret, but we do see a rise from 0.6 to 0.9 in the 400 to 500nm range, it stays above 0.9 in the 500 to 600nm range and it then drops from 0.9 to about 0.5 in the 600 to 700nm range. All in all, the ASI2600MM Pro outperforms the ASI1600MM Pro by about 30% in QE peak, but it is always good to look at QE graphs of astrocameras as they vary significantly across wavelengths.

Analog to Digital Converter
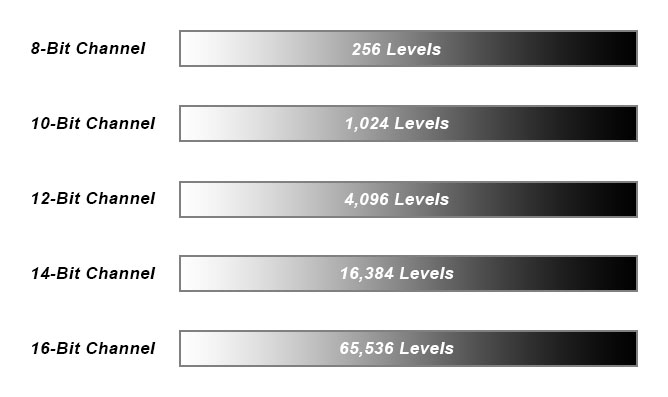
The ASI1600MM pro has a 12-bit Analog to Digital Converter whereas the ASI2600MM Pro has a 16 bit ADC. An ADC is able to covert the photons of light that fall on your camera sensor into a digital signal that can be stored as a file on your computer. The 12-bit ADC of the ASI1600 can produce 4096 different levels of brightness in the range from black to white, whereas the 16-bit ADC on the ASI2600MM Pro can represent 65.536 different levels of brightness in the range from black to white. So the ASI2600MM Pro offers a much higher dynamic range in a single picture.
Anti-dew heater and illuminated back
The AI2600MM Pro offers an additional dew-heater on the window above the camera, that can be used to prevent dew or icing issues on your camera. The ASI1600MM Pro doesn’t have a dew heater. Also, the asi2600MM has back-illuminated wiring on the CMOS sensor whereas the 1600MM Pro has front-illuminated wiring. Back-illuminated wiring is supposed to help to increase the sensitivity of the camera and it should also provide a further reduction in amp glow when taking long-exposure pictures. For example, I took this 5-minute dark frame with my asi1600MM Pro at unity gain. It is very good but it still produces a little bit of amp glow in the corners. This is a 5-minute dark frame with my ASI2600MM Pro. As you can see, there is no noticeable amp glow.


Price and backfocus
The ZWO ASi2600MM Pro has a big sensor and a back-focus of 17.5MM, so you’ll probably want to use at least 36mm or 1.41-inch filters or bigger filters with this camera. The asi1600MM PRO has a smaller sensor and a shorter back focus of 6.5mm, and it works fine with smaller and cheaper 1.25″ filters. Finally ,the prices of both cameras. The ASI2600MM Pro is priced at $2480 whereas the ASI1600MM Pro is much more affordable at $1280 at the time of writing.