You may have wondered whether you should use a mono or a colour camera for your astrophotography. In this blog I’ll attempt to provide you with an answer. The main advantage of using a mono camera is that (a) it is able to collect more light from deep space objects; (b) it usually has a higher quantum efficiency, and (c) a mono camera is better in narrowband imaging as compared to a colour camera. The main advantage of using a colour camera is that it makes capturing and post processing deep sky objects less time consuming and less complex. Below, I’ll elaborate on using a mono or a colour camera for your astrophotography, as well as the main advantages and disadvantages.
Astrophotography with a mono camera
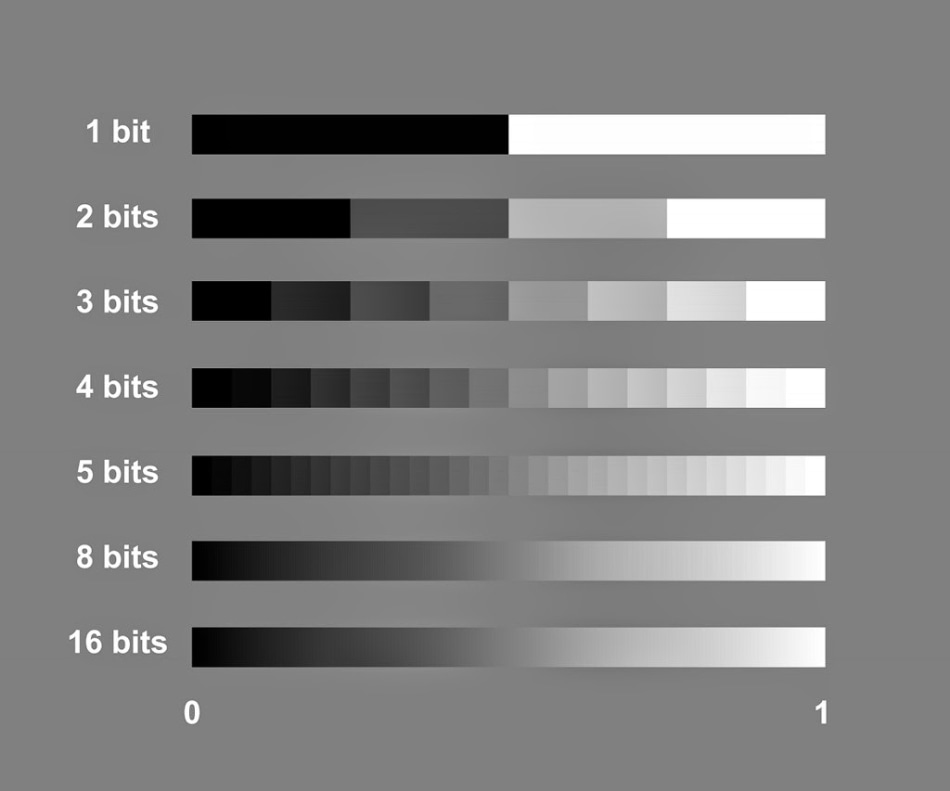
So let’s first get into how astrophotography with a mono camera works. When you attempt to take a picture of a deep sky object, you are capturing photons that are many light years old, which will be ‘registered’ by the sensor of your camera. The sensor of your digital camera is equipped with many light capturing wells that are able to convert the photons into a digital signal with so called Analog to Digital Converters (ADC’s). These ADC’s measure the intensity of every photon, usually in ADU (Analog to Digital Units). So, ADU represent the intensity of light for each of the pixels on your camera – from pitch black to bright white with all the gray scales in between. It is important to mention that the higher the bit rate of your ADC, the more variation in gray scales your camera is able to detect in between your black and white point of your digital image.
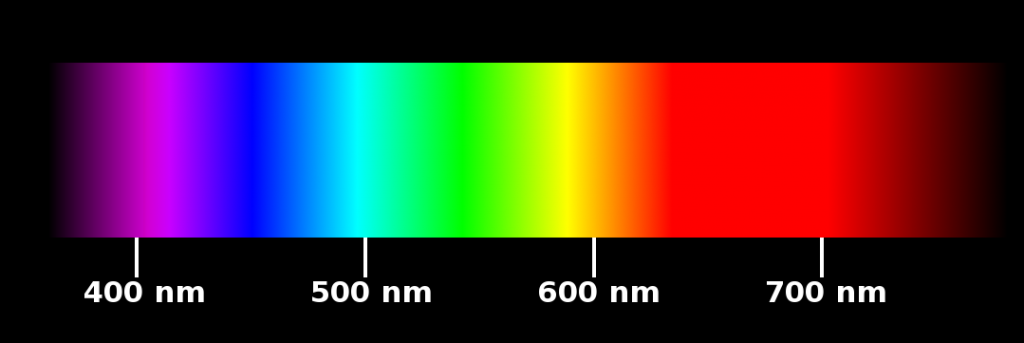
However, the ADC of your camera cannot detect the different colour(s) of light. This is why astrophotographers use filters when imaging with a mono camera. These filters are used to pass light from a particular part of the light spectrum representing a specific colour, while rejecting light that travels at different wavelengths. For example, blue photons emit light in between 450 and 485 nanometers (nm) of the light spectrum, green photons emit light from 500nm to 565nm and red photons from 624nm to 740nm. So let’s imagine we are using a blue filter that is positioned in front of your camera sensor. This blue filter will only ‘pass’ photons that travel in between the 450nm to 485nm range while rejecting photons that travel at different wavelengths. That way, you can be sure that you are only capturing blue photons representing the blue light of your deep sky object. Similarly, you can use green and red filters in front of your mono camera. So with a mono camera, astrophotographers capture the blue, green and red light separately from a single deep sky object. Using post processing techniques, the red, green and blue images are first stacked separately and then combined into one overall colour picture of a deep sky object. Note that when you know the RGB and intensity of light, you can produce any kind of colour in the visual light spectrum for every pixel on your camera.
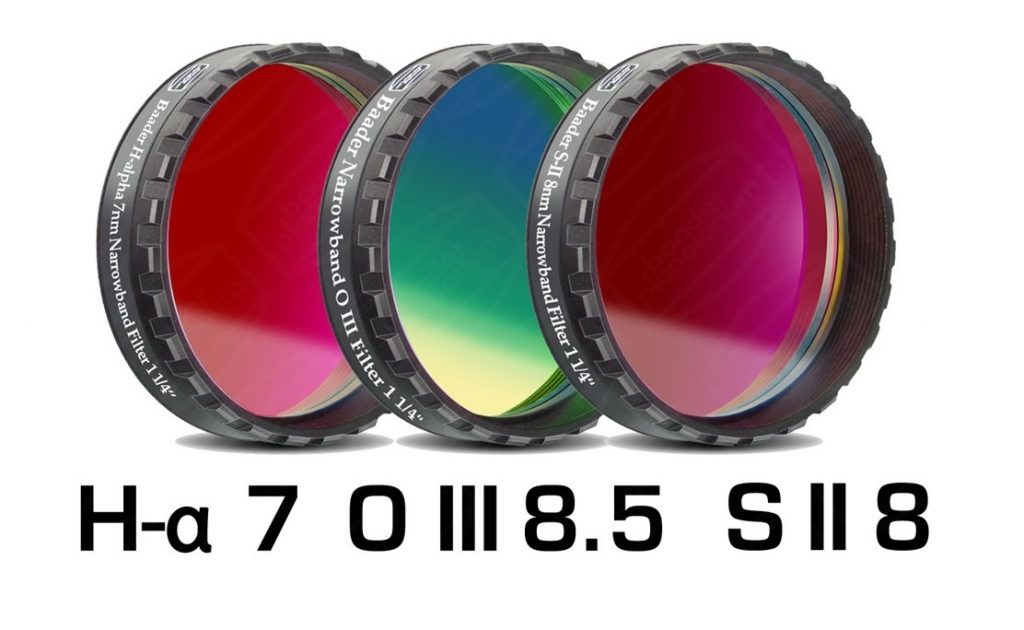
In addition, amateur astrophotographers with mono cameras often use narrowband filters. Narrowband filters – as the name suggests – only capture a very small part of the light spectrum and reject light from other wavelengths. A popular filter that is often used for astrophotography is the Hydrogen Alpha filter. A lot of famous emission nebulae include HII regions of ionized hydrogen. Ionized hydrogen emits light at a very specific wavelength of 656nm. By using a H-alpha filter in front of a mono camera, astrophotographers are able to capture the Hii region of a deep sky object while rejecting light emitted in other wavelengths. This is very useful as it will reveal high contrast, rich Hii regions of many well-known objects such as the horsehead nebula, the orion nebula and the north america nebula. Narrowband filters are especially useful in urban areas that suffer from strong light pollution, as it rejects all light emitted from artificial light sources in the city. Other often used narrowband filters are Sii (sulfur) and Oiii (oxygen) filters which, together with Ha, can produce a false colored image of an object representing the different elements of an astronomical object. Narrowband images are often combined into a so called Hubble palette, referring to the way in which many pictures from the Hubble telescope are processed by professional astronomers. In the Hubble palette, Sii is coloured red, H-alpha is green (or rather, gold), and Oiii is blue. That way, the different colours in the Hubble palette visually distinguishes between the different elements that are present in a deep sky object.
Astrophotography with a colour camera
Many astrophotographers start their hobby using a colour camera, such as a regular DSLR. There are also dedicated colour cameras for astrophotography. The sensor on a colour camera works similar to the sensor of a mono camera, as explained above. Thus, light capturing wells on the camera sensor convert photons to a digital signal using Analog to Digital Converters (ADC’s). These ADC’s can measure the intensity of the photon (in ADU’s), but not the colours of these photons. To detect the different colours of light, a colour camera has a filter array that is placed in front of the sensor of your camera. Most cameras use a Bayer filter, named after its inventor Bryce Bayer who was working for the camera company Kodak.
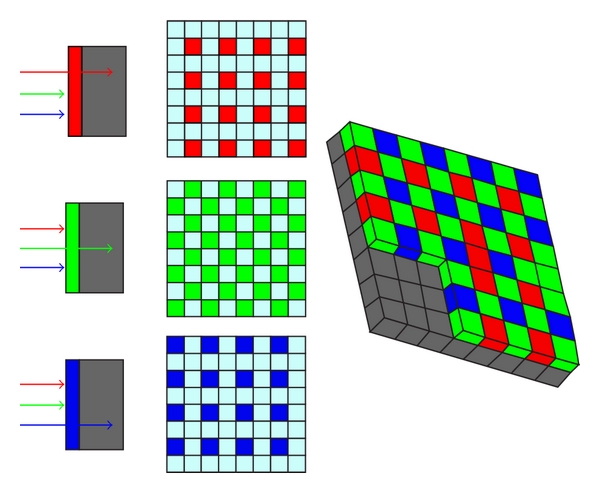
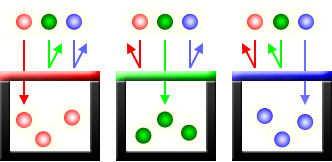
A Bayer filter basically consists of (arrays of) red, green and blue filters that are fixed in front of your camera sensor. Every four (2×2) capturing wells have a so called RGGB filter array which together make up one pixel in your picture. Note that two out of the four wells have a green filter in front of them, whereas only one well has a blue and one has a red filter. So, the Bayer filter is biased towards capturing green (50%) in comparison to blue (25%) or red (25%). The Bayer filter is intentionally designed like this because our human eyes are physiologically most sensitive to green light. Using the ADC and the Bayer (RGB) filters, your digital comera can produce pixels in your digital image with a that has a specific color and intensity. You can play around with these combinations yourself here. Your DSLR camera or dedicated colour camera use a similar process, although the algorithms involved to come up with a color and intensity of a pixel are a bit more more advanced.
Colour cameras are ‘faster’ and easier to use than mono cameras
The main advantages of using a colour camera are that it will simplify your astrophotography in terms of time and complexity. With a colour camera you can immediately capture coloured images of your favorite deep sky objects. With a mono camera, you will need to capture that same object separately using blue, green, and red filters which will take about 3x more time (and energy). Stacking and post processing your astropictures is also a lot easier when using a colour camera versus using a mono camera. You can stack and post process all of the coloured images without having to worry about stacking and integrating red, green and blue pictures of your favourite astronomical object.
Advantages of using a mono camera
So why do astrophotographers use a mono camera when it requires so much of their time and energy? Let’s get into some of the main advantages of using a mono camera.
Mono cameras capture more light
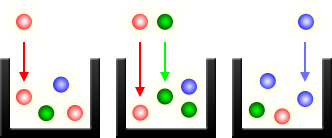
The main advantage of using a mono camera is that you will be ale to collect more light coming from deep sky objects. Let’s imagine that we are a blue photon that has traveled for many light years. We enter a telescope and we get refracted (or reflected) onto the camera sensor. But, ah, we are a blue photon hitting a green filter of the Bayer matrix in a colour camera. Game over for us! The green filter rejected us because we have a different wavelength. Unfortunately, this happens many times, in fact, about 75% of the time as the Bayer pattern is RGGB. When that same blue photon passes a blue filter in front of the mono camera, it can land anywhere on the camera sensor and it will always be registered.
Let’s imagine that we – as a blue photon – hit a blue filter of the Bayer matrix, and we do get registered by a colour camera. What happens next? That blue photon will now be combined with other capturing wells in the RGGB pattern. Worse case scenario, if we are a low intensity blue photon and are combined with other capturing wells that did not capture any light, chances are that the combined pixel of your digital picture only shows ‘black’ space…we are lost again. This same story also applies to red photons. There is only about 25% chance that blue and red photons will be registered using a colour camera, after which these photons will be combined with the other capturing wells to generate a digital pixel with a certain intensity and color. Green light has more favorable odds, as about 50% of all green light will pass the Bayer pattern of a colour camera. Unfortunately, there is not much green light to detect in the universe – the most common colour is red. When using red, green and blue filters in front of a mono camera, all photons of light that will be within the light spectrum of a particular filter will be passed and can land anywhere on your mono sensor and will always be registered. Hence, you can capture a lot more red, green and blue photons of light when using a mono camera.
Mono cameras generally have a higher quantum efficiency
Another advantage of using a mono camera refers to Quantum Efficiency (QE). QE refers to the efficiency with which your camera is able to convert a photon into an electron – a digital signal. Ideally, we want that efficiency to be 100%, so that every photon will be converted into a digital signal. The Quantum Efficiency of colour cameras tends to be somewhat lower as compared to a mono version of that same camera due to its design. This means that less photons will be detected and converted into a digital signal. If you are looking for a new astrophotography camera, I recommend you always check out the QE of that camera.
Mono cameras are better for narrowband imaging
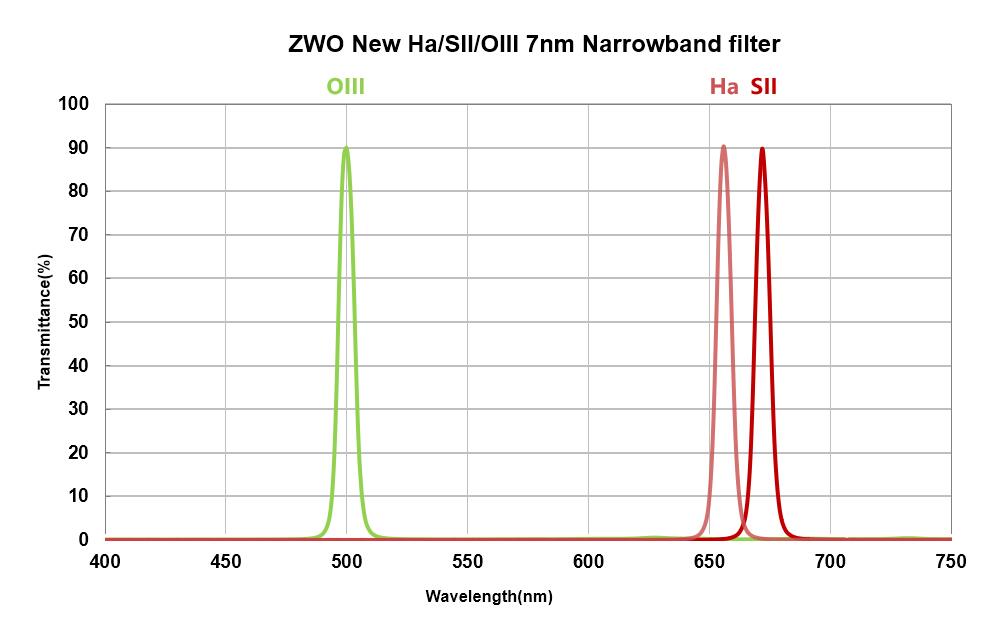
One final advantage is that mono cameras are much better cameras for narrowband imaging. Many astrophotographers have wondered if they should use narrowband filters in combination with a colour camera. Well…of course you can do that, but let’s think about what will happen. The most often used narrowband filters are Hydrogen-Alpha (H-alpha) filters that pass photons of light at 656nm; Sulfur (Sii) at 672nm, and oxygen (Oiii), at 500nm. So, Ha and Sii filters are within the red part of the light spectrum, whereas Oiii is in the blue part of the light spectrum. If we are a particle of ionized hydrogen, we will first slip through the H-Alpha filter after which we have about a 25% chance of getting registered because of the Bayer matrix in front of the camera sensor of your colour camera. Sulfur (Sii, red light) and Oxygen (Oiii, blue light) particles have the same odds – they only have a 25% of getting detected due to the RGGB Bayer matrix. With a narrowband filter in front of a mono camera, every photon that passes your filter can land on any part of your camera sensor and will be registered.
Conclusion
So, should you engage in astrophotography with a colour or a mono camera? The answer to that question is…it depends. The main advantage of using a colour camera is that you will spend less time and energy on capturing and post processing coloured images of your astronomical objects. Also, as your colour camera is already equipped with a Bayer filter, you do not need any additional equipment such as filters and filter wheels. I would personally recommend a colour camera to anyone who is just starting their astrophotography hobby. When you are just starting your astrophotography hobby, you have to learn many different skills like how to setup and polar align your mount, how to track objects in the night sky with high precision using auto guiding, and how to capture and post process those images. Mastering all those steps will take time and energy. Having a colour camera helps you to simplify your workflow.
Once you have mastered some of these basic astrophotography skills and you want to take high quality pictures of your astronomical objects, there is only one way to go: Mono! Mono imaging allows you to capture more light at specific wavelengths of any astronomical object with which you can create stunning pictures of astronomical objects – even when you live in a light polluted city (like me). It does require more time and effort to capture the same astronomical object using different broadband (RGB) or narrowband (Ha, Sii, Oiii) filters. You also need to engage in more complex post processing to get your final picture where you will have to stack the images of each of the filters separately before integrating those images to produce an overall coloured picture. But when you do, and it works out, you’ll be amazed by the high quality of the your astrophotography pictures of your mono camera. I personally started out with a DSLR camera, then moved on to a color camera, and I ended up using a mono camera, the ZWO ASI 1600MM pro.
I want to remind you that I’m just an amateur astrophotographer myself, and I welcome different views on this subject. If you have anything to add, please use the comment section below so we can engage in a conversation and learn from each other.
Clear skies!
Awesome page, Continue the useful job. Thank you.
Thank you James!
I have an SBIG ST-402ME cooled monochrome CCD with integral colour wheel for imaging, and a monochrome ZWO AS1200MM-S for off-axis guiding. It took a while to wean me from my DSLR and later a colour CCD, but the results are worth it.
Your articles and website are second to none. Thanks again Wido!
Thanks so much Patrick!
Thanks for providing such a clear and detailed explanation of the equipment and processes. Very useful and informative.