One of the first things you will have to learn when getting into astrophotography is to polar align your telescope mount. When you just bought your first equatorial mount, this can be a little daunting.
A good polar alignment can be achieved in five steps. First, point the tripod of the mount to the the north if you are in the northern hemisphere and south when you are in the southern hemisphere. Second, level your tripod. Third, put your mount into the correct latitude position. Fourth, use a polar scope to polar align your mount to the north celestial pole. Fifth (optional) use software to really NAIL your polar alignment like a pro. In this blog, I’ll explain these five steps in more detail and I will mention some pro tips on how you can master your polar alignment.
What is Polar alignment?
Some articles on the web turn polar alignment into some exotic, mysterious art. My main aim in this blog is to provide you with five easy to understand tips that will help you to NAIL your polar alignment, without making the procedure overly complicated. I will also try to keep this article focused on the procedure itself – its a more about “how to” perform the procedure rather than “why”. However, before presenting the five tips, I’ll spend one paragraph on what polar alignment actually is and why it is important if you want to improve the quality of your astrophotography endeavors. If you don’t want to read that part, feel free to skip to the first tip! Note that I’m located in the northern hemisphere (the Netherlands) so my tips are about how to polar align to the north celestial pole. If you want to align to the south celestial pole, please click here. Are you more of a YouTube person and less of a blog reader? Then click on the video below. If not, keep on reading :-)!
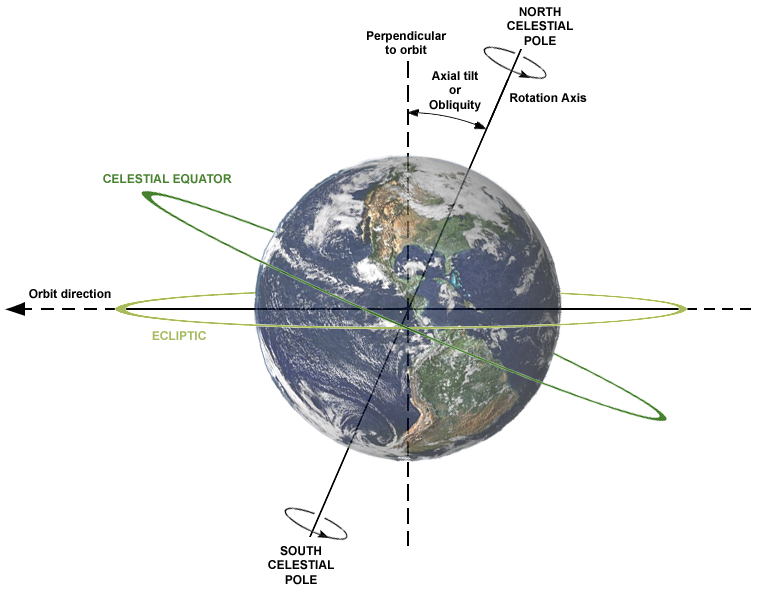
When getting into deep sky astrophotography, one of the first things you’ll need to buy is an equatorial mount. The main reason is that you can “align” an equatorial mount with either the north or south celestial pole when performing astrophotography. So what are these celestial poles exactly? Well, as you are interested in astrophotography, you probably know that you live on a spaceship (earth) that rotates every 24 hours around it’s own axis. If you believe in a flat earth, you should stop reading and seek help from your nearest astrophysicist :-). So let’s think about drawing an imaginary line that goes from the south pole to the north pole, right through the center of the earth – we call that line the rotation axis. As the earth is a little bit tilted in relation to the sun (23.5 degrees to be exact), the rotation axis is also a bit skewed, as you can see on the picture below. Now extend that rotation axis from the north pole up towards the sky. Now that’s the north celestial pole. Vice versa, extrapolate this line from the south pole towards the sky and you’ll get the south celestial pole. Note that these are imaginary lines, you cannot actually see the north or south celestial pole.
So what? you might think. Well, the north and south celestial pole are at the heart of what we call our equatorial coordinate system, where every object in the sky has its own coordinates. These coordinates are based on the assumption that our telescope mounts are “aligned” with either the north (in the northern hemisphere), or the south celestial pole (in the southern hemisphere). Why is alignment with these celestial poles so important? Good question.
Let’s do a little thought experiment. Let’s assume that you are on the north pole – at 90 degrees latitude – with your telescope and sufficient clothing to protect you from freezing to death. Now, if you’d look at the stars, you would see that they move exactly from east to west – without any variation in altitude. Polaris, our north star, would be almost exactly above your head, as it is located very close to the north celestial pole. Now let’s imagine that you are on the equator – at 0 degrees latitude. The stars would move mainly in altitude, meaning that you would see them shoot straight up into the sky, and fall back down again, with little horizontal movement. Also, polaris would be difficult to see as it is very close to the horizon. Let’s finish this experiment by going to the south pole, at -90 degrees latitude (again, bring warm clothes!). The stars would move from west to east because we are “upside down” without any change in altitude. Polaris would be out of view as it is on the other side of the earth, but you would see Sigma Octantis – the south polar star. Although… when I read those south polar align blogs, it does not appear to be a particularly bright star – so we “northies” should consider ourselves lucky to have polaris! Check out this short two minute movie where I visualise some of the paths the stars describe along the sky, depending on your latitude position, using stellarium – a free software app.
So, do all the stars have different coordinates depending on the different locations on earth? No of course not, that would be a total mess. Just as on earth, where every city has a latitude and a longitude position, every deep sky object has two coordinates, one “declination” (DEC in short) and one “right ascension” (RA in short) coordinate which are always the same independent from where you are on earth. For instance, polaris has a DEC of +89° 15′ 51″ – close to 90 degrees, where we would find the north celestial pole – and a right ascension (RA) of 02h 31m 49.09s. I will not get into the RA coordinates in this blog. Let’s just think of RA as a kind of longitude position which, together with DEC, will identify a specific location of a deep sky object in the universe.
So if the stars are describing different paths along the sky depending on the latitude position on earth, how can we accurately track deep sky objects which are defined by the same DEC and RA coordinates? Simple, by polar aligning our telescopes to either the north or south celestial pole. Let’s take me for example. I’m in the Netherlands, at about 52 degrees latitude. I can point my telescope exactly north and adjust the latitude position of my equatorial mount so it matches that 52 degrees latitude. That way, I am aligned with the north celestial pole. Or when I would be in New York, I would also point my telescope north, but change the position of my equatorial mount to about 41 degrees latitude. By changing the latitude on my mount, the mount will be polar aligned with the north celestial pole – both when I’m in the Netherlands and when I’m in New York. If I then tell my telescope mount to track a deep sky object such as polaris ( DEC 89°; RA 02h 31m 49.09s), my mount would be able to accurately find and track polaris in both locations using the same RA and DEC coordinates, as the equatorial mount is aligned with the north celestial pole. This is also the reason why another popular mount – the ALT-AZ mount is NOT suited for deep sky astrophotography. You cannot change the latitude position of such a mount (at least, not without additional gear such as a wedge), so you cannot align it to the celestial pole. Well, enough explaining. Let’s get into the “how to” mode. So, what steps do we need to take to polar align our mounts? Let’s get into it.
Tip 1: Put your mount into the correct position
This is easy enough, right? Just point the tripod of your telescope mount into the north (360 degree) direction. If you don’t know where the north is, you can either use a real compass, or a smartphone app. I used the smart gps compass map for android APP in my video which you can find here. Just click on compass, and move your phone until the arrow is pointed north, towards the 360 degree position. That’s where you need to put your telescope when you are in the northern hemisphere like me. So, usually the two legs of the tripod are in front, and you put the third leg of the tripod to the back. You have to put the tripod such that the telescope will face north. On my Celestron AVX mount, there is a little peg at the top of my tripod that should always face north. Anyway, you’ll figure that one out yourself and if not, put your question in the comment section :-). In this part of the video, I show you the compass APP I’m using:
PRO tip:
If you are doing astrophotography from your backyard or balcony, chances are that you will put the tripod in the same position every time you will start your astrophotography adventure. So if that is the case, it would be wise to mark the positions of the three tripod legs somehow. On my balcony, I have used thumbnails to mark the spot of each leg, so the next time I go out I simply put my mount near one of those thumbnails so that i don’t have to use a compass. Or maybe you could use some chalk to indicate where your legs are positioned? Let’s move on to the second tip.
Tip 2: Level your mount!
The second tip is very simple but nevertheless important: LEVEL YOUR MOUNT! My Celestron AVX mount does not have any kind of bubble leveler – some mounts do – so I use a simple spirit level which I put horizontally as well as vertically on my mount to be sure it’s level. If not, you can easily adjust the legs of the tripod until the mount is level. The reason why this is important is that your mount can accurately track the deep sky objects from your specific location when you are levelled. If not, you will notice that unguided tracking of the stars will result in the star moving slowly of out of the field of view. Of course, using guiding software such as PHD2 will send corrections to your mount when you are not exactly level. But all these extra pulses will also result in a somewhat higher error in your tracking ability – at least that is my experience. In this part of the video, I show you how I level my mount:
Pro tip:
Many experienced astrophotographers swear by leveling their mount as close to the ground as possible. So, this means NOT unfolding or extending the legs of your tripod in any way, or only extend it a little if it’s absolutely necessary to get your mount level. The reason for this is that – arguably – the tripod is much more stable when leaving it unfolded, and winds are less likely to impact the accuracy of your tracking. I’ll be honest…I’ll extend the legs nonetheless because it makes it easier to connect and/or adjust my other gear if necessary :-).
Tip 3: Put your mount in the correct latitude position
If you have read the introduction then you know that putting your mount into the correct latitude position is essential to accurately track deep sky objects – and if you skipped the introduction I’m telling you now. Some telescope mounts have GPS built in so it automatically updates the latitude position of a particular location. I’m still working with my AVX mount which does not have such luxuries. Ofcourse, it is easy nowadays with a smartphone APP to get an accurate latitude position. For instance, you could use the smart gps compass map I told you about earlier here, as it also includes a “my location” tab on which you can click to get an accurate reading of your latitude (and longitude) position.
So, now that you know at what latitude you are, you can adjust your EQ mount to that position by simply using the altitude screws that are on your mount. In my video. I’ll show you how to adjust these altitude screws. Basically, they are on the front and on the back of your EQ mount. By simply loosening one screw while tightening the other screw, you can change the altitude position of your mount. In this part of the video, I discuss how to adjust your mount to the correct latitude position:
Pro tip:
Uuhhmm, not sure. The latitude position is the latitude position…there are no pro tips here. But you probably understand that you want your alignment to be as accurate as possible…in the next tip, I’ll discuss a manual way – with a polar scope – to get an accurate alignment, which is what most people do. And then I move on to the final tip where I tell you my personal secret to NAIL your polar alignment like a pro. So one tip could be – if you want to be a pro – skip reading the fourth tip and start reading the fifth and final tip :-). Although I have to warn you, it will cost you some money…
Tip 4: Use a polar scope (what most people do)
An equatorial mount usually comes with a polar finder scope. If not, you can easily acquire them for your mount – most of them ranging from 20 to 100 USD/EUR. My Celestron AVX mount came with this polar finder. The easiest explanation is that a polar finder scope is just a mini-scope that you put in the center of your mount, with some info on it that will help you to properly polar align your scope. In order to be able to look through your polar finder towards the night sky, most scopes require you to turn the RA axis of your mount about 90 degrees. I show you how to perform this procedure in my video at 10:28. After you have done this, you should be able to look through your polar scope at the night sky. Depending on the type of polar scope you have, you will get information that will help you to accurately align your telescope mount with the north celestial pole. In my case, my polar finder scope shows (a) a cross-hairs with the NCP (North Celestial Pole) marked by a little cross – this should be at the center of your polar finder – and (b) an indication of Polaris, and (c) the constellations of the Big Dipper and Cassiopeia as a reference – not to scale.
So that’s a lot of info, but not to worry. The first thing you have to do is figure out where Polaris should be positioned in the finder scope the exact time you are starting your polar alignment. You can use free APPS for this. in my case, i downloaded a free PolarisView APP for android. If you are going to use this particular app, be sure to check on “View as in polar finder scope”. The app will show you a simple picture with a red cross-hairs, the center of the cross-hairs resembles the North Celestial Pole. You also see some circles and a white dot – this white dot is important as it represents Polaris – our north star! So, let’s say that you are standing alongside your telescope mount and you have finished tips one through three. The next tip is to use your polar finder scope to align your scope with the north celestial pole. You will look at the APP – not hours before during daytime, but right at that time – to see where the APP says Polaris should be centered in your polar finder scope. For example, if it shows Polaris a little bit to the upper right quadrant, you will turn your polar scope until it shows Polaris at that specific location. Now – if you have performed the first three steps with some degree of accuracy 🙂 – you will see Polaris in your polar finder scope. If that is the case, use the altitude and azimuth screws of your mount to move Polaris into the correct position and DONE. You have (visually) aligned your telescope mount to the north celestial pole. Congratulations! Not sure on how to adjust your alt-az screws? Then check out my video on how to adjust your mount at 11:47. And I discuss the free PolarisView APP here.
What if you do not see Polaris in your polar finder scope? Don’t panic. Recheck tips one through three. Are you really sure your mount is pointed north, levelled, and at the correct latitude? Perhaps some minor adjustments will get polaris in the broad field of view of your polar finder scope.
Pro tip:
OK, this is going to sound lame, but…the pro tip here is to forget about Tip 4 and do the polar alignment procedure as explained in tip 5 after finishing the first three tips.. All the above tips will get you aligned accurately enough to start tracking the stars and allow you to engage in astrophotography – no worries! The final tip is for the nerds, the “pro’s” out there who want to get sub-minute guiding accuracy at all costs :-). If you feel this is not for you, no problem! Enjoy your astrophotography hobby like a normal person.
Tip 5: How to NAIL your polar alignment like a pro
So how do I get sub-arc minute accuracy on a relatively inexpensive mount like my AVX? Well…the honest explanation is that….I cheat my way into a perfect polar alignment using easy to understand software. In particular, for the last couple of months I have been using Sharpcap Pro, which includes a very easy to understand polar align tool. Hey, this is an astrophotography website, so I hope you have connected an imaging camera to your telescope and are focussed on the stars by now. If not, do that first! And you have to purchase the pro licence of sharpcap here. It does not cost much, 12 EUR/15 USD for a one year licence…It’s up to you. I didn’t use it at first and got by without it. Make your own decision. But I have to tell you, it helped me to shave off about 1 arc-minute of polar align error (at least on the DEC axis)…uuhm, yes, with PHD guiding ON of course.
So, OK, the previous steps got you close to a perfect polar alignment. Now it is time for the PRO step. Below, I’ll explain how it works using words. If you want to see this procedure on video, feel free to click here to watch my video from 8:10 onwards where I discuss polar alignment in sharpcap pro.
So if you are finished downloading, installing and buying a licence for sharpcap pro, you can open the program and you will of course first start to adjust the focus of your camera so the stars are in view. If you don’t know how, simply click on “Camera” and choose the camera you’ve connected to your laptop/PC. Also note the small “focus assistant” magnification glass icon which shows all kinds of data (FWHM, multi-star FWHM, Bahtinov mask etc.) to help you to refine your focus. I will not get into details on how to focus here, because we are talking about polar alignment. I’m assuming you are able to focus your telescope…after all…you are reading the pro tip. Now, click on the “tools” menu and select “Polar align” to start the magic. Sharpcap will automatically take a picture using your imaging camera that is attached to your telescope. If you are aligned and focused correctly, this will take only 1 second after which it will tell you that the image is “SOLVED” in the bottom left of the screen. Now Sharpcap will instruct you to click the next button (bottom right), so do that. Next, sharpcap instructs you to rotate your telescope mount 90 degrees using the RA axis. If you don’t know how to do that, check my video at 10:29.
Now, after you have turned your telescope mount 90 degrees, Sharpcap automatically takes a second picture of the north celestial pole and it will inform you about what is called your “periodic align error” in arc hours:minutes:seconds. During my particular recording, I had a polar align error of about 11 arc minutes – after using my polar finder! How can this be? Am I such an idiot? Did I screw up the first four steps? Perhaps. But be aware that I was performing manual procedures (leveling, pointing north, adjusting the latitude) and using a polar finder scope that has a much WIDER field of view as compared to your imaging camera that is connected to your telescope. So in short, sharpcap pro nails your polar alignment because it captures a much more DETAILED view of the north celestial pole!
But enough about me, let’s get back to the procedure. After sharpcap has “solved” the second image, it asks you to click “next” (bottom right). After this click, you hopefully see why I recommend Sharpcap. It’s because of its simplicity! Below the polar align error, sharpcap shows two SIMPLE instructions. In my particular session, it informed me to move my mount about 4 arc minutes to the left and about 10 arc minutes up. So now, it comes down to simply adjusting the alt-az screws that are on your mount. I show this procedure in my video at 11:47. And by the way, apologies for referring to the alt-az screws on your mount as alt-az and altitude screws. That’s just my way of butchering up the English language being a Dutchy…So, quite simply, you can adjust your mount to the left or right by adjusting the azimuth screws, while adjusting the altitude of your mount by adjusting the altitude screws. Put simply, you loosen up one screw while tightening the other to move the mount either left or right (using the azimuth screws) and up or down (using the altitude screws). You keep on adjusting until your focus is within one arc minute of accuracy. Note that the adjustments are usually VERY minor. So really take care in NOT overdoing these adjustments, as small changes will often result in arc minutes of change. If you are successful, sharpcap pro will compliment you by stating that you have achieved an ” EXCELLENT” polar alignment…isn’t that nice.
Anyway, now I told you how I do it. Hope you find this information useful. It helped me to really get my guiding more accurate with my Celestron AVX mount. On average, i get sub-arc minute accuracy while guiding with PHD2 on – something that I could not achieve when polar aligning my mount with my polar finder..
Pro tip:
Another pro tip? What are you talking about? Tip 5 is the pro tip! Anyway…I guess….one extra tip might be…that I use the “team viewer” APP to mirror my PC or laptop screen on my smartphone. So, my PC is inside my room and I run a 10 meter USB cable to my mount on my balcony. So what I would have to do is to walk inside my room every time I make a minor adjustment using the alt-az screws, to check whether that change resulted in a decrease in polar align error. With team viewer (freely available for personal use) i can mirror my PC screen on my smartphone, which will instantly show any changes in periodic align error while I’m standing next to the mount. I find this really useful! You’ll have to install team viewer on your PC here, and click here for the play store (android) link.
Conclusion
I hope this information helps you to align your telescope mount. I’m also curious…are you using different steps or different software to really nail your polar alignment? Let me know in the comments section down below. If you like this blog, feel free to give it a heart. Hey…this is a wix site. I cannot change the heart icon into a telescope (although i would love to do that).
That’s all folks, thanks for reading and of course I wish you…Clear Skies!
#polar #align #alignment #tutorial #telescope #mount #equatorial #germanequatorial #eq #GEM #sharpcap #astrophotography #astronomy #universe #backyard #cosmos #deepksy
Wido, great info! I am learning a lot with your website and your youtube channel, thanks very much!
I am a beginner who lives in 25.7617° N (South Florida) and Polaris is always obstructed in my backyard. You mentioned about doing the drift align procedure in your Youtube Channel, but I was wondering if the “All Star Polar Alignment” with Celestron mounts would solve my problem?
I really wanted an iOptron mount for their portability though 😉
Thanks Philipp! Yes, the ASPA is a good way to align your telescope. What you could do is go through the ASPA procedure. When you’re finished, find the object you want and perform a drift align procedure (e.g. in PHD2) to ensure your tracking is OK and make some final adjustments if necessary. Hope this helps, clear skies!
Thanks! Yes, definitely try out ASPA, it will help the mount to calibrate its position. And you could ofcourse use a compass to make sure your mount is facing north. After the ASPA procedure, you could simply slew to an object and watch if it stays centered in your Field of View. Have fun!