Are you wondering why your Moon pictures are blurry? Well, first of all you want to put your camera and telelens on a stable tripod and work with a remote shutter, a remote APP, or a 10-second countdown when taking your Moon picture. This avoids vibrations in your picture that cause a blurry image. Next, put your camera to manual mode with the following settings: shutter speed of around 1/125, f/ratio of f/10, and an ISO value of 100. Also, put your white balance to “tungsten light”. Follow these actions and you’ll get a nice and sharp picture of the Moon. Do you want some pro tips to get that razor-sharp Moon picture? Then keep on reading, or watch the video below!
How to avoid blurry Moon pictures…
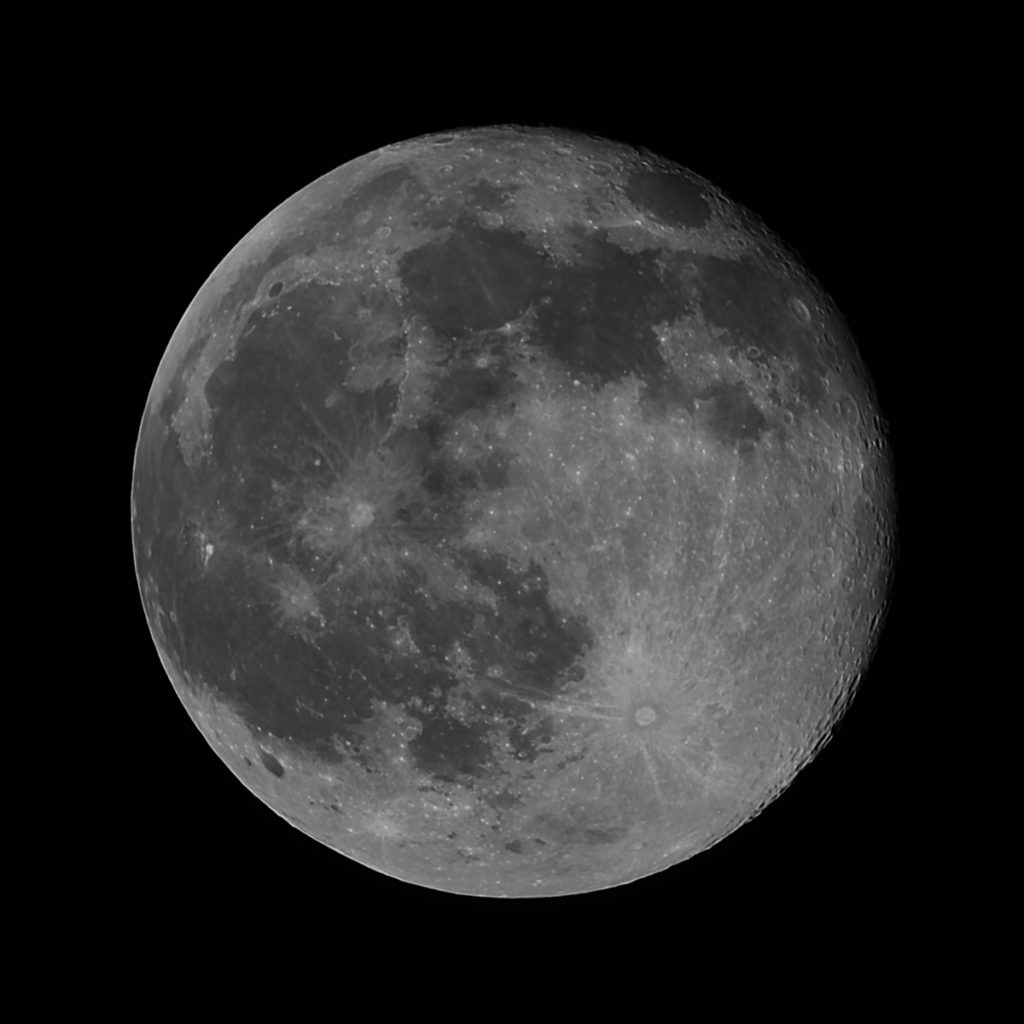
Are you having trouble getting a nice, sharp picture of the Moon? Or maybe your photos are too bright and you’re having trouble seeing the surface details? If so, don’t worry, I’m here to help! In this blog, I’ll guide you through diagnosing your camera issues and optimizing your techniques to get the perfect shot. Keep on reading until the end and I’ll even share some of my pro tips to help you get a stunning, razor-sharp picture of the Moon just like this one!

The Moon is an amazing sight to behold in the night sky, and it’s no surprise that it’s the first thing many photographers want to capture. With its close proximity to us, the stunning craters and mountain ranges, and its ever-changing phases, the Moon makes for some seriously stunning photography. But it takes some special techniques if you want to get a sharp shot like this one. I’m here to provide you with some tips on how to get that perfect, sharp image of the Moon you can be proud to share with your friends or post on Instagram!
Camera, lens, and other gear-related stuff
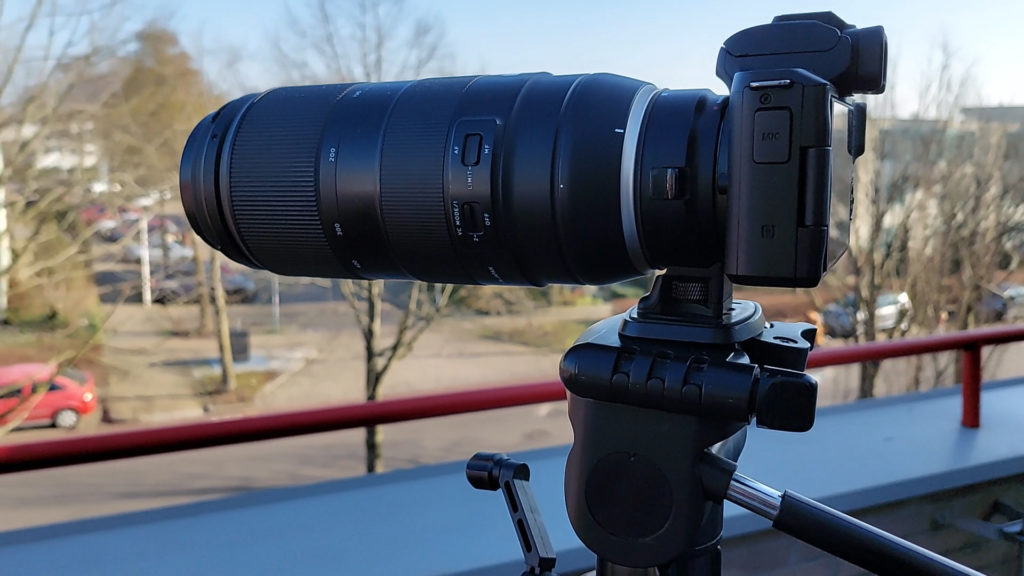
Any regular camera nowadays is good enough to take stunning images of the Moon. You do need a long focal length lens to capture the surface details of the Moon. For the above Moon picture, I used my Canon M50 with my Tamron 100 to 400mm lens. To ensure your camera stays perfectly still during the shot, use a tripod and a shutter release cable or remote app. Alternatively, you can set your camera to a 10-second countdown timer to ensure your shots come out vibration-free.
The right camera settings for Moon pictures
Let’s move on to adjusting the camera settings to capture the Moon. To start, switch your camera to manual mode – for most cameras, you can just turn the dial of your camera to M. After that, you’ll want to adjust the exposure time, the f/ratio, the iso-value, and the white balance. Personally, I set my exposure time to 1/125th of a second, my f/ratio to around F/10, and my iso-value to 100. Let’s start with adjusting the exposure time: a very short exposure time of about 1/4000th of a second will give you a very dark picture of the Moon, while 1/8th of a second will overexpose it. I find that 1/125th of a second gives me a bright picture without overexposing its surface. Now, let’s look at the f/ratio. This is the relationship between the lens diameter and the focal length and is calculated by dividing the focal length by the diameter of the lens. I find that a f/ratio below F/10 results in an overexposed image of the Moon, while a f/ratio higher than f/16 leads to an underexposed image. Finally, let’s adjust the ISO value. ISO refers to the sensitivity of your camera to light, and I keep it to the lowest setting possible because the Moon is very bright. A higher ISO often leads to an overexposed picture of the Moon without any of its surface details. For great Moon pictures, it’s best to set your white balance to tungsten light – that’s the lightbulb icon. This will give you a nice grayscale image of the Moon, and a dark blue night sky, even when taking pictures in a light-polluted area. If you have an autofocus lens, put it to continuous autofocus (AFC or AI Servo, depending on your camera). If you have manual focus, just turn the focuser until the Moon looks sharp on your camera’s LCD screen. Once you’ve taken your first picture, zoom in all the way to check that your focus is sharp!
My PRO tips to get a razor-sharp image of the Moon!
When you apply the above-mentioned tips, you probably end up with very reasonable pictures of the Moon. But it doesn’t compare to the picture of the Moon I showed at the beginning of this blog. So let me also share my PRO tips on how I created that picture. It actually involves taking a one-minute video of the Moon, and editing that video using different software programs that are all completely FREE to download and use. It will take a couple of minutes to follow the different steps you need to take, but I promise you’ll get a razor-sharp picture of the Moon when following this tutorial.
Take a one-minute video of the Moon
The first step might seem a bit weird, but don’t worry! Let’s take a one-minute video of the Moon. To get the best quality, make sure your camera is set to the highest available settings – for my Canon M50 that’s 4K recording at 25 frames per second. Switch the camera dial to video and use the same settings you used for taking pictures, so that’s a shutter speed of 1/125, a f/ratio of f/10, and an ISO value of 100. Once you’re done recording, download the video to your computer for further processing.
How to process a video of the Moon
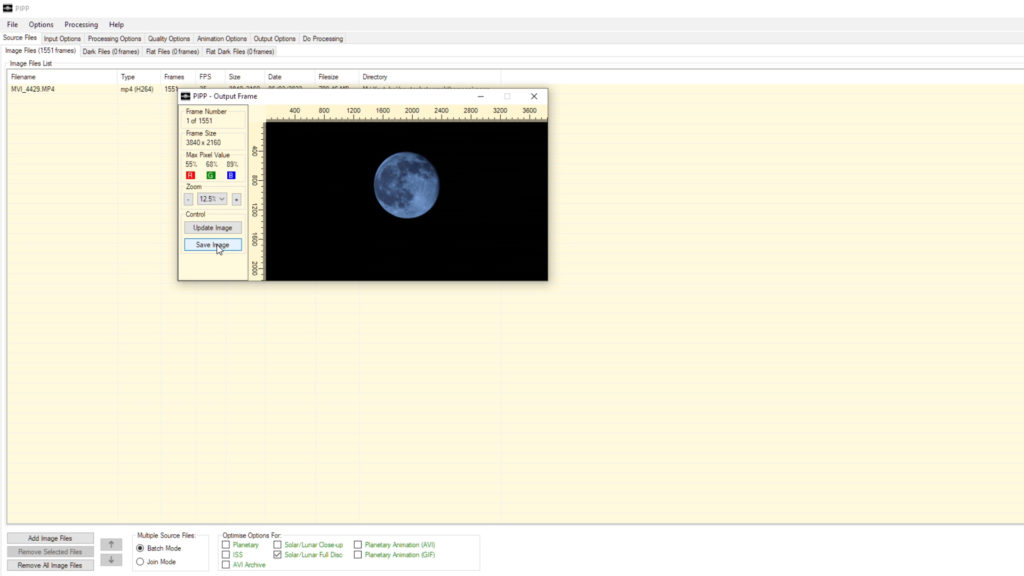
If you zoomed in to 400mm or higher, you may have noticed the Moon shifting during your one-minute recording. To counteract this movement, you can use the Planetary Image Pre Processor (PIPP) program. All you need to do is drag your downloaded movie file into PIPP, select ‘Solar/Lunar full disc’, and click on update image. After this, go to the output options tab and select ‘SER format’. Then click on the ‘do processing’ tab and hit ‘start processing’ – this takes a few minutes, but you’ll notice that the Moon stays perfectly centered in the processed video.
In Autostakkert, you can take the SER file produced by PIPP and open it up. Drag the SER file to the view screen and you’ll see a frames slider with an indication of the quality for each video frame. Select a sharp, high-quality frame, then head to the options menu and select surface under image stabilization, check on improved tracking and leave the quality estimator settings to local AP. Click analyze, and Autostakkert will generate a quality graph that shows the quality of each frame in the video. On the left side of the graph are the best-quality frames, and on the right are the worst-quality frames. By clicking on the graph, you can preview each corresponding frame in the viewscreen.
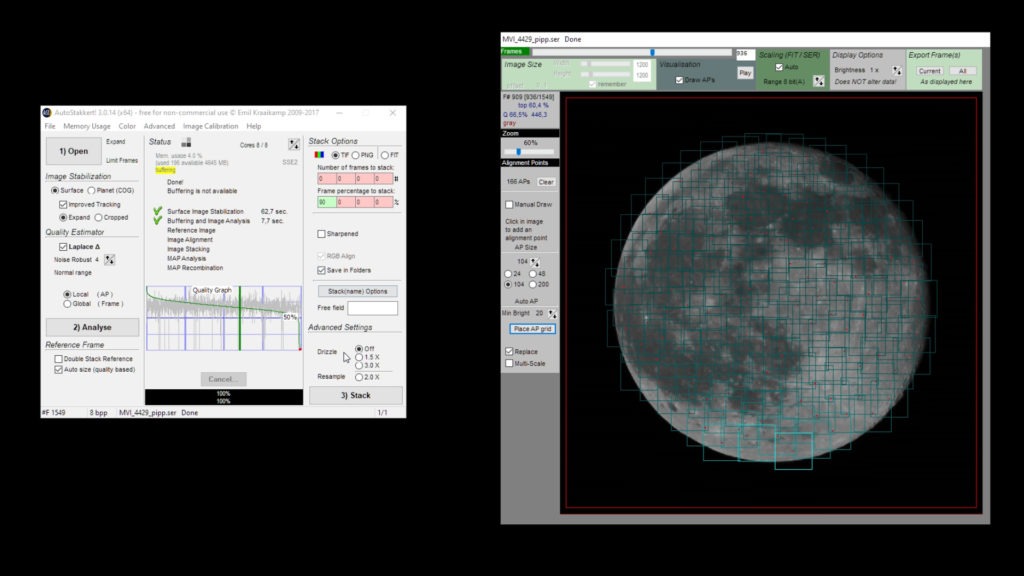
As a rule of thumb, you could select all frames above the 50% line which, in my case, includes almost all the frames in my video. You can fill out multiple boxes by typing in the number of frames to stack or the frame percentage to stack. For the sake of this tutorial, I’ll ask autostakkert to stack 90% of the frames which are about 1400 frames of the Moon. Next, you want to add alignment points to your frames in the viewscreen which helps autostakkert to align different areas of the Moon between the different frames in your video to produce a stacked picture. With a full Moon, I usually select an AP size of 100, and a minimum brightness of about 20 that covers the whole disc. Next, click “place AP grid” and you’ll notice a grid over your Moon image. Now, you’re ready to stack. I’m not ticking the sharpened box, but do select the “save in folders” option. After that, click stack and autostakkert will use all the selected frames into one stacked picture of the Moon.
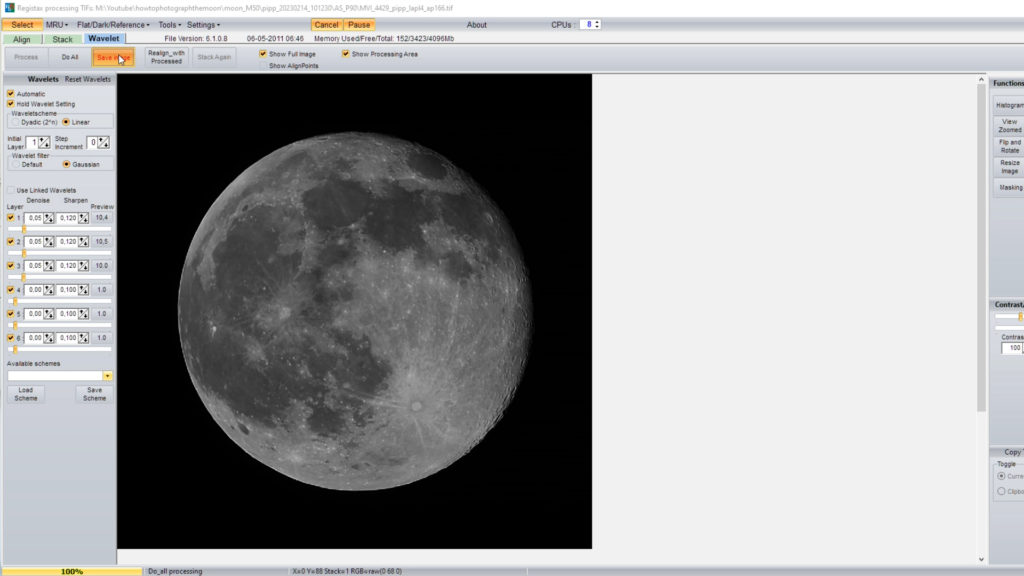
In the last step, you’ll want to download and use Registax6. All you need to do is drag the stacked tiff file produced by autostakkert into Registax6 and select the wavelet tab. Click “show full image” and leave the wavelet scheme to linear and the wavelet filter to gaussian. Then, try dragging the first, second, and third layers to around 10 percent, and click “do all”. You’ll notice that your Moon picture is much sharper than the individual Moon pictures taken in higher resolution. If you want to make it even sharper, you can experiment with the sliders and the denoise and sharpen settings in each of the layers. When you’re satisfied with the result, click “save image” and save it in your preferred format. That’s it!
If you’re looking to get into planetary imaging, I’ve got two great blogs that will help you get started with programs like Autostakkert and Registax. If you Implement the tips I give you, and I’m sure you’ll be able to take some amazing, sharp images of the Moon to show your friends and family or post online. So don’t wait – go out and capture some stunning pictures of the Moon!
Great insight & content…
Trying to Photograph April’s Pink Moon. THANKS
Great insight & content…
Trying to Photograph April’s Pink Moon. THANKS
Good luck!