In this blog, I’ll attempt to answer the 10 most frequently asked questions you guys have asked me over the past couple of years about astrophotography cameras.
1. Can I use my DSLR camera or smartphone for astrophotography?
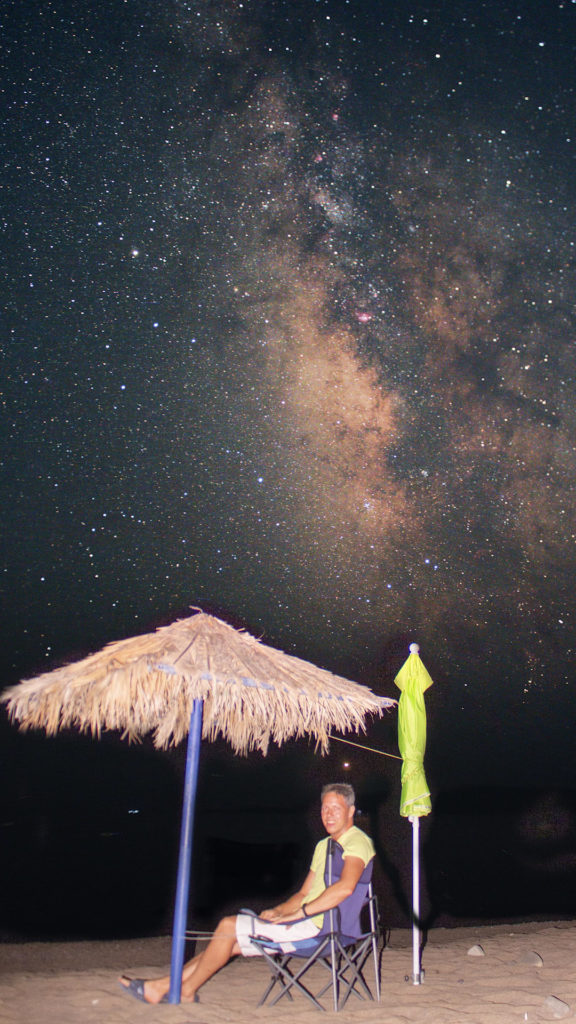
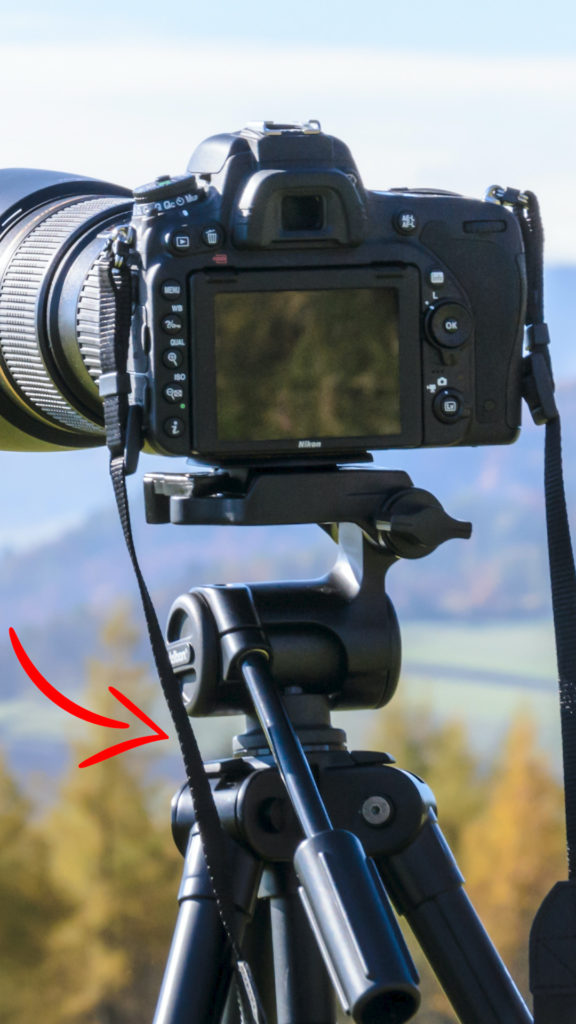
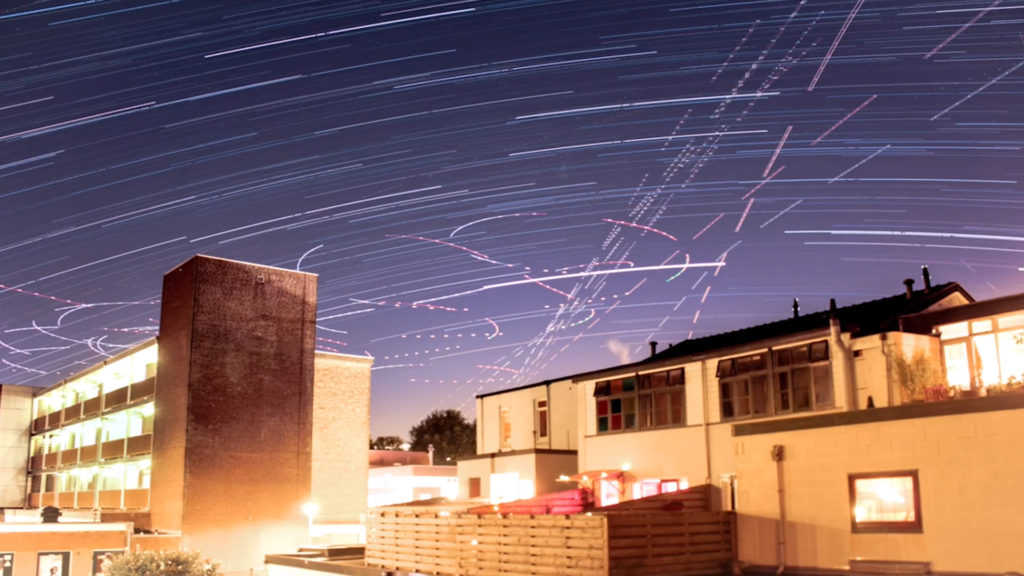
This is a basic question I get a lot from people who are thinking about getting into astrophotography for the first time. The answer is Yes, of course! All you need is a DSLR camera or smartphone, and a tripod so that your camera remains stable while taking long-exposure pictures of the night sky. I’ve used my DSLR and smartphone to take pictures of the Milkyway, make star trail pictures of the night sky, and photographing meteor showers like the Geminids or the Perseids.
(Canon 1200D)
2. Should I buy a dedicated astrophotography camera with a telescope?
No. It is possible to attach your DSLR camera or smartphone to a telescope using the appropriate adapters. However, there are two main limitations to using a DSLR camera or smartphone. First of all, DSLRs and smartphones have what is called an IR-cut filter. This filter will block light in the infrared part of the light spectrum, which is great for daytime photography. Unfortunately, lots of objects in space like nebulas and galaxies emit light in the red and infrared parts of the light spectrum. The IR-cut filter in your smartphone or camera will block light in the near-infrared, so you’ll be unable to capture that light from objects in space. You can solve this by removing the IR-cut filter from your DSLR camera. There are often professionals that can remove the IR-cut filter for you if you feel uncomfortable doing it yourself, so you will be able to capture that light in the near-infrared. Keep in mind that your daytime pictures will be affected as well, your pictures will show a reddish glow.
A second limitation is that DSLRs and Smartphones do not have an option to cool the CMOS sensor. So when you take long exposure pictures, the electronics in your camera will heat up and produce noise in your pictures. You may have seen bright red, green, and blue dots in your picture when taking long-exposure pictures at night, especially when it’s hot in the summer. A dedicated astrophotography camera with cooling can cool your camera sensor down and this will improve the quality of your astrophotography pictures considerably.

3. What kind of astrophotography camera is best to capture objects in the night sky?
This depends on the objects you want to capture. Objects can be divided into objects within our solar system like the planets and our moon, and objects outside of our solar system like nebulas, or even galaxies beyond our own Milkyway. The objects within our own solar system receive light from the sun. As such, the planets and our moon are among the brightest objects in the night sky. Because they are so bright, you don’t need a long exposure time to photograph these objects. In fact, most photographers take one or two-minute videos of the moon and the planets, after which they process these videos using specific software programs like autostakkert and registax in which they select and stack the highest quality pictures. So when you want to image objects within our solar system like the planets, you’re going to need a camera that is great at taking short videos. I’ll get back to mentioning some of the specs you’ll need to take into account when answering the next question.
Objects outside our solar system, like nebulas and other galaxies, are many lightyears away and receive light from other stars than our sun. As a consequence, all of these objects are a lot dimmer and you’ll need a camera that is great at taking long-exposure pictures of the night sky. As the earth is rotating, you’ll also need a good quality equatorial mount to track these objects in the sky, and a good quality telescope to take good quality pictures of objects in space that are located outside our solar system. The process of deep-sky astrophotography is very different from planetary imaging. You’re actually going to take many pictures of the same object in space which you’ll stack together using specific processing programs like deep sky stacker, photoshop, or Pixinsight.
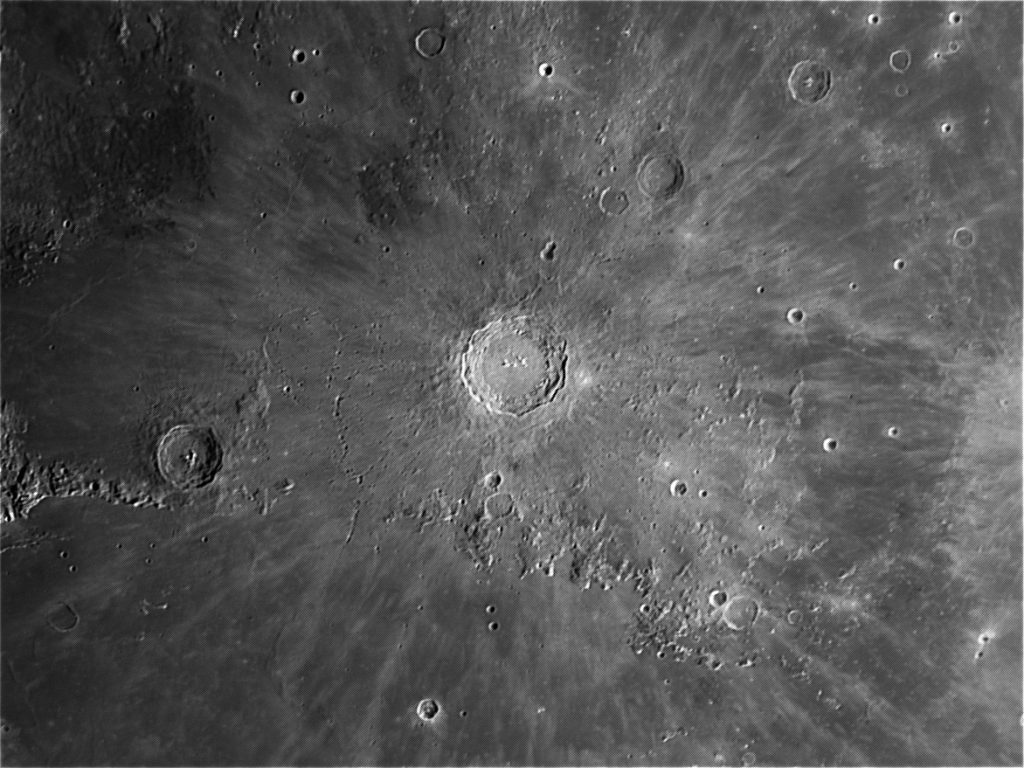
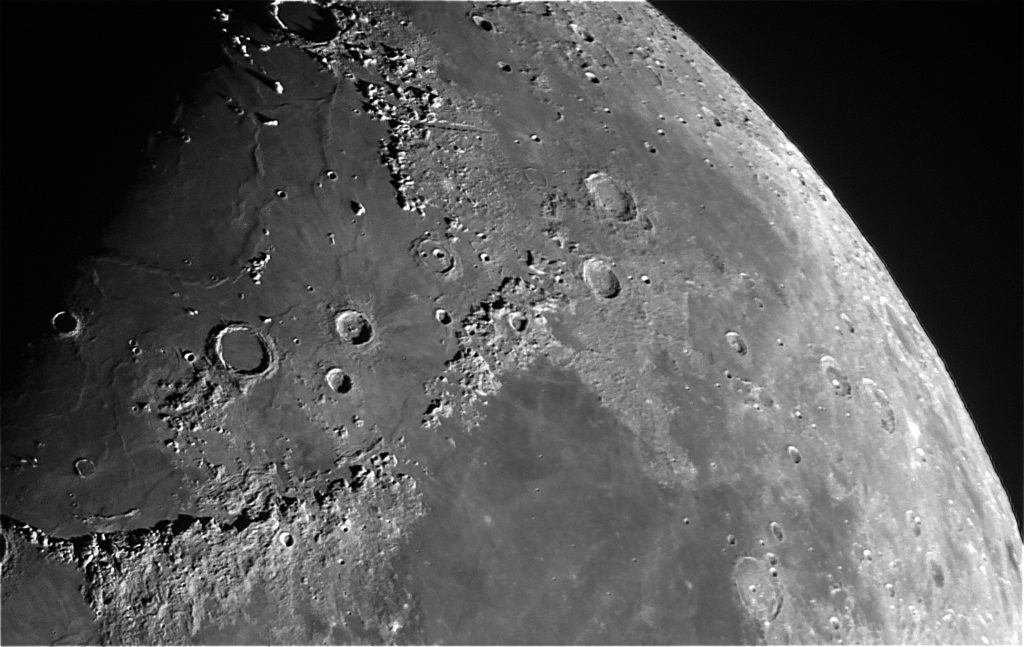
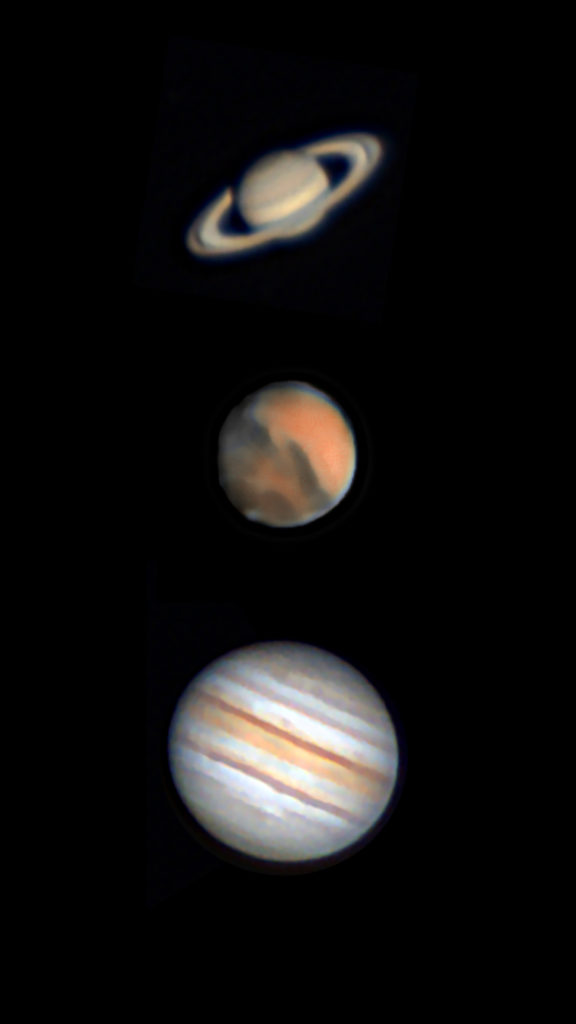
4. What cameras are best for imaging the moon and the planets?
When capturing the planets, one of the most important things to look out for is if the camera has a high FPS = Framerate Per Second. The higher the number of frames per second a camera has, the more pictures you’ll have of the planets for each of your videos within a given time. If your camera has an FPS of 25, you’ll end up with 25*60 = 1500 pictures of a planet in a one-minute video. When your camera has an FPS of 50 you’ll end up with 50*60 = 3000 pictures of a planet. The more pictures or frames you’re able to collect in your video, the more options you’ll have to select high-quality pictures of a planet and disregard the low-quality pictures. Moreover, as the planets are among the tiniest objects in the sky, you don’t need a high-resolution camera. Often, a one or two-megapixel camera is already sufficient to capture the planets in our solar system. One exception is the moon, which is of course a lot bigger than the planets. So you’ll need a higher resolution camera for the moon – also depending on the focal length of your telescope or lens. For planets, I would recommend a focal length of at least 2000mm whereas, for the moon, about 300mm focal length is already sufficient to get a good view of the craters, mares, and mountain ranges on the moon. When capturing the planets at high focal length, you also need a high-quality tracking mount so that the planet remains in your field of view while you’re capturing the planet. Examples below are all taken from my light-polluted backyard with an Edge HD 8″ telescope and the ZWO ASI178MC planetary camera.
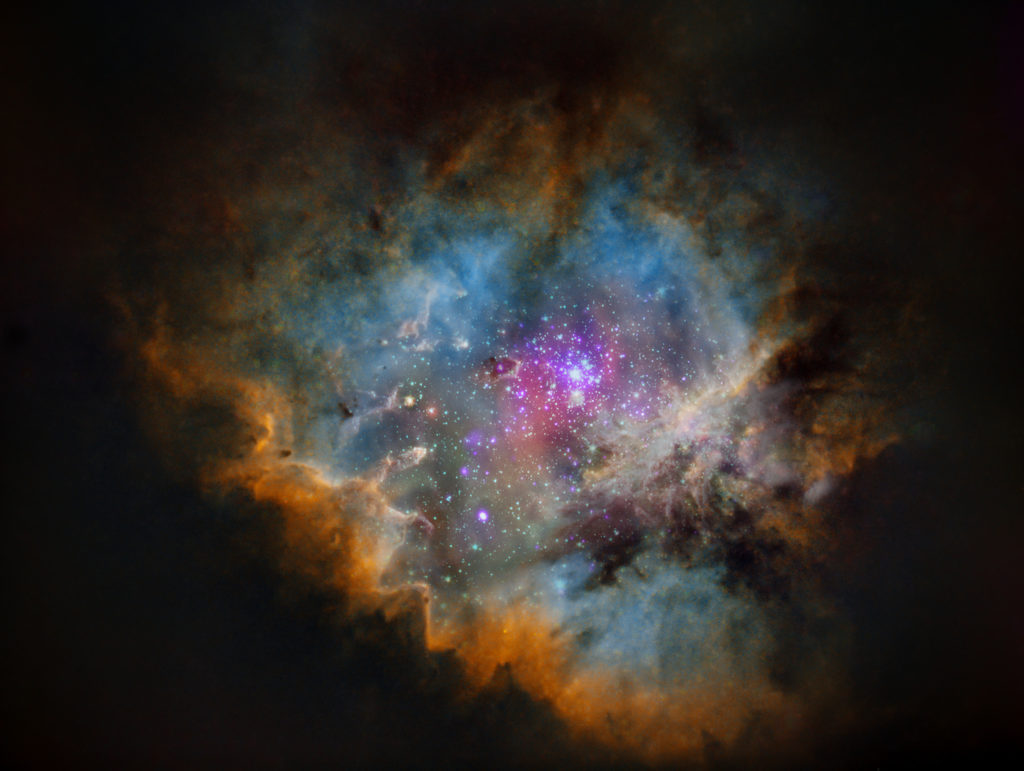
5. what cameras are best for deep-sky photography?
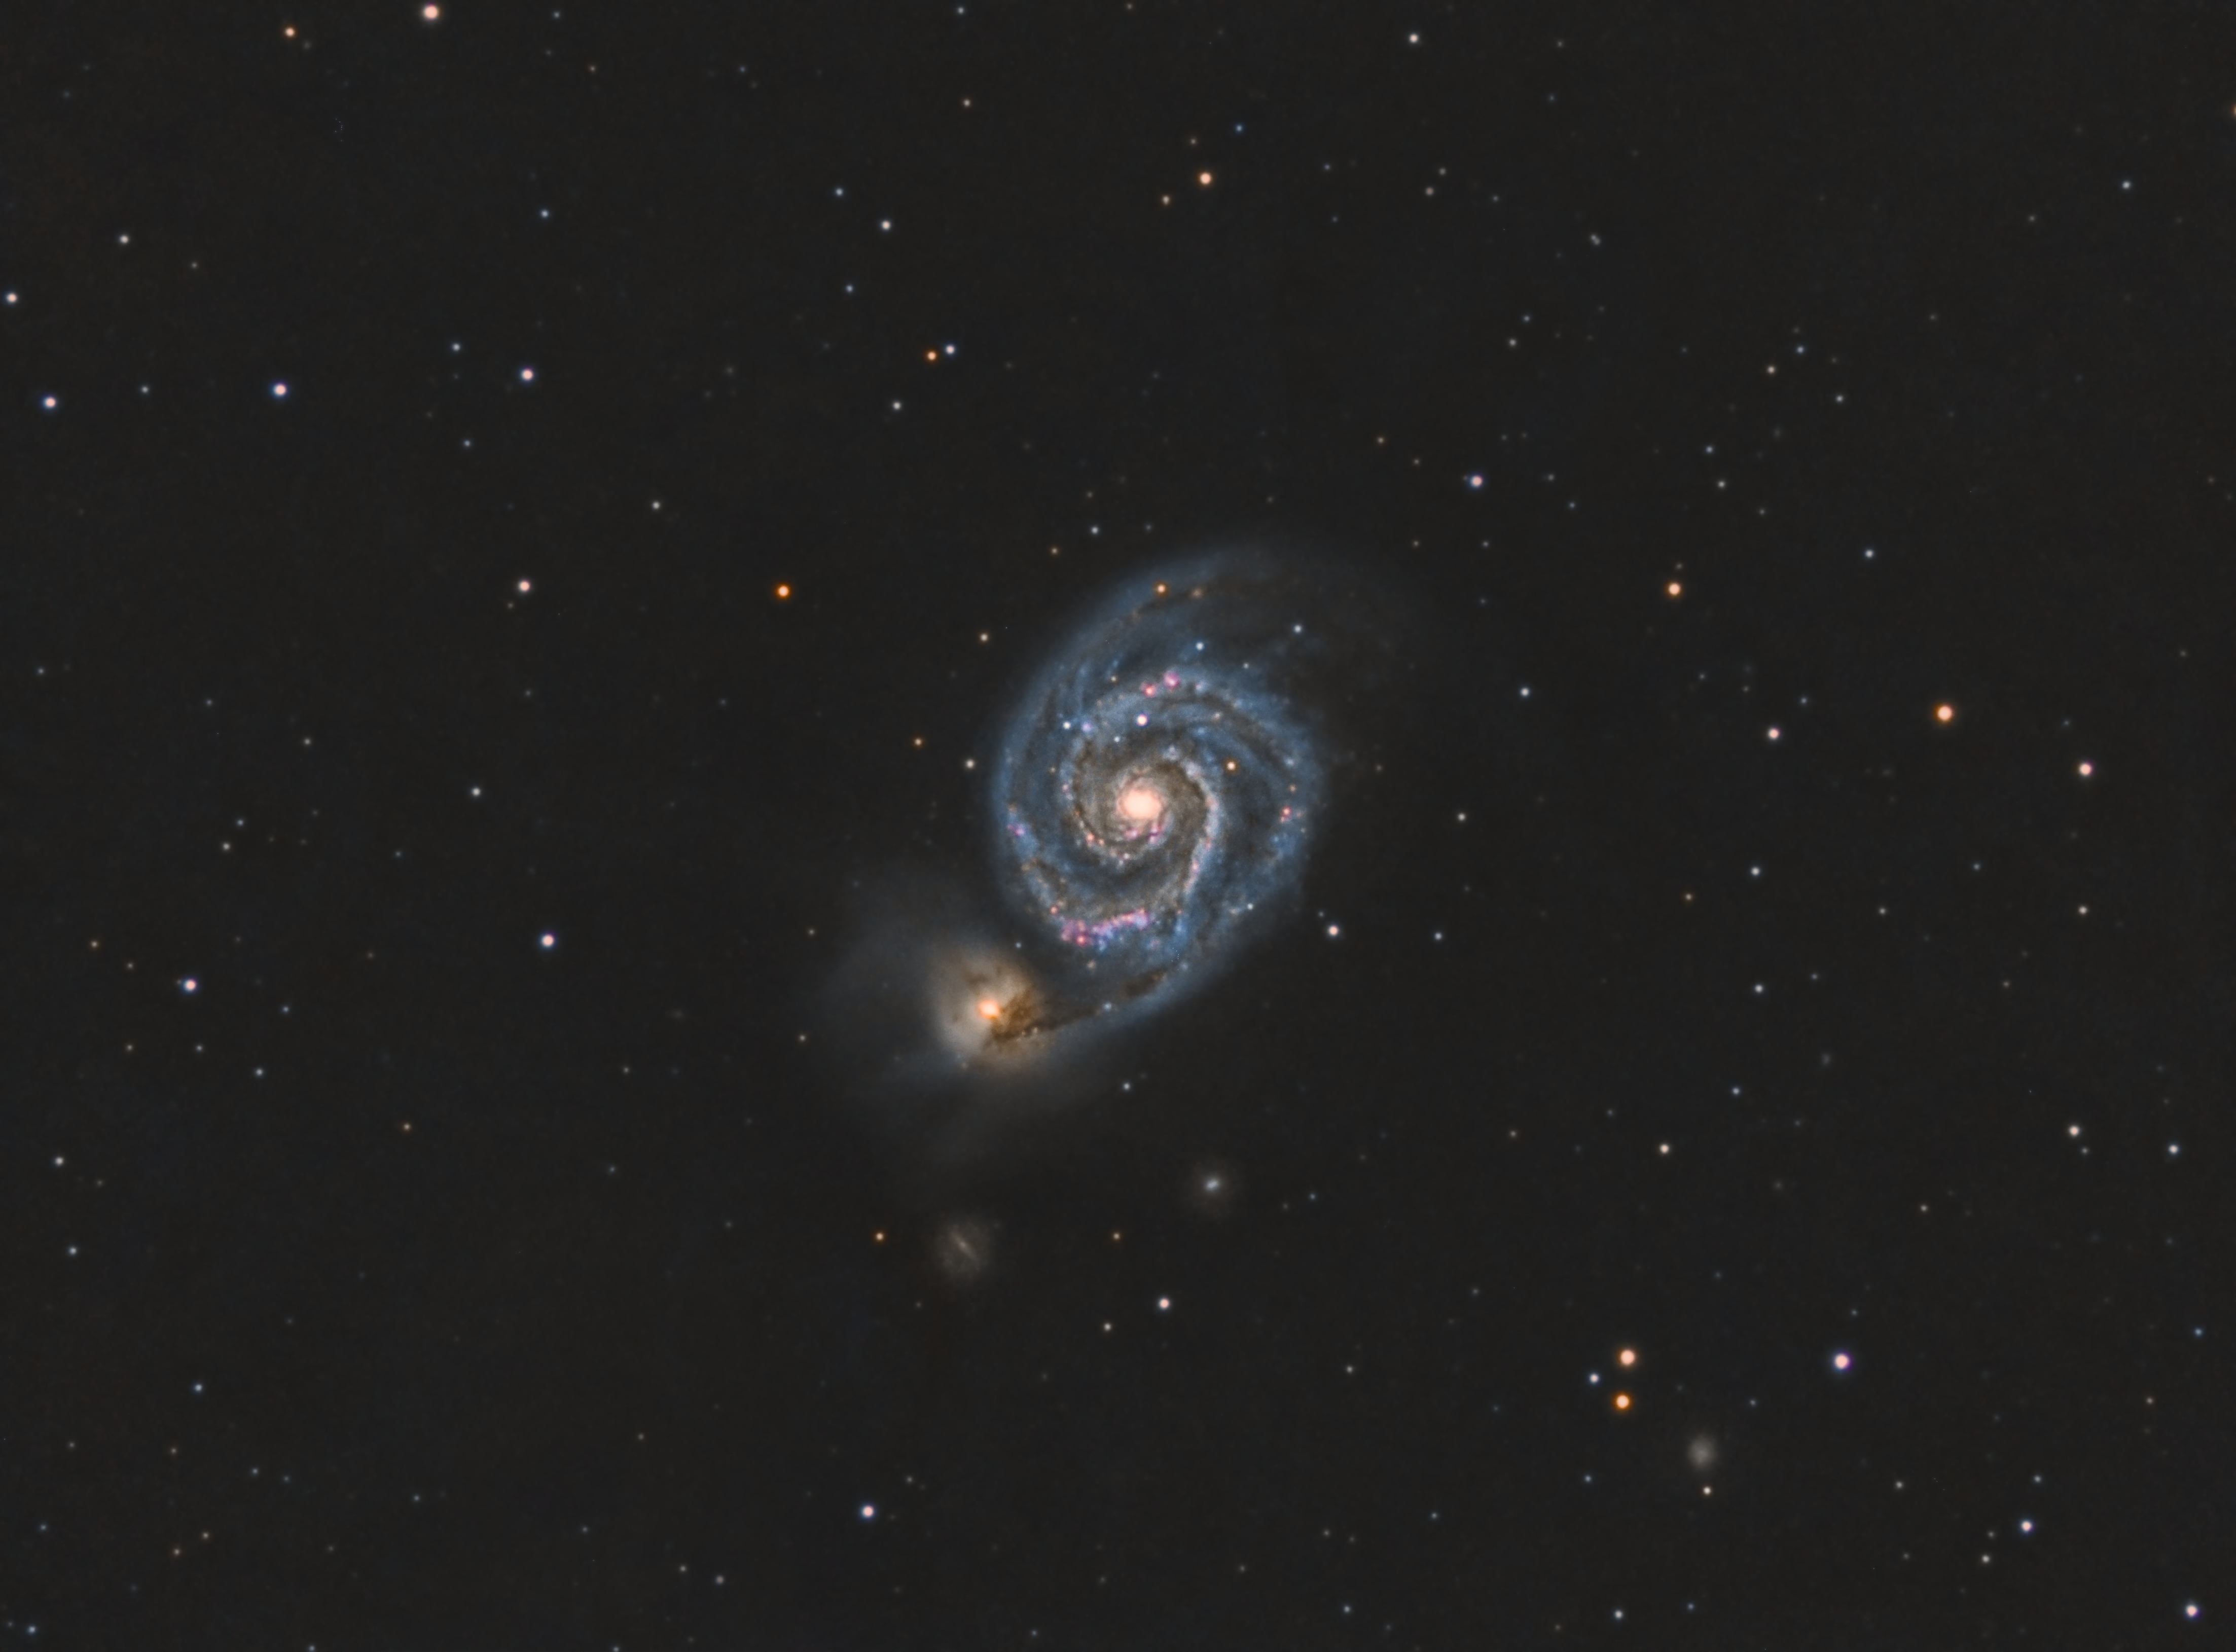
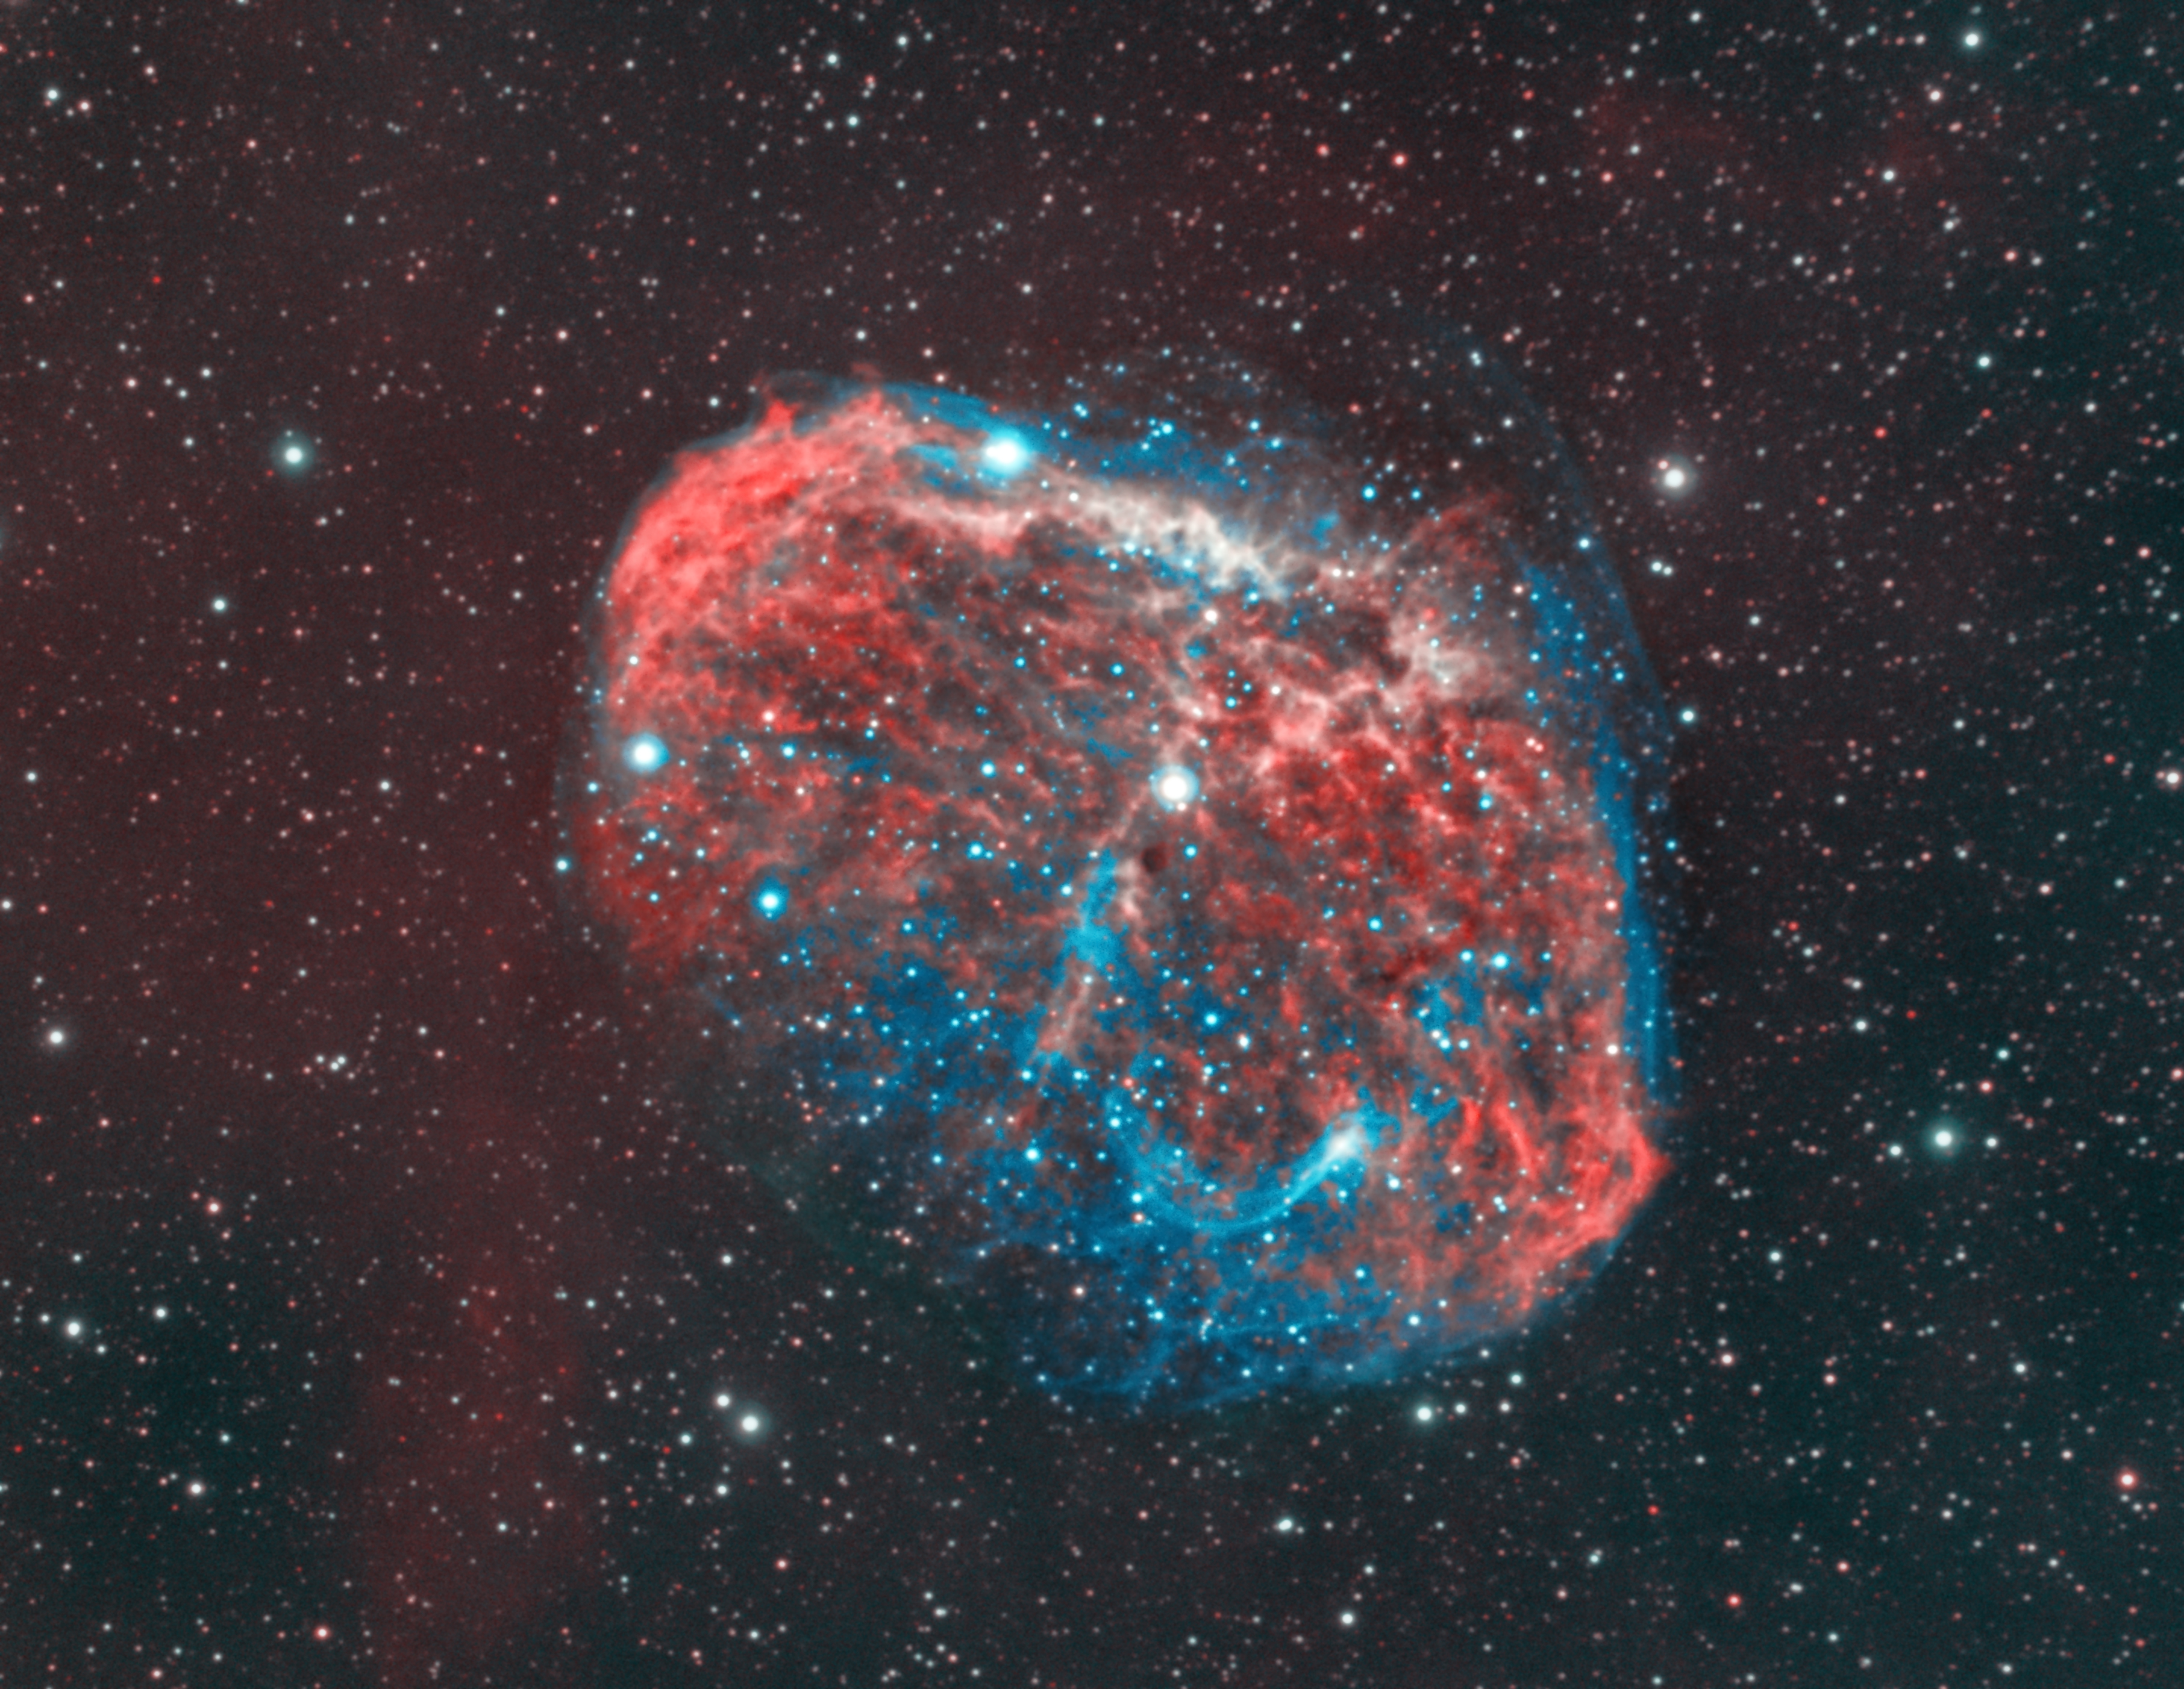
Deep-sky objects like galaxies, nebulas, and globular clusters come in different shapes and sizes. Also, they are a lot dimmer as compared to solar system objects. You’ll need a camera that is excellent at taking long-exposure pictures to catch the dim light from deep space objects. The first thing you want to look at is if the camera has the option to cool the camera sensor down to at least -10C or 14F. By cooling down the camera sensor, you’ll end up with a much clearer picture of the deep sky object, without the noise otherwise produced by the camera sensor. Also, you want to check the QE or quantum efficiency, of the camera. The higher your QE is, the better your camera is able to convert the photons from deep space into an electronic signal that will be registered by your camera sensor. Another thing you might want to look into is the dynamic range of the camera, often indicated by the Analog to Digital Converter, or ADC, measured in bits, and Full Well Capacity, measured in electrons. The higher the ADC number and Full-Well depth numbers of your camera are, the higher the dynamic range of the camera. The higher the dynamic range is, the more tonal variations the camera can show between the black and white points of your pictures. All pictures below are taken with a ZWO ASI 1600MM Pro (cooled) astrophotography camera and my Edge HD 8″ telescope from my light-polluted balcony in the city center.
6. How do I know if deep-sky objects will fit on my pictures?
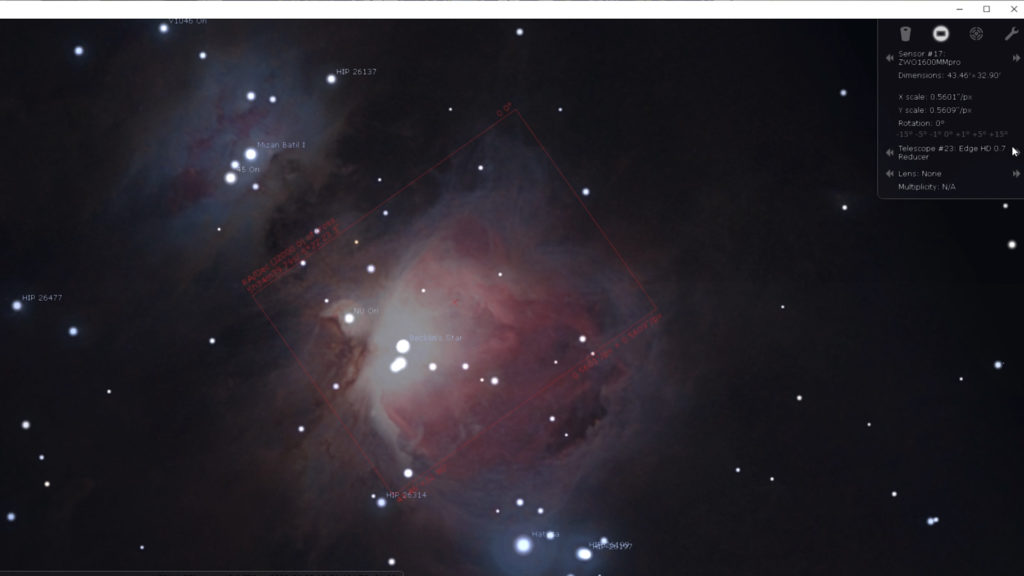
This depends on four variables, being the size of the object you want to image, often measured in degrees and arc minutes; The focal length of your telescope, often measured in mm; The resolution of your camera often measured in the number of pixels in width and height, and the pixel size of the camera. One good way to check if the object will fit in your picture is to use free software tools like Stellarium. In Stellarium, you can simply add information about the telescope and camera you’re going to use, and Stellarium will show you a square or rectangle that is synonymous with the field of view you’ll be getting.
7. mono vs color camera?
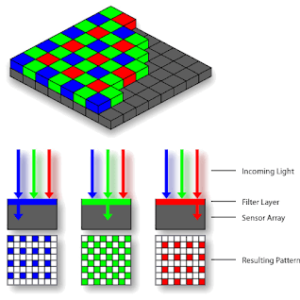
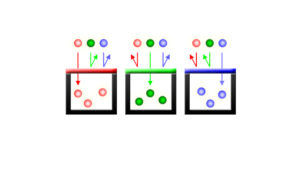
This is a question I get a lot. The short answer is that it depends. If you’re just starting out, I always recommend buying a color camera. It makes the whole process of capturing and processing your astropictures a lot easier. This being said, you can get higher-quality pictures when using a mono camera with additional filters. The main difference between a mono and color camera is that a mono camera doesn’t have a Bayer matrix while a color camera does have a Bayer matrix. A Bayer matrix is a matrix of tiny filters, with an RGGB pattern. So this basically means that 25% of your camera sensor is able to collect red or blue light, while 50% of your camera sensor is able to collect green light when using a color camera, which is great for daytime photography. Unfortunately, many objects in space like nebulae are primarily emitting light in the red and blue parts of the visible light spectrum. By using a mono camera in combination with a red or blue filter, your camera will be able to collect most of the photons in that part of the light spectrum – also depending on the quantum efficiency of your camera to turn photons into electrons. However, you do need to spend more time on capturing and processing an object as you’re capturing objects using separate red, green, and blue filters.
8. Can I get into astrophotography when I live in a city under severely light polluted skies?
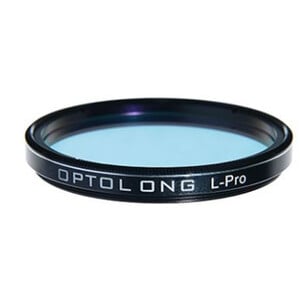
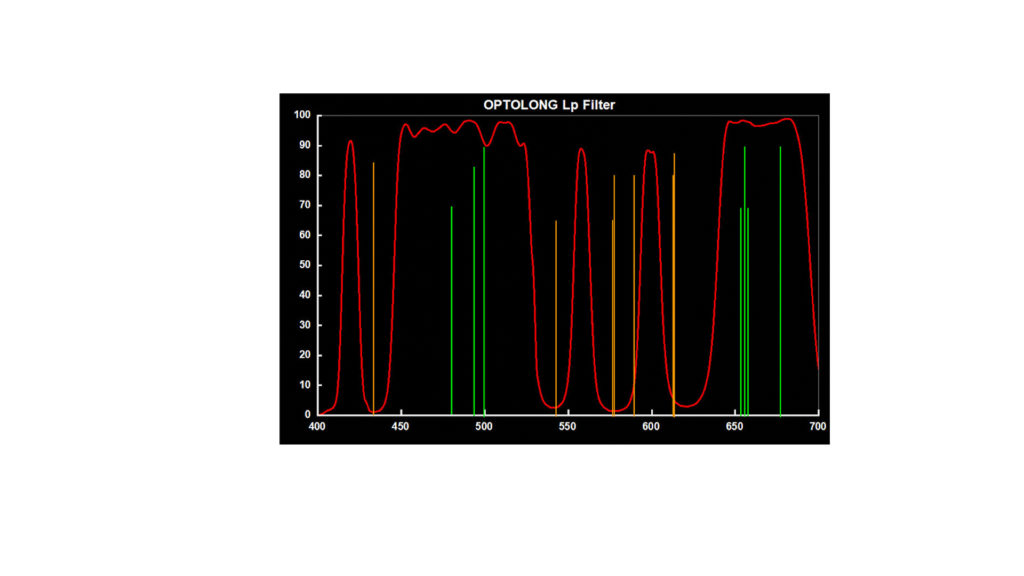
Yes, definitely. A dark sky location without light pollution is the best way to get the highest quality pictures. You can use APPS like Dark Sky Finder to search for dark sky locations in your neighborhood. However, lots of us don’t have the time or option to move to a dark sky location for every imaging session. Luckily, there are ways to capture deep-sky objects under light-polluted skies. Your first option is to buy a light pollution filter for your DSLR or Astro camera. Light pollution filters are able to block the light in the visible light spectrum that often comes from artificial lights, like high and low-pressure sodium lights often used in street lights and industrial areas. One issue here is that LED lights are becoming more and more popular in most cities. LED lights are very efficient – which is good for power consumption – but LED emits light in all parts of the visible light spectrum, making it harder to block LED with a light pollution filter. A second way to get into astrophotography from a light-polluted sky is to engage in so-called narrowband imaging. When using narrowband filters, you are able to capture a very small portion of the visible light spectrum that coincides with the emission of light from specific elements that are often present in deep-sky objects, like hydrogen and oxygen which are among the most often found elements in the universe. You can integrate pictures taken with various narrowband filters to create a color picture, where the colors represent the elements that are present within a particular deep sky object. For more information about filters and astrophotography, click here.
9. (How) do sky conditions other than light pollution affect my images?
Yes, definitely. People talk a lot about astronomical seeing conditions. Outside conditions such as the humidity, temperature, high yet streams, and bad cloud layers can severely affect the quality of your Astro pictures. Moreover, when objects are closer to the horizon, there is a lot more atmosphere as compared to capturing objects that are directly overhead in the zenith, which negatively affects the quality of your pictures. There are various apps that can show you how all of these elements affect your astronomical seeing, like the astronomy seeing website of meteoblue.
10. What is the best camera and telescope combination?
For deep-sky astrophotography, it is important to check out if your camera is a good match with your telescope. There are many things to take into account, but one important thing you need to do is check your imaging scale. Any kind of telescope and camera combination will give us the arc seconds per pixel. The formula is (Pixel Size (μm) of camera / Focal length of a telescope) * 206.3 = angular resolution in arcseconds/pixel. Now, most skies we shoot from have sky conditions that offer seeing conditions between 1 and 2 arc seconds. This means that objects smaller than 1 arcsec will be blurred to a size of 1 arc seconds by the atmosphere.
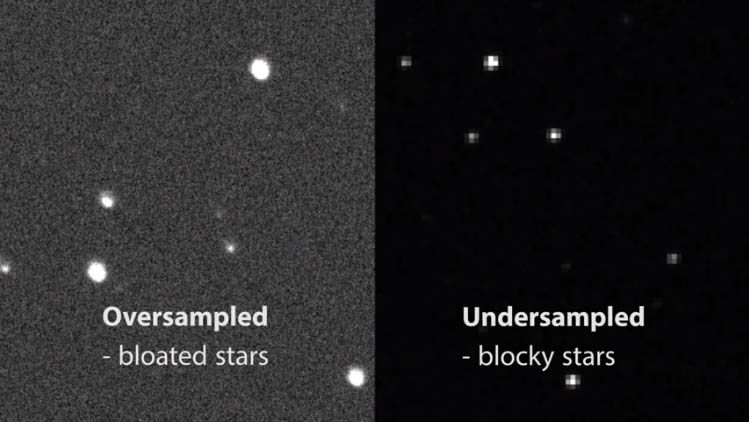
If you choose a camera telescope combination that gives less than one arc-second per pixel (think long focal length telescope and small pixels) stars will cover many pixels and appear large or ‘bloated’. As you are spreading out the light from the star over many pixels the sensitivity of your imaging will decrease. When using a camera and telescope combination with an arcsecond per pixel higher than 2, most of the light from a star will fall on a single pixel. This is called undersampling. The image of the star can appear blocky as not enough pixels are used to convey a round shape to a star. Also if a one-shot color camera is used the starlight will need to fall on separate red green and blue pixels of the Bayer matrix for a true color picture. If all the light falls on a single pixel you’ll end up with a green, blocky star, which will look strange.
One exception is planetary imaging. When making short videos of the planets using a high FPS, it is possible to “beat the seeing” as it is called. There may be a window during your imaging session where the seeing drops below the average of 1 to 2 arc seconds per pixel. In that case, pictures below one arcsecond per pixel will provide sharp images of the objects you’re capturing.
Hope this info was useful! Leave a comment or ask a question if you like. Clear skies!
Wido.
Hey so I am going to a picnic in 2-3 days so, I don’t have any camera or telescope. I just have my phone which is Redmi 8 (Not pro or note just normal redmi 8). So can i do astrophotography with it. If yes, was settings should I use?
Do you have nightmode available on your android phone? Check the store. Put your smartphone on a tripod and use night mode. You’ll get some decent photos (for a smartphone).
Hello, I have an 8″ dob. 1200 mm FL..
I’m looking to get a camera for it.. I’m just not sure what to get?
Mirrorless? DSLR? ZWO? I’m looking to get an EQ Platform for it as well . Looking to get planetary and DSO if I can…
Any info would be greatly appreciated..
dahawkins7257@gmail.com
Thank you
Don
Hi Don, I would recommend a planetary camera for your dobsonian. ZWO has some great affordable cameras like the 678MC color camera.
It is a bit difficult to put a dobsonian on an eq mount, that’s not what there designed for. If you want to go for deep-sky astrophotography, one of the best ways to start is to get a smaller ED/APO refractor or a newtonian telescope.
Cheers.
The last topic does not actually make a recommendation as to best telescope and camera combination. It the best combo between 1 and 2 arc seconds? Or?
Hi Helmut, for deep-sky, I would always check if the imaging scale with the camera/telescope combi is around 1 to 2 arcsecs.
Cheers.Go lower and you’ll often get oversampling due to atmospheric distortions, go higher and you’re not getting the highest resolution out of the deep sky objects you image.
Apart from that, a higher aperture telescope will give you a higher native resolution as it is able to resolve tinier objects.
And a shorter f/ratio will limit the time your exposure time.
Hi Helmut, for deep-sky, I would always check if the imaging scale with the camera/telescope combi is around 1 to 2 arcsecs.
Cheers.Go lower and you’ll often get oversampling due to atmospheric distortions, go higher and you’re not getting the highest resolution out of the deep sky objects you image.
Apart from that, a higher aperture telescope will give you a higher native resolution as it is able to resolve tinier objects.
And a shorter f/ratio will limit your exposure time needed to photograph objects.
Hi Helmut, for deep-sky, I would always check if the imaging scale with the camera/telescope combi is around 1 to 2 arcsecs.
Cheers.Go lower and you’ll often get oversampling due to atmospheric distortions, go higher and you’re not getting the highest resolution out of the deep sky objects you image.
Apart from that, a higher aperture telescope will give you a higher native resolution as it is able to resolve tinier objects.
And a shorter f/ratio will limit your exposure time.
Hello Wido, I have a GSO f/5 750mm Newtonian Reflector. I am planning to buy a ZWO ASI camera for planetary imaging. I am planning to purchase either 224MC colour, 585MC, 178MC. It would be helpful if you let me know which one to purchase as I am now confused.
Hi Pavan, I’d go with the 585mc. I didn’t test it personally but it has a wider field of view for the moon and its a bit easier to find the planets. It also has a higher qe, a deep fwe and a small pixel size with max fps 45 and low read noise.