I’m guessing you clicked on this link in search for a comprehensible guide to sequence generator pro. Indeed, it can be quite daunting the first time you open sequence generator pro and see the many buttons, options and menus. Of course, sequence generator pro has its own online guide which you can find here. It is a good, detailed guide. Unfortunately it is also is 216 pages long. Being an astrophotographer myself, I know you probably want to get this program up and running without having to read through every little detail this program has to offer. My main aim was to make a comprehensive, illustrative guide that would help astrophotographers to setup and use sequence generator pro. I have created videos and screenshots which are embedded in this guide in order to help you get up and running as quickly as possible. I have divided this guide into different parts:
- How to setup your camera
- How to setup your filter wheel
- How to setup your telescope mount
- How to setup plate solving
- How to setup PHD2
- How to setup your first imaging session
- Your first live imaging session!!!
Note that there are many other options available in sequence generator pro which I’m not covering. My main goal is to enable you to get your basic astrogear (camera, mount) working in sequence generator pro. As a side note, It is probably wise to perform most of these steps during daytime. It can be quite frustrating to run into a snag on a clear night – believe me, I’ve been there. In order to limit the chances of that happening, you can already setup and test your gear during daytime. Also, be prepared to go through some learning curves. It will take some time to master sequence generator pro. If the first session doesn’t go as planned, that’s OK. My own experience with using astro software is that practice makes perfect. So let’s get into the first part.
How to setup your camera in sequence generator pro
In sequence generator pro, all your astrophotography gear (camera, filter wheel, telescope, auto guiding, and so on) can be setup using the “equipment profile manager”. You can find it by clicking on the “Tools” menu, and then selecting “Equipment Profile Manager”. This is actually a pretty clever menu that enables you to store multiple combinations of astrophotography setups. For example, after being in this hobby for several years, I have worked with a DSLR camera, a dedicated ZWO ASI 178MC color camera, and now I’m mainly using my ZWO ASI 1600MM pro. Well, sequence generator pro kinda expects you have different setups, and it enables you to save those different setups in the equipment profile manager. This is really useful, as you only need to go through the setup process of the different kinds of gear you might have once and save it as a “new profile”. During susbsequent nights, you simply select the profile of the astrogear you are using, and sequence generator pro will automatically adjust its settings to that profile.
The first thing you need to do is to give your profile a name. Go to the upper left box and type your new setup name in the box under “Select or name a profile”. In the video I’m using “exampleprofile” but it would be wise to name your profile after the gear you are setting up. For example, I have a “Canon 1200D” profile, a “ZWO178MC-Cool” a “ZWO1600MM pro” profile, and so on. Note that profiles not only include camera setups but also other hardware such as your filter wheel, telescope mount, focusser, and so on. You can setup your gear by clicking on one of the tabs running from the upper center to the upper right of the equipment profile manager.
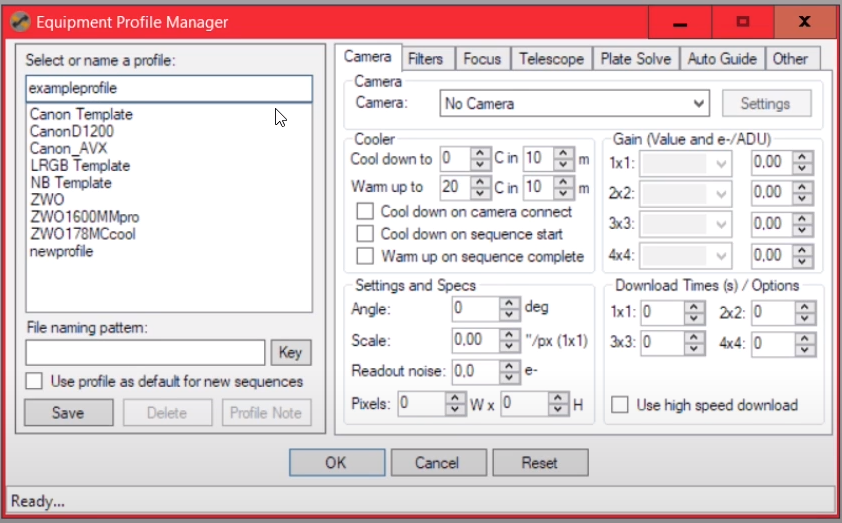
After selecting a name, it’s time to setup your camera. The “Camera” tab is open by default and it shows you all of the settings you can adjust. The first place to start is to click on the Camera drop down menu and select the type of camera you are using.
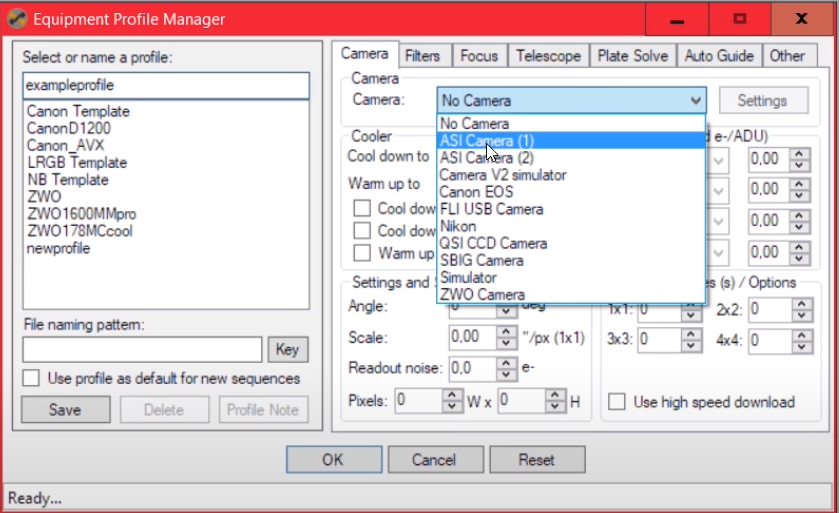
Note that sequence generator pro includes most popular brands such as Canon, Nikon, ZWO, QSI, SBIG and FLI cameras. Select the brand that is applies to your camera. Note that many dedicated astrophotography cameras come with an ASCOM driver. Be sure to first install the ASCOM driver of your camera as Sequence Generator Pro will use that ASCOM driver to communicate with your camera. As a next step, it would be wise to connect your camera to your PC/Laptop (often via USB) and click on “settings” to check whether sequence generator pro recognizes your camera. If it does, you should see a display with the name of your camera, the image type, and your camera gain setting with possibly some “presets” that a camera often has. After you have verified that sequence generator pro can detect and communicate with your camera, click OK.

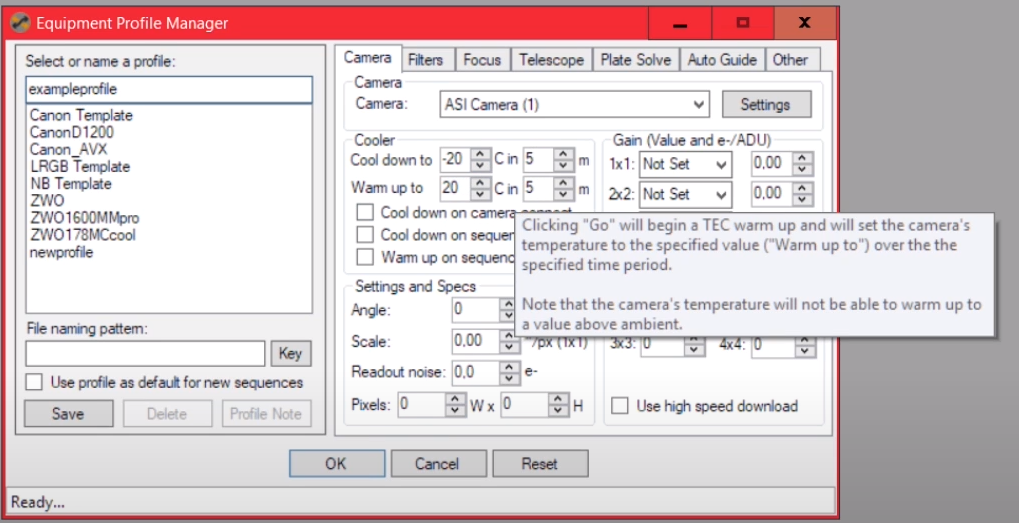
The next thing to do is to setup the “Cooler” section. This is only necessary if you have a camera that has a cooler in the first place. If you have a DSLR (Canon or Nikon) camera, you can skip this step. In the “cool down to” and “warm up to” sections, you can select both the temperature to which the camera should cool down or warm up to, as well as the number of minutes it will take for your camera to reach that temperature. The gradual cooling down or warming up of your camera sensor is important as quick changes in temperature may damage your camera. I usually cool my cameras to -20C to -25C, depending on the season, and I often select between 5 to 10 minutes for the camera to cool down. Click on the arrows next to the “cool down to” sentence, and select the temperature and cool down time of your liking. Similarly, you can select the temperature and warm up time to warm up your camera. I usually opt for 20C and 5 to 10 minutes. Use the arrow buttons to select the temperature and time for your camera to warm up after the “warm up to” sentence.
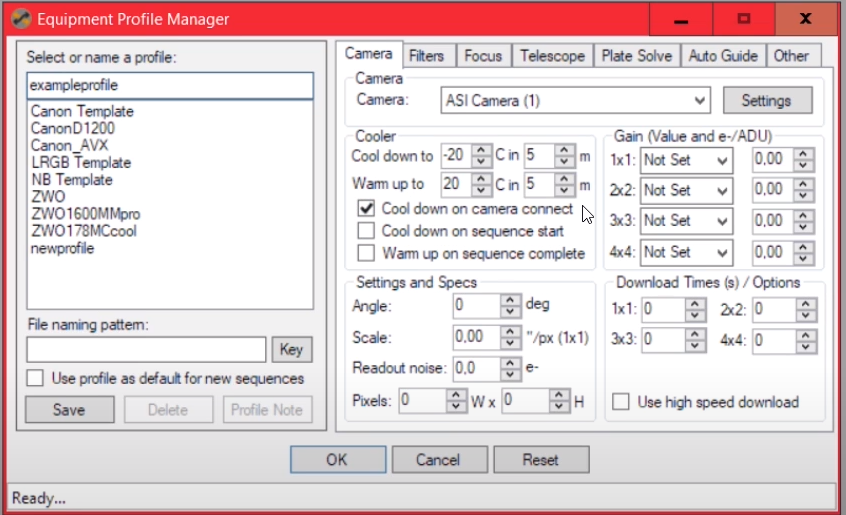
If you want sequence generator pro to start cooling your camera down as soon as the camera is connected, check the box that mentions “cool down on camera connect”. Alternatively, you can setup your camera to cool down on “sequence start”. I always select “cool down on camera connect”. That way, I’m sure my camera is cooled down before I start my imaging session. Similarly you can ask sequence generator pro to automatically warm up your camera after a sequence is completed by checking the “warm up on sequence complete”. Note that you can also control the cooling and warming of your camera manually in sequence generator pro during your imaging session, I usually leave the warm up option unchecked.
The next thing to do is to setup “settings and specs”, which consists of Angle, Scale and Readout noise. As for Angle, I have always left this at 0 degrees and never experienced any issues. You can calculate the Scale in inches per pixel (“/px) by using the following equation: (pixel size (in um)*206,3)/focal length of your telescope in millimeters (mm). The pixel size of your camera is often available on the website of the supplier. For example, the pixel size for my ZWO 1600MM pro camera is 3,8 um. You can find this info on the ZWO website. Next, you’ll need to know the focal length of the telescope you’re using in mm. For example, I’m often using my 80mm teleskop service photoline F/6 APO which has a 480mm focal length. So in my case, the scale would be (3,8umx206,3)/480mm = 1,63 “/px. Note that in the video, I’m using 560mm as focal length, resulting in a 1.40 “/px. The main reason to setup your imaging scale is to use plate solving and the framing and mosaic wizard, which is discussed in a later section of this guide.
As a next step you’ll have to fill in the read noise of your camera. The best thing to do is to go to the website of your supplier and check out the read noise which in the case of my ZWO1600mm pro is 1.2e. You can enter this number in the box named “Readout noise:”. Finally, you’ll also need to enter the Pixel size of your camera sensor. Again, this can be found on the website the supplier of your particular camera. In my case the ZWO has 4656 x 3520 pixels.
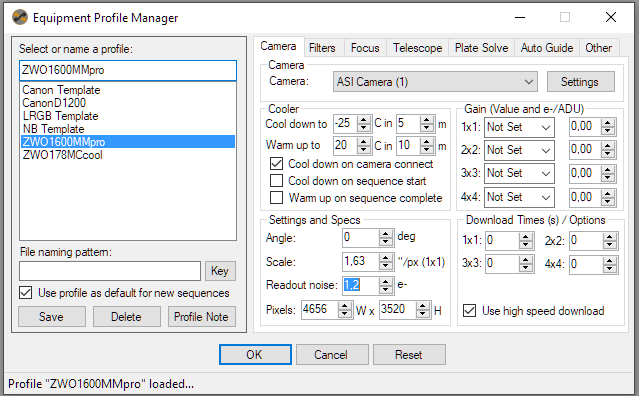
I usually leave the Gain and Download Time(s)/Options sections in the setup at default. The final thing to do is to press “Save” in the lower left section of the equipment profile manager. Note that you can check on the box “Use profile as default for new sequences”. You want to check on this box if this is the camera (and gear) you would normally use during an imaging session. For example, in 90% of my imaging sessions, I’m using my ZWO1600mm pro, so I have checked this box. Sequence generator pro will assume I’m always using this profile unless I’ll actively open the equipment profile manager and select another profile.
How to setup your filter wheel in sequence generator pro
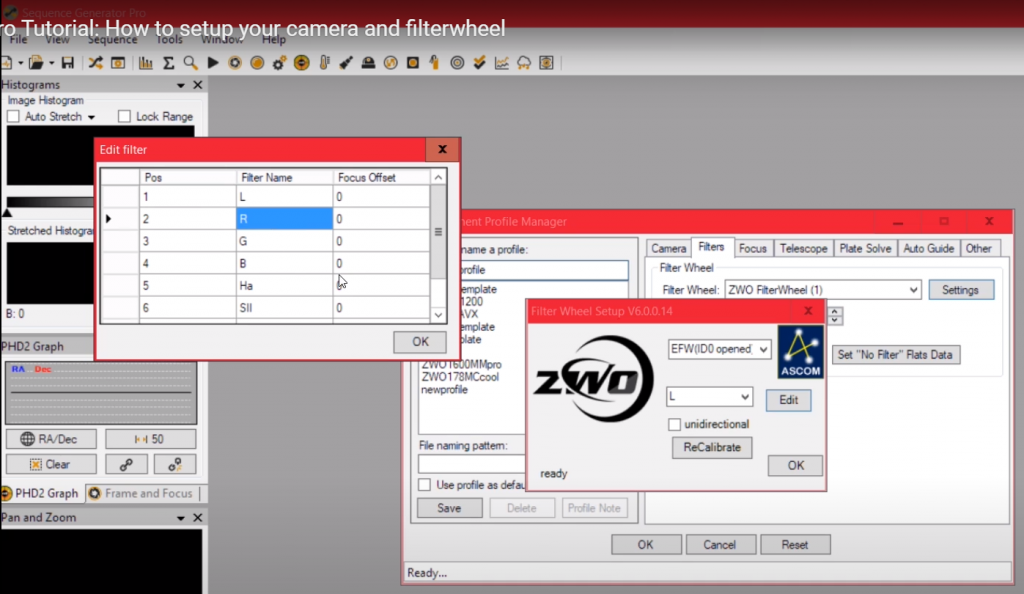
If you have a filter wheel, you can click on the second tab named “Filters” when you are in the Equipment Profile Manager (Tools menu –> equipment profile manager). Click on the drop down box and select your particular brand. Sequence Generator Pro supports FLI, QSI, SBIG and ZWO filter wheels. As with your camera, be sure to download and install your ASCOM driver for your filterwheel first, which usually can be found on the web page of the supplier.

It is a good idea to check if your filter wheel can be detected by sequence generator pro. You can test this by first connecting your filterwheel to your laptop/PC and then click on “Settings”. In my case, the ZWO logo of my filter wheel pops up, indicating that sequence generator pro has detected my filterwheel. By clicking on edit, you can now edit the names of the particular filters you have setup within each of the positions of your filter wheel. In my case, I have an 8 position electronic filterwheel from ZWO. My LRGB filters are in positions 1-4, my ZWO narrowband filters in positions 5-7 (Ha, Sii, Oiii) and my IDAS D1 light pollution filter is in the 8th position. By typing the name of each of your filters in the “Filter name” column, you can identify the filter for each of the positions of your filter wheel. You can also set the “Focus Offset” for each of the filters in this menu. I usually leave this to default. If you want to add a particular offset, enter that number in the Focus Offset column next to filter name for each of your filters. press OK. Note that offset can also be changed when setting up your imaging session.
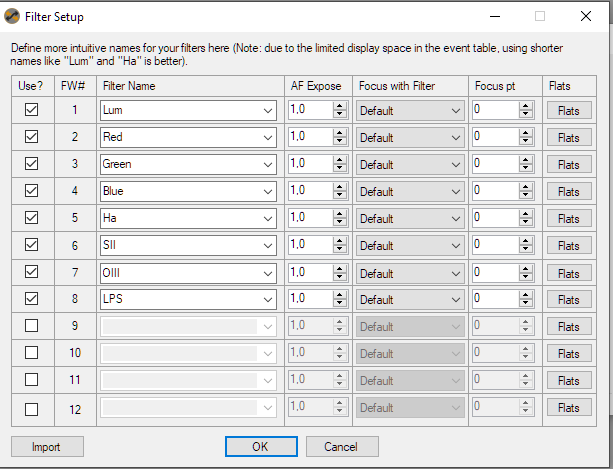
Another way to name your filters without having to connect your filterwheel physically to sequence generator pro is to simply click on “Set Filters”. This menu does not link to your filter wheel directly, so you’ll need to define how many positions your filter wheel has. You can do that by checking the “Use?” boxes, which refer to the “FW#” column that shows you the positions in your filter wheel. In my case, I have 8 positions so I checked the 8 boxes in the “Use?” column. Next, you can name each of your filters in the “Filter Name” box. Note that there are also other, more advanced options such as defining the autofocus exposure, the focus point and the flats settings for each of the filters. In this tutorial, we are simply interested in connecting a filter wheel to our profile within the equipment profile manager. So we’ll leave the advanced settings to default for now. Click on OK to go back to the overview screen of the Equipment Profile Manager. Remember to always save your profile after changing it by clicking on “save”.

How to setup your telescope mount in sequence generator pro
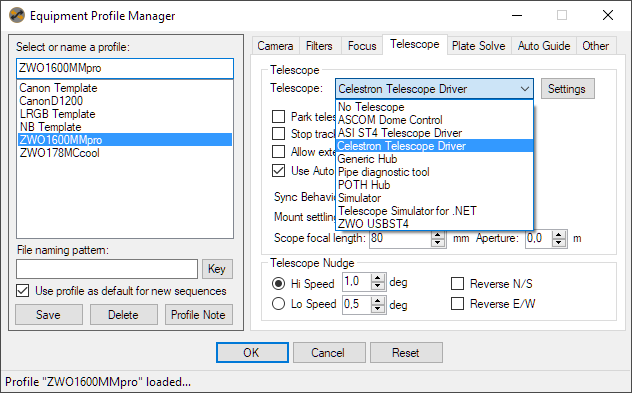
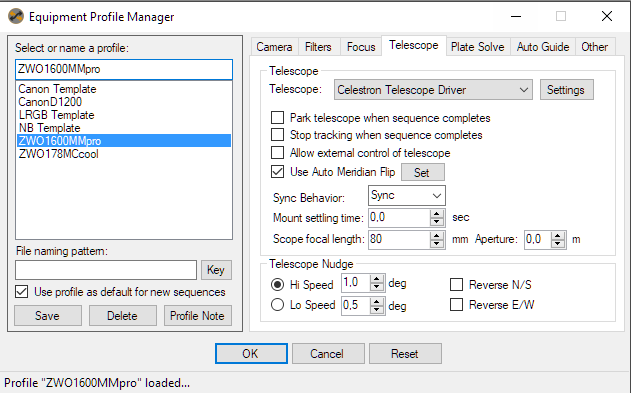
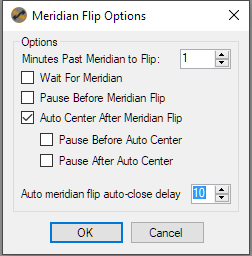
In order to connect your telescope mount to sequence generator pro, you’ll first need to install the ASCOM driver for your particular mount. If you did not do so already, you can probably download, and install the correct ASCOM driver for your mount here. After you have setup your ASCOM connection with your mount, go to “Tools” –> “Equipment profile manager” and select the “telescope” tab. Select the ASCOM driver for your telescope in the “Telescope:” drop down menu. You can click on the “settings” when your telescope mount is connected to your PC or laptop. If it’s connected correctly, you should be able to see the correct COM port that is used by sequence generator pro to communicate with your mount. I myself leave everything else to default except for one option, which is the auto meridian flip. This is really useful when your deep sky object will pass the meridian during an imaging session. Check on “Use Autoflip” and click on “Set”. In this menu you should check “auto center after meridian flip”. This will enable sequence generator pro to automatically target and plate solve (see below) your deep sky object after the meridian flip.
How to setup plate solving in sequence generator pro
Arguably, this step is not essential to getting sequence generator pro up and running. However, many astrophotographers use sequence generator pro as their main imaging software exactly because of its ability to perform plate solving. Plate solving – in a nutshell – allows you to fully automate your targeting process. Just type in the name of the deep sky object you want to photograph, select the way in which you want to frame that object in the field of view of your camera, and sequence generator pro will slew automatically to that object and center it for you so you can start imaging. This – and automated meridian flips – saves us astrophotographers a lot of time. If you decide not to setup plate solving you can of course skip this step altogether. Below you’ll find a video and a step-by-step tutorial on how to setup plate solving in sequence generator pro.
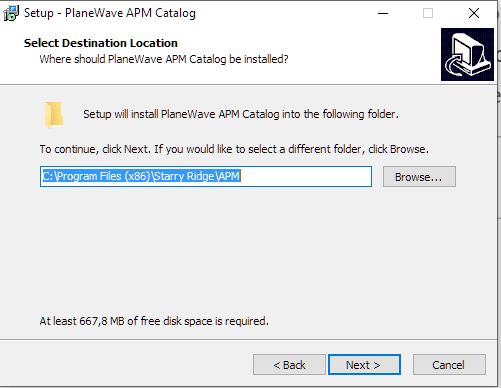
As a first step, you need to download and setup plate solving software. You can download the necessary files here. The two files you need to download are: “Setup APM Catalog.exe” and “UCA3PS.zip”. After downloading the plate solving software, you’ll need to run the “setup APM Catalog.exe” file. Open the file and choose the directory you want to install the APM catalog. I installed the catalog in the suggested default folder.
You’ll also need to unzip the UCAC3PS.zip file to a folder of your choice. Remember in which folders you installed and unzipped these two files because you will have to select those folders in sequence generator pro.
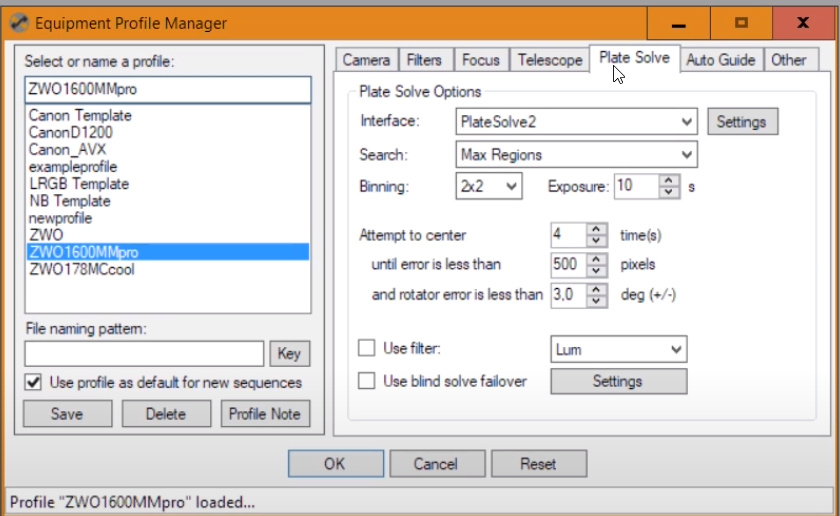
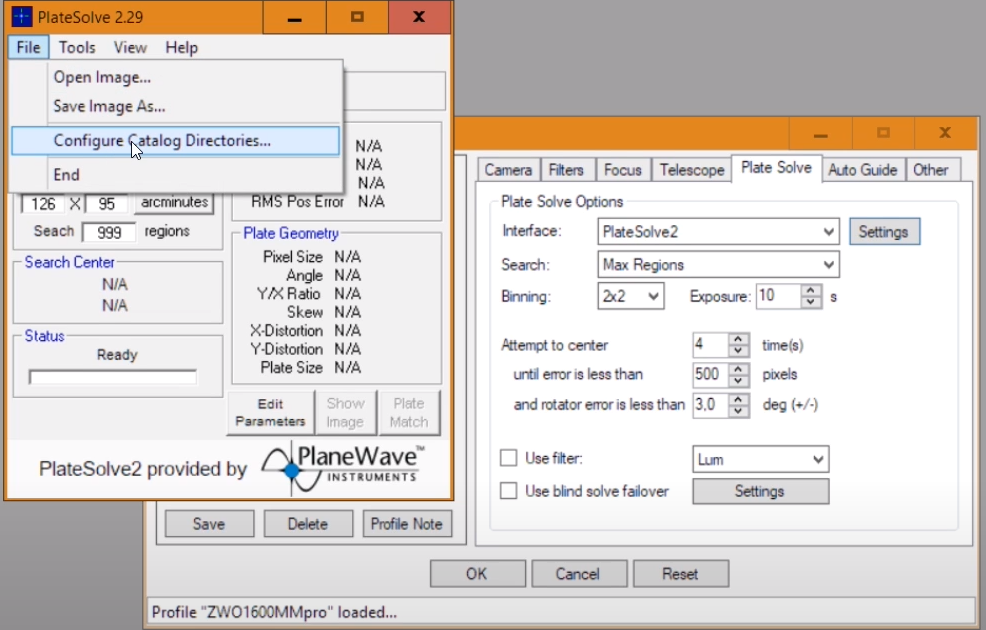
Back in sequence generator pro, go to the “tools” menu, select “equipment profile manager” and go to the “Plate Solve” tab. Select “PlateSolve2” as your Interface from the drop down menu. Set “Search” to Max Regions, and binning can be set to whatever you like, I usually go for either 1×1 or 2×2. What is important is the exposure setting. I recommend putting this to about 10 seconds. This means that sequence generator pro will take a 10 second exposure after which it will determine whether you are sufficiently centered on your deep sky object. I’m under heavy light polluted skies and a 10 second exposure is usually sufficient for sequence generator pro to calculate its position. Next, I normally set “attempt to center” to 3 or 4 times. This refers to the number of times sequence generator pro will try to center your deep sky object in the center of your cameras field of view. My experience is that sequence generator pro will not need more than two or three attempts to center your deep sky object in the center of your image. Set “Until error is less than…” to about 300 to 500 pixels, depending number of pixels on your camera. I’m using the ZWO1600MM pro with 4656 x 3520 pixels. I would recommend you take about 10% of that number, so 352 to 465 pixels. This means that the object will be less than 10% off center when you start imaging. Next, the “rotator is less than…” is only relevant if you own a rotator that can rotate your camera. I don’t own one, but I usually leave this to 3 degrees. Next, I usually leave “use filter” unchecked. I never experienced any issues, no matter what filter I used. Also, I never use “Use blind solve failover” so I also leave this box unchecked.
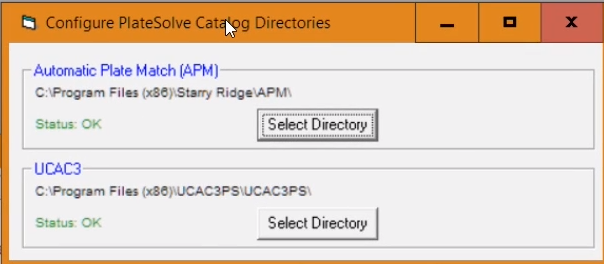
You now need to setup the plate solving software. Click on the “settings” button next to Interface. This will lead to a pop-up menu “PlateSolve”. Click on “File” and select Configure Catalog Directories. This will again lead to a pop-up window where you can select the folder in which you have installed the APM and the UCAC3 files. After choosing the correct directory, sequence generator pro should report “Status: OK” for both directories. Click on the “x” to close the screen.
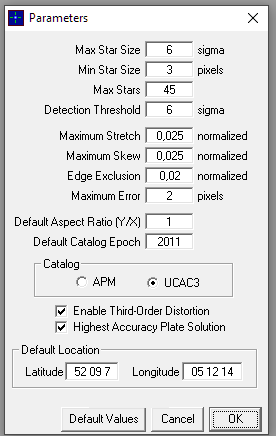
Go to “View” and select “parameters”. This will open up a “parameters” window. I usually leave everything to default and only change the latitude and longitude information to my location. If you’re unsure what your latitude and longitude is, you can use this online tool. After entering the correct location, you are done setting up plate solving in sequence generator pro. Close the platesolve windows and don’t forget to save your profile!
How to setup PHD2 in Sequence Generator Pro
Sequence generator pro can fully automate your PHD2 guiding process as well. After centering on a deep sky object, sequence generator pro will communicate directly with PHD2 by starting the calibration process after which it will automatically start guiding and – if you want – dither. I’m assuming that you are already familiar with PHD2 guiding software and you’ve installed PHD2 on the same laptop or PC as sequence generator pro. If this is not the case, then first check out how to install and use PHD2 guiding.
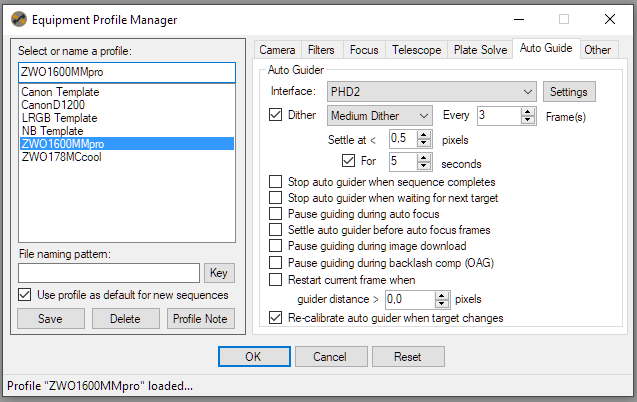
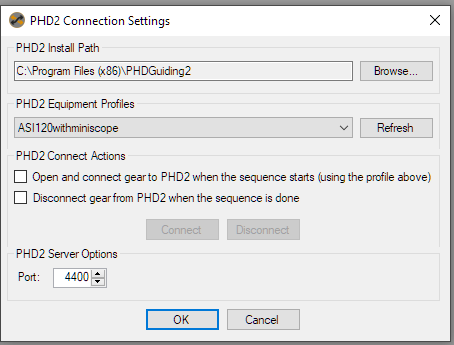
In sequence generator pro, go to the “tools” menu, select “equipment profile manager” and go to the auto guide tab. Choose “PHD2” as your interface. When you click on “settings” this will result in a popup windows where your PHD2 connection settings are stored. Check if the folder where PHD2 is installed on your computer is correct. Also, if you’ve setup different profiles in PHD2, you can select the profile that you want to use for your auto guiding. In my case, I have a ZWO120MC and Orion 50mm guidescope and named this profile: “asi120withminiscope” which I selected under PHD2 Equipment Profiles.
I have a habit of always opening PHD2 natively and connect my gear to PHD2 and check if everything is working. If you want to fully automate this process, you could check the box that states “Open and connect PHD2 gear when the sequence starts”. Likewise, if you want sequence generator pro to automatically close PHD2 after completing its imaging session, you can check the box that states “disconnect gear from PHD2 when the sequence is done”. When you’re done, press OK which will bring you back to the Auto Guide tab.
Note that you can select dithering as well. I strongly recommend you do so. Dithering means that once every few frames, sequence generator pro moves the position of your camera a little bit. With dithering you can more easily remove hot and cold pixels, cosmic ray artifacts, fixed pattern noise and other unwanted artifacts during post processing. Check on the box that states “Dither”. In the drop down box select “Medium Dither” and decide after which number of frames you want dither. I usually dither every three frames, but I know astrophotographers who dither after every frame. I would put “Settle at” to about 0.5 pixels and set dithering to 5 seconds.
Next, there are a lot of options to choose from depending on your preferences. Usually, I leave most of these options checked off, but feel free to select them depending on your preferences. The only thing I do check is to “Re-calibrate” the auto guider when I change targets.
How to setup your first imaging session in sequence generator pro
If you have followed the above steps correctly, you should be able to fully follow this tutorial. If you did not setup plate solving, you can still follow this tutorial. Just ignore the first part where I’ll discuss how you can select and setup a target using the Framing and Mosaic Wizard.
If you do have plate solving installed, goto Tools –> Framing and Mosaic Wizard which will open the Wizard menu. Click on the Profile tab to make sure the correct profile has been selected. Also make sure that the Scale (“/px) and pixels of your camera under “Define the Camera Data” are correct. If you are unsure what values should be used, check the first section on how to setup your camera. I often set the overlap to 30% – note that this only matters when you are planning on making a mosaic which is out of scope for this guide.
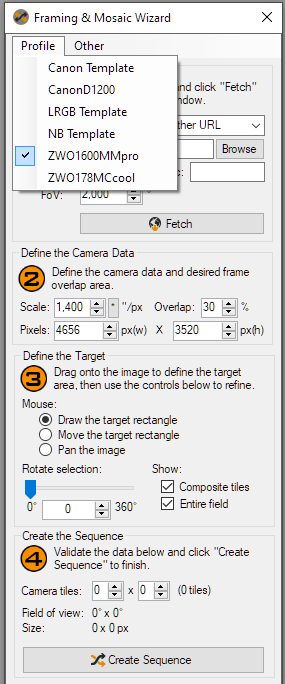
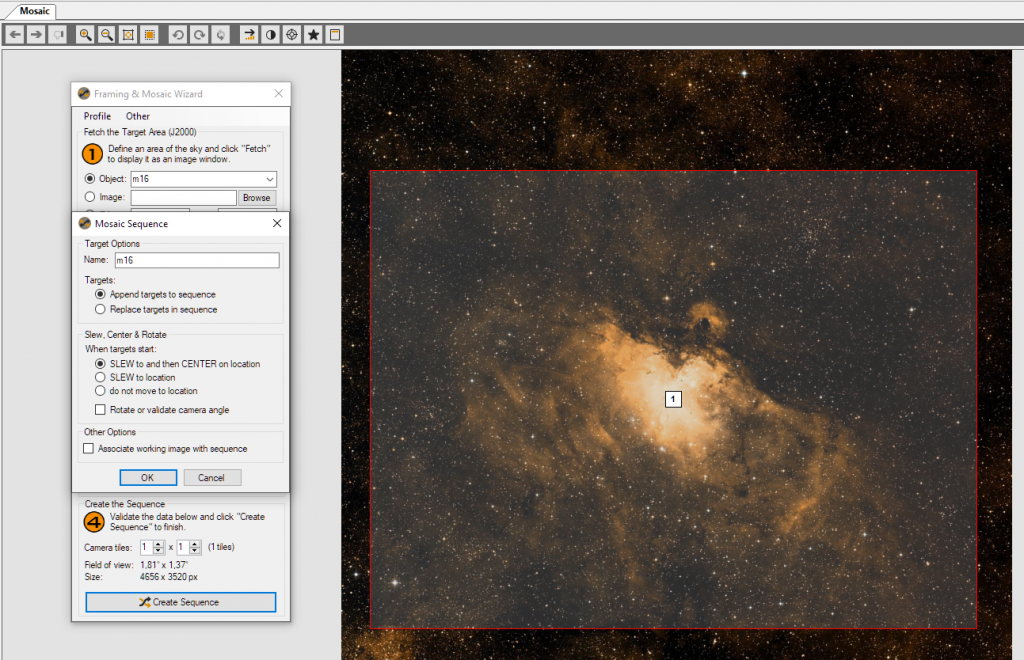
The next thing to do is to select a target. You can use any messier, NGC, or full name for the object that you want to image. In the example below, I typed in “M16” in the “object” box which refers to the eagle nebula. Sequence generator pro will search its data base for the correct coordinates (RA/DEC) and show a picture of the selected object. Note that when the object is either too big or too small you can change the FoV to a higher or lower number.
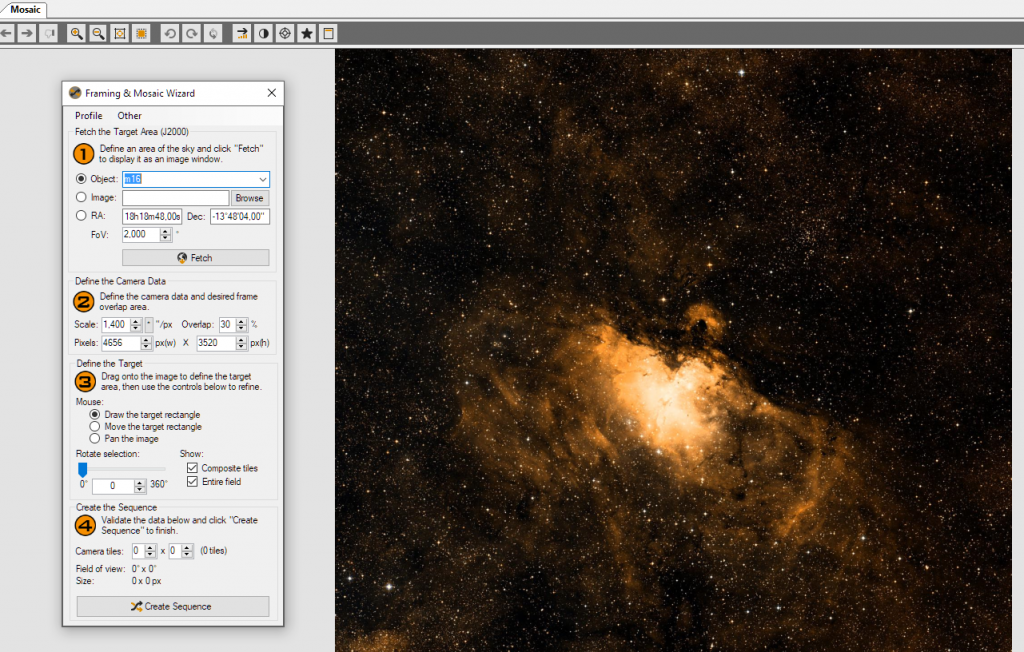
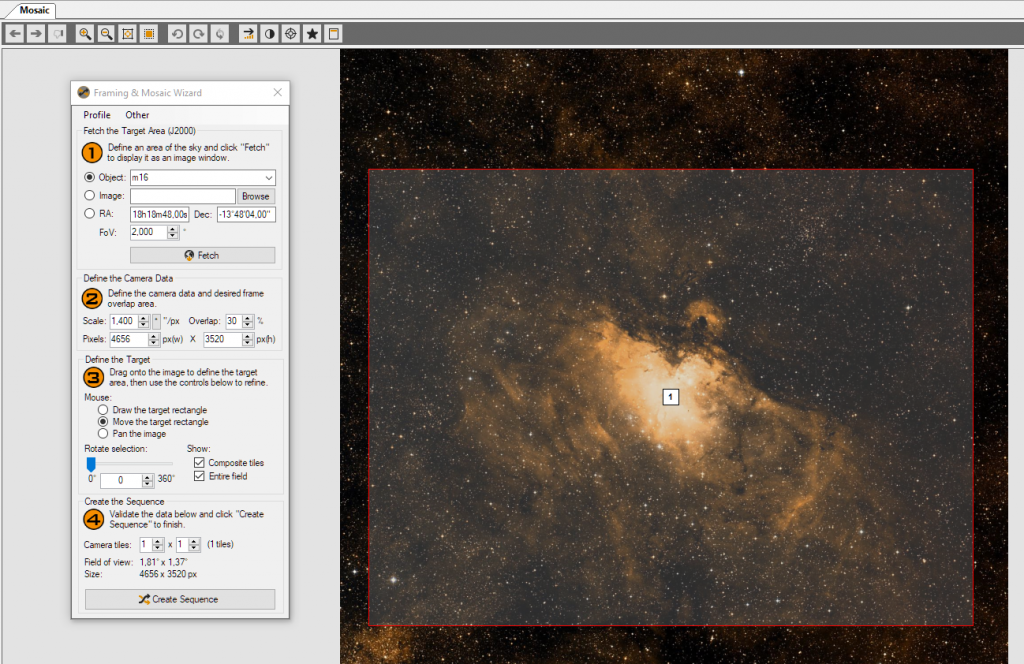
Next, you want to select the manner in which your camera will be focussed on your target. In order to do so, just click on the picture. This will open up one (or multiple) camera tiles. If your goal is to simply select the frame you want to image, adjust your camera tiles setting (under number 4) to 1×1 tiles. You can drag the tile across the picture until you are satisfied with your framing. Note that this is the frame that sequence generator pro will use as a reference to slew and center your mount on your target, in this case the eagle nebula.
Once you are satisfied with your composition, click on “create sequence”. This will open up a new pop-up menu. You can adjust the name of the object if you so desire in the “Name” box. You want to append this target to a sequence, which refers to your imaging session. So you can leave this to default. You can also leave SLEW and CENTER on location to the default setting. Finally, I have unchecked the “Rotate or validate camera angle” section, as I do not own an automatic Rotator. Click OK. If you have checked off the rotate option, you’ll receive a warning message that sequence generator pro cannot guarantee the angle of your picture. Click “Yes” to continue. You will now get a message “Succes, created one new target”. Press OK, and the sequencer should automatically open.
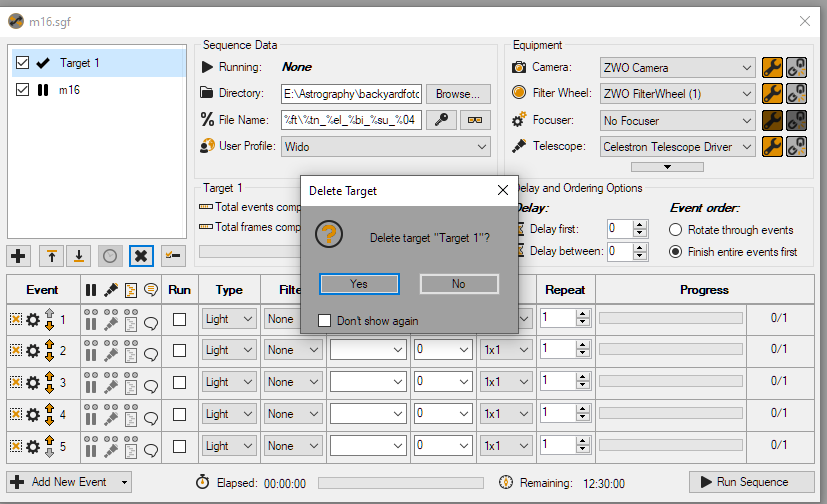
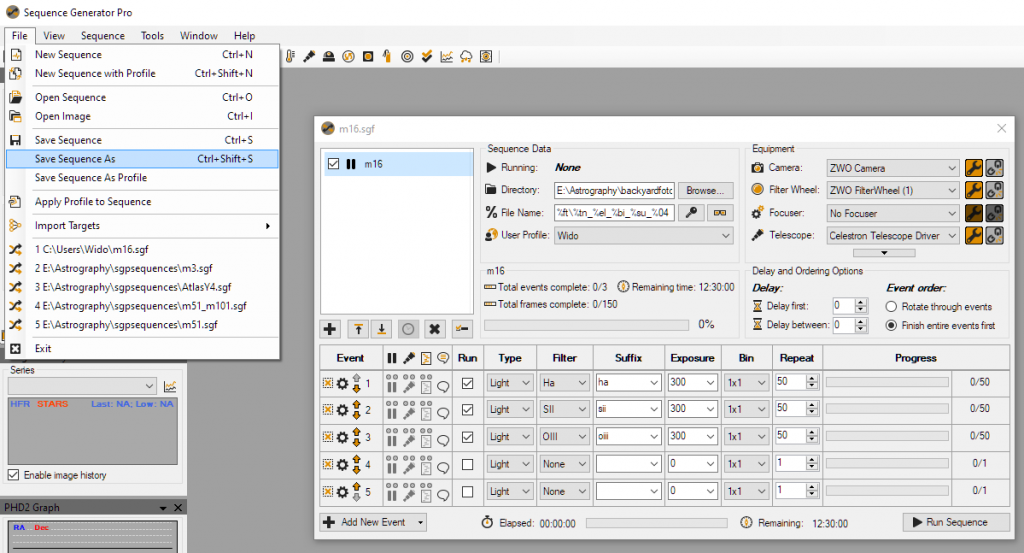
When your sequence opens, it should look something like this. The first thing to do is to get rid of the default Target 1 that is always there. You can do that by selecting target 1 and click on the “X” button below the target section. You’ll get a warning message, click “Yes”. Now, you should be left with only one target “M16”.
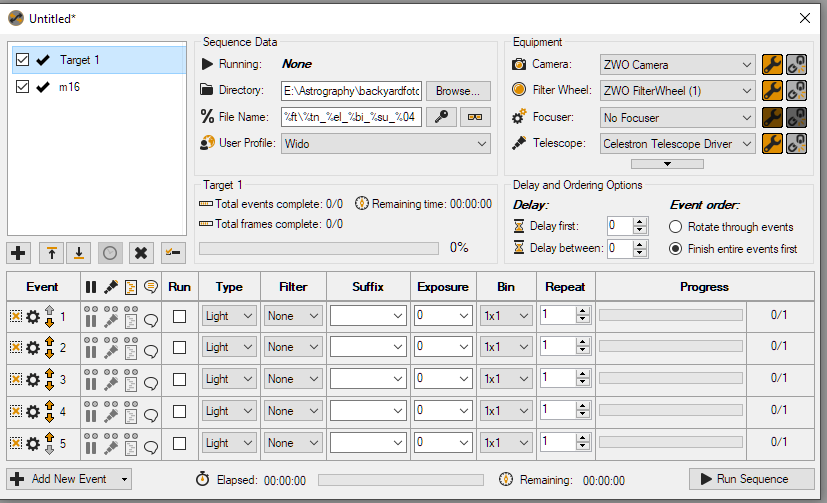
Now, it is time to setup your imaging session (a sequence) in sequence generator pro. The dashboard is pretty straightforward. In the Sequence data section, you should first click on Browse and select a folder where your pictures will be stored. I usually create a folder namend “Temp” on my computer where I store the RAW or FITS files from a session. Next, you’ll see the Equipment part on the right. You could click on the “grayed out” chain next to the wrench for your Camera, filter Wheel, Telescope and any other types of equipment which will connect your gear to sequence generator pro. We are not quite there yet, as we have to setup the sequence first.
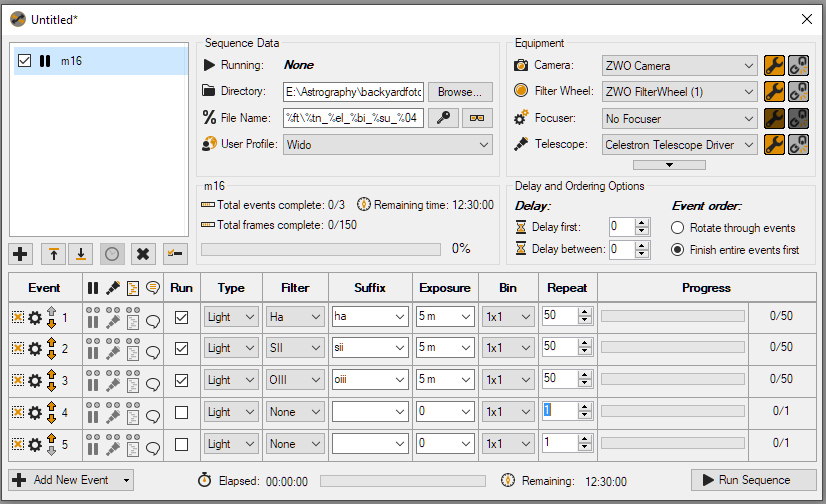
In the event section, you can setup your imaging session. The way how to set this up depends on your gear. In the example below, I’ve created a session with my mono camera and filter wheel. Let’s go through this step-by-step. First, you need to ensure that the “run” box for a particular event is checked. If not, sequence generator pro will ignore that event. Next, You’ll have to select the type of frame you want to capture. In this example, we are only interested in capturing “light” frames. Next, you can setup a filter if you have an automated filter wheel. If not, you can leave this to default. I do have a filter wheel and created three events (see picture below). If you want to set a filter, just click on the drop down box and select the filter you want for each of the different events. In my case, I have setup three events for three different narrowband filters (Ha, Sii, Oiii). I have put the names of each filters in the “Suffix” box. This will be included in the name of each picture so I know which filter was used. Next, you can set the exposure time. This will of course vary, depending on your camera, filter and target. In the example below, I selected 5 minute exposures from the exposure drop down menu for each of the filters. Alternatively, you can manually write the number of seconds, for example “75s”, and the exposure time will be adjusted to 75 seconds. Finally, you can select your binning (I always leave this to 1×1) and you can select the number of pictures you want to take in the “Repeat” column. In this example, I’ve selected 50 pictures for each of the events. Note that the sequence generator pro calculates the “remaining time” to be 12h:30m, which is the total time it would take to image 150 frames of 5 minutes each. You can choose set a “Delay” between taking your images. For example, if you prefer a cool down period after an image is taken, you can set that here. I usually leave this to 0 as I have a cooled camera. As a final option, you can choose to either “rotate through events” or “Finish entire event first”. I usually choose “finish entire event first”.
If you are happy with the way your sequence is setup, don’t forget to save it. Goto “Files” and “Save sequence As…” to save your imaging session setup in your favorite folder.
Note that you can do all these preparations during the day! At night, simply open sequence generator pro and goto “File” –> “Open Sequence”, and you should be good to go.
Your first Live imaging session!!!
So here we are. You have followed all of the above steps and are ready for your first imaging session in sequence generator pro. Pretty exciting! As a rule, before starting your imaging sesssion, always check:
- Tools –> Equipment profile manager; ensure the correct profile is selected
- Open sequence –> do one more check, did you setup your sequence correctly?
- If you did not automate this: Fire up PHD2 and connect your gear
- Click on the grayed out buttons in the sequencer to connect your gear
- Now that you are ready…click on “Run Sequence”
If everything is setup correctly and you are using plate solving, your mount should automatically slew to and center on your target, after which sequence generator pro will communicate with PHD2 to auto calibrate on a guide star (see video below). After this is done, sequence generator pro should automatically start the imaging session by taking pictures of the deep sky object you want to image. Note that I’m using the word “should” here. I really like sequence generator pro, but some issues may occur. Maybe you failed to select the correct profile. Or for some other reason, your gear doesn’t connect. Guiding may not be accurate for some reason. This is all part of the game. I’ve come to learn that over time, you will be able to iron out most of the issues you may experience during your first imaging sessions. When you do, sequence generator pro is a real treat to use. It highly automates and professionalizes your imaging sessions. On good nights, you can just enjoy all those beautiful light frames that come rolling in. Look at it this way, if you want to spent serious money on your mount, camera, filter wheel and other astrogear, you may as well go all the way and buy sequences generator pro. In the end, it will save you a lot of effort to manually find and center your target, get it in focus, start auto guiding and manually flip your mount after it reaches the meridian. I can highly recommend sequence generator pro – and this is not a sponsored message! See how sequence generator pro works on a good night in the video below – where I’m trying to capture the north america nebula. This was one of my first videos, not my best one, but it shows you how a live session works.
Hope this was useful for you, feedback is appreciated!
Clear skies!
덕분에 sgp 사용법을 잘 배웠습니다.
감사합니다.^^
천만에요. 유용하다고 생각해서 다행입니다 🙂
This is excellent. I’d already studied many tutorials so I knew a lot of the info you presented but what I needed – and got here – was the whole picture, i.e., the sequence to follow. Thank you! I have one picky comment if you’ll indulge me for a minute, and I see this everywhere so it’s not just you. “Setup” is a noun. “Set up” is a verb. I see things like “when you setup your gear…” all the time. We set up our gear. When we’re done setting it up we hopefully have a good setup. There. I got it off my chest! 🙂 I’m looking forward to more of your tutorials.
Got it, thanks!
How to access and set up what information is put on fits header. Information placed in fits header has changed from 6 months
ago??