Are you wondering how to take a picture or make a time-lapse video of a comet with your telescope from your backyard? I’ve asked myself that same question a few months back and did some research. To capture a comet with a telescope from your backyard, you’ll need the right equipment and software, accurate coordinates of the current location of the comet and some post processing techniques to turn your pictures into a video. In this blog I’ll explain each of these steps in more detail so you can start taking pictures and making awesome videos of comets yourself.
1. Equipment needed to capture a comet
You don’t need any special astronomy equipment beyond that what you’ll also need to take deepsky astrophotography pictures. A computerized equatorial mount and a camera that can take repeated exposures will do fine. The camera doesn’t have to be a dedicated cooled astrophotography camera, any DSLR, planetary, or astrophotography camera will do. A guidescope and camera are recommended, as guiding will keep your field of view similar across multiple frames. In the above video, I used the following equipment to capture comet ATLAS C/2019 Y4:
2. How to find and capture a comet
Comets are continuously “on the move”. So in order to know where a comet is, you’ll first need to check its accurate position. Websites such as the Sky Live offer detailed information on the exact declination and right ascension coordinates of any comet within our solar system. Declination coordinates are given in degrees, arc minutes and arc seconds whereas right ascension coordinates are in hours, minutes and seconds. For example, at the time of writing this blog post, comet Atlas C/2019 Y4’s current position is: Right Ascension: 07h 11m 14.9s; Declination: 67° 48′ 02.1″ (J2000). If you are a visual astronomer and rely on star charts, you can also find an accurate chart of the its position here.
Next, you’ll need to setup your mount, telescope and camera which I trust you already know how to do. If you are just starting out in astrophotography, I recommend you first learn how to polar align your equatorial mount, as explained in this blog. After you have polar aligned your mount and your camera is in focus, the next thing to do is to slew the mount to the correct RA and DEC position. If you are a visual observer with sufficient knowledge on how to find objects based on star charts, just check the accurate chart of the comet and manually position your mount and telescope to that patch of the night sky. As for myself, I’m not such a hero in manually finding objects in the night sky and rely on software instead. In particular, I’m using the plate solving option in sequence generator pro to accurately position my mount. It would take too much time to explain everything there is to know about sequence generator pro. However, if you are keen on learning how to work with this software, these four videos on how to setup sequence generator pro – including plate solving, second video – may be useful.
If you have plate solving working in sequence generator pro, all you’ll have to do is to setup a target in an new sequence with the correct RA and DEC coordinates you’ve retrieved. Just open a new sequence, add a new target and click on the settings button of that target as explained in my video here and in this picture.
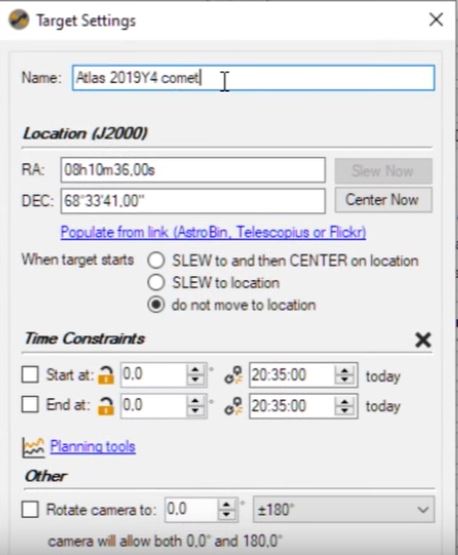
You will get to this screen which allows you to input the correct RA and DEC coordinates, using the format as displayed in this picture. You should also enable “SLEW to and then CENTER on location” if you want the telescope to automatically slew to the target at the start of new imaging session. If you already have the telescope in the correct position, you can leave this off and start your sequence. I’m no expert on the correct settings to capture comets, but I found out that an exposure time of about 30 seconds with a gain setting of about 150 clearly showed the comet in my pictures when auto-stretching my images. In terms of quantity, I would say, the more pictures you can take the better, especially if you are interested in creating a time-lapse video. Take into account that 1 second of video normally includes about 25 frames per second. I my case, I ended up with about 500 images of the comet, which enabled me to create video of about 20 seconds.
3. Post processing your pictures to create a timelapse video of the comet
Of course, you can do anything you like to process your pictures, depending on your preferred software and preferences. post-processing software such as deepskystacker and pixinsight have specific comet modules or process in which you can accurately align all of your pictures on the comet to create a stacked image. Alternatively, you can star align all of your pictures which will create pinpoint stars with a bright line showing the path of the comet during your capturing session. It would go to far to explain all of these processes in one blog. I will focus instead on explaining how tou can create a time-lapse video of the comet.
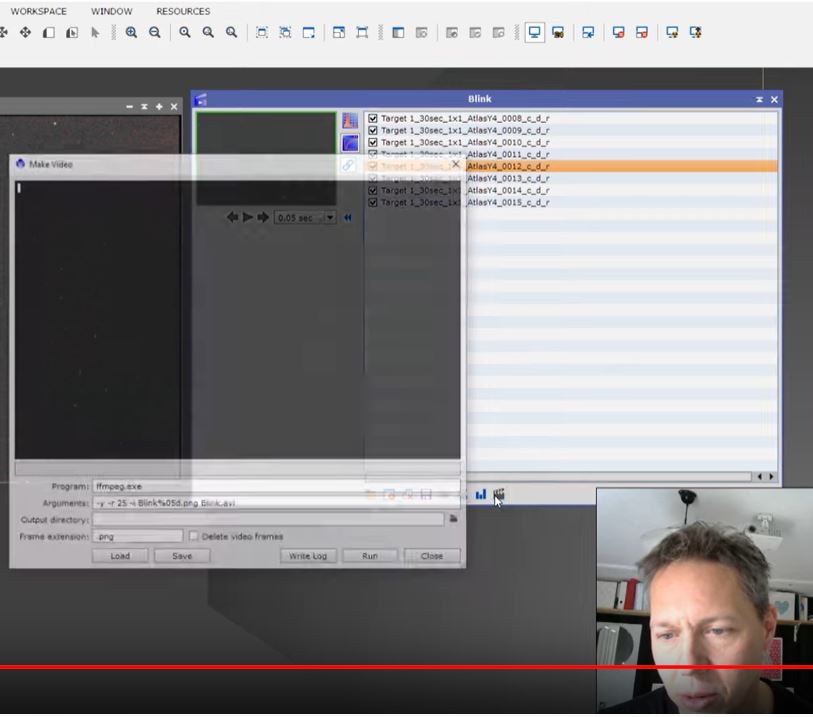
The first thing you may want to do is apply correction frames (flats, darks, bias frames) and star align each of your individual images. After you have completed this process, your main goal would be to stretch all of your images. The way I do this is by using the “blink” process in pixinsight, as also demonstrated in the video. Blink automatically stretches all of your frames with a linear transfer function. So, the first thing you can do is open up all of your images in the correct chronological order in Blink. Next, blink has a very useful export option which creates both a video (in avi format) and exports all of your stretched frames into a separate folder. Just simply click on the movie icon in blink, and select a folder to which you want to export all of your images and video. Blink will then save all of your automatically stretched images in png format to that folder, as well as the AVI file.
Final thoughts
I hope this blog helps you to get started on capturing comets in our night sky. Comet Atlas C/2019 Y4 was the first comet I’ve captured from my backyard. It is a very exciting experience! I felt a real connection to this comet as I realized that it is actually (relatively) near earth as opposed to objects I usually image that are many light years away. The fact that you need to check the accurate position of the comet before capturing and the option to create a time-lapse video of a moving object in space makes it all the more exciting and gratifying. I would highly encourage you to go out and capture a comet yourself, it’s super fun and exciting to do! See the final video I’ve created below.
Clear skies!