In this blog, I’ll mention five tips to improve your astrophotography hobby that I’ve picked up over the years. These tips may be useful when you are wondering how to:
- Increase the accuracy of your polar alignment;
- Select deepsky objects that are ideally sized for your camera and telescope;
- Improve the focus of your camera;
- Increase the accuracy of your guiding in PHD2, and;
- Increase your general resilience to failures (trust me, there will be some bad nights).
Tip 1: Increase the accuracy of your polar alignment
A good polar alignment is essential to increase the accuracy with which your equatorial mount is able to track objects in deep space. You can find all the necessary steps to polar align your equatorial mount here. About two years ago, I began using the sharpcap”polar align” method after I visually polar aligned my mount with my polar scope. This really helped me to improve the tracking and guiding accuracy of my mount. To use the polar align procedure in sharpcap, your equatorial mount should be roughly aligned with the north celestial pole and your camera needs to be in focus and connected (via USB) to your computer. You can select the polar align module in the tools menu, after which sharpcap automatically takes a picture of the celestial pole. After clicking “next” sharpcap will ask you to move your RA axis of your mount about 90 degrees. You can watch the video above if you are unsure how to do this. It involves unlocking the clutch of your RA axis on your equatorial mount and turning the axis 90 degrees after which you lock the clutch. After this, press next. Sharpcap will take a second picture of the celestial pole and will inform you about your “Polar Align error” in hours, arcminutes and arcseconds (HH:MM:SS).
The main goal is to get your polar align error down to less than one arcminute. You can achieve this by moving your mount in altitude and azimuth, using the bolts that are on your equatorial mount as demonstrated in the video. Basically, this involves turning one bolt of your azimuth or altitude axis while tightening the other one. Sharpcap will tell you what your remaining polar align error is in azimuth (left / right) and altitude (up / down). Be sure to make small adjustments as big adjustments to altitude and azimuth result in arcminutes of change. After you have achieved a polar align error that is less than one arc minute, simply close the polar align module in sharpcap and reposition your RA axis in the parking mode.
Tip 2: Calculate the size of astronomical objects for your camera and telescope
You don’t want to end up shooting pictures of an object that is either very small, or too large for your camera sensor. In order to avoid these kind of surprises, you can use free online calculators such as astronomytools. This easy to use website can accurately calculate how big your target will appear on your picture. Simply go to astronomytools, click on “field of view” and select “imaging mode”. After that, you can select one of the messier or solar system objects. You add information about your telescope (aperture and focal length) and camera (resolution and sensor size). If you are unsure about these values, goto the company website of your product and you will find this info. For example, I have an APO refractor with an aperture of 80mm and a focal length of 480mm. My ZWO ASI 1600MM pro camera has a resolution of 4656 x 3520 and a sensor pixel size of 3,80 microns. You can even add a barlow lens (if you use one), and play around with the angle and binning options. After you have inserted this information, you can click on “Add to View” and astronomytools will show you how large the deepsky object will appear in your picture. By using calculators such as astronomy tools, you can avoid the disappointment of setting up your gear and capturing your first picture, only to realise that the target is either too small or too big for your camera and telescope combination.
Tip 3: Improve the accuracy of your focus on deep sky objects
It goes without saying that an accurate focus is very important for the quality of your astro pictures. In addition to manually focussing or using a bahtinov mask, most capturing software have so called focussing modules. For instance, sharpcap has a focussing assistant which – among other things – shows you the Full Width Half Maximum (FWHM). Similarly, Sequence Generator Pro has a frame and focus module that produces a Half Flux Radius (HFR) value.
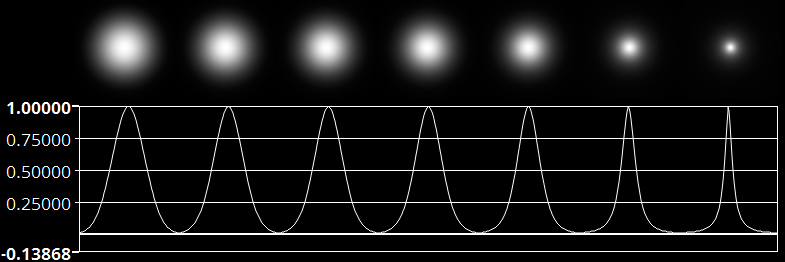
The Full Width at Half Maximum can be best explained with the above picture. Every star has a certain apparent diameter in the night sky. The FWHM measures the brightest point of a star (usually the center) and then calculates the diameter of the star when brightness values are at 50% of that maximum brightness. So, the FWHM can be calculated by measuring the distance between two points where the star is at 50% of its maximum brightness. Similarly, the Half Flux Radius takes the center of a star and then calculates the radius that center to a point where the star radiates at 50% of its brightness.
Now let’s move on to practical use. The HFR and FWHM can (also) be used to measure how well your camera and telescope are focussed on the night sky. When you are out of focus, FWHM and HFR values will be higher as compared to when you are completely in focus. So what you need to do is make multiple pictures of the night sky and compare the FWHM or HFR values across those pictures. Luckily, most capturing software programs have built-in focussing modules that have a “looping mode” which produces these values with every new picture. For example, Sequence Generator Pro (frame and focus) and sharpcap (focussing assistant) both have such modules and produce FWHM and/or HFR values for each of the stars that are detected (see SGP picture below). I usually set my exposure time to 3 to 5 seconds.
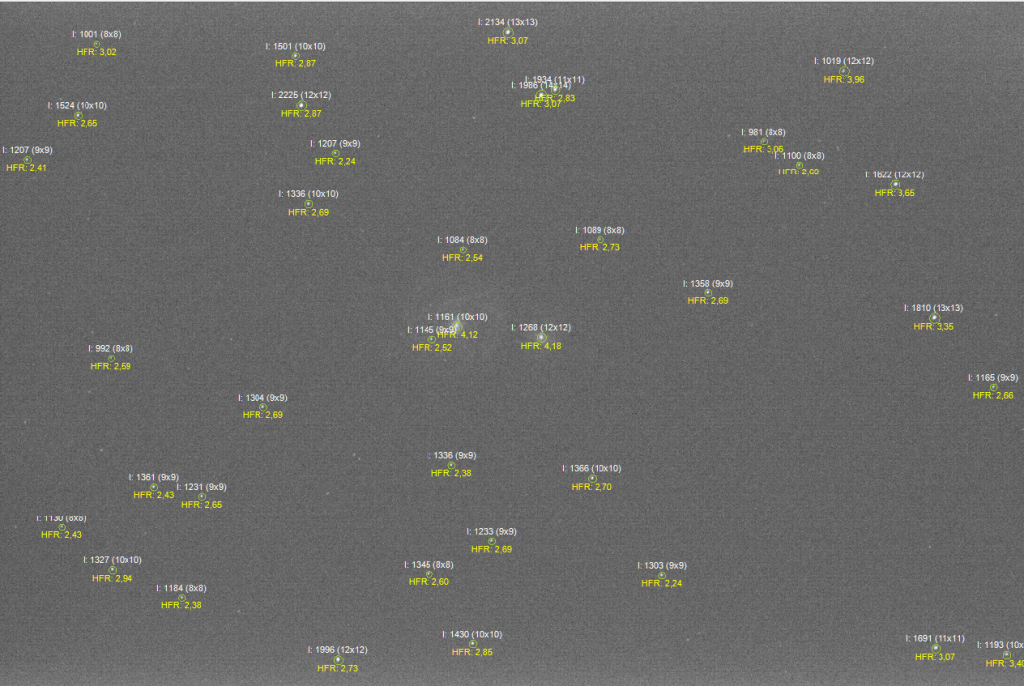
SGP shows an HFR value for every star that is detected. The idea is that you make small manual adjustments to your focuser while your camera is in loop mode, until you hit the lowest value. If you keep on turning your focuser in the same direction, you’ll notice that at one point your values go up again. That’s when you know you have hit the lowest values. Put it in that last position and you are ready to go. I’m assuming that you are still manually focussing on the night sky (like I still do). Of course, if you want to go all out, you can buy one of those fancy auto focussers that are out there on the market. But that’s another story for another blog.
Tip 4: How to increase the accuracy of your guiding in PHD2
One of the most important steps in capturing high quality astronomical pictures is accurate guiding. Most amateur astronomers use PHD2 guiding software which is freely available (which is awesome!). So I’ll mention three things you can do to improve the accuracy of your guiding in PHD2. I’ll not get into PHD2 in detail, this is not a PHD2 tutorial. I’m assuming that you are already familiar with the basics of autoguiding in PHD2.
The first tip that I have for you is to connect your telescope mount via your ASCOM driver to PHD2. Most mounts have a dedicated ASCOM driver with which you can connect your mount. One of the benefits is that PHD2 will talk to your mount directly via ASCOM to accurately track your selected guidestar. An alternative way is to connect your guide camera directly to the autoguide input on your mount via an ST4 cable. Although this would also work, this is usually not recommended as this leads to less accurate guiding.
The second tip I have is use the guiding assistant in PHD2 when you use your mount and guide camera for the first time. Note that you should already be setup and autoguiding in PHD2. When in guiding mode, goto the tools menu and select the guiding assistant. PHD2 will stop autoguiding and will track the movement of your mount without making any corrections. I would recommend you let PHD2 calculate the accuracy of your tracking for at least 4 to 5 minutes. After that, you click on next and PHD2 will automatically send pulses to move your mount north, south, east and west. This procedure is completely automated, you don’t have to do anything. After the guiding assistant is done, it will suggest the values you should use to accurately guide in RA and DEC. Simply click on ” apply” to implement both suggestions and you are ready to go!
One final tip I have is to correct your DEC in one direction. This is only necessary when you experience large fluctuations in your DEC axis during guiding. During some nights, I noticed such huge curves in my DEC guiding due to the fact that PHD2 would first (over)correct my guiding error moving north, and then (over)correct my guiding moving south. I noticed that when I started guiding in one direction – only north or south – these curves would become much less pronounced. You can adjust your DEC guiding by clicking on “auto” on the bottom task bar in the main screen and then select either “north” or “south”. This tip is also useful when you notice a particular trend towards north or south in your DEC axis when guiding.
Tip 5: How to remain resilient in astrophotography
I just wanted to end with letting you know that it is OK to make mistakes. I surely have made a lot of mistakes and some nights can be very frustrating. Some things that I’ve experienced over the years: Gear that won’t connect, finding out that I was “out of focus” after a whole night of imaging, clouds that suddenly appear when your gear is finally working…I could go on and on. The major thing to remember is this: Everyone experiences these nights! I know there are lots of videos and blogs about the wonders of astrophotography and everyone appears to be happy and sharing wonderful pictures of the astronomical objects they were able to capture. But trust me, every last amateur astrophotographer has experienced the frustrations and challenges similar to those I’ve just mentioned. If you did not, then you are one lucky bastard :-). The only thing I want to say is: I have been there too, and eventually you will solve the issues that you are experiencing. Try to remain resilient, reach out to other astronomers on fora, chats or just react to this blog and I will do my best to help you. Eventually, you will find the source of the problem you are dealing with. Heck, you might even learn something every time you solve such problems, I know I did. So in sum, don’t obsess to much about nights that didn’t go as planned, reach out to others and try to remain resilient when this happens to you. The universe is billions of years old and it will be there for your next night of clear skies!
Take care and keep looking up!
Really excellent information here! I’m impressed that you are willing to take on the Herculean effort of helping others. Impressive. I especially liked your last thoughts on frustration and keeping things in perspective. How can I subscribe to your blog?
Hi Dane,
Thanks for the positive comment! I actually don’t have a subscription option right now, but I’ll work on it, thanks for the tip.
In the meanwhile, you could subscribe to my youtube channel as most of my blogs will also be mentioned in my videos (if you can stand my Dutch accent :-)).
Best,
Wido.