What is the best camera for astrophotography? Well, that really depends on what you want to photograph. In this v/blog, I’ll get into the kind of objects (Moon, Planets, Deep-sky) you want to capture and how this affects the kind of camera specifications you’ll need to be looking for. In general, cameras that are good for planetary imaging don’t need a large sensor, but do need an acceptable FPS speed. For deep-sky objects outside of our solar system, you want a camera with a big sensor, low read noise, high quantum efficiency, high full-well capacity, and a high-bit ADC to engage in deep-sky astrophotography. Let’s discuss each of these specifications in more detail.
Planetary imaging
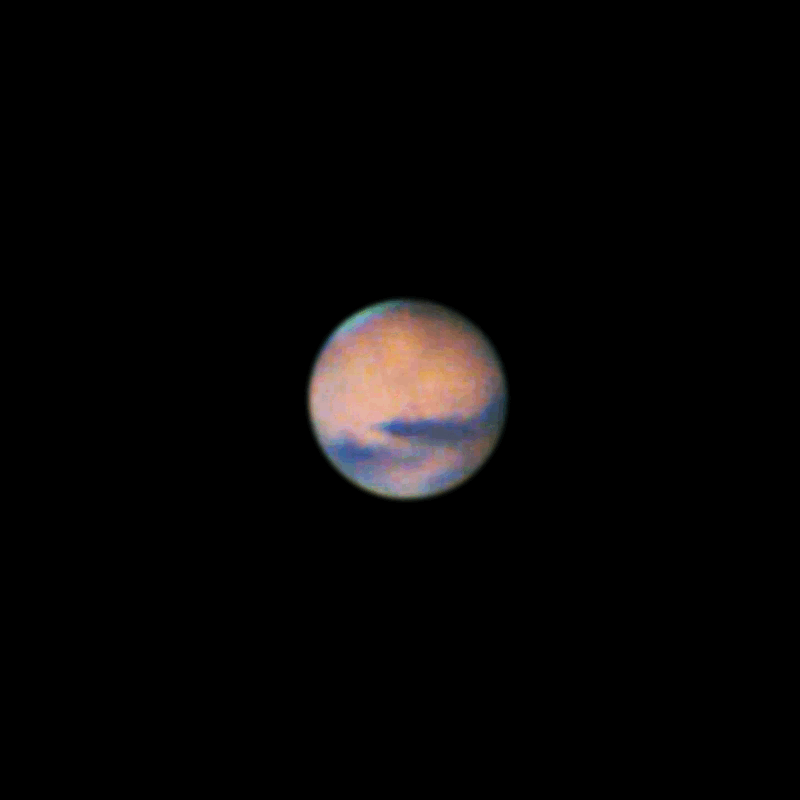
Most people start their astrophotography hobby by looking at the moon and the planets in our very own solar system, and at one point, you probably want to photograph them. Technically, this is not ‘astro’ photography as astro means “star”, so most people talk about Moon- and Planetary imaging. If your plan is to start with planetary imaging, you’ll need to know that our moon and the planets are among the smallest and brightest objects in the night sky, as they are illuminated by our own sun. One of the best ways to capture the moon and the planets is by taking short videos; often only one or two minutes long. Planetary imagers end up with many video frames of a planet, which can be stacked and processed further to create a nice final picture. Because the planets are so tiny, you’ll also need a long focal-length telescope to properly magnify these planets in the sky. In this video, I’ll focus on cameras, but check the “getting started” section on this website to find more info on telescopes, cameras, and other gear you’re going to need when getting into planetary imaging or deep-sky astrophotography.
Deep-Sky Astrophotography
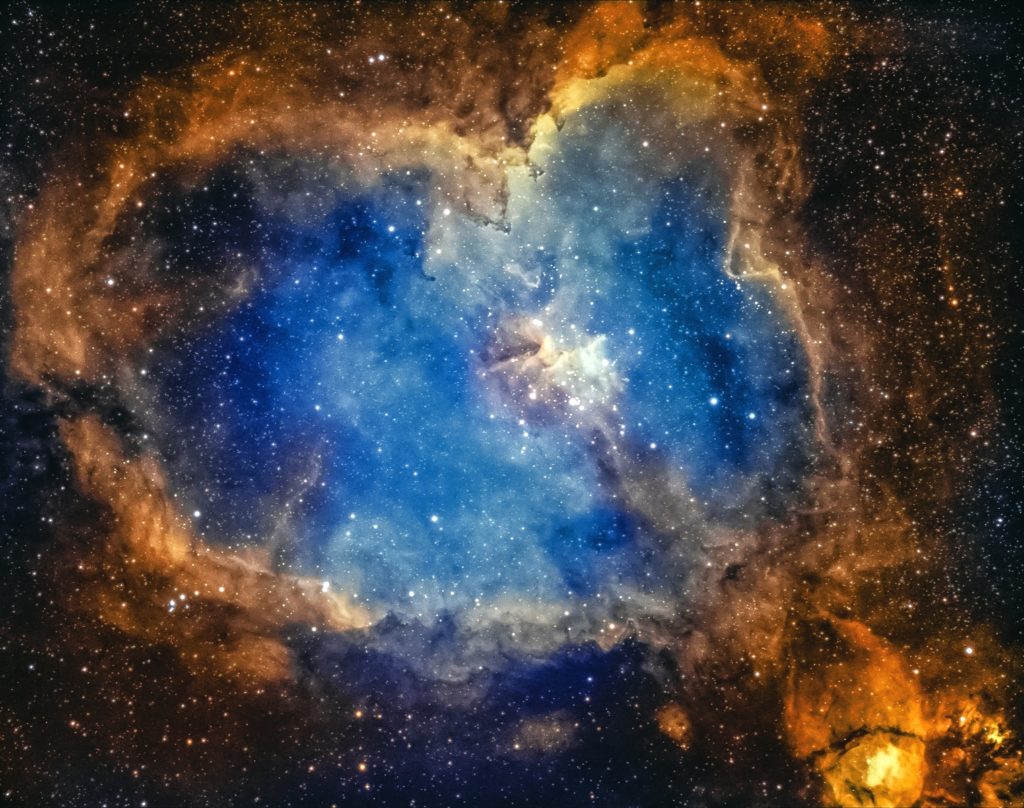
Deep-sky astrophotography is very different from planetary imaging. Deep-sky astrophotography is about capturing faint light from objects that are far beyond our own solar system, Often, hundreds, thousands, or sometimes even millions of light-years away. Herein lies the main challenge for deep-sky astrophotography; you’ll have to take multi-minute exposures of Deep Sky Objects like nebulas, star clusters, or galaxies to capture that faint and very old light from deep space. In order to do just that, you’ll not only need a high-quality camera to take long-exposure pictures but also other gear like a high-quality equatorial mount to track the movement of objects in the night sky due to the rotation of the earth. Again, in his video, I’ll stick to discussing cameras, but if you’re interested in the gear needed to start deep-sky astrophotography, please check out the “getting started” section on this website. Astrophotographers end up taking multiple pictures of the same object in space, which results in many hours or even days of data. In astrophotography, data refers to both the quantity and the exposure time of all the pictures you took of a single object in space. These images are then stacked and further processed to create a final image of a deep-sky object.
Camera specifications
Now that you know that deep-sky astrophotography is all about taking long exposure pictures and planetary imaging is all about taking short exposure pictures, you probably also understand that the specifications of a good camera are not the same for deep-sky astrophotography and planetary imaging. So let’s discuss which specifications to look for when either buying a planetary or a deep-sky astrophotography camera.
Resolution and Pixel Size
Let me try to explain as clearly as I can how resolution and pixel size play a role in astrophotography. But I have to warn you, this is going to take a while. Resolution refers to the size of the digital image the camera produces and is usually expressed in terms of the number of pixels a camera holds. The more pixels the sensor of your camera has, the larger the field of view you will be getting when imaging objects in space. This is nice because large deep space objects like the Andromeda galaxy will fit in the field of view of your camera. This is not the whole story though. The exact field of view you will be getting does not only depend on the resolution of your camera, but also on the pixel size of the camera, and the focal length of the telescope or lens you’re going to use when imaging the night sky. This is often referred to as the “imaging scale” and can be calculated by using the formula: (Pixel size / focal length) * 206.265. The imaging scale relates to the amount of sky you’re going to cover with each pixel of your camera sensor and this is often expressed in arcseconds per pixel.
OK, this sounds a bit abstract so let’s so let me try to point out how this works in practice. An arcsecond is equal to one 1/3600 of a degree. Do you remember that geo triangle from your math class? Do you see that first stripe indicating one degree? Divide that by 3600, that’s one arcsecond. Such an angle appears to be negligible, but let’s remind ourselves that space is HUUUUGE, and the field of view of a particular angle gets increasingly wider with distance. For example, the moon at roughly 384 thousand kilometers covers 2040 arcseconds in width and height. And one of the most popular and largest objects photographed by astrophotographers, the Andromeda galaxy at about 2 and a half Million lightyears from the earth covers an amazing 3 degrees in width and 1 degree in height, so that’s 10.800 by 3600 arcseconds. So, if your camera and telescope combination would exactly cover one arcsecond for each pixel, you’d need a sensor of at least 10800 by 3600 pixels to capture our neighboring galaxy in one picture without any room to spare. If your imaging scale is two arcseconds per pixel, you’d need a sensor of a least 5000 by 2000 pixels.
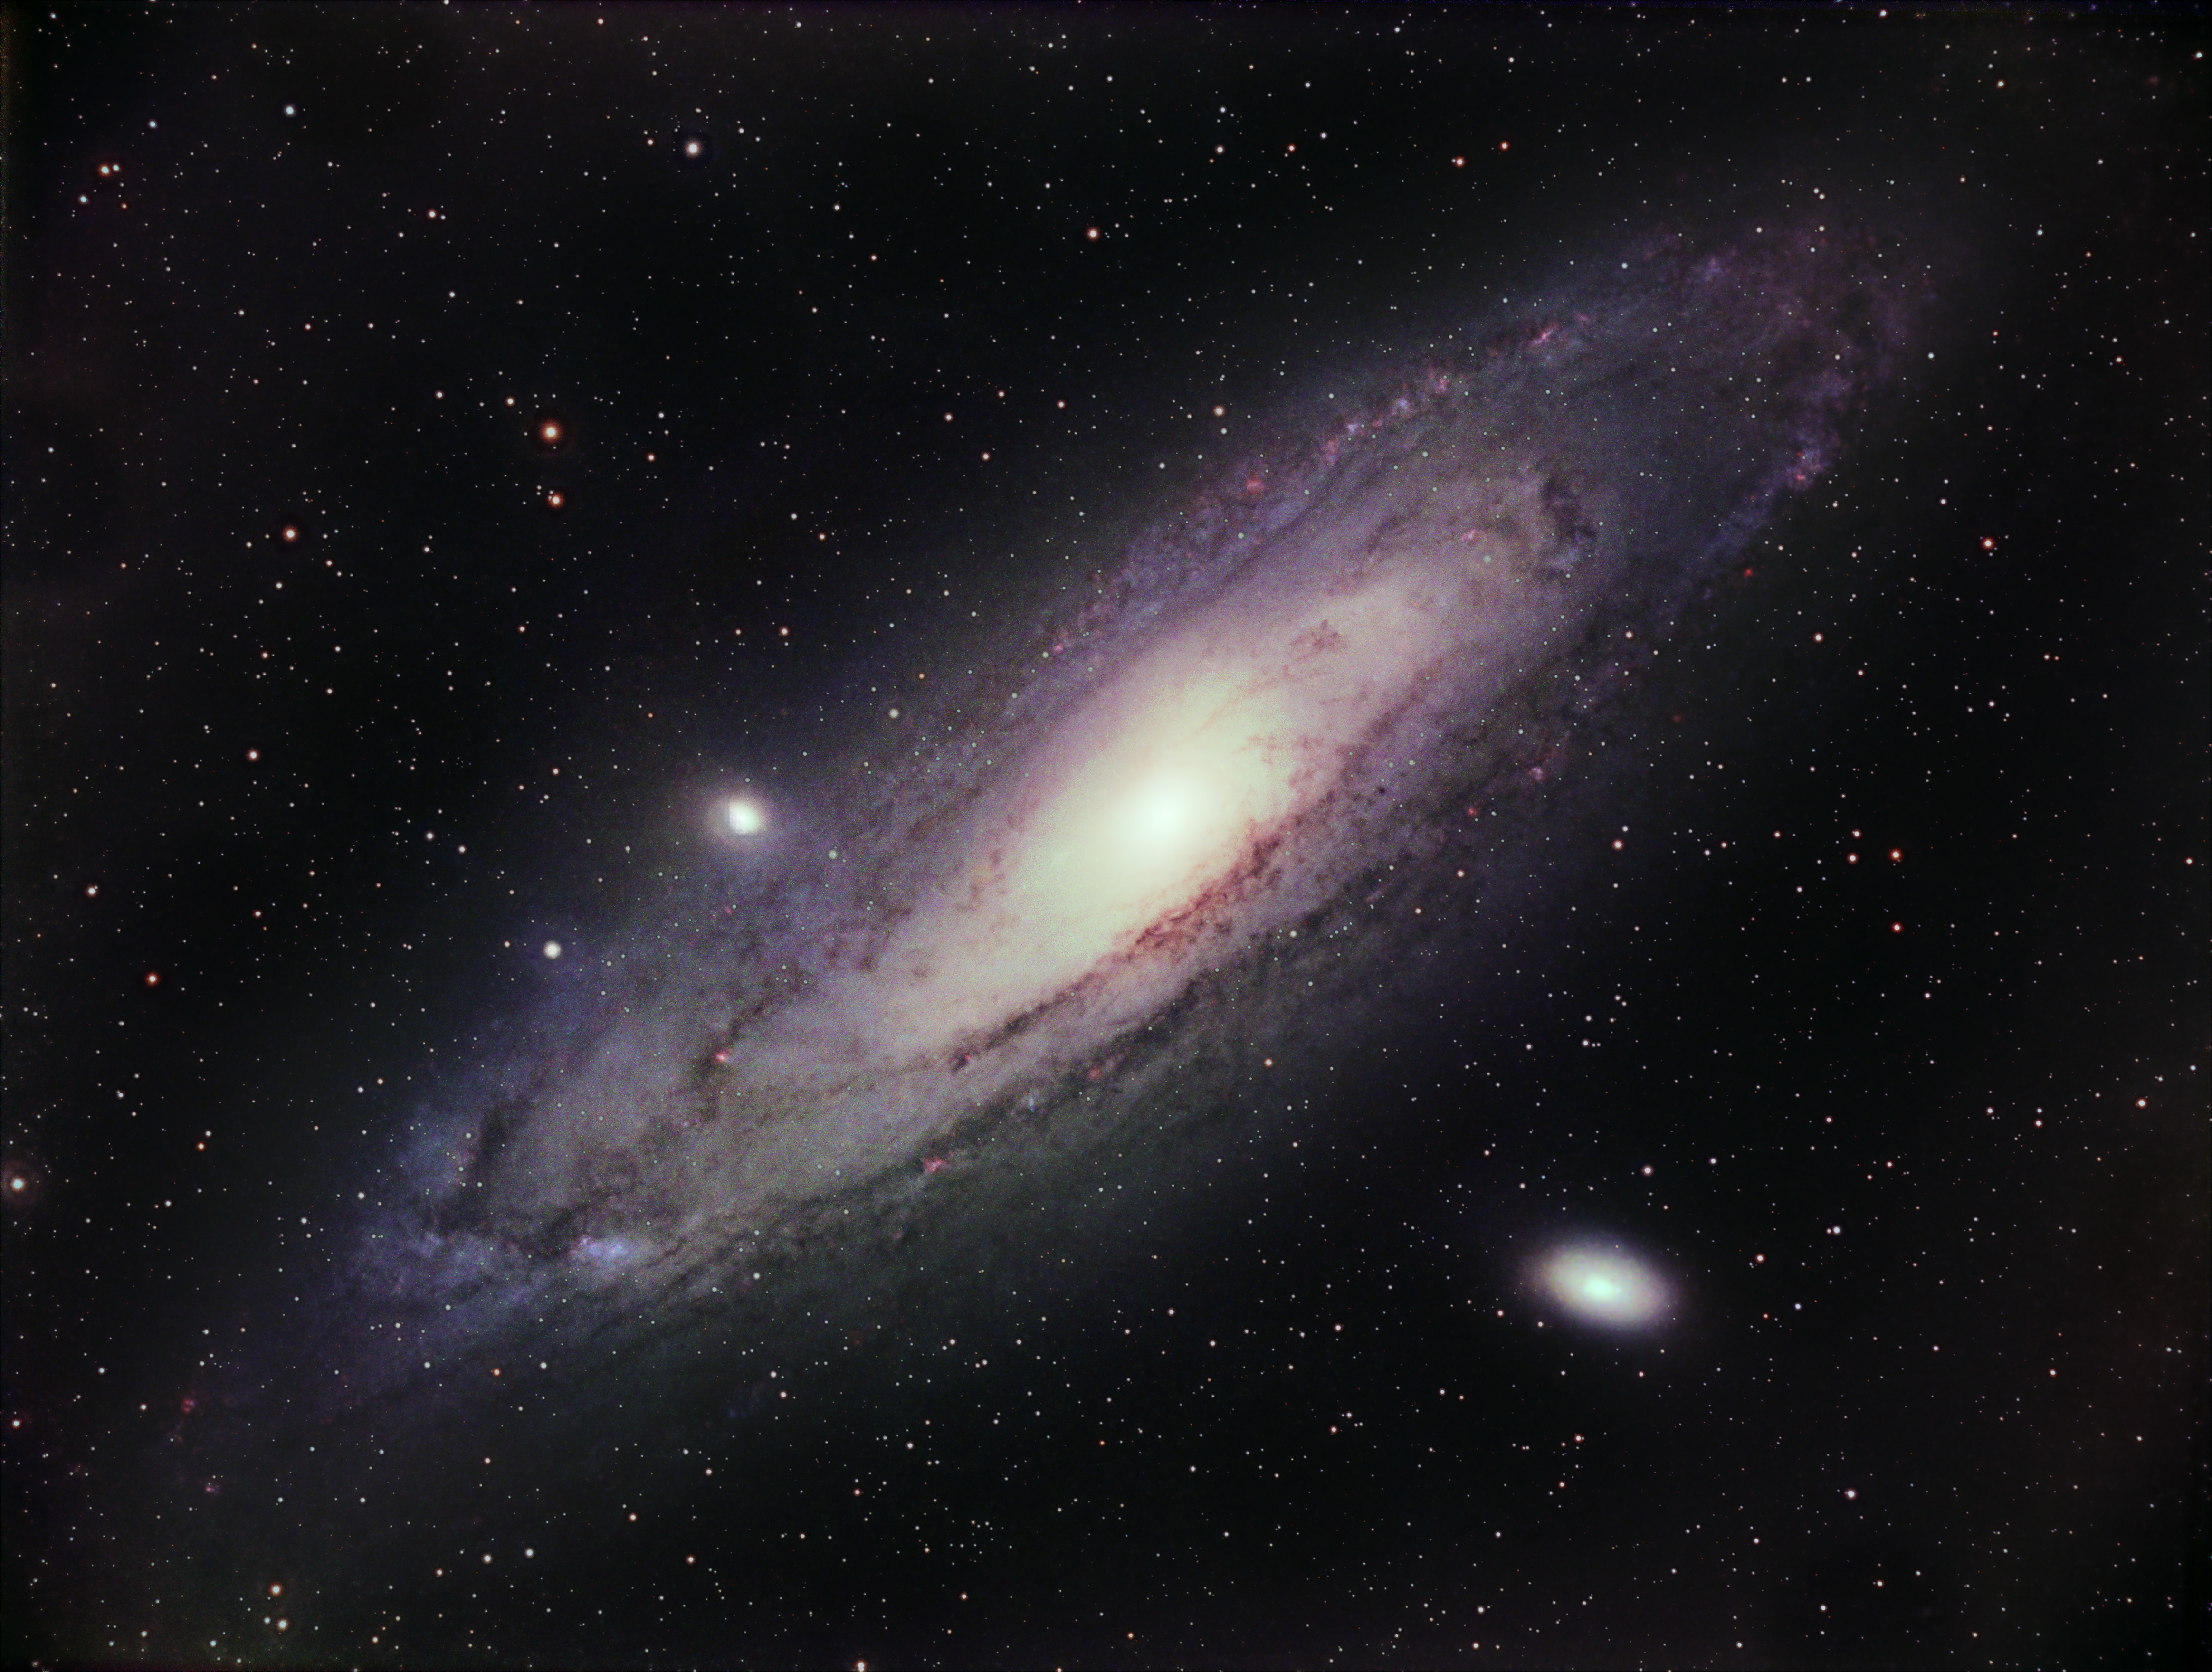
4656 x 3520 pixels (image scale = 1.63 arc seconds per pixel)
Are you still here? I hope so. If you are, let me also explain why an ideal imaging scale for deep-sky astrophotography is a camera and telescope combination is somewhere in between 1 to 2 arc seconds per pixel. An imaging scale higher than 2 arc-seconds per pixel will lead to what is called undersampling, whereas an imaging scale of less than one arcsecond per pixel leads to oversampling. This is easy to understand. Your camera consists of supertiny, square pixels. You need at least six or nine of those pixels to produce a round shape, like a star. Undersampling means that your imaging scale is such that most stars will cover only one to six pixels. you can’t produce a round shape with that amount of pixels, and stars will look rather blocky in your image. This is called undersampling. On the other hand, if your imaging scale is below one arc second per pixel, you often end up with big, bloated stars covering many pixels in your image. In addition, the astronomical seeing from most locations on earth is about 1 arc second or higher, due to atmospheric turbulence caused by turbulent airflows in the earth’s atmosphere. That’s why most professional telescopes are built on mountain tops; the less air, the better your astronomical seeing. There are some tricks to deal with oversampling like binning and drizzling to deal with undersampling, but it would be best to already take the imaging scale into account when searching for a camera.
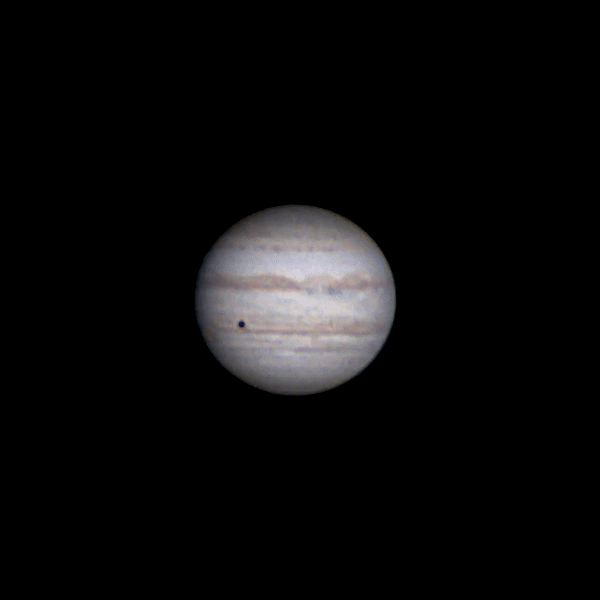
So let’s also discuss imaging scale in relation to planetary imaging as this works out quite differently. As already mentioned, the planets are tiny objects in the night sky. Now that you know more about imaging scale and arcseconds, let me tell you that the biggest planet in our solar system, Jupiter, only covers about 51 arcseconds when Jupiter is in opposition. In opposition means that a planet is at its closest point to Earth in its orbit around the Sun. Venus covers about 61 arcseconds as one of our neighboring planets when in opposition, Mars covers 25 arcseconds and Saturn 21 arcseconds at the best of times. You probably notice that I haven’t mentioned Neptune and Uranus yet. I suggest you google those planets with arcseconds added, and you’ll know why no amateur has come up with a decent picture of those planets. So, let’s assume that your imaging scale is 1 arcsecond per pixel. You don’t have to be Einstein to realize that Jupiter will only cover 51 pixels of your camera, Venus 61, Mars 25, and Saturn 21 pixels at the best of times! So what does that mean when talking about resolution and imaging scale? Well, it means that even a tiny one-megapixel camera sensor, which refers to a camera that has 1200 x 900 pixels, can easily capture these planets, or even when these planets are captured at an imaging scale of 1.4th or even 1/10th of an arcsecond per pixel, the planets would still fit in the field of view of a one-megapixel camera.
So, that is good news as a smaller sensor relates to a cheaper camera. Most experienced planetary photographers are indeed imaging at sub-arcsecond imaging scales with long focal length telescopes. So what about the astronomical seeing you could ask. Doesn’t the astronomical seeing limit the imaging scale when capturing planets? Well, yes, but planetary imagers argue that they can beat the general astronomical seeing conditions as they engage in something that is called lucky imaging. Often, astrophotographers take short videos of the planets at a high framerate per second or FPS. So let’s talk about that.
Frames Per Second (FPS) rate
Framerate per second, or FPS in short, is only important for planetary imaging. FPS refers to the number of images your camera can take for every second of video. In lots of Hollywood movies, a standard FPS of 24 frames per second is often used. There are exceptions, however, with some movies being shot as high as 120 FPS to get smooth slow-motion scenes. So what does FPS mean for planetary imaging? Quite simply, the higher your FPS, the more images per second you can take each second. For example, a camera with 25 FPS takes 1500 pictures in one minute, whereas a camera with 50 FPS takes 3000 frames per minute. Having twice as many frames increases your options to select and stack only the highest quality frames. If you get lucky and you have 10 seconds of good astronomical seeing during a one-minute video, an FPS of 50 will get you 500 high-quality frames of a planet, whereas an FPS of 100 will get you 1000 frames. Even if the astronomical seeing is stable during the entire video, more images are still preferred as you will be able to stack up to two times as many images to produce a final picture which increases your signal-to-noise ratio. Is there no limit to FPS speeds? yes, there is a limit to this as a shorter exposure time also relates to the need to increase the gain of the camera, which introduces more noise in your video. However, it is nicer to have a planetary camera with a high FPS which you can always slow down, as compared to having a camera with a lower FPS that cannot be increased. For deep-sky astrophotography, FPS is not important whatsoever, because you’re going to take long-exposure pictures of dim objects in deep space.
Cooling system
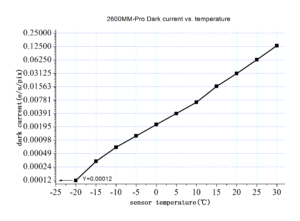
Most dedicated deep-sky astrophotography cameras have a cooling system designed to cool the camera down to below-freezing temperatures. The reason for this is that heat tends to build up in your CMOS sensor when taking long-exposure pictures of a deep-sky object. This build-up of heat results in dark current noise in your picture, where unwanted electrons are visible on your image that is independent of the light falling onto the sensor. A cooling system on your camera will keep the unwanted dark current noise to a minimum. Most camera cooling systems drop dark current in half for every 5 degrees they are cooled, so it makes sense to cool the camera sensor as much as possible. This is why most deep-sky astrocameras have thermoelectric coolers which can cool the camera sensor down to about -35 degrees below ambient temperature. I do have to note that cooling is not required for deep-sky astrophotography. Many people have a DSLR camera. Some tricks to avoid dark current noise without cooling are to dither between images and subtract dark frames that match the exposure time and temperature of your light frames. I will not go into the technical details of this, that’s for another video. In my honest opinion, it’s preferable to have a camera with a cooler for deep-sky astrophotography, as it keeps the dark current noise to a minimum which is always better than trying to get the noise out when it is already in your deep-sky pictures.
For planetary imaging, however, the benefits of a cooling system is negligible. Even though the camera sensor can become quite warm when taking videos at a high framerate per second, the exposures are so short that the dark current doesn’t have time to build up in each of the frames.
Mono versus color camera
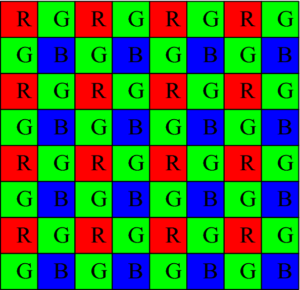
For both planetary and deep-sky astrophotography, selecting a mono or a color camera is a personal choice. Both have their pros and cons. The main advantage of a color camera is that your camera is able to produce a color image of the night sky without the additional complexity that goes into using a mono camera. So why do many experienced astrophotographers prefer a mono camera? I have a separate blog about this on my website, but it basically comes down to this. Every color camera has a Bayer matrix in front of the camera sensor. That Bayer matrix consists of supertiny filters in the colors red, green, and blue that are placed in front of every pixel. 50% of the Bayer matrix consists of green filters, whereas 25% of the filter consists of red and 25% consists of blue filters. This RGGB pattern as it is called is oversampling green and undersampling red and blue to mimic our human physiology as we are more sensitive to detecting green light, and we want our pictures to match what we see with the naked eye in real life. Unfortunately, when a photon in the red or blue part of the visible light spectrum hits a green filter, it will be rejected, and vice versa, if a green photon hits a blue or red filter, it will also be rejected. This is of no concern for daytime photography, but in astrophotography, we want to collect every precious ancient photon of light.
Shooting in mono has several advantages. First of all, as there is no Bayer filter, we can just shoot the night sky in black and white without using any filter which is called shooting luminance frames. The absence of a filter makes it so that most photons will be registered on the camera sensor regardless of their color, which creates a highly dynamic black and white picture of objects in space. Also, you can use Red, green, and blue broadband filters to collect light from those specific parts of the light spectrum, and combine them to create a natural-looking color image. Finally, you can also use specific narrowband filters to only catch a very specific part of the light spectrum that corresponds with ionized hydrogen or oxygen often found in nebulas that emit light at very specific bandwidths. The main disadvantage of monochrome imaging is that you do need additional filters and some device that holds your filters in front of the sensor of your mono camera, like a filter wheel. It also takes more time to collect the light using different filters and the process of creating a final picture from your images is also more complex. But in the end, you do get higher quality astrophotography pictures which is why folks are willing to spend the extra effort. This is true for deep-sky astrophotography as well as planetary imaging.
Read noise
Read noise refers to the noise of your camera’s electronics. As each pixel value is being read out, a few extra electrons are lost or gained randomly causing the readout value to vary a little bit from the actually captured signal. Read noise has the most impact on faint signals. As such, read noise is important for deep-sky astrophotography as we are trying to capture faint light from deep-sky objects. Unlike other noise sources, like dark current noise, read noise is independent of things like exposure time or cooling. This means you will get a similar amount of read-noise, whether have a short or long exposure time, or whether you use cooling or not. The best weapon against read-noise – as well as other types of noise – is to increase your exposure time. The noise increases only with the square root of the signal, so with longer exposure times, the weak photons from your deep-sky object have a higher chance to get above the noise of your camera. Other than increasing the exposure time, your best bet is to get a higher-quality camera that produces less read noise in the first place. Arguably, low read noise is more important for deep-sky astrophotography as the planets already have a strong signal as they are bright objects that are illuminated by our own sun.
Quantum Efficiency
Quantum efficiency refers to the effectivity with which your astrocamera can register and convert photons into a digital signal. If 20 photons of light fall on a single pixel of your camera sensor, in a perfect world, the readout for that pixel would be 20. QE is often expressed in percentages and QE graphs that show how effective a camera is at converting photons into electrons for different wavelengths of light. For example, if the average QE is only 50%, then the sensor only converts half of the photons that fall on the camera sensor to a digital signal. High-end sensors have a QE of around 90%, meaning that these cameras are much more sensitive and covert almost all photons into a digital signal. In general, a camera with a higher QE is better.
Analog to Digital Coverter and Full well depth
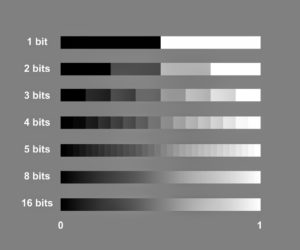
The dynamic range of your camera depends on the analog to digital converter or ADC in short. Let’s start simple with the lowest number of bits: 1 bit. This simply means that your camera is able to create two variations; 0=black, and 1=white. With every one-step increase in bit, the ability to produce variations from black to white increases by the power 2. So, a 2 bit ADC can produce 2×2=4 variations, a 4 bit ADC can produce 2x2x2x2 = 16 variations. The highest quality deep-sky astrophotography cameras are currently 16-bit cameras that can produce 16 to the power 2, is 65.535 variations from black to white. So the more bits your ADC has, the subtler variations in tonal values you can have. We call the large range of values in an image its dynamic range. More dynamic range is always better when processing your images.
Another aspect of dynamic range is the full well capacity of the pixels of your camera sensor. The full-well capacity is the largest charge a pixel can hold before saturation, which results in degradation of the signal. When the charge in a pixel exceeds the saturation level, the charge starts to fill adjacent pixels, a process known as blooming. The camera also starts to deviate from a linear response and hence compromises the quantitative performance of the camera. So the main takeaway from all this is that that a higher bit ADC and a higher full-well capacity will result in a higher dynamic range which is what you want in your astrophotography pictures.
In sum
So, this was quite a v/blog, I hope you are still here. Let me quickly give you an overview of what we discussed. First, I told you that planetary imaging is mainly about taking short exposure pictures, often in video format, of the planets in our solar system. Deep-sky astrophotography is mainly about taking long exposure pictures to catch the faint light from deep-sky objects that are outside of our solar system. For planetary imaging, even sensors with a low resolution are good enough to capture the planets as they are very tiny objects in the night sky. Also, a high framerate per second is preferred as it will get you more pictures of the planets, but a cooling system is not needed. For deep-sky astrophotography, you want a high-resolution camera with a cooler to keep the dark noise current to a minimum whereas FPS is not important at all, as you’re going to take long-exposure pictures of the night sky. For both types of imaging, a color camera is much easier to use, whereas a mono camera will ultimately produce higher quality images, and you generally want to look for a camera with low read noise, a high quantum efficiency, a high bit analog to digital converter, and a high full well capacity.
Clear skies!
Wido – AstroForum
Thanks for the tutorial. This is a complicated process for a beginner like me, but I appreciate how you make it manageable.