The Seestar S50 Smart Telescope is an impressive and budget-friendly choice for aspiring astrophotographers and beginners. Priced at just $499, the Seestar S50 offers a camera-equipped telescope on a tracking mount, enabling effortless observation and imaging of celestial wonders like the Sun, Moon, and Deep-Sky Objects through your smartphone or tablet. The Seestar APP provides wireless control and real-time weather updates, lunar phases, rise/set times, and optimal viewing suggestions for your location. Say goodbye to sky-hunting; the Seestar S50 Smart Telescope employs intelligent features like platesolving for automatic object detection and tracking. It caters to both novices and advanced users, supporting jpg, mp4, AVI RAW, and TIFF formats for versatile processing. If you’re looking for an affordble, user-friendly, lightweight smart astrophotography experience, this may be it!
ZWO provided me with an early model of the Seestar S50 Smart Telescope for thorough testing. In this review, we will explore the setup process of the SEESTAR S50 APP, discuss capturing celestial objects such as the Sun, Moon, and Deep Sky Objects using this telescope, and examine the additional features available in the SEESTAR APP, including the virtual sky atlas and the community space for Seestar users. Let’s begin!
10 Years in the Making: The Seestar S50 Smart Telescope
To understand the roots of the Seestar S50 smart telescope, let’s take a quick look at ZWO’s journey in the astroproducts arena. Around ten years ago, ZWO began crafting CMOS sensor cameras specifically designed for planetary and deep-sky astrophotography. My personal connection with ZWO began in 2017 when I acquired my first deep-sky astrocamera, the ASI1600MM Pro, which I quickly grew fond of. This camera not only secured my first NASA Astronomy Picture of the Day award, but also earned me some local recognition with my pictures featuring in well-regarded Dutch astronomy magazines like Zenit. Over time, ZWO expanded beyond astro-cameras, diversifying into a comprehensive range of astroproducts, spanning telescope mounts, auto focusers, filters, filter wheels, guidescopes, and more. They also pioneered devices like the ASIAIR, enabling wireless connectivity and control of these astroproducts through a dedicated app on your smartphone or tablet. This marked a significant departure from older astroproducts reliant on antiquated hand controllers or lengthy USB cables tethered to Windows-based PCs or laptops. With the Seestar S50 smart telescope, ZWO set out to combine their smart technology and astroproducts into an affordable telescope, offering newcomers easy and affordable access to astrophotography. Did they achieve their mission? Let’s explore further to find out!
Seestar S50 Smart Telescope Specs: A closer look
The Seestar S50 boasts a 50mm triplet apochromatic refractor design with a 250mm focal length, yielding an f/ratio of f/5. Its top-tier optics promise crisp night sky imagery. Equipped with an integrated Sony IMX462 camera sensor boasting 2 Megapixels (1936×1096 pixels) and 2.9-micrometer pixels, this combination affords a 1.3° x 0.7° view at a pixel scale of 2.39 arcseconds per pixel. For reference, the full moon and the sun, each about half a degree in size, fit comfortably within its field of view.
Weighing a mere 3 kg (6.6 pounds) and standing at a compact 14x13x25cm (5.5×5.1×9.8 inch), the Seestar S50 offers portability and convenience. Its battery lasts approximately 6 hours and recharges via a regular USB-C cable. The telescope captures images in jpeg and TIFF formats and record videos in MP4 or AVI formats. The telecope seamlessly connects to your smartphone or tablet via WiFi within a 5-meter range. The telescope arrives in an elegantly designed telescope case, complete with a compact tripod, solar filter, and USB-C cable. Additionally, it is equipped with an alt-az mount. But let’s not delay any further – it’s time to put the Seestar S50 to the test.
Setting Up the Seestar S50 APP: A Step-by-Step Guide
To control my Seestar S50 with my smartphone, I had to follow a few steps to set up the Seestar APP. Let me walk you through the process, so you’ll know what to expect.
- Download the Seestar APP: You can find and download the Seestar APP from the Play Store, App Store, or directly from the ZWO website. It’s important to note that ZWO is still working on the software for the Seestar S50, and during my testing, I used version 1.7.1.
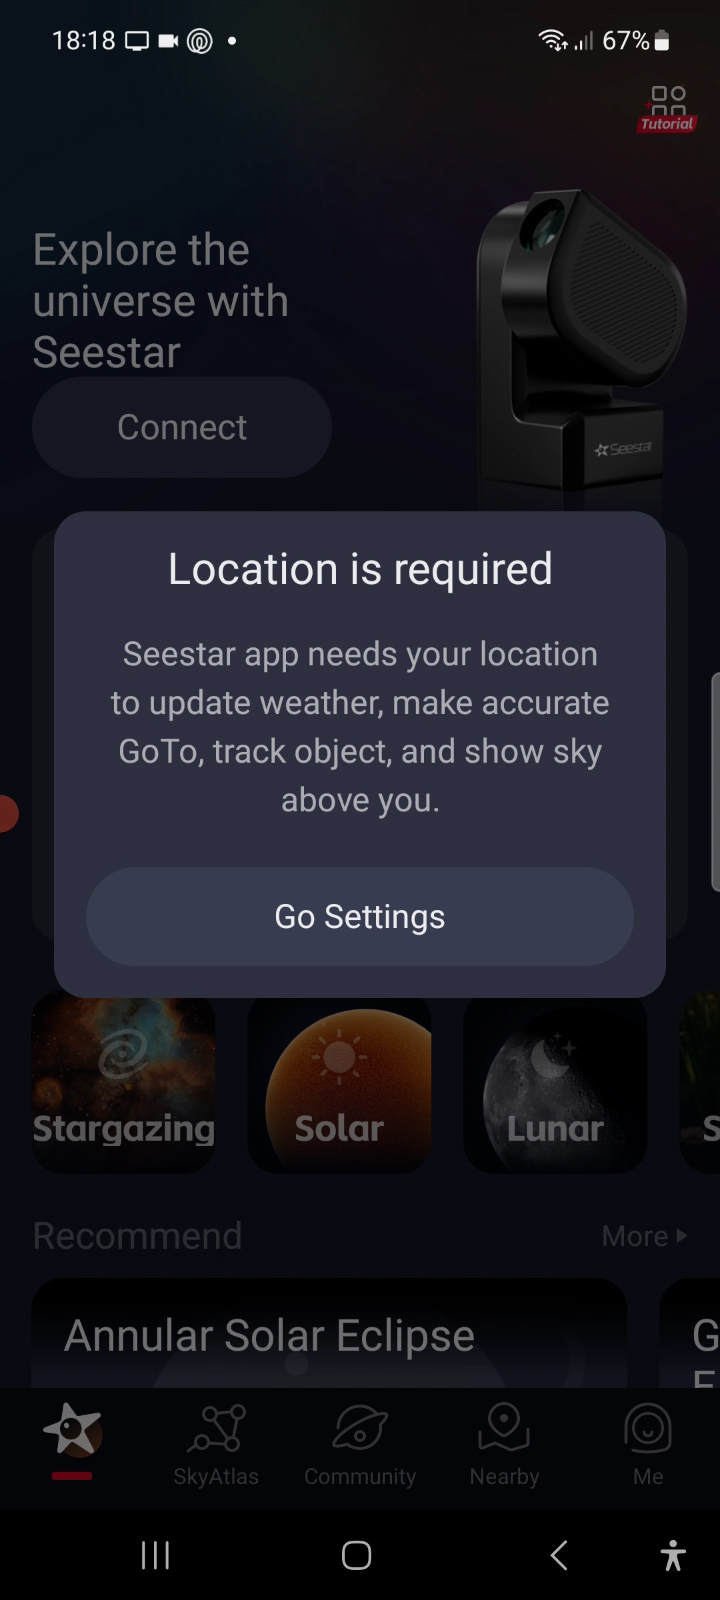
- Initial Setup: When I opened the APP for the first time, it gave me some basic information about protecting my personal information. Then, it requested permission to access my location. This helps provide accurate weather updates and information about the night sky. It’s also necessary for the Seestar to find and track objects in the sky accurately.
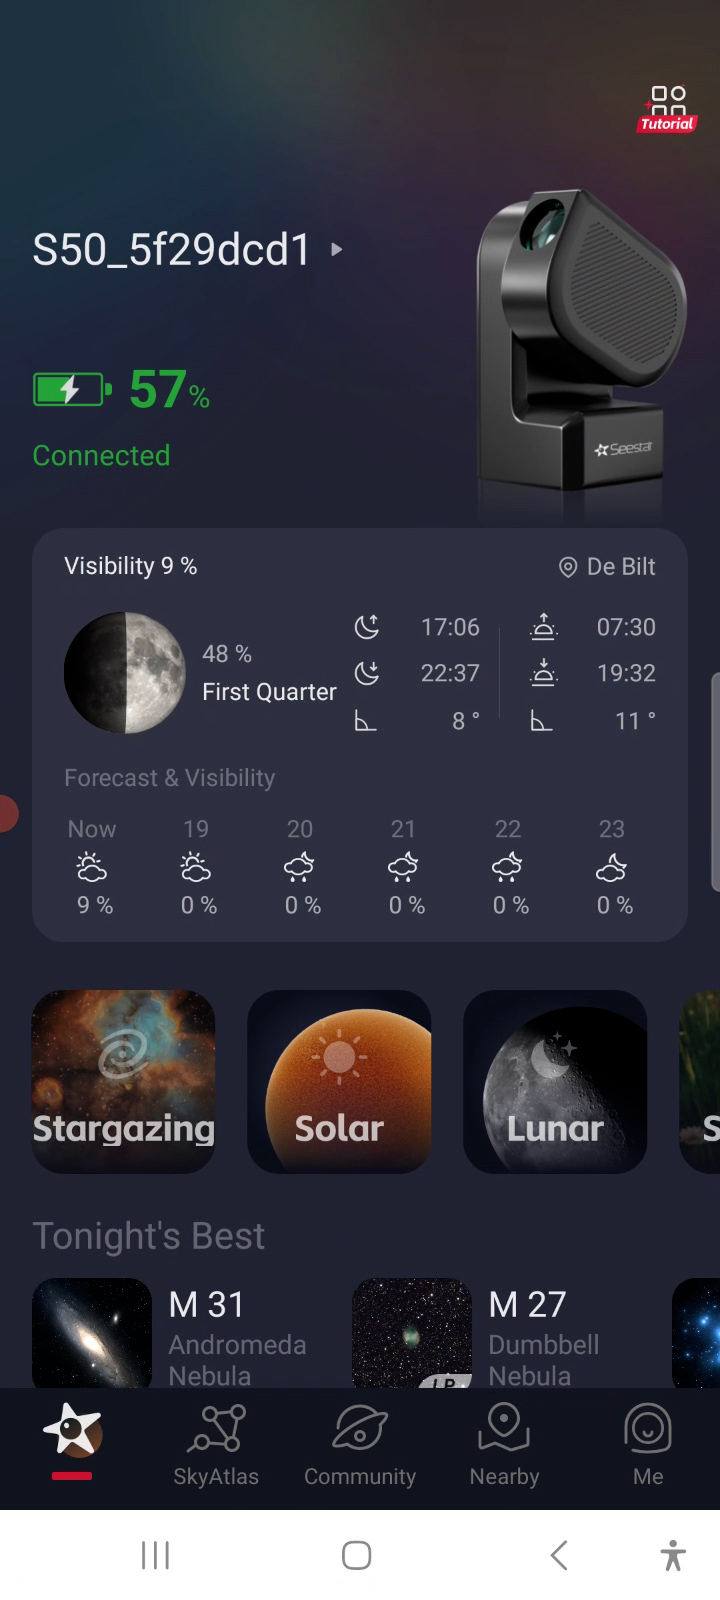
- Weather and Sky Information: After granting permission, the APP displayed a precise weather forecast, the current moon phase, and the times for sunrise and sunset, which was quite useful.
- Connection Permissions: Next, I needed to allow the APP to establish a Wi-Fi connection between my smartphone and the Seestar S50. This enables the telescope to use location information effectively.
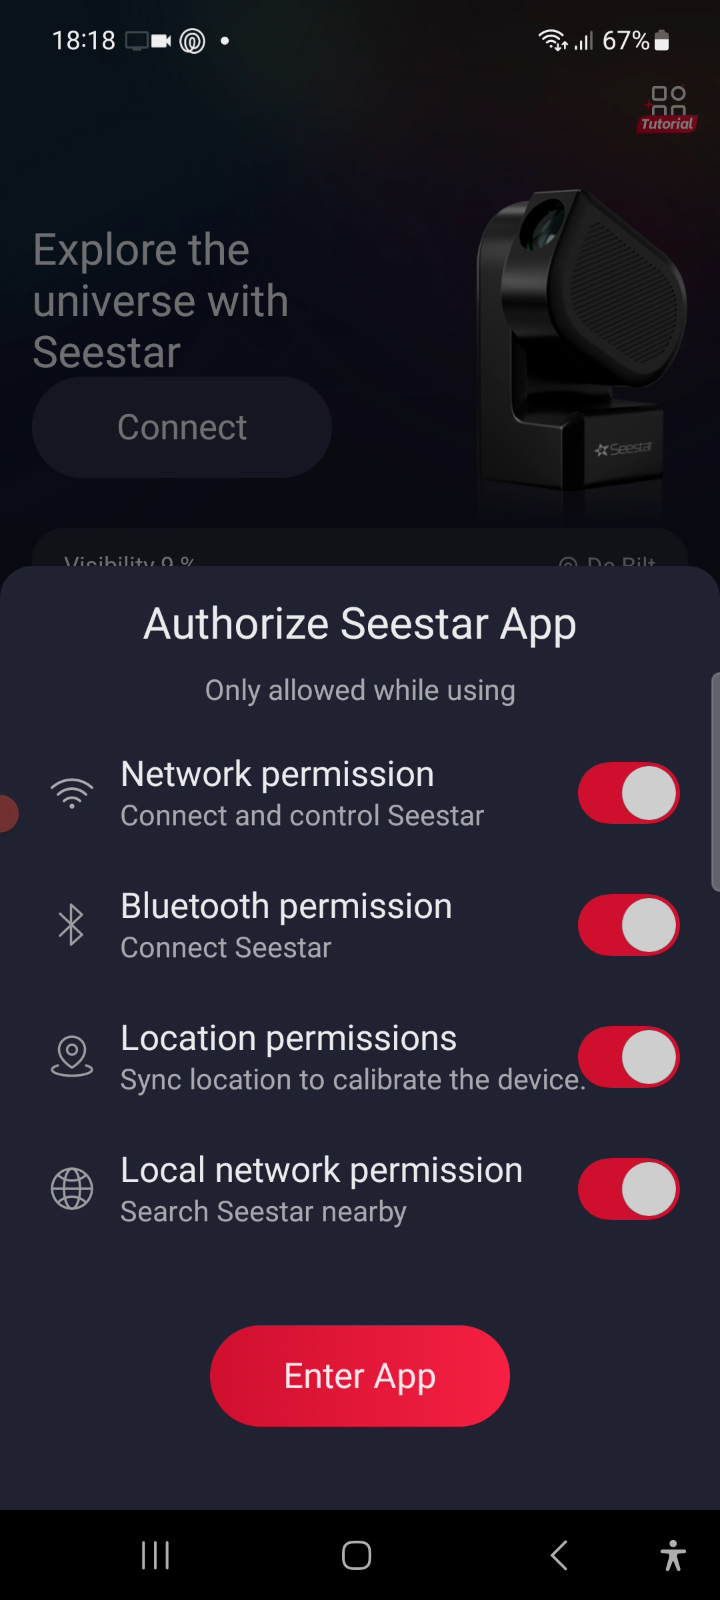
- Additional Permissions: I encountered another authorization screen requesting permissions for Bluetooth, Wi-Fi, location, and network access to connect to and control the Seestar S50.
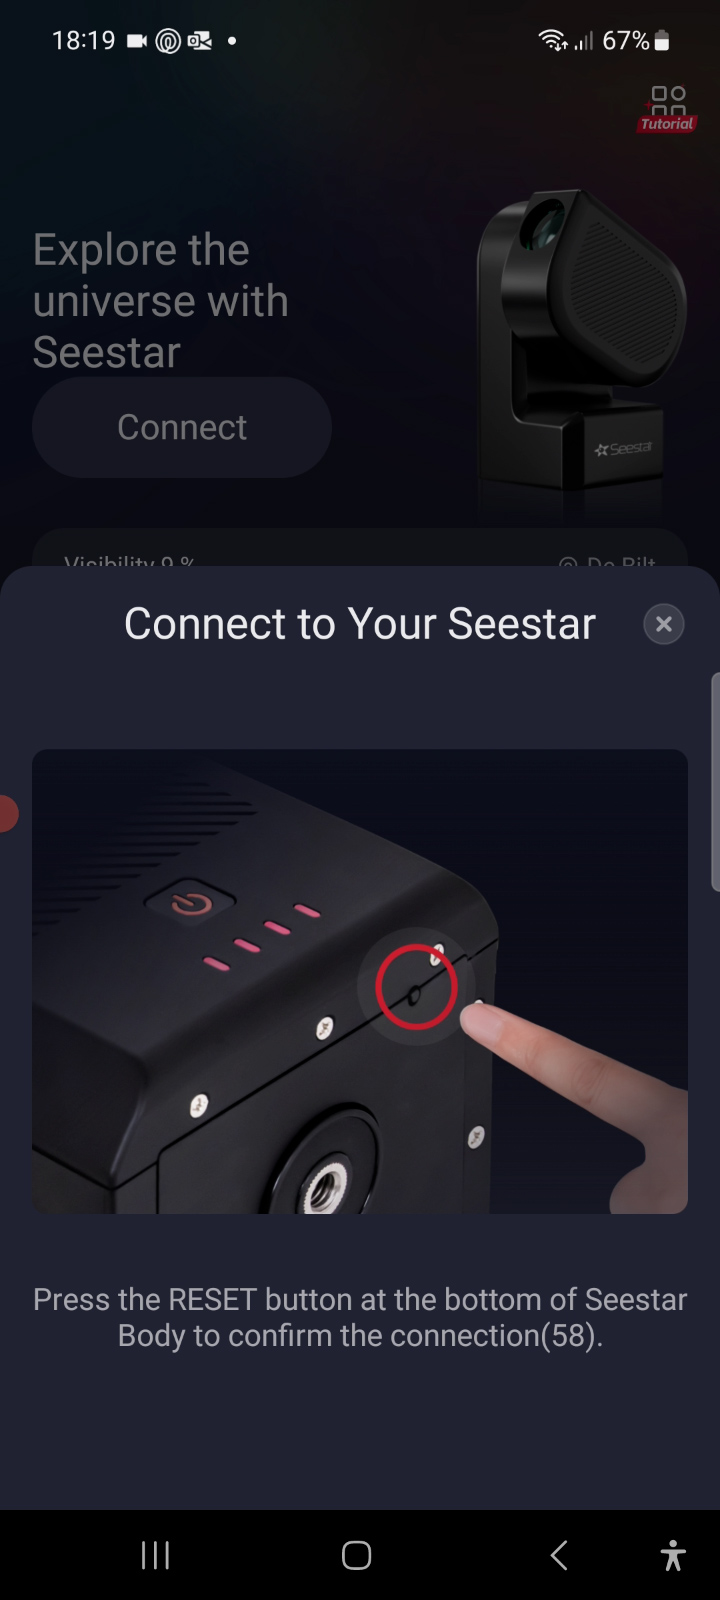
- Connecting to Seestar S50: After accepting these permissions, I saw the Seestar S50’s Wi-Fi signal, which began with “S50” followed by a combination of letters and numbers. Clicking “connect” prompted me to press the reset button on the Seestar S50 to confirm the connection.
- Activation: At this point, the Seestar activated for its first use. It switched from speaking Chinese to English.
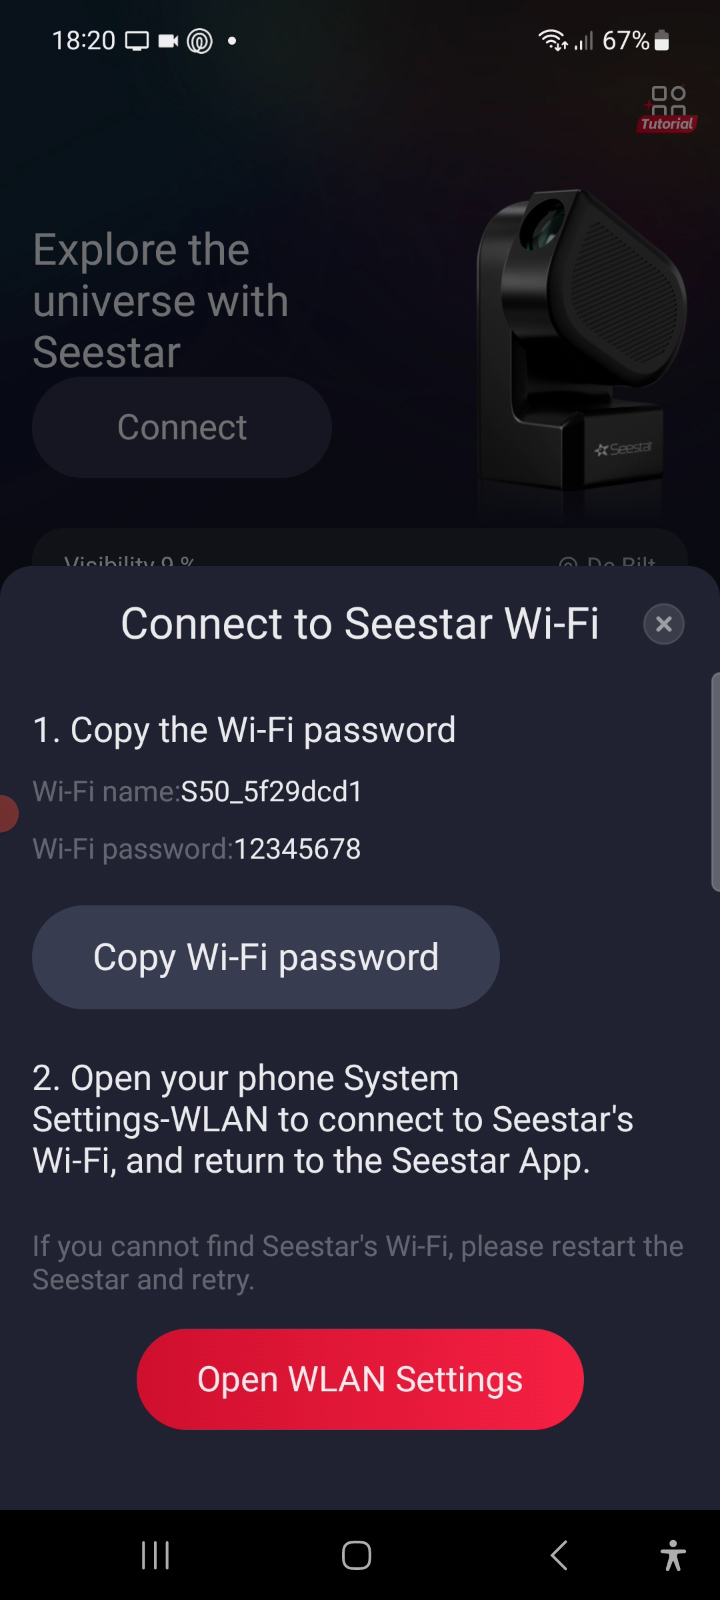
- Wi-Fi Setup: The APP displayed a default Wi-Fi name and password, which is “12345678.” It asked me to switch from my home Wi-Fi to the S50’s Wi-Fi signal. I connected my smartphone to the S50’s Wi-Fi signal using the provided password.
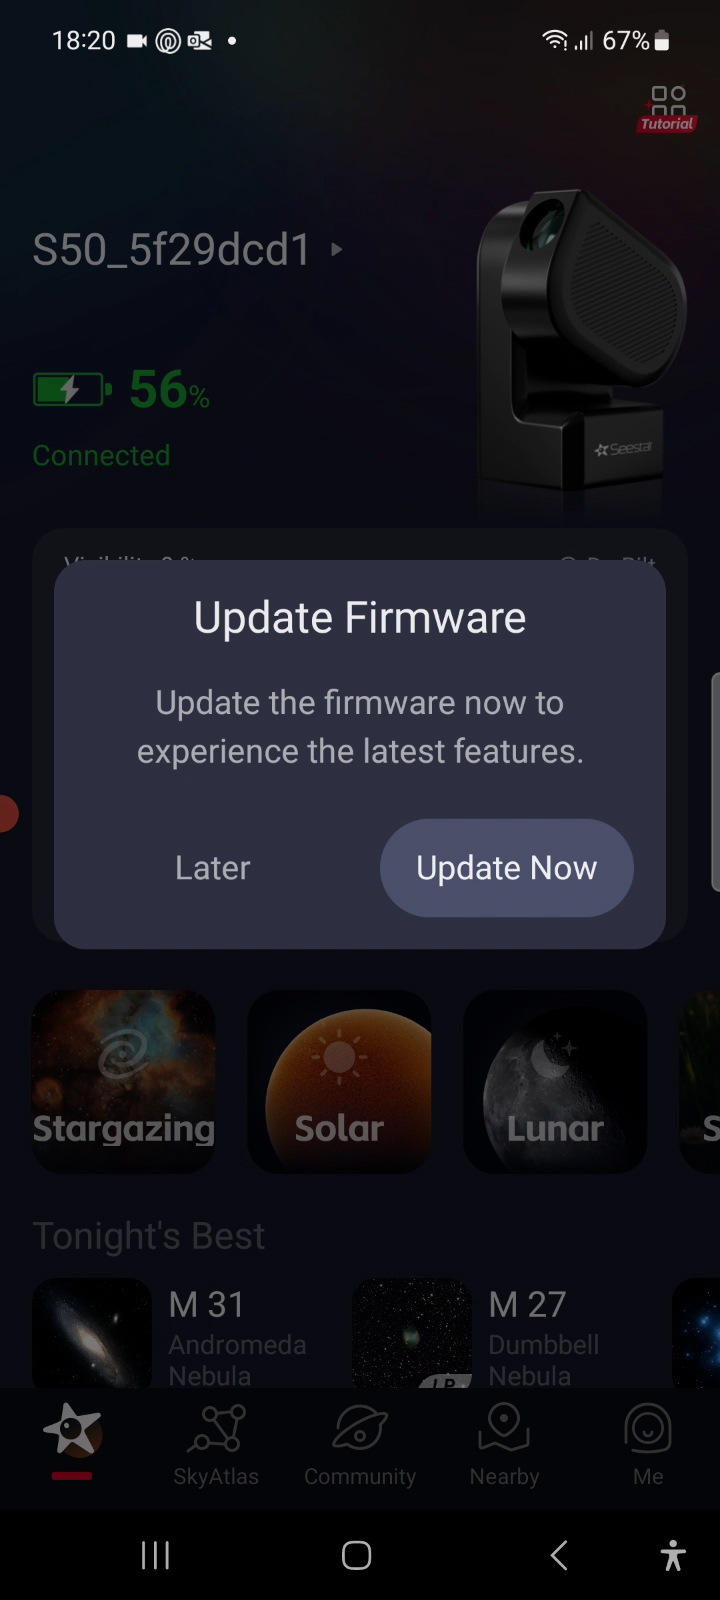
- Firmware Update: The APP prompted me to download the latest firmware for the Seestar. It also informed me that a solid yellow light indicated that the Seestar had been updated to the latest version. After the update, I clicked “OK” and reconnected to the S50’s Wi-Fi signal.
That’s the entire procedure for setting up the APP. Afterward, all that was left to do was turn on the Seestar and connect to its Wi-Fi signal to control the telescope.
My first Solar Imaging Adventure with the Seestar S50 Smart Telescope
I climbed up to the rooftop of my house, determined to secure an unobstructed view of the sky with the compact tripod. Once there, I opened the Seestar APP and connected it to the telescope via Wi-Fi. In the APP, I selected “solar” as one of the four telescope modes available, with the others being lunar, stargazing, and scenery. As I eagerly anticipated capturing the Sun, an unexpected cloud drifted in front of it, right when the telescope was attempting to locate it. Because of this, this first attempt to automatically find the Sun ended in failure.
Virtual touch-based controls
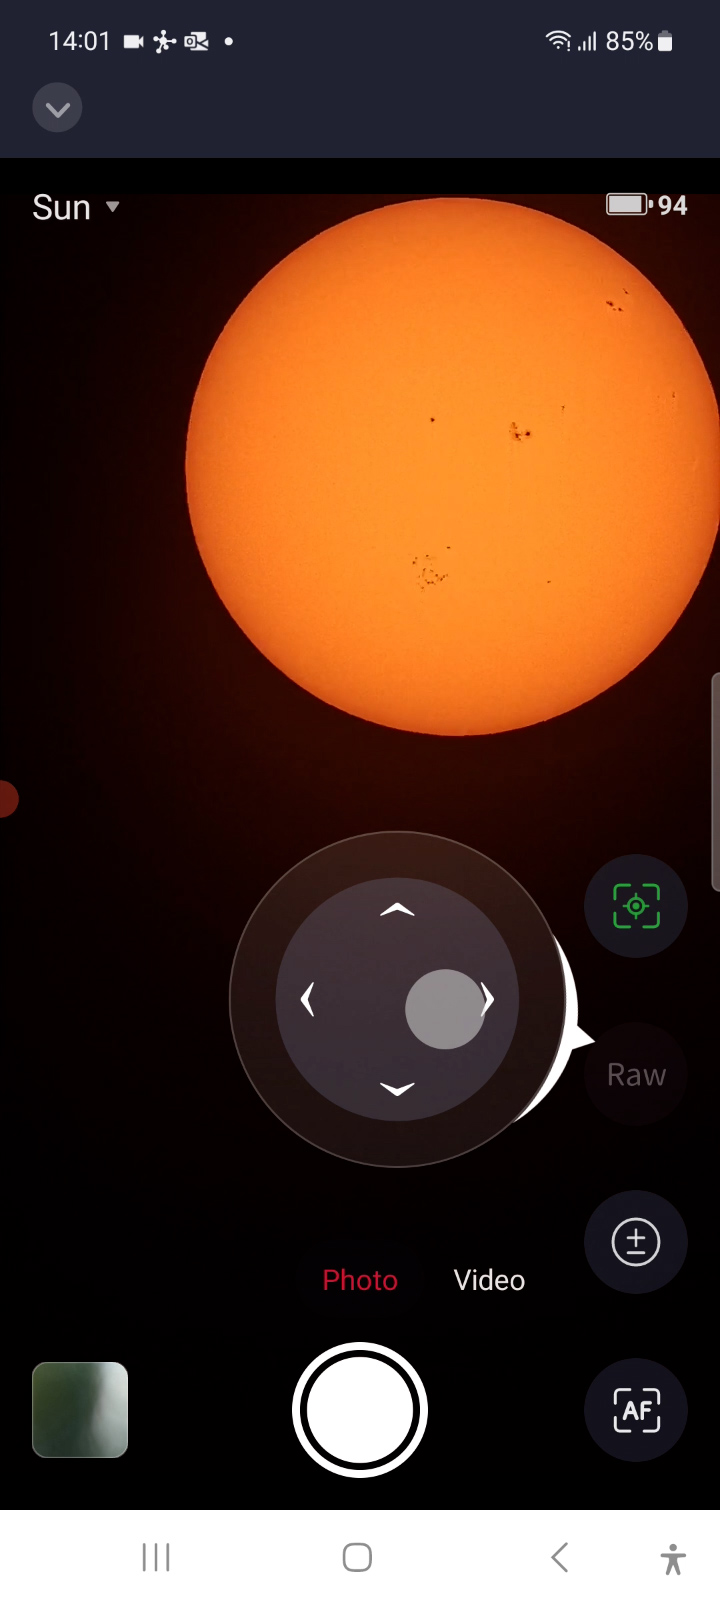
However, I decided to take this opportunity to explore the virtual touch-based controls, accessed by tapping on a gray circle that appeared slightly below the center of my smartphone screen. This control displayed arrows for moving the telescope up, down, left, and right. The further I dragged my finger towards the edge, the faster the telescope moved. While it didn’t take long to spot the Sun, aligning it precisely in the smartphone frame proved challenging. Controlling both speed and direction with a single touch-based control felt a bit tricky. My suggestion to ZWO would be to separate the telescope’s speed control from the direction, allowing users to first set the slew speed and then fine-tune the direction. I also discovered that simply swiping across my smartphone screen in any direction caused the telescope to move. That was another option for precise adjustments.
Zoom and Autofocus
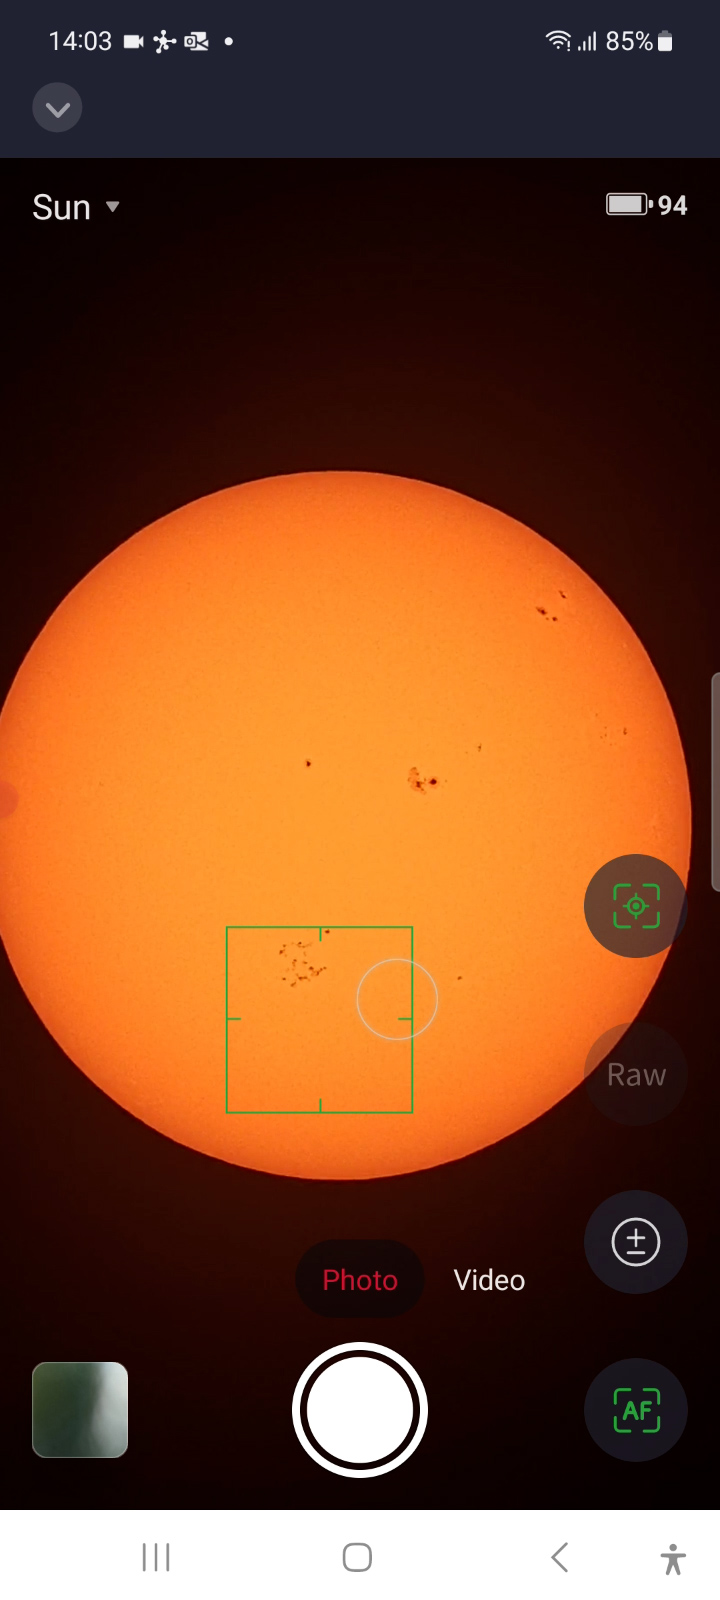
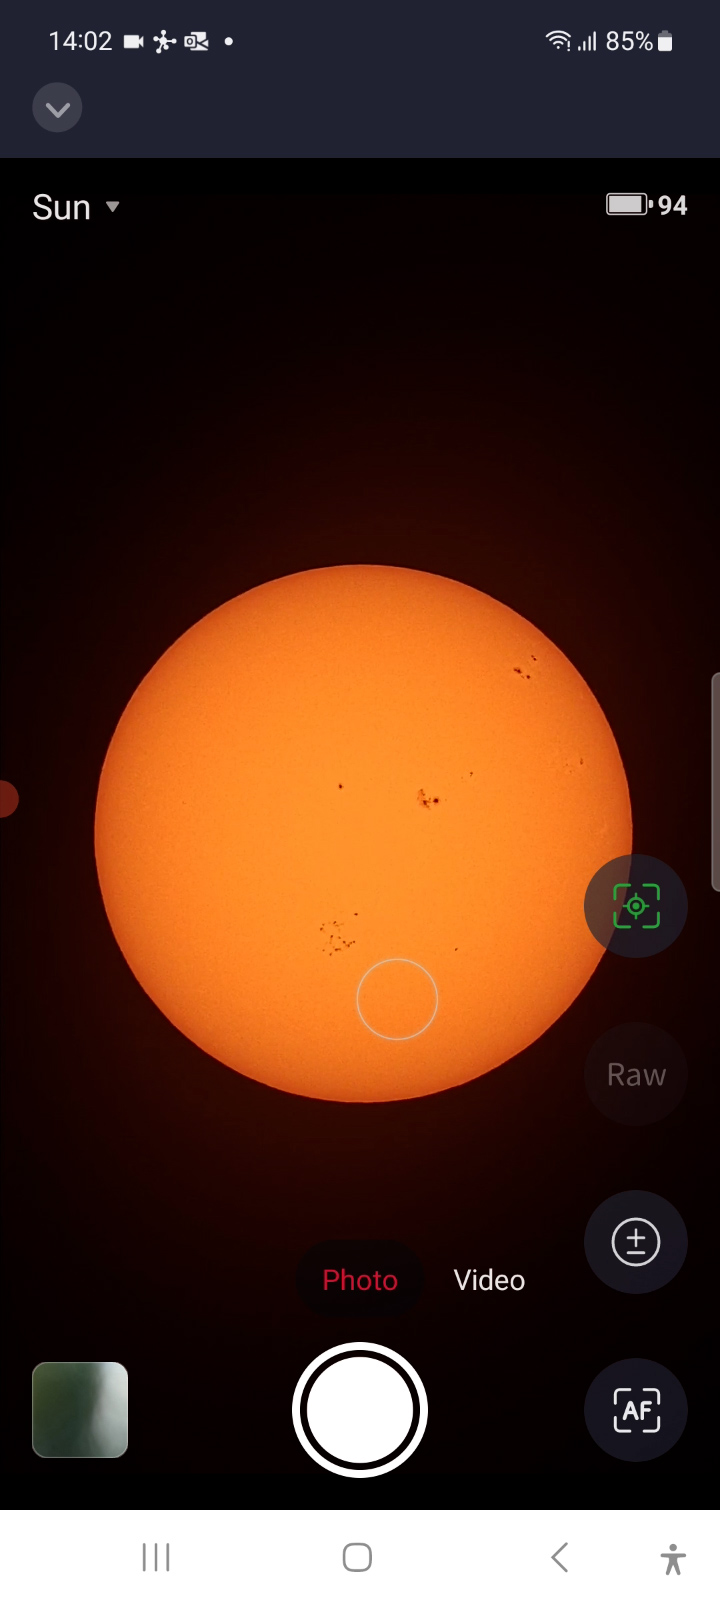
I decided to exit the solar mode and start anew. This time, the Sun shone brightly without a cloud in sight, and the Seestar S50 flawlessly centered it on my smartphone screen. After confirming that the Sun was indeed centered, the telescope automatically initiated tracking, as indicated by the crosshair icon on the right of the smartphone screen. Next, I learned that I could zoom in and out by pinching the smartphone screen. Placing two fingers on the screen and spreading them apart zoomed in, while bringing them together zoomed out. Although the Sun appeared to be in sharp focus, I wanted to ensure absolute clarity. I tapped on the autofocus icon at the bottom right of my smartphone screen. A green rectangle appeared, and the Seestar S50 automatically refocused on the Sun, delivering perfect clarity.
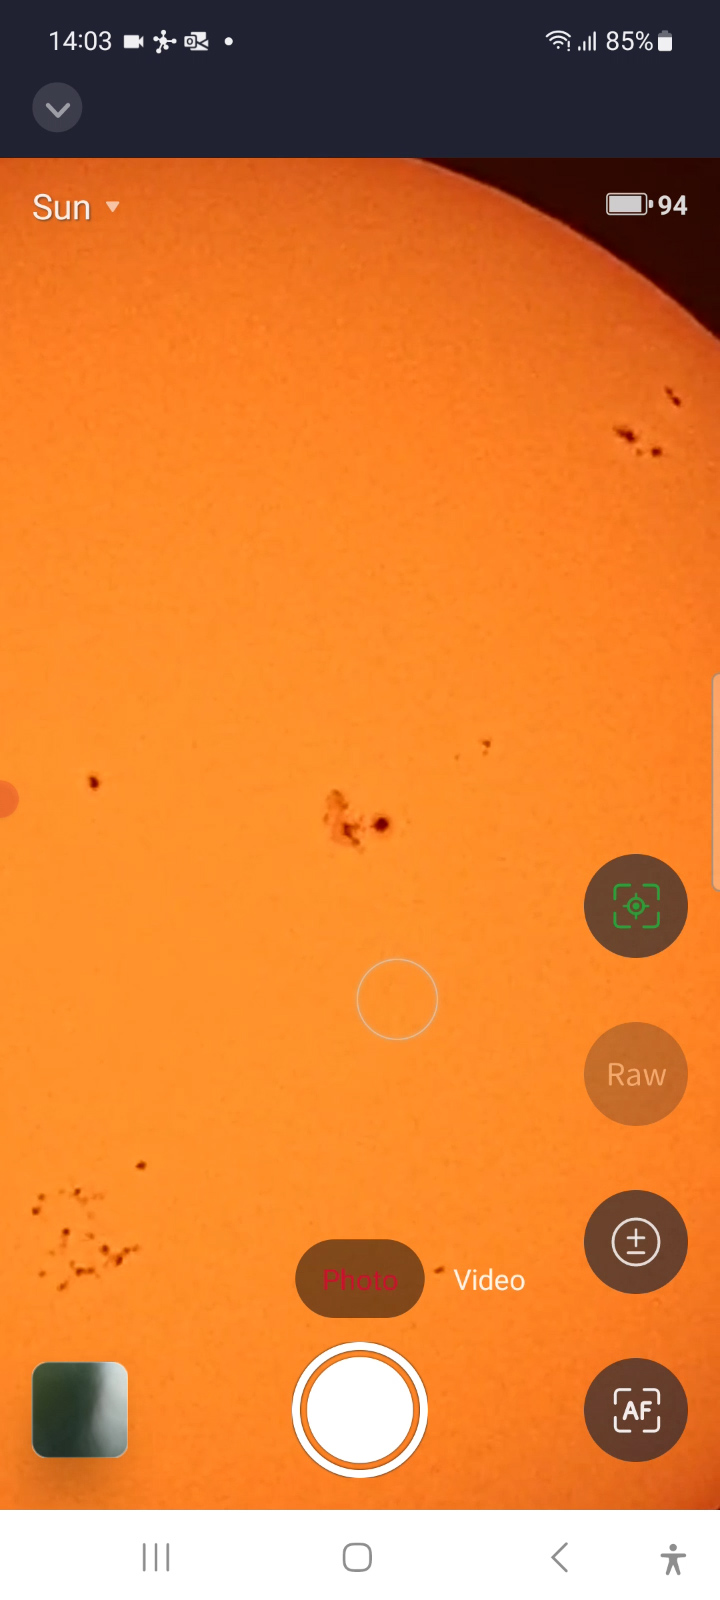
Taking photos and videos with the Seestar S50
With the Sun centered, in focus, and tracking, I selected video mode at the bottom of the smartphone screen to record a one-minute video. Initially, I began recording without selecting RAW, resulting in an MP4 format video. The quality pleased me, especially given the abundance of sunspots on the Sun, a testament to the approaching solar maximum in 2024. It’s a prime time for solar observation. Each one-minute video contained around 700 frames, indicating a recording rate of approximately 12 frames per second. The MP4 file size was about 70MB, and downloaded directly to my smartphone. The photo mode is perfect for snapping images, saving them as JPG files on your smartphone. JPG and MP4 files are ideal for those content with live views and eager to share them instantly. These files end up on your smartphone, ready for quick sharing with family and friends, bypassing the need for time-consuming processing.
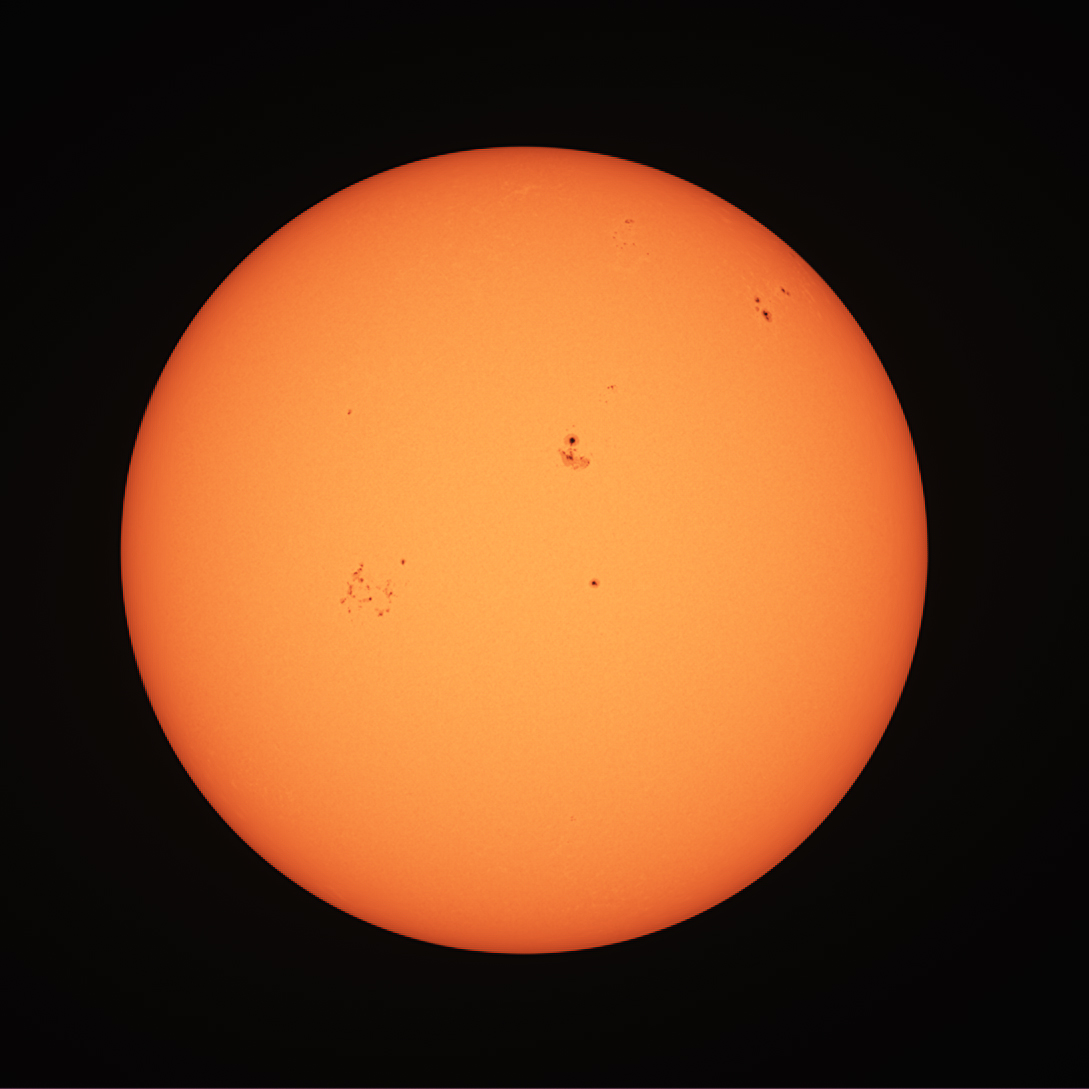
After completing an MP4 video, I opted for another one-minute video in RAW format. By clicking on the RAW icon in the APP, it turned green. RAW videos are recorded in AVI format and stored on the Seestar S50’s EMMC storage card in a folder named “myworks.” To retrieve these files, a simple USB-C connection to a laptop or PC is all that’s required. These AVI videos offer significantly higher quality, with my one-minute video occupying a 1.4GB file. RAW videos are captured in grayscale, intended for those eager to undertake advanced video processing to produce a sharp, stacked final image of the Sun or the Moon. I used Autostakkert to debayer the video, select and stack the highest quality frames (about 90%), and further enhance the image in Registax. I was pleased with the resulting image that clearly shows the full disc of the Sun and its sunspots.
Capturing the Moon with the Seestar S50 Smart Telescope
As evening descended, the moon became a prominent presence in the sky, and the Seestar app informed me it was a 71% waxing gibbous moon. With anticipation building, I repositioned the tripod to align with the moon’s position and fired up the Seestar APP.
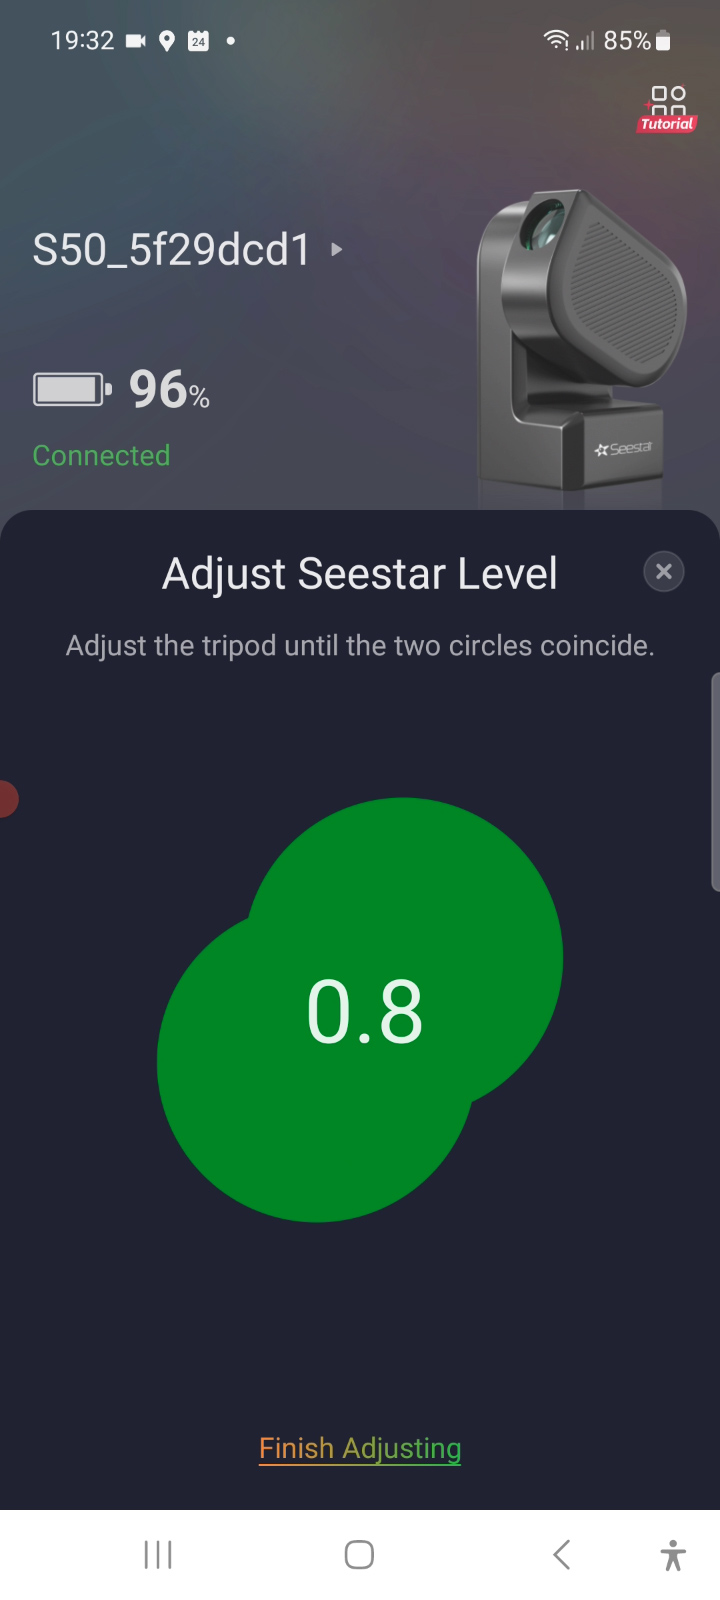
Leveling the Seestar S50 Smart Telescope
Interestingly, upon adjusting the tripod’s position, the Seestar APP flagged that the telescope was no longer perfectly level. The APP displayed two circles with a numerical degree value, and I tweaked the tripod’s legs until the circles overlapped sufficiently, indicating a deviation of less than 1 degree. Leveling the telescope is crucial for accurate object finding and tracking in the night sky.
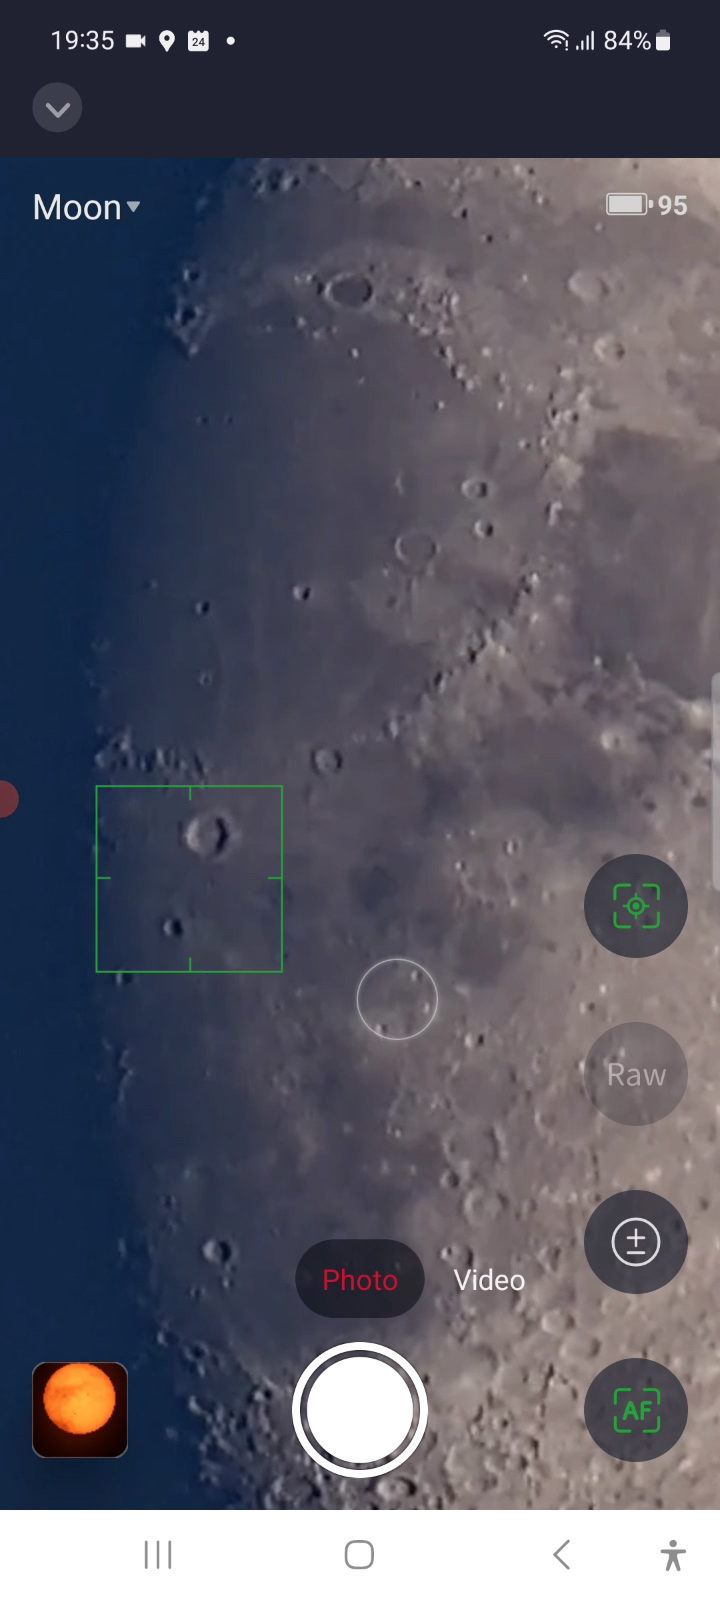
Locating and Auto-Focusing on the Moon with Ease
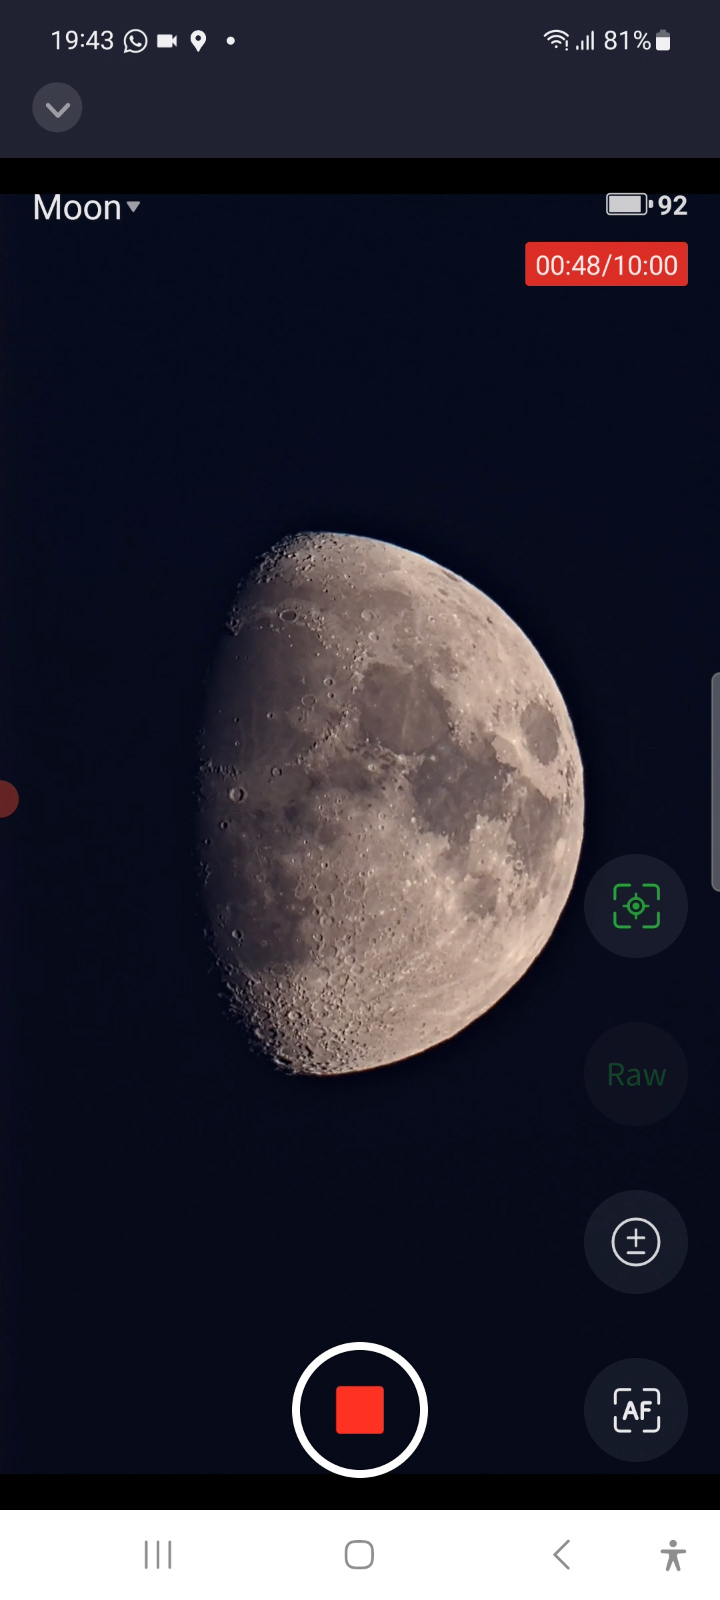
With the leveling done, I selected lunar mode in the APP. The Seestar S50 embarked on an automatic quest to locate the moon in the evening sky. However, the initial attempt proved unsuccessful, likely because the stars had not yet emerged in the night sky. Later attempts under dark skies worked flawlessly. I employed the touch-based virtual controls once more to manually find and center the moon on my smartphone screen. The lunar mode offered the same options as the solar mode, as mentioned above. Once the moon was centered, I used a pinch gesture on my smartphone screen to zoom in and confirm that it was in focus. It appeared to be, but for an added layer of assurance, I utilized the autofocus option again, which worked flawlessly. One feature I almost overlooked is the ability to adjust the exposure time using the +/- icon available on the right of the screen. The default settings are so effective, that I wouldn’t recommend altering them when photographing the moon or the sun.
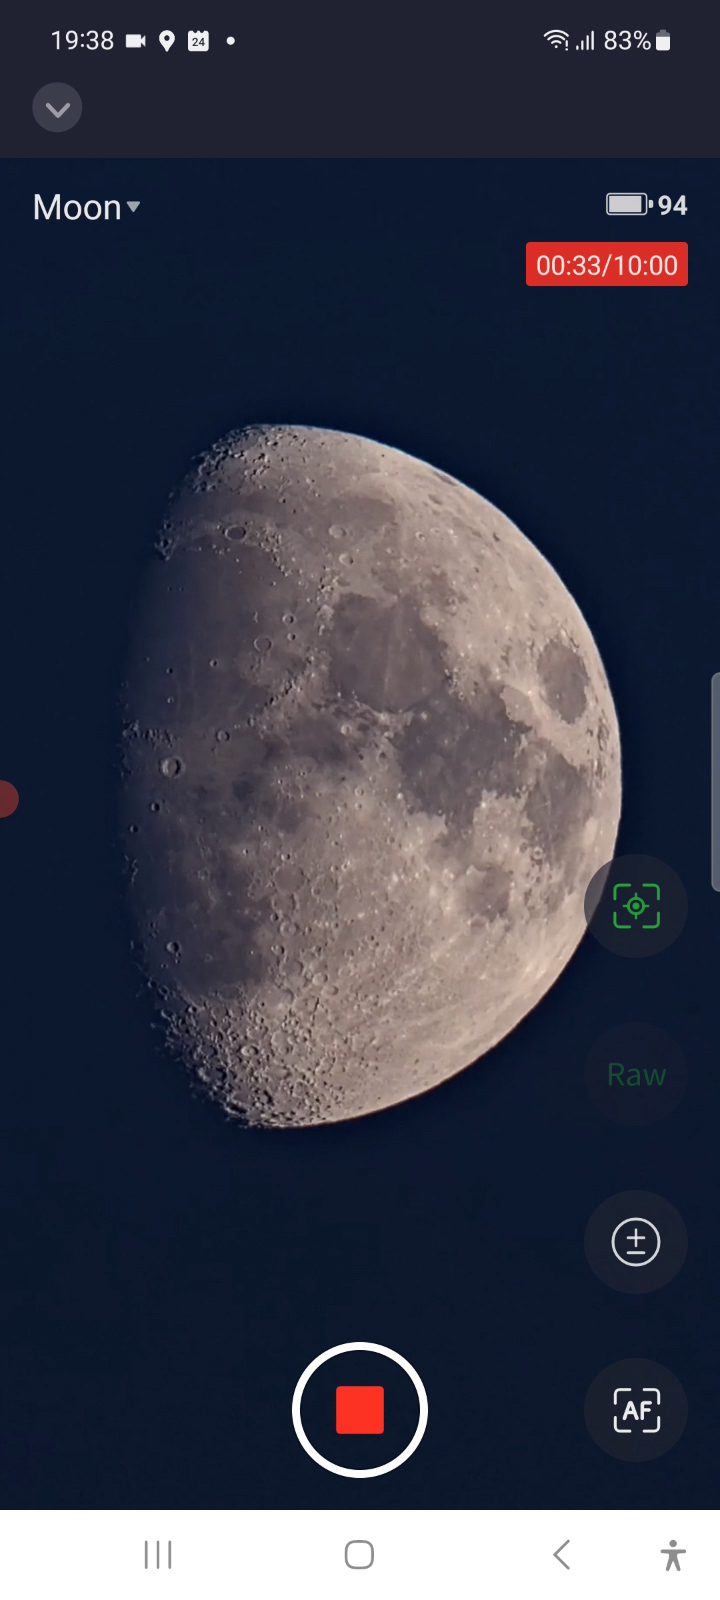
Capturing Stunning Moon Shots Using the Seestar S50
Subsequently, I captured two videos of the moon: one in MP4 format and another in RAW format. The MP4 video exhibited noticeable moon movement, attributable to the moon’s low position in the sky during the early evening, only 10 degrees above the horizon. This low angle meant that the moon’s light had to traverse a significant amount of atmosphere, resulting in the wobbly appearance. Nonetheless, I always love capturing the moon during this time, when the evening sky bathes it in a soothing bluish glow.
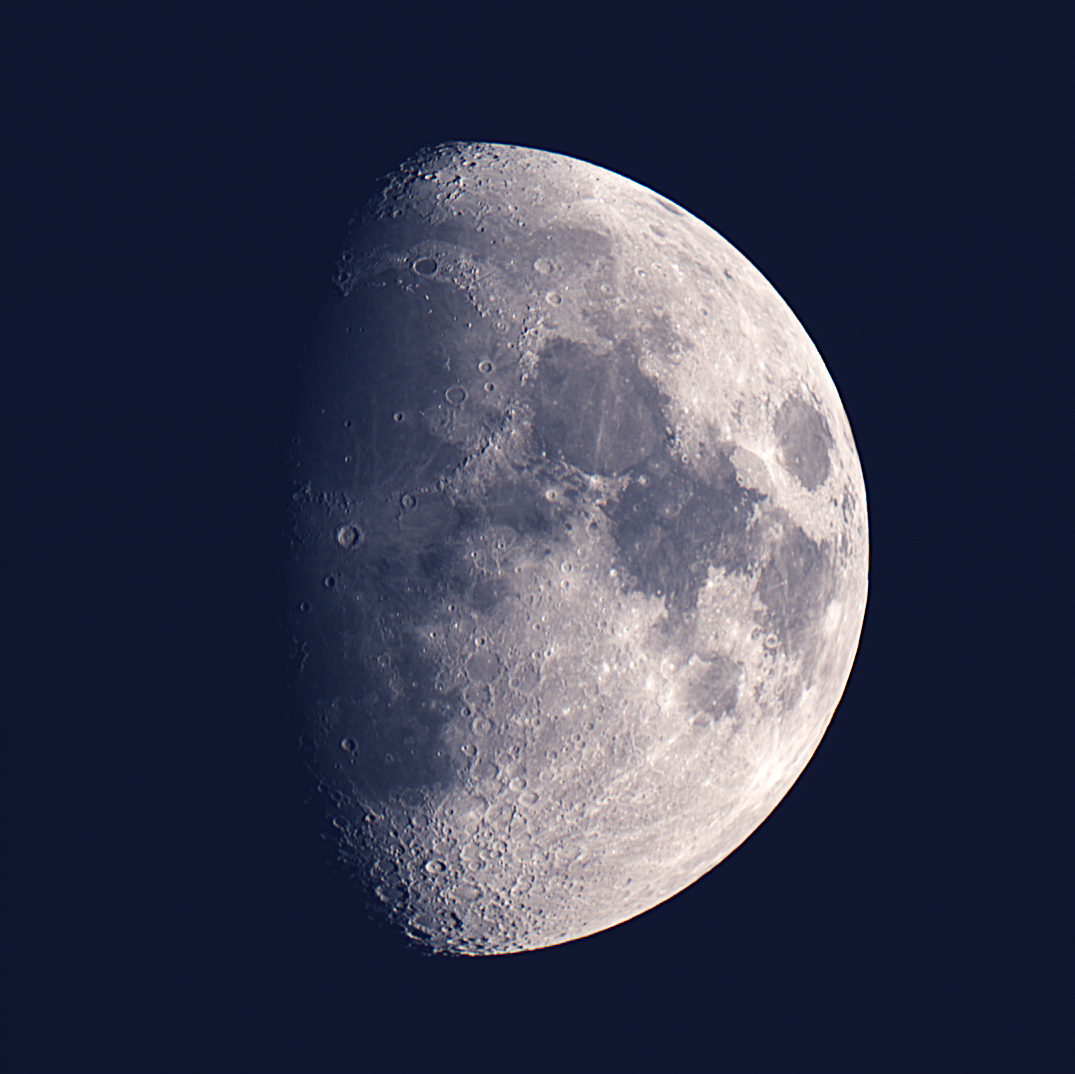
I was genuinely impressed by the quality of the MP4 video. For those venturing into astrophotography and seeking a solid lunar video, this is already a commendable choice. As mentioned earlier, MP4 and JPG files download directly to your phone, ready for immediate sharing. If you’re feeling more ambitious, you can opt for RAW videos in higher quality AVI format. The RAW video, which I recorded, retained approximately 12 frames per second, yielding about 700 frames for a one-minute video. The RAW format necessitates a debayering process. In Autostakkert, I had to select “BGGR” to achieve the correct colors. The end result was a stacked image, with 75% of the frames used in Autostakkert and additional sharpening applied in Registax. If you’re eager to explore this technique, you can find a tutorial video on moon photography here.
Seestar S50: Your TikTok and YT Shorts Telescope
An intriguing aspect worth noting is that all videos and images are produced in portrait mode, tailored for smartphones, rather than the traditional landscape mode more suitable for television and PC screens. This suggests that the Seestar S50 caters to individuals keen on sharing their visuals on smartphone platforms like TikTok, Instagram, and YouTube Shorts.
The Seestar S50 Smart Telescope is available at ZWO, Agena Astro (USA/WW), High Point Scientific (USA/WW), and Astroshop (EU/WW).
Deep Sky Astrophotography Made Easy with the Seestar S50
I waited until complete darkness fell before delving into deep-sky astrophotography with the Seestar S50. The Seestar APP offers multiple ways to locate and view objects in the night sky:
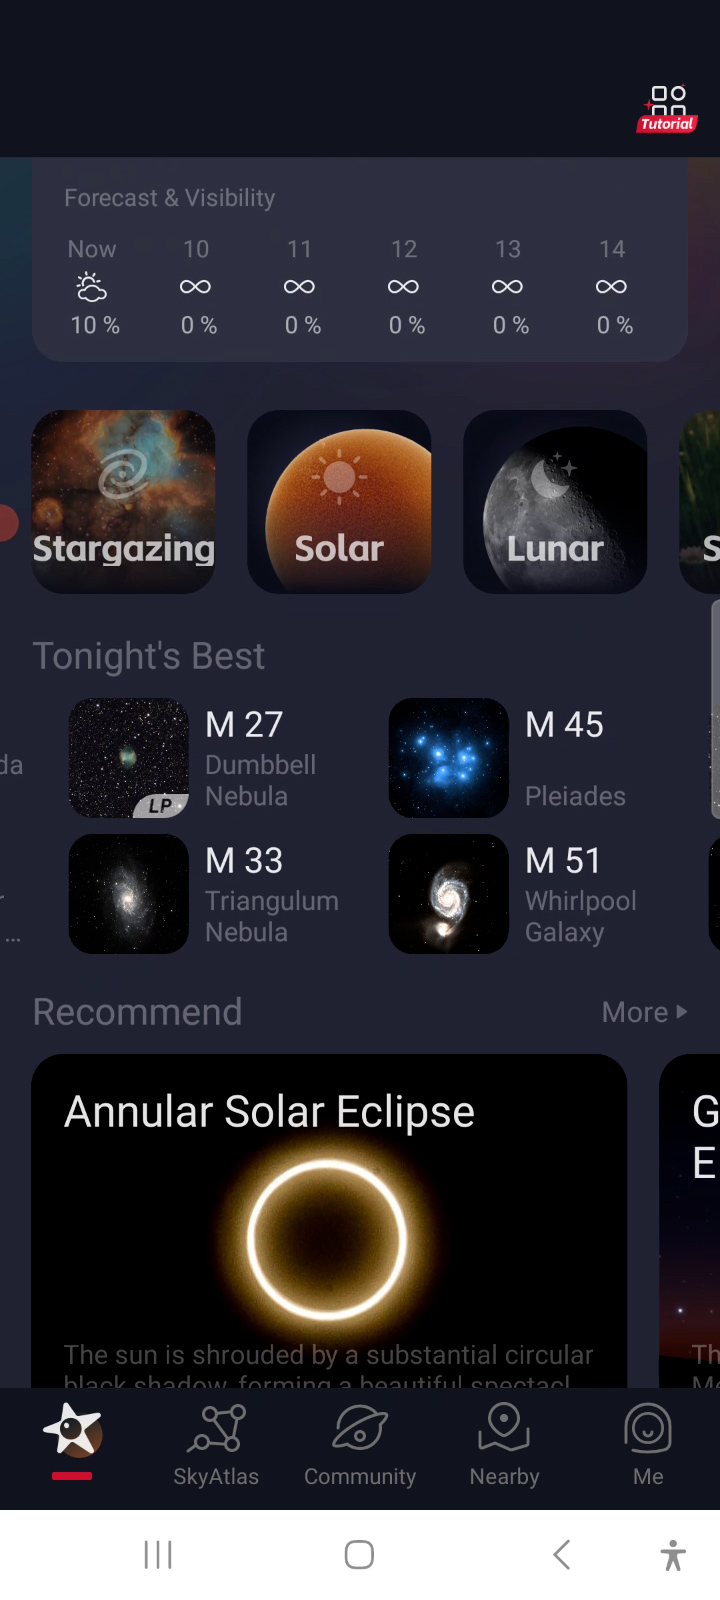
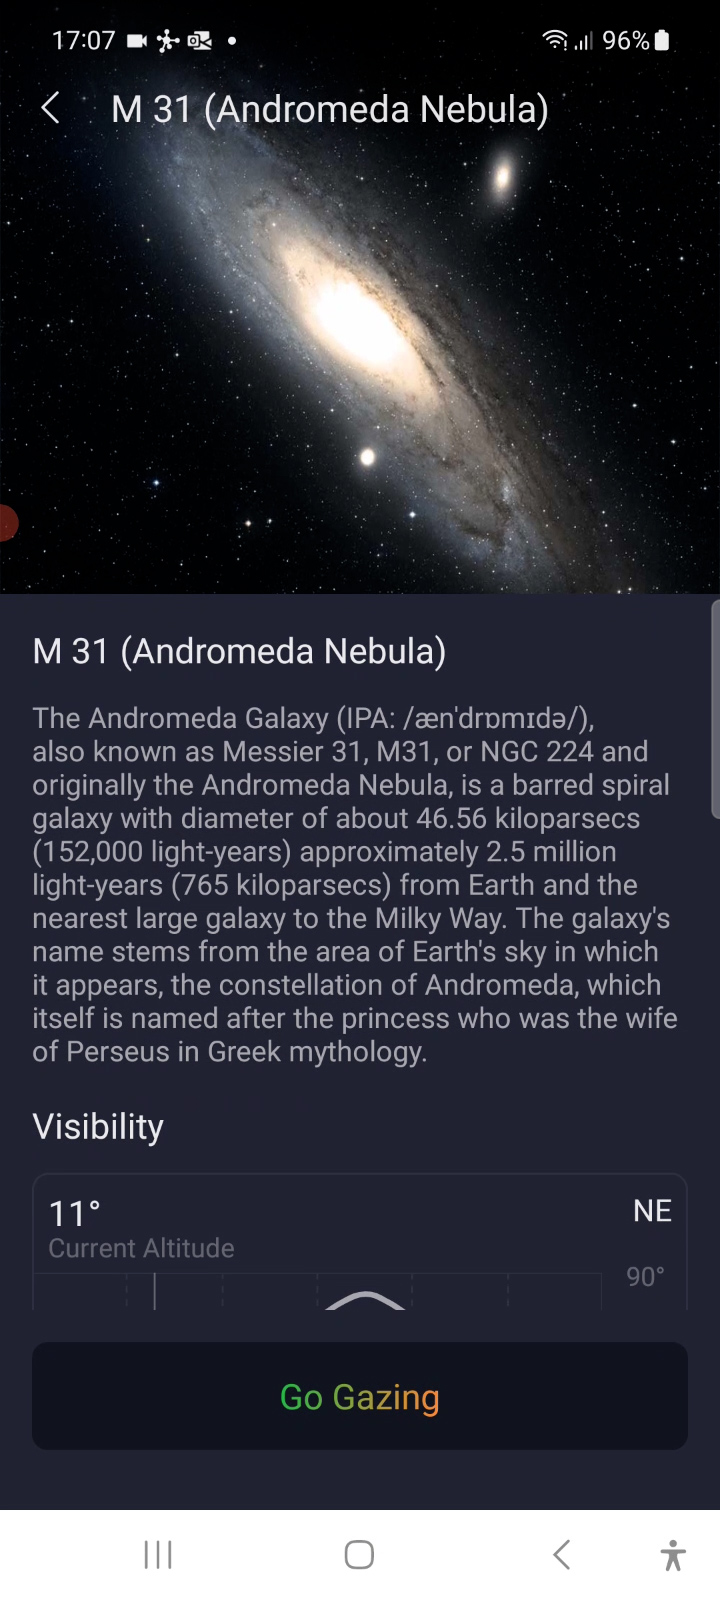
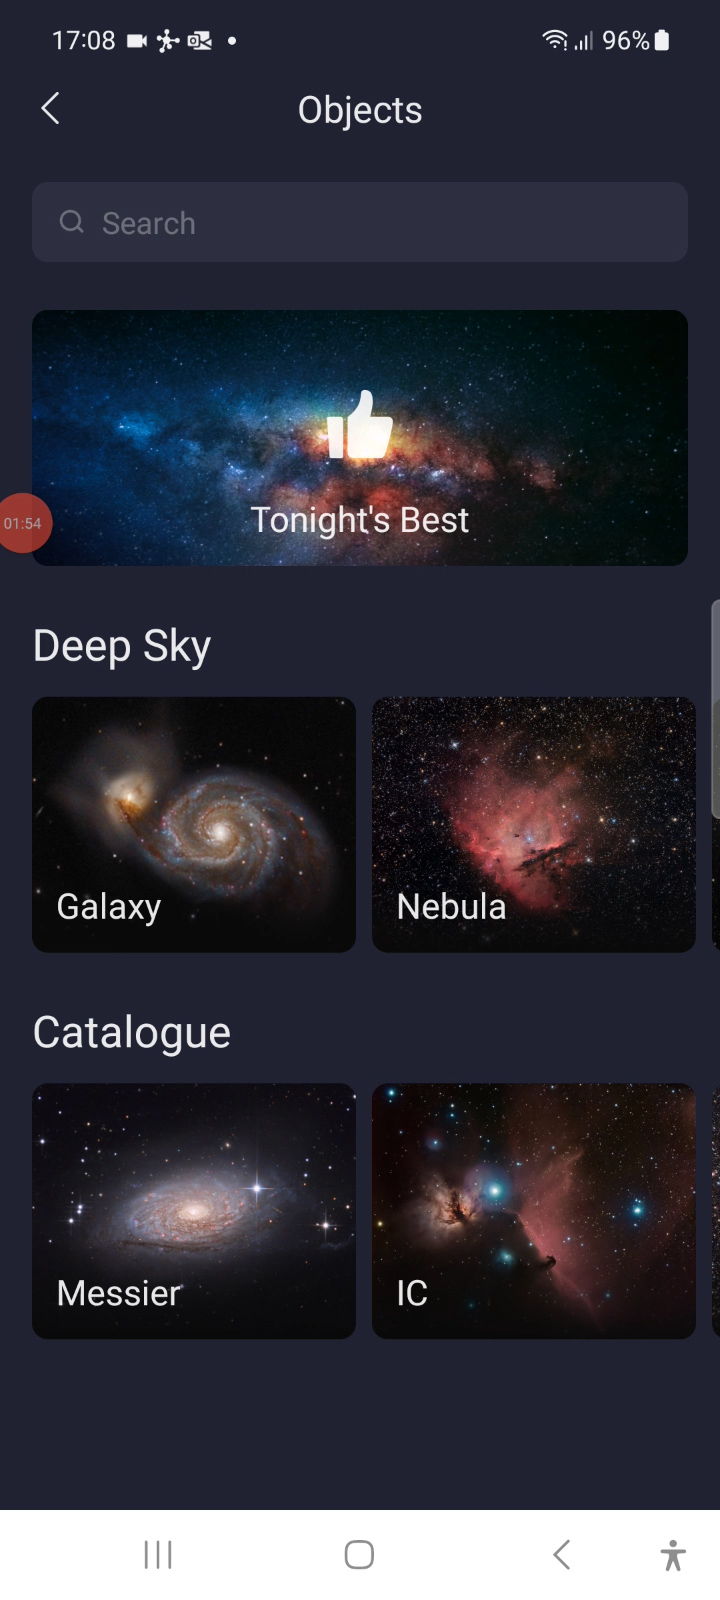
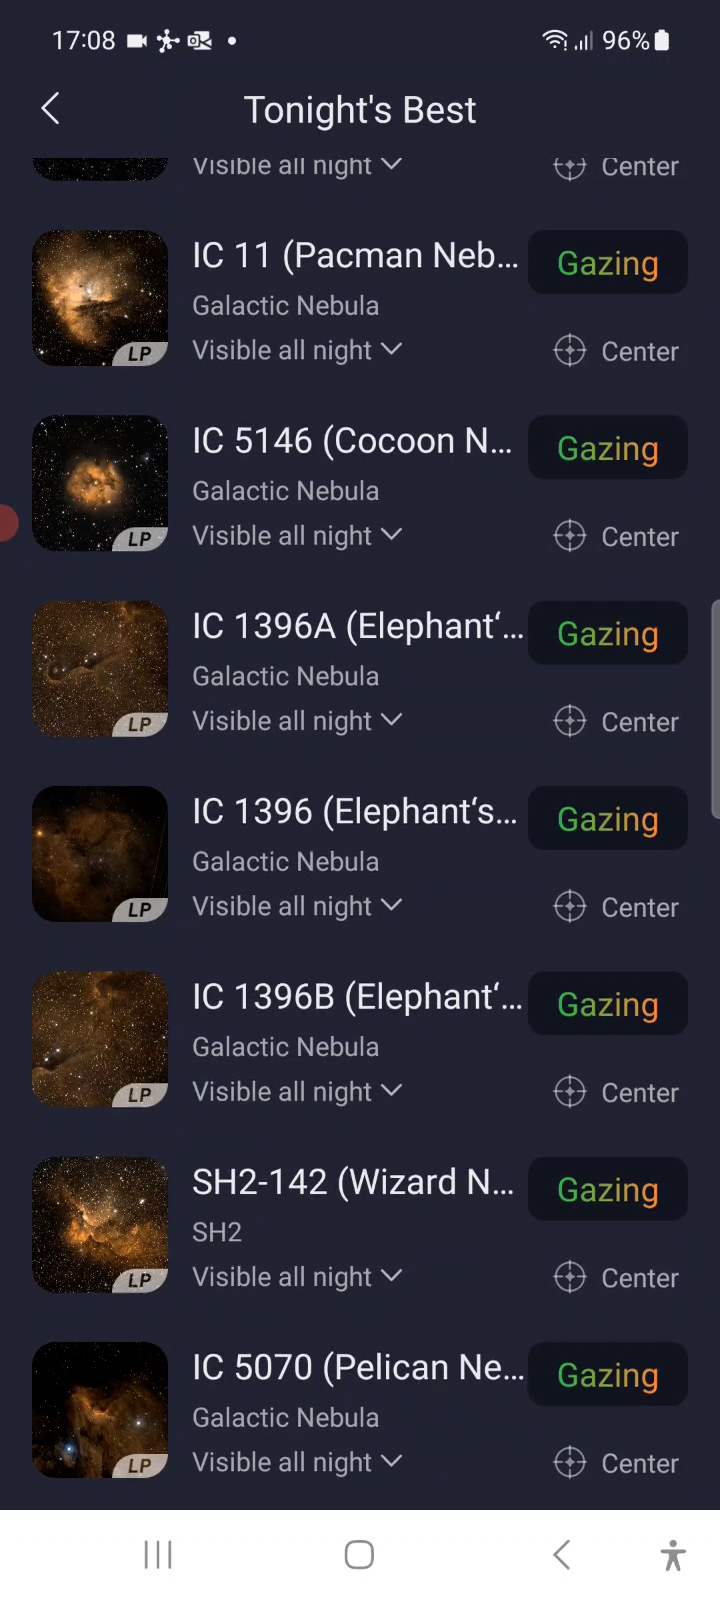
- Tonight’s Best Targets: When you open the app, it shows you a list of the best objects you can see that night based on your location. This is awesome if you’re new to astrophotography and want some quick ideas. If you click on one of these objects, you’ll get more info about the object, such as where it is in the sky and when you can see it. If you want to take a closer look, just tap “go gazing,” and the telescope will point right at it.
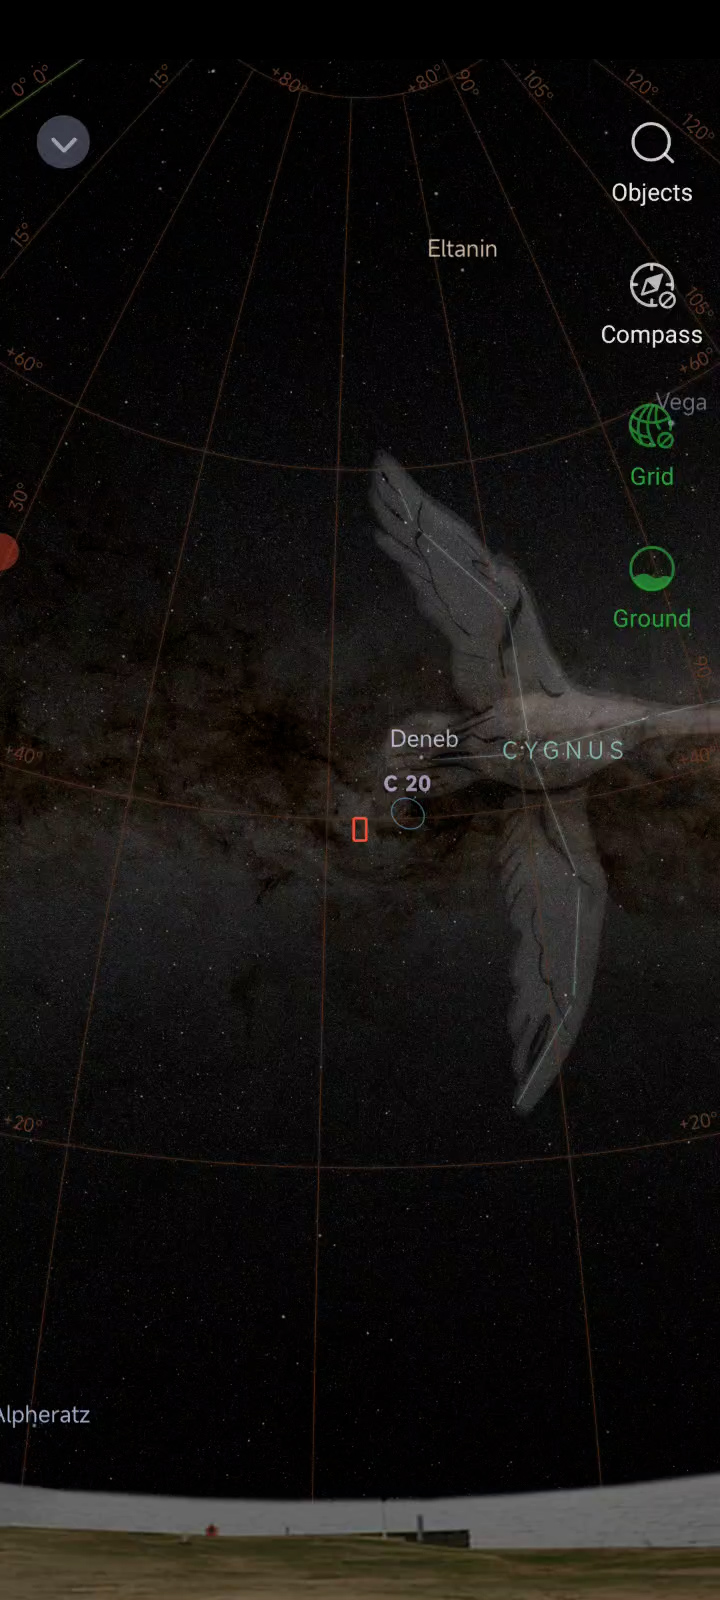
- Stargazing Mode: Another way to find objects is by using the stargazing mode. This mode shows you a live view of the night sky through your telescope. You’ll see a picture of the Big Dipper in the bottom right corner. When you tap it, you get the virtual sky atlas showing all the objects in the sky. Turn on the compass (it’s at the top right), and as you move your smartphone, you’ll see where things are in real-time. You can zoom in by pinching the screen. If you want to check something out, just tap on it and press “goto,” and the telescope will point there.
- Searching Objects: There’s also a magnifying glass icon on the top right of the virtual sky atlas. This opens a menu with more objects to explore. You can choose from tonight’s best targets, galaxies, nebulas, and famous astronomy catalogs like IC and Messier objects. When you pick something, you’ll learn more about it and can press “gazing” to have the telescope point at it. In the list of objects, you’ll also see a “center” option. If you click that, the virtual planetarium will pop up again, centered on your chosen object, and you can press “goto” to make the telescope move there.
- Sky Atlas: The easiest way to enter the virtual sky atlas is to tap the icon in the app’s bottom menu.
Pointing the Seestar S50 to objects in the night sky
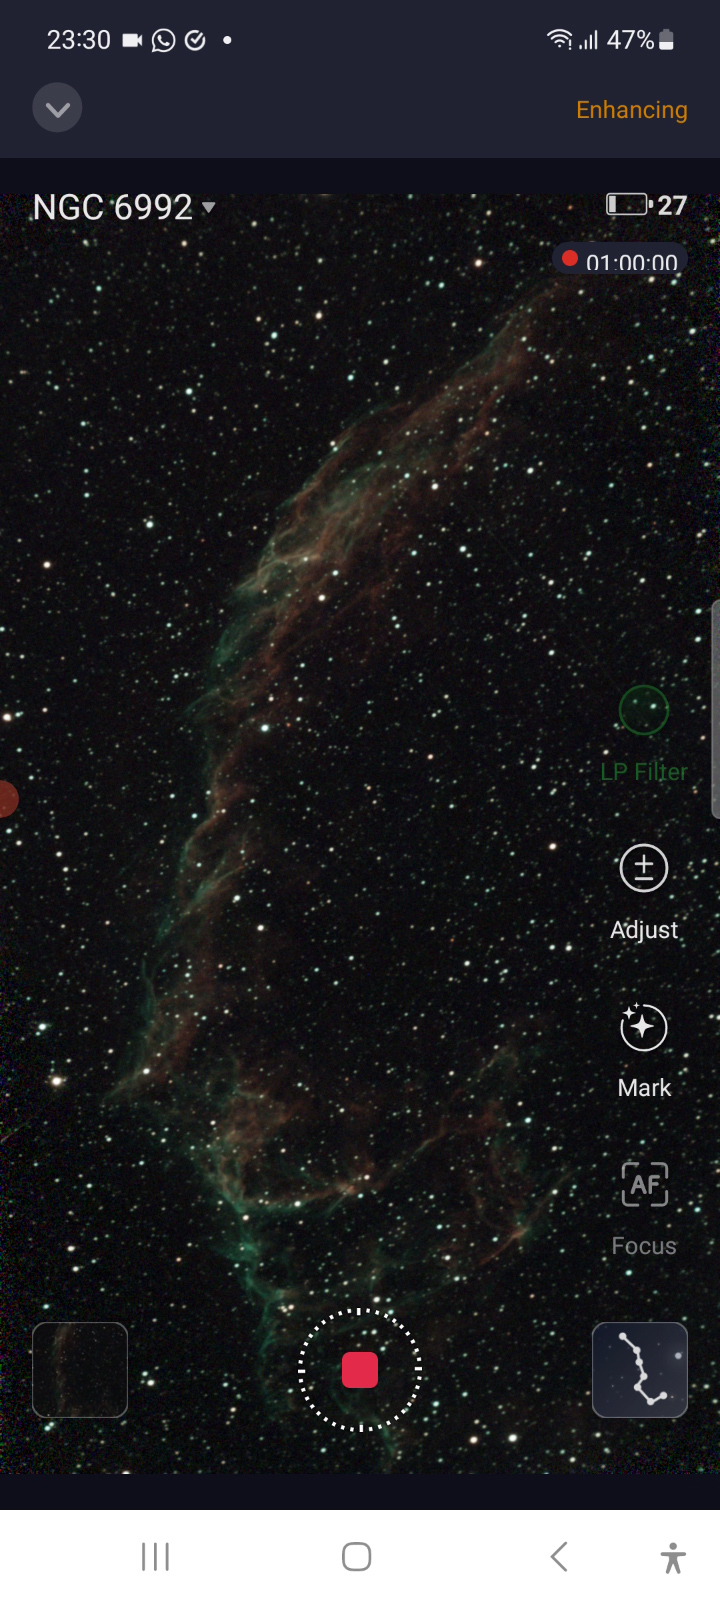
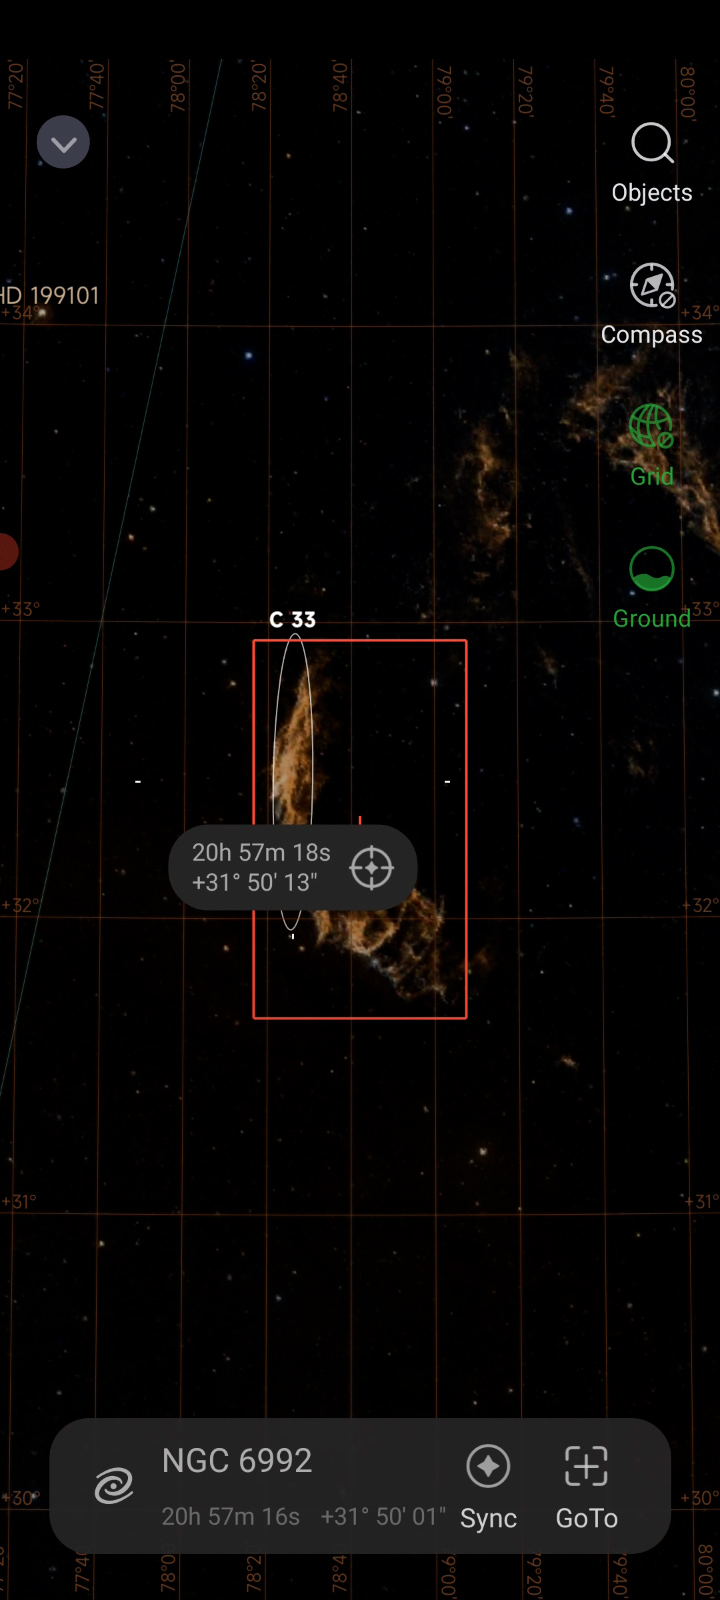
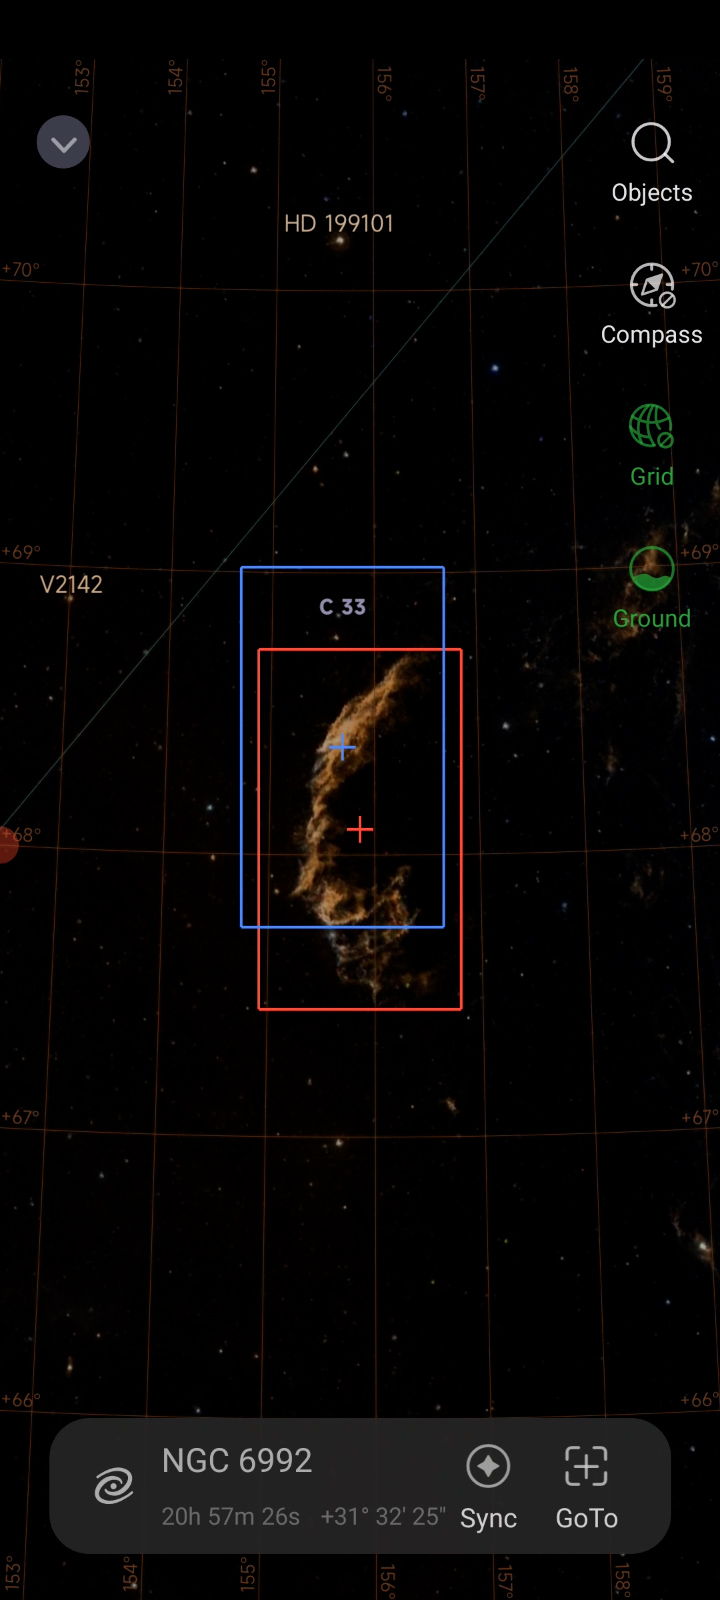
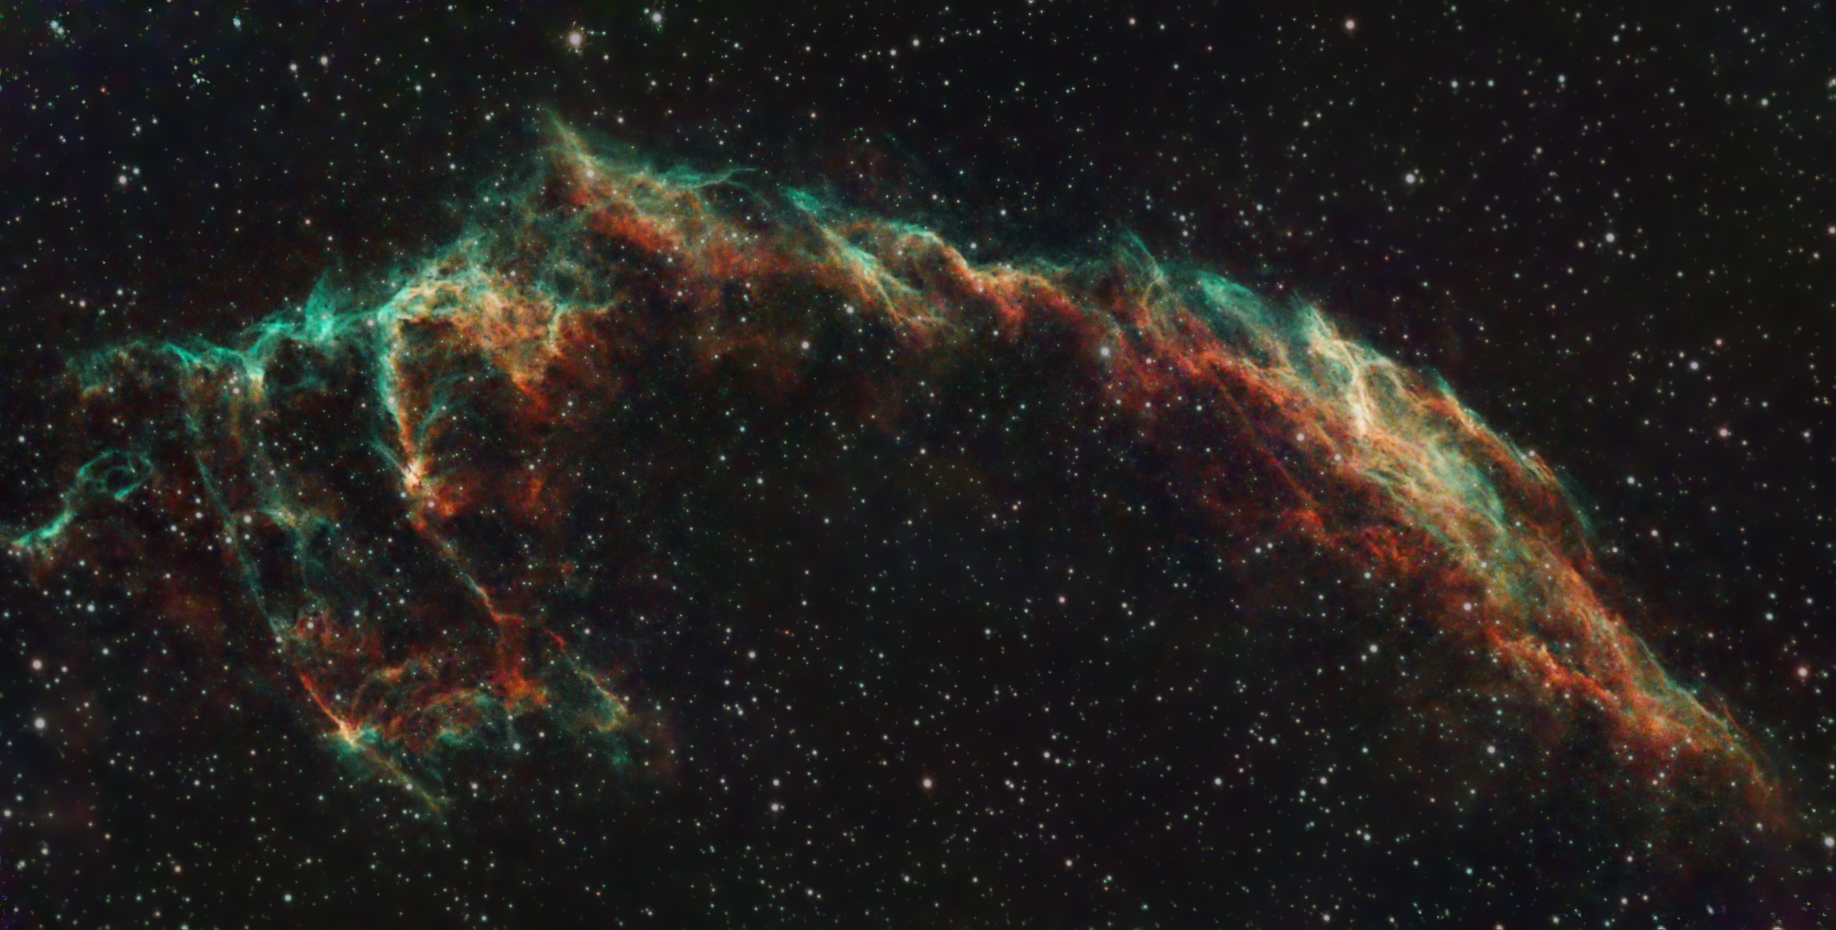
In the virtual sky atlas, I chose NGC6992, which is also known as the eastern veil nebula. I picked it because it was high up in the sky at my location in the northern hemisphere, and it fit perfectly in the view of my Seestar S50 telescope. After I clicked ‘go gazing,’ the telescope automatically moved to point at that part of the night sky. In the sky atlas, you’ll see a blue rectangle representing where the Seestar S50 telescope is pointed at. Once it was in position, the Seestar S50 used a clever technique called ‘platesolving’ to make sure the object was right in the center of the camera’s view. It took a quick photo and then compared it to the sky atlas to figure out exactly where it was. After that, it made a tiny adjustment to get everything lined up perfectly. When the two rectangles, one blue and one red, matched up exactly, the Seestar S50 said ‘goto success.’
I double-checked to make sure the telescope was aimed exactly where I wanted it to be. I noticed that the default framing wasn’t quite what I wanted for the nebula picture I had in mind. So, I moved the red rectangle to match my desired framing and hit ‘goto’ again. The Seestar used its smart platesolving trick once more to get to the new position. This automatic platesolving feature is super helpful for beginners because it takes away the challenge of finding objects in the night sky. The Seestar S50 does all the hard work for you.
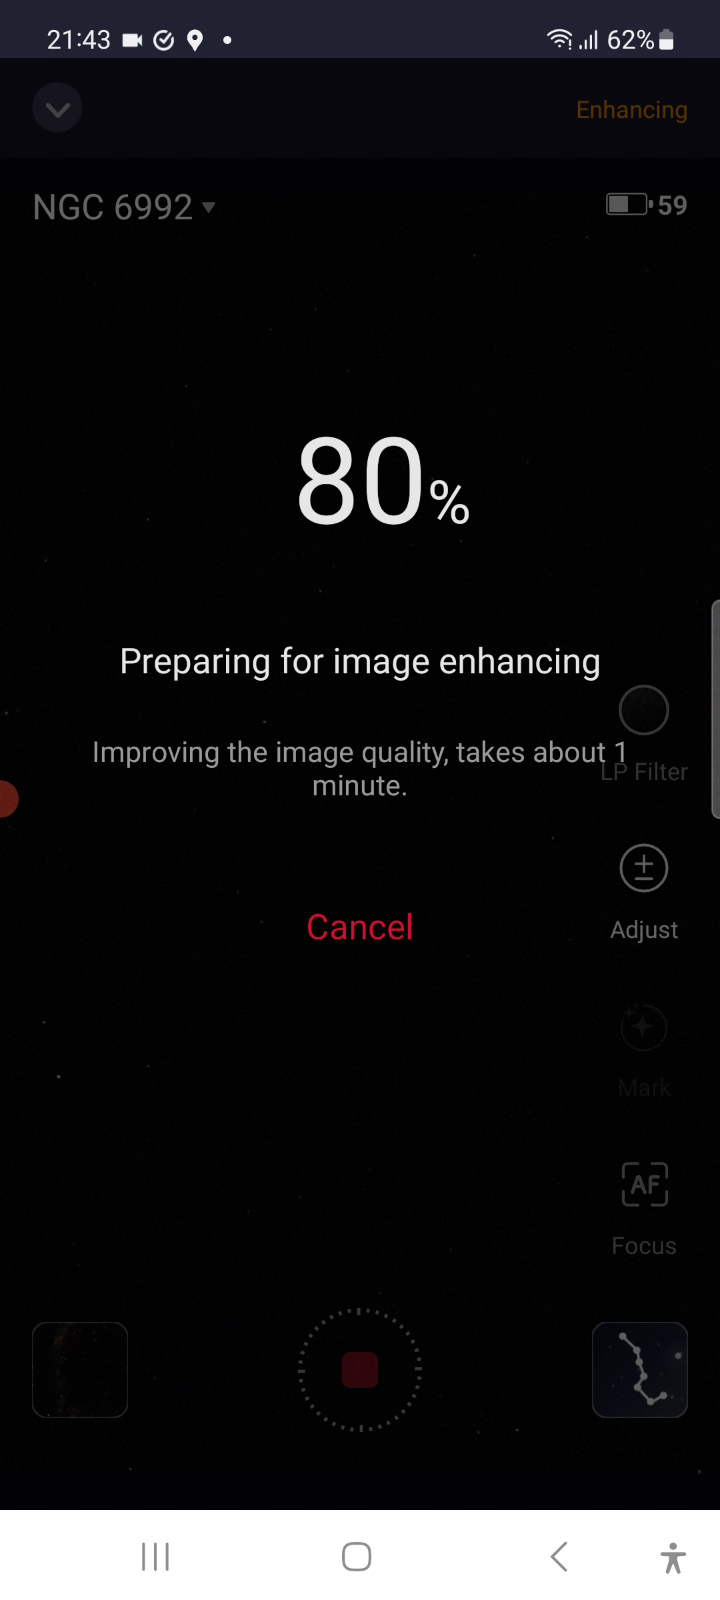
Capturing the Night Sky: Seestar S50’s Lucky Imaging Technique
Once the Seestar S50 was in position, it went into a ‘previewing and enhancing’ mode. This part was automatic and took about a minute. I can only guess what the Seestar S50’s software did, but it might have involved the camera taking some calibration photos. I’ll ask ZWO about it and share more details on this blog once I know more. Anyway, once the previewing and enhancing were done, the Seestar S50 automatically started taking 10-second exposure photos of NGC6992. It then stacked each new photo on top of the previous one.This stacking technique is known to astrophotographers as ‘lucky imaging.’ Because the Seestar S50 is an altitude-azimuth telescope and not aligned with the celestial pole, it can only do 10-second exposures to avoid startrails or elongated stars. Each stacked photo helps make the object look clearer by reducing the unwanted noise like light pollution from streetlights, industrial areas, and city glow, and enhancing the light signal from the nebula. On the right side of the screen, there are icons for adjusting the gain and enabling autofocus. Since the Seestar S50 performed thorough previewing and enhancing before capture, I left these options untouched.
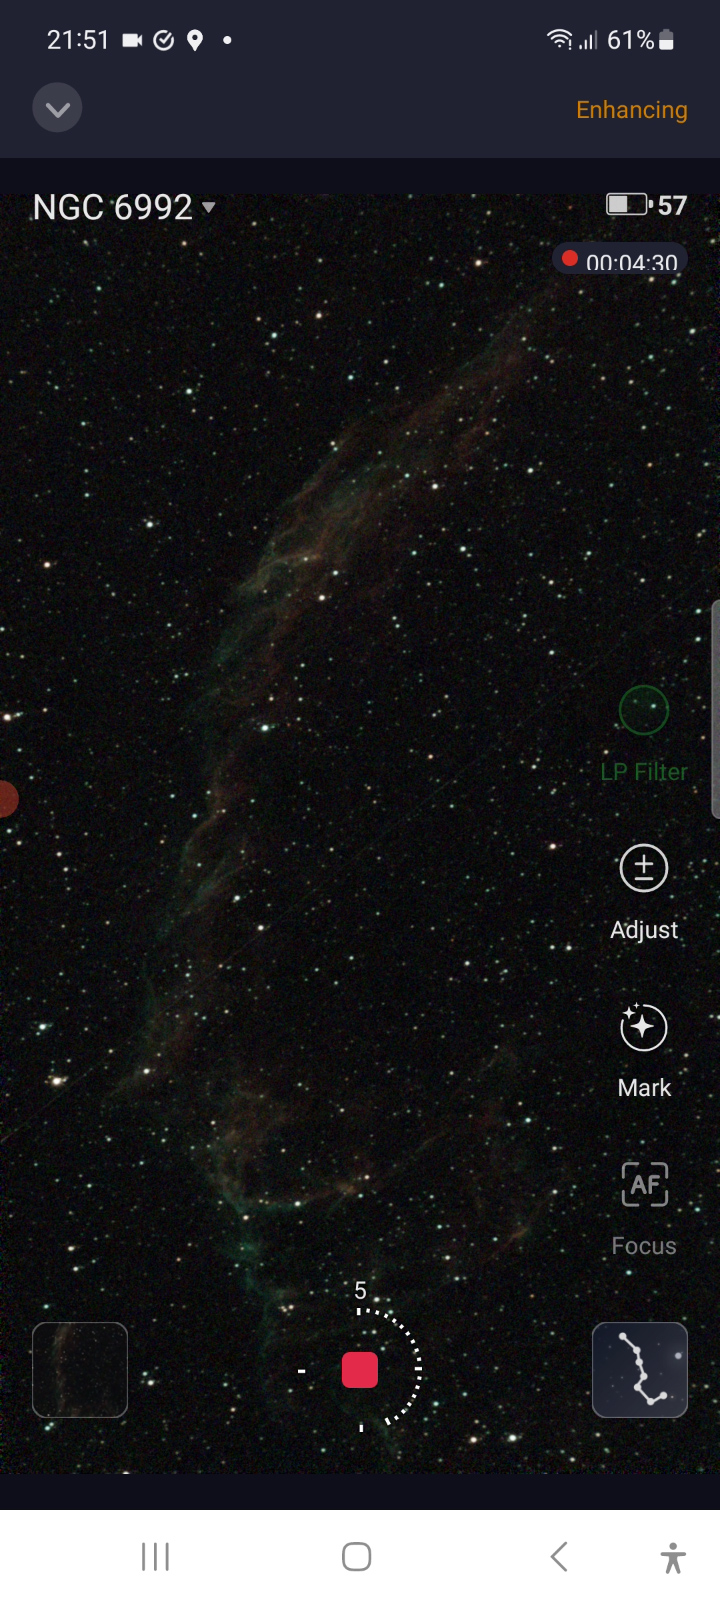
Seestar S50’s Automated Light Pollution Filter
I noticed ‘LP filter’ was highlighted in green on my smartphone. This signifies that the Seestar S50 automatically deploys its light pollution filter for this nebula, enhancing the ionized hydrogen and doubly ionized oxygen signals (Ha and Oiii) emitted by the nebula while blocking out light pollution in the yellow and orange parts of the light spectrum, which are often associated with artificial light pollution. I observed that the sky atlas comes with predefined settings for activating the light pollution filter based on each object. This is a smart feature because certain objects like galaxies emit light across the entire visible spectrum. For these broad-spectrum objects, it’s unwise to use a light pollution filter as it could block out their light. This automation is a great benefit for beginner astrophotographers as it ensures the right filter choice. Advanced astrophotographers also have the flexibility to manually disable the LP filter by tapping on the screen’s lettering.
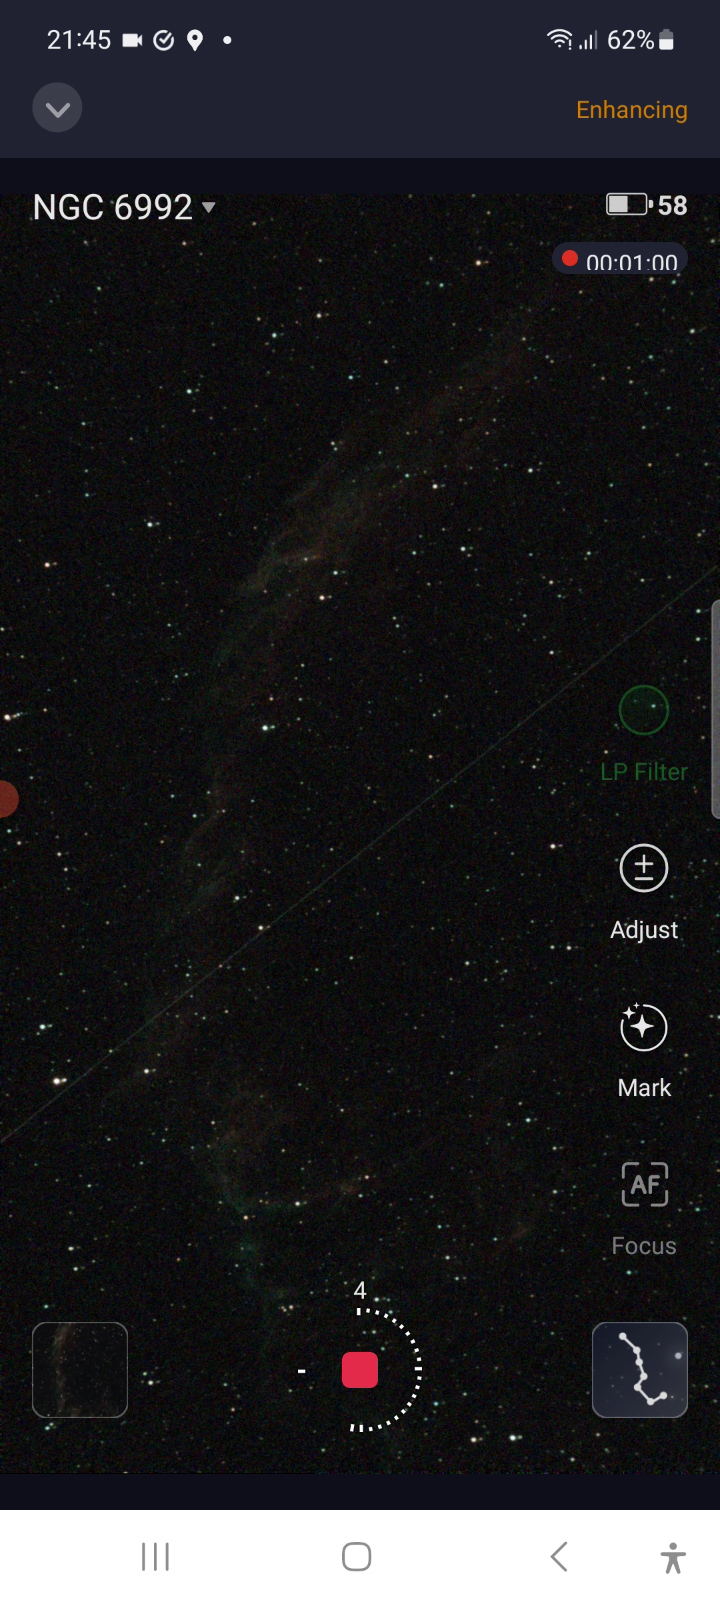
Streaks from Satellites and planes
After a few minutes, I noticed a diagonal streak running through my image, likely caused by a passing satellite reflecting sunlight within the camera’s field of view. Such streaks from satellites and planes are not uncommon in astrophotography. With the stacking technique, each subsequent image reduces the prominence of this one-time satellite streak while enhancing the nebula’s brightness, as the nebula’s signal is consistent across all frames. AFter a couple of minutes, the satellite streak had disappeared, while the nebula’s visibility has significantly improved.

Capturing the Eastern Veil Nebula (NGC6992) in Just One Hour with the Seestar S50 Smart Telescope
I proceeded to capture the nebula for about an hour, documenting the progress on my smartphone. It’s advisable to limit your capture time to around one hour to mitigate field rotation issues associated with alt-az mounts. Additionally, I had only about an hour of clear skies before clouds returned. I was astonished by how rapidly the nebula became visible. On the top right of the smartphone screen, a time indicator displayed the total exposure time. I also noted that one hour of capturing consumed approximately 30% of the Seestar’s battery. After an hour, I concluded the capture process by pressing the stop record button, and the Seestar S50 app promptly saved the stacked JPG file to my smartphone.
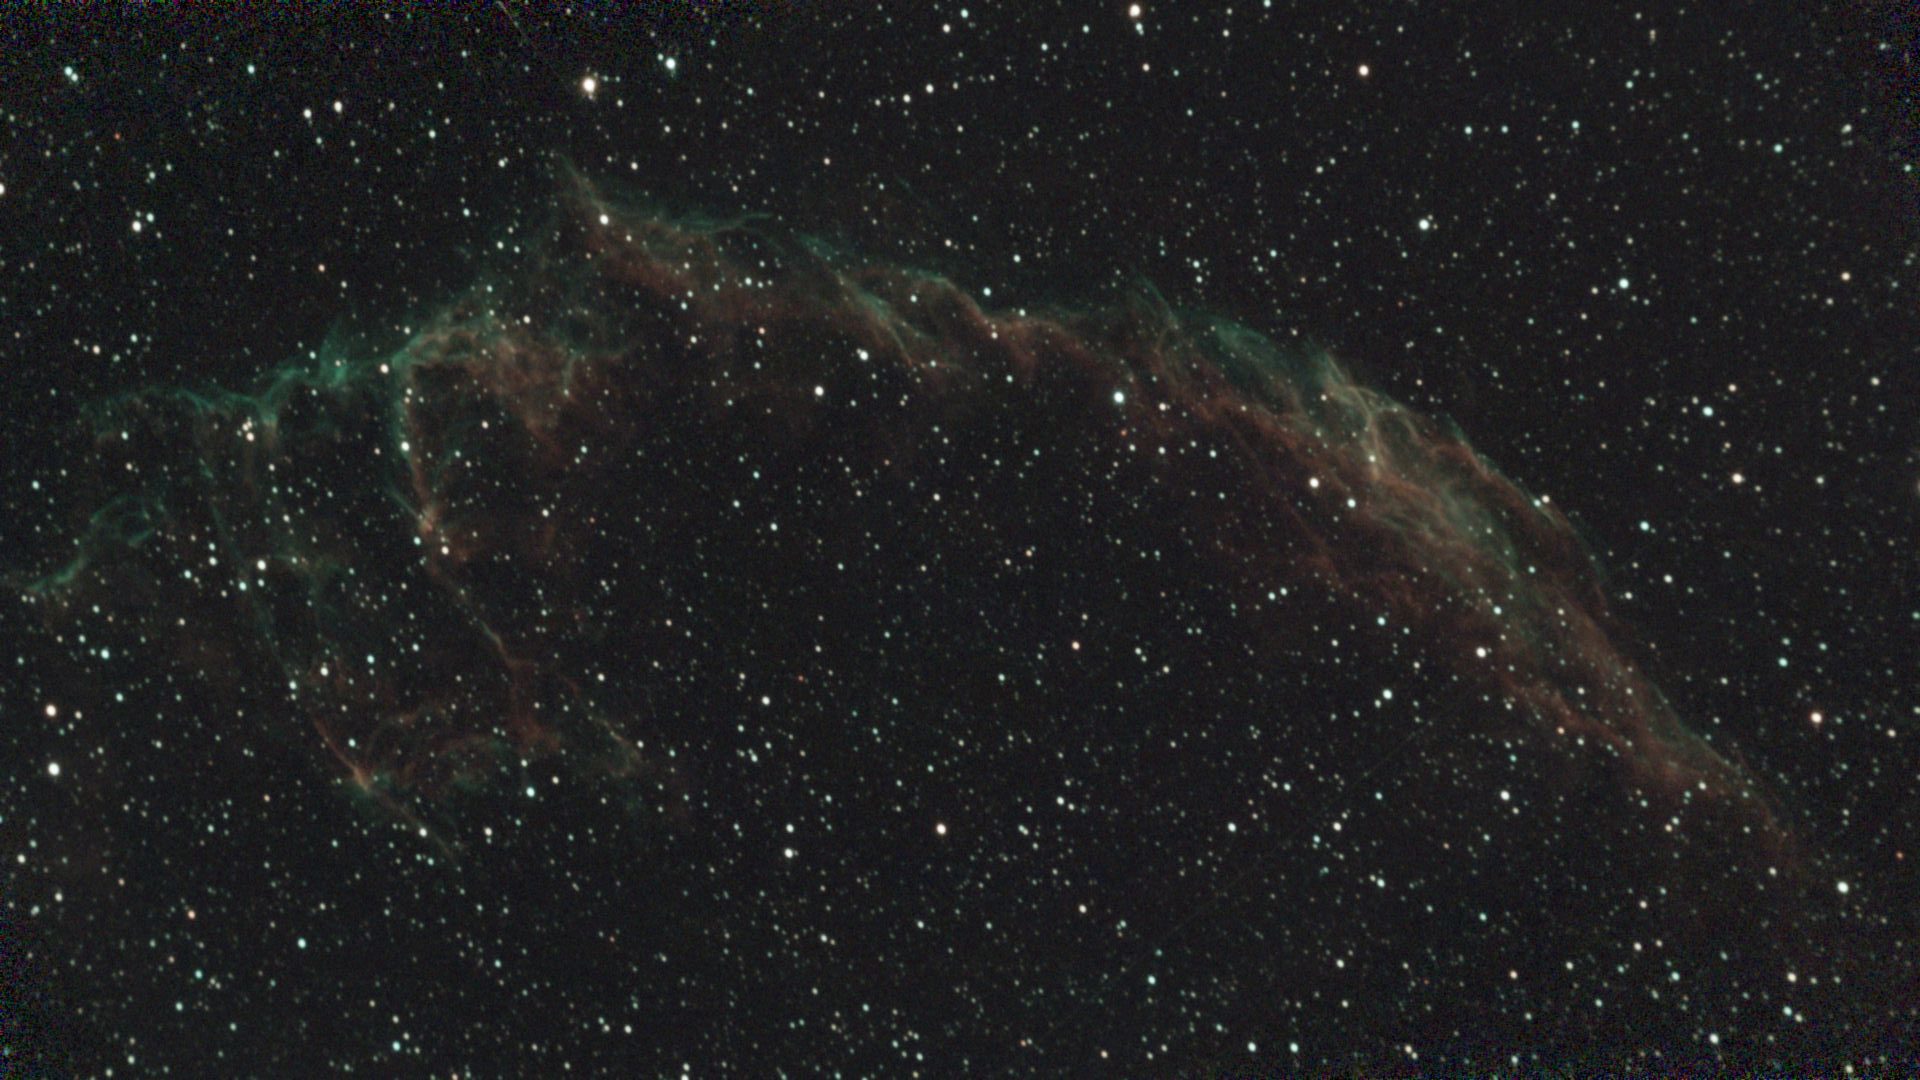
When I connected the Seestar S50 telescope to my PC using a USB-C cable, I could download a stacked 16-bit linear TIFF file for advanced processing. The telescope saved the stacked file, but the individual photos were not available. I utilized the linear TIFF file for advanced processing in pixinsight and photoshop, including dynamic background extraction, separating stars from the nebula using Starnet++, stretching, color enhancement, and multilinear noise reduction. Considering it’s only an hour of capture time, I was genuinely impressed with the resulting image. While experienced astrophotographers generally prefer individual photos and calibration files, I was delighted to skipping the stacking process by using the already stacked linear TIFF file, although I did need to remove a satellite streak. Moreover, the 2 MP resolution of this photo significantly expedited post-processing compared to my usual 26MP photos of my Asi2600MM Pro camera.
Seestar S50: Not your planetary Telescope
If you’re just starting out in astrophotography and want to capture planets, I have some news that might disappoint you. The Seestar S50 telescope has a relatively short focal length of only 250mm. Even though it uses a camera with small pixels designed for planetary imaging, this short focal length won’t give you those detailed planetary pictures you might be hoping for. Instead, planets will look like bright stars in the night sky. Take Jupiter, for example, which will show up with its four Galilean moons. When you switch the Seestar to astrogazing mode, it starts stacking your pictures, that’s not the best for planetary imaging.The lunar video mode is more useful in this regard, but that mode is completely designed to find and capture the Moon, and not the planets. So, for moon, sun, and casual deep-sky astrophotography, the Seestar S50 does a pretty decent job. But if you’re serious about planetary imaging, you’ll need a different telescope.
Seestar S50: Scenery mode and community tab
Before I wrap up my thoughts on the Seestar S50, it’s worth mentioning that it’s got a daytime Scenery mode. This mode is a lot like the Lunar and Solar modes but meant for taking pictures during the daytime. What’s more, the app comes with a cool feature—a community tab. This is where you can connect with fellow Seestar S50 users. You can show off your photos, tell your stories, and learn from others. It’s a nifty addition that builds a friendly and supportive community of Seestar S50 enthusiasts.
Seestar S50 Smart Telescope: Final Verdict – Is It Truly Stellar?”
Here’s my final take after putting the Seestar S50 and its accompanying app through some real-world testing. I must admit, it left quite an impression. If you’re new to astrophotography and are working with a budget of around $500, the Seestar S50 deserves your attention. It packs quality optics and a nifty Sony camera sensor that can capture stunning shots of the Sun, Moon, and deep-sky wonders, as I showcased in this blog. The Seestar app streamlines telescope control, even though the initial setup takes a bit of patience. Plus, the light pollution filter helps to capture breathtaking nebulae in deep space while fending off pesky artificial light.
Finding celestial objects in the night sky can be a rookie’s struggle, but not with the Seestar S50 smart telescope. Just pick your target on your smartphone, and this telescope automatically homes in and tracks it. And if you’re not keen on diving into complex photo or video editing, no worries. The default images and videos you get on your phone are share-worthy with friends, family, or the Seestar online community via the app. Just remember, if you’re all about planetary imaging, you’ll need a different telescope.
Now, what about the seasoned astrophotographers out there? If you’ve already invested in a high-end astrophotography setup, you’re likely aware of the trade-offs made by ZWO. They’ve opted for a 2MP planetary camera sensor to keep costs down, which doesn’t quite match up to the top-tier, dedicated, cooled astrophotography cameras. Also, the Seestar S50 smart telescope sports an alt-az mount, capping your exposures at 10 seconds and introducing field rotation during extended tracking.
Let’s keep it real, though. Cooled deep-sky astrophotography cameras kick off at a grand, and adding an equatorial mount with autoguiding for those lengthy exposures incurs further expenses. The Seestar S50 is clearly designed for aspiring astrophotographers, automating many tasks that seasoned folks like us want to handle manually. But here’s the twist—I was pleasantly surprised by the stacked Sun and Moon shots I produced from the 16-bit AVI files. And I found that a linear one-hour stacked TIFF image could be surprisingly well-processed in PixInsight and Photoshop. Also, I heard from ZWO that they may enable saving the individual files of a stack in future software updates…So, the next time I have just an hour of clear skies, I might just opt for the Seestar S50 smart telescope over setting up the advanced astrophotography rig.
Clear skies!
Great tutorial with clear explanations; Thank you very much.
I have seen some pictures made by Seestar with logo and name of the object at the bottom. How can we get that ?
Hi Jacky, honestly I’m not aware of that option but I’ll ask. Perhaps it can be done in the Seestar APP. It has a community page to share pictures. Thanks!
EDIT: Yes, it’s in the new APP update. If you take a picture, you’ll get to see those details in the picture on the APP – you can download and share that picture.
I just got my Seestar and am quite impressed. two suggestions: put a level on top of the scope in shutdown position to facilitate initial leveling and 2. include a comet/asteroid search or at the very least allow entry of an RA-DeC position. at 2.39 arises pee pixel us pretty good for nice detailes astrophotography. would be nice if it had an equatorial tracking kode so it could be mounted on a wedge but that would require better bearings and likely counterweight so probably doubles price. but a thought
Can I use MacBook Pro for processing images !
Thank you very much a really clear tutorial. – The app works perfectly with my Iphone but on a 2019 android phone with android 9 it would not save images to the phone as it had not created the correct folders on the phone. On my tablet with android 10 it works fine but I think many android tablets including my newish lenovo use GPS for their compass which is not recognised by the app. This affects using the sky atlas. One other thing worth mentioning was that my seestar would not initially autofocus on stars. The default focus setting of 1840 was way out probably too far out for the auto to cope. Using manual focus I found that 1600 was about right so I reset the default to that and it works ok.
Appreciate the great info. I have a question: can you download the Seestar APP to a Windows PC? Or will the app only run on Android or Apple? I would like to control from a laptop rather than a smartphone or Android tablet if possible. Thanks.
It’s very much an mobile APP, like the ASIAIR.
I had the same feeling about using my smartphone, but I have to say it works really well.
Very nice review. I really liked where you talked about the “previewing and enhancing” mode and getting more info from ZWO on exactly what’s happening then. Would love to hear more on this, thanks for the thorough review!
Thanks for this detailed information. Thanks to it, I’ve purchased my Seestar and am back to stargazing during those rare clear moments. I wonder, does it make sense to place the Seestar on an equatorial mount (non-go-to)?
Hi Geert, thanks. The Seestar S50 is designed as an alt-az telescope. But you can always try. If succesful, you could avoid field rotation.
However, the tracking will not be perfect without any guiding, and the max. exposure is 10 seconds, you cannot change that.
I just wanted to stop in and say; Hey!
Because of your reveiw, I just ordered a SeeStar S50. I just have a question for you. In your comparison video between the Dwarf II and the SesStar you weren’t using the tripod that came with the SeeStar. What tripod were you using, It looks like an iOptron tripod. Looking to get my SeeStar a decent tripod and wanted to make sure I get one that fits! Thanks and keep up the good work!
Thanks! And yes, that’s the iOptron tripod.
Hello Wido,
Thanks for super documentation – just got my Seestar S50 – your presentation helped guide me through first light. I’ve been exploring amateur astronomy since 1984 and am enjoying intro astrophotography whilst in the house with a cup of coffee on a cold evening.
Jim Lawrence Albuquerque NM
Thanks so much Jim! Enjoy the Seestar.
Thank you very much for your review and detailed information and instructions. Your article answered so many of my questions. I received my SEESTAR last week and am also very new to astrophotography. It’s also been cloudy and raining since I received it!
I experienced the 2017 eclipse and it was a life changing event and was able to get lucky and get a few good photo’s but I am going to be able to experience the 2024 eclipse with almost 4 minutes of totality. I am hoping SEESTAR makes getting better photos possible.
Any tips or suggestions for solar eclipse photography with SEESTAR?
I’m nice again thank you for the info you have already provided. It is greatly appreciated!
Hi David,
When the sun hits totality, I think you can simply remove the solar filter to see the corona of the Sun. As this only lasts a couple of minutes, be sure to put the filter back on when the Sun re-appears from behind the moon to avoid any kind of damage to your telescopes’ electronics.
Cheers.
Wido.
Hi! Awesome job.
One question, when staking, I presume that the software discards pics with satellite trails, planes or shooting stars. Do you know if there’s a way of KEEPING those instead of deleting? I mean, those lights with “undesired noise” are stored somewhere?
thanks!
The planes/satellites will be visible on the individual pictures. If I’m correct, the Seestar S50 APP is now updated to also store individual photos and not only the stacked picture.
hola Wido. Tengo algunos problemas de enfoque en cielo profundo con el SeeStar S50. Sabes si puede ser por culpa de poca nivelación o por angulo de visió demasiado vertical?
which target are you trying to image? Do you have the same focussing issues with other objects?
Very nice and concise review and beginner’s tutorial. I learned more from this post than from perusing the internet for over two weeks! Just a short response to let you know that your efforts are very much appreciated.
thanks so much Ron!
Very good and concise beginner’s introduction and tutorial on the Seestar s50. I learned more from this post than I did perusing the internet for the past several weeks! I just wanted to leave a brief reply to let you know that your efforts are very much appreciated – Thank You.
Is there an advantage to turning on the capture each stacked frame vs. leaving the switch off? Does that limit stacking or does that allow a final image in the scope’s memory to be imported rather than say 100 stacked frames that need post stacking? Also, now to I open and save the FITS files as png for example? That seems tedious.
Hi Bob,
The Seestar S50 produces a final stacked image as a jpg and TIFF file for every deep sky photo. In addition to that, you can save individuals fits files and stack them yourself.
This may be advantageous if you have some bad frames, or planes/satellites running through your pictures, you can leave these out when manually stacking your photos.
If you don’t like manual stacking, just take the 16 bit TIFF file on the Seestar (myworks) folder and use that for further processing. Did that answer your question?
Thank you for a great review. I got the Seestar S50 as an entry into astrophotography. I also wanted a small telescope that I can take with me on trips. I have other scopes but the Seestar S50 has become my “go to” telescope for its easy set up and great photos. I sent some of my photos to my fellow astronomy club members and they loved them. The pics look great straight from the device!