Registax6 is one of the most popular software programs to sharpen and denoise stacked pictures of The Planets. In part 2 of this tutorial, I show you how you can process a stacked picture of Jupiter created in Autostakkert3! (tutorial part 1). If you didn’t read or watch part 1, I highly recommend you’ll do that first. In this tutorial, I explain how to color balance your picture and use the histogram and contrast/brightness to adjust your picture in Registax6. After that, I’ll discuss the wavelets options, starting with a basic introduction on how to use each of the layers to denoise and sharpen your picture. After that, I’ll discuss the two different wavelets schemes (dyadic vs. linear) and the “linked wavelets” options that heavily affect the way in which can sharpen and denoise your stacked picture in Registax 6 using each of the six layers. I’ll finish by showing three examples of how I processed Jupiter (with a dyadic, linear, and a linear + linked scheme).
Before starting this tutorial, I quickly want to mention that Registax is free software created by an international group of motivated software developers with Cor Berrevoets from The Netherlands as the main developer. It’s awesome to see that developers from my own country have created two free software tools to process the planets which are being used across the globe: Autostakkert3! and Registax6. It is my hope that with these tutorials I can contribute as well. So let’s get into Registax6.
Downloading Registax and opening a stacked image
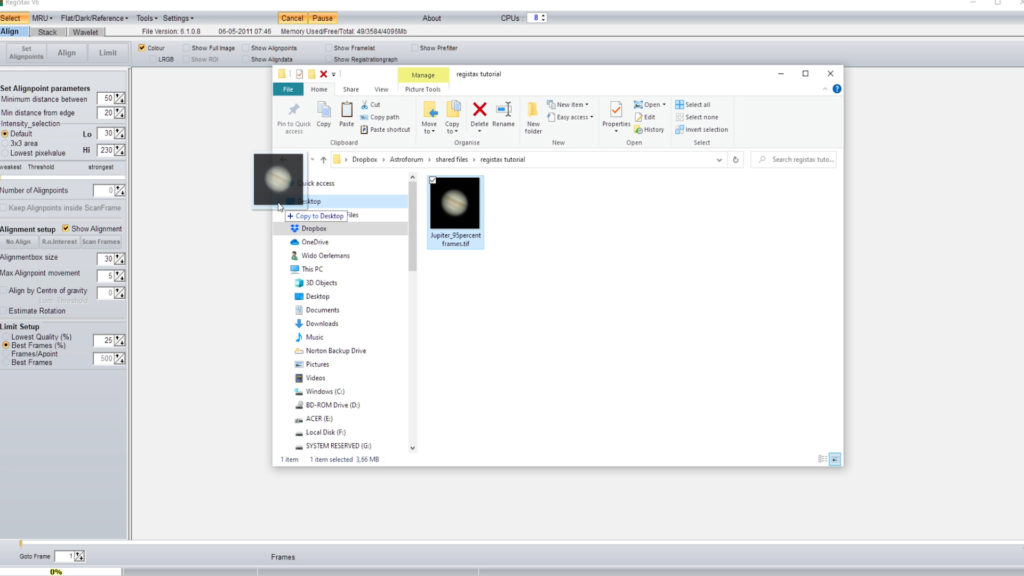
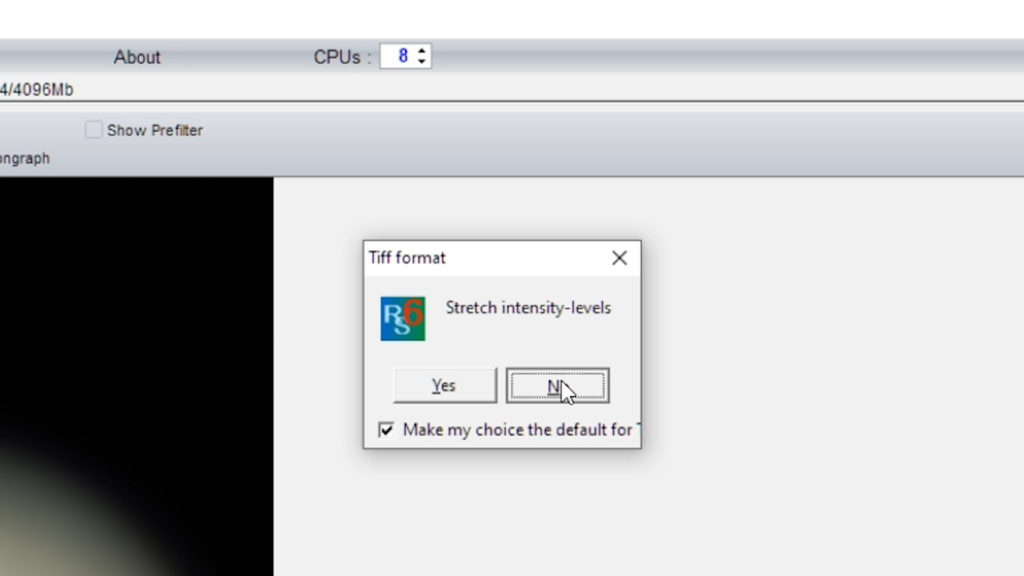
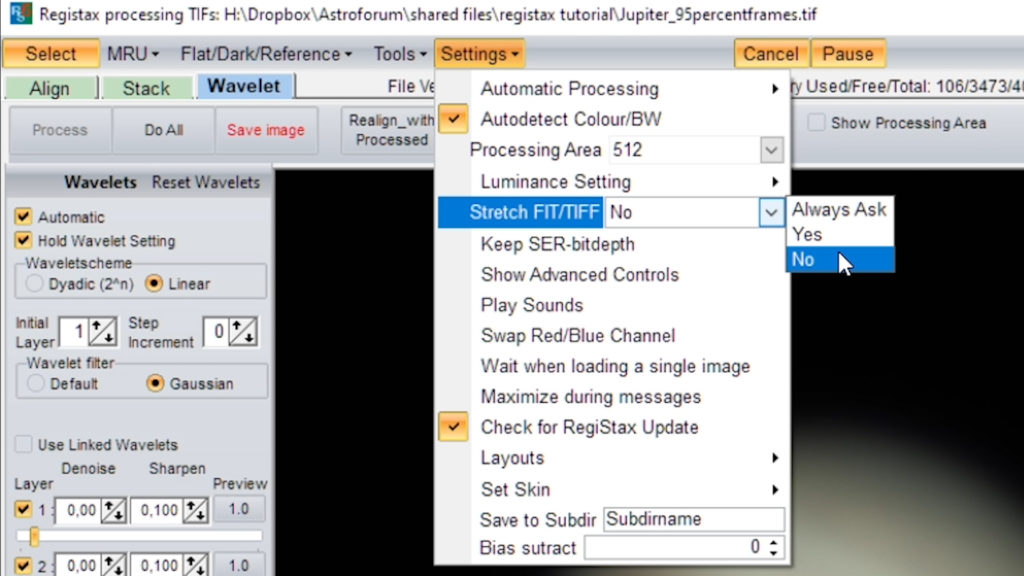
You can download Registax from this website. Note that you should download Registax 6.1 first before you can download and update Registax to its latest version, v6.1.08. After updating and installing the software, we can open up the image created in Autostakkert by simply dragging and dropping the image into the main window of Registax. If you use Registax for the first time, the program will probably show a textbox with the option to “Stretch intensity levels”. Just click “no” and check “make my choice default”, as we are going to process this picture ourselves. Another way to make sure Registax doesn’t automatically stretch your pictures is by clicking on the “settings” tab and set the Stretch FITT/TIFF to “No”. With the image visible in Registax, I always check the “show full image” box which will adjust the size of the picture to fit the view window in Registax.
RGB align and RGB balance
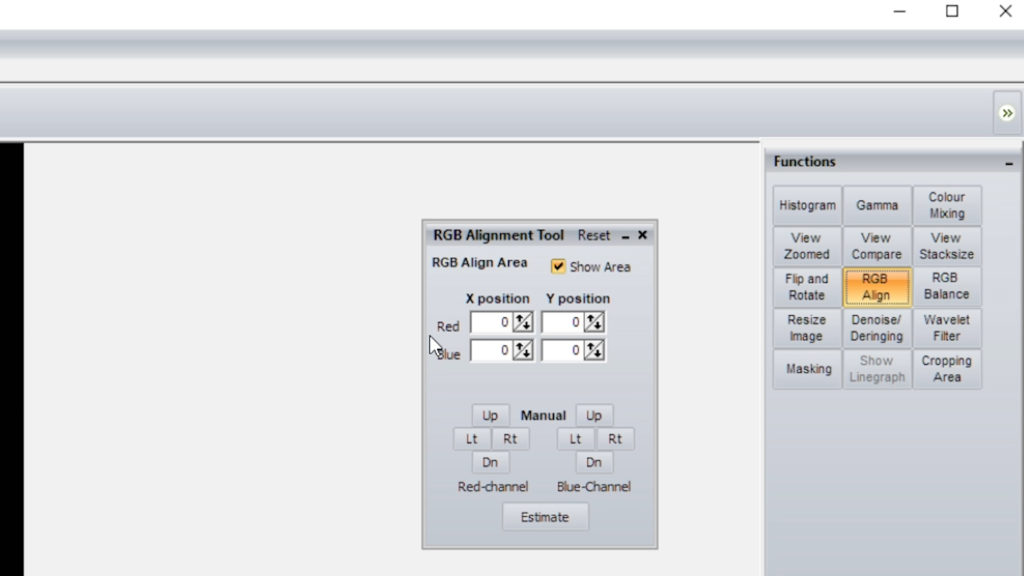
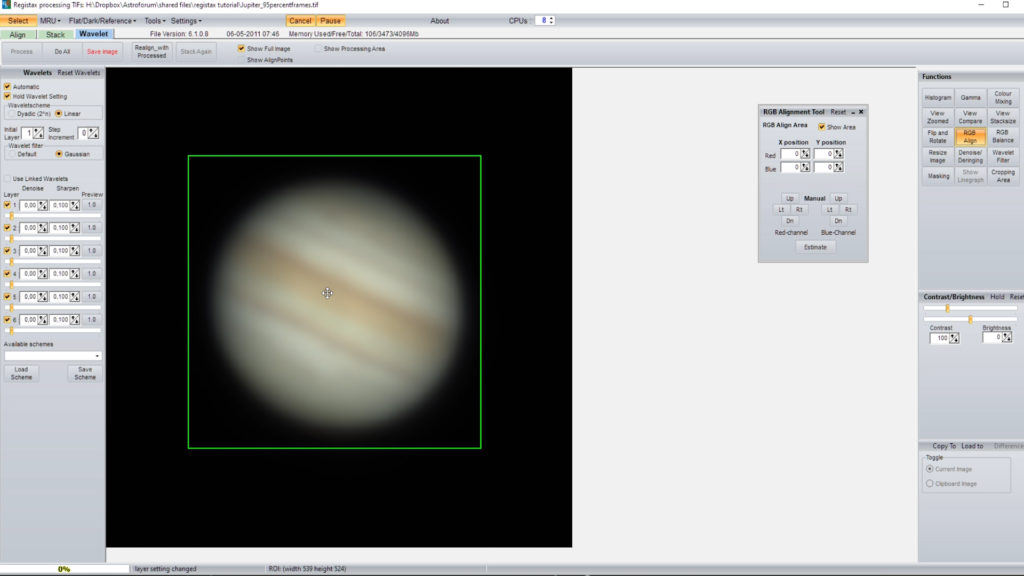
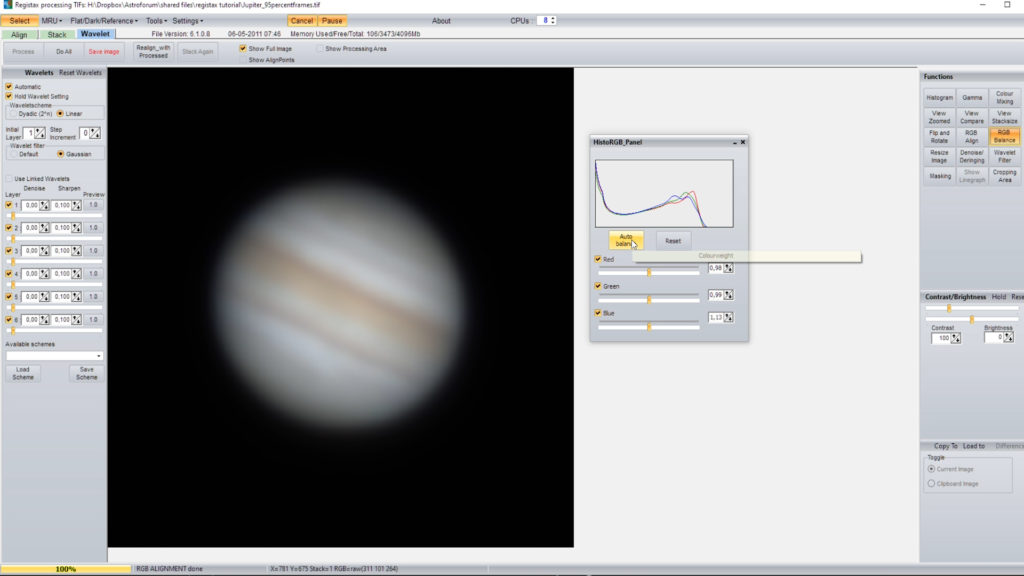
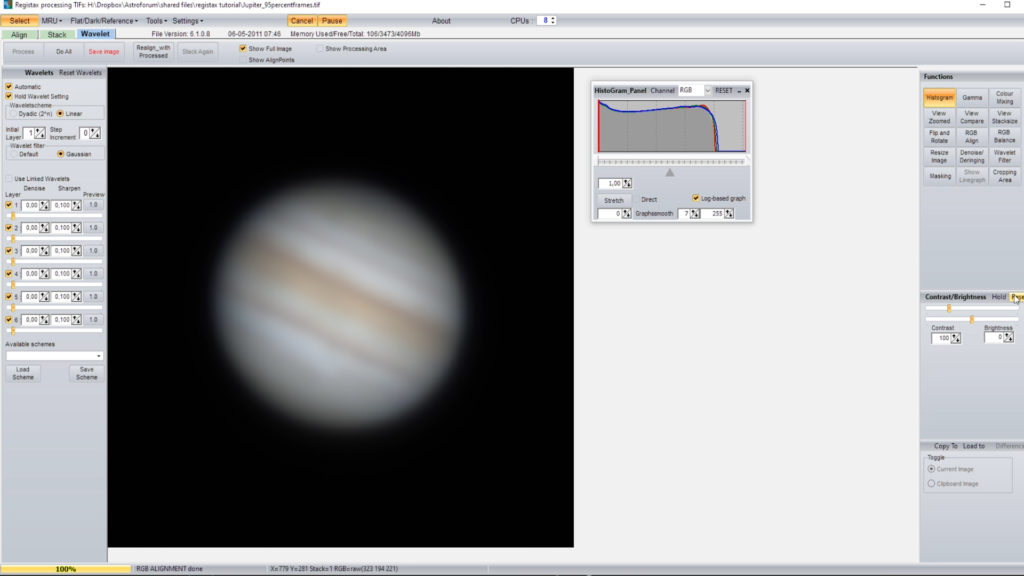
If you already used the “RGB align” option in Autostakkert, your picture should already have a good color balance. Nevertheless, it is always good practice to re-check the color balance in Registax. In order to do so, we need to open up the RGB align function by clicking on “RGB align” in the “Functions” window, towards the top-right of the screen. Note that a green square appears on your image once you’ve clicked on RGB align. You should resize that square so that it encompasses the whole planet. This can be done by left-clicking the corners of the square and holding the left mouse button while dragging your square. You can also reposition the square to encompass the entire planet by left-clicking in the middle of the square, and holding down the left mouse button while dragging the square around. After you have positioned the square, click on “Estimate”. Depending on the speed of your processor and the image size, this may take some time. You’ll notice that the estimation is done when the slider on the bottom left shows “100%” and a message appears with “RGB ALIGNMENT” done. Clicking on RGB align again will close the RGB align window. As a next step, we will open up the “RGB balance” window, which will show you a histogram panel with RGB colors. By simply clicking on “Auto balance”, your picture will be color balanced. After this is done, click the “RGB balance” function again to close the window. As a final check, it is also good practice to open up the histogram function and check the log-based graph. If your picture appears to be a bit too dark or too bright, you could adjust the midpoint of the histogram by left-clicking and dragging the midpoint on the slider to the left for a brighter picture, or to the right for a darker picture. You can also adjust the contrast and brightness of the picture by dragging the contrast and brightness sliders, or the related up and down arrows, on the right of your screen. Take care not to stretch the histogram to a point where the RGB lines do not appear to touch the bottom line of the histogram, as you want to avoid clipping your data. As our stacked picture is bright enough, we will leave the histogram sliders and the brightness and contrast sliders to in the default setting.
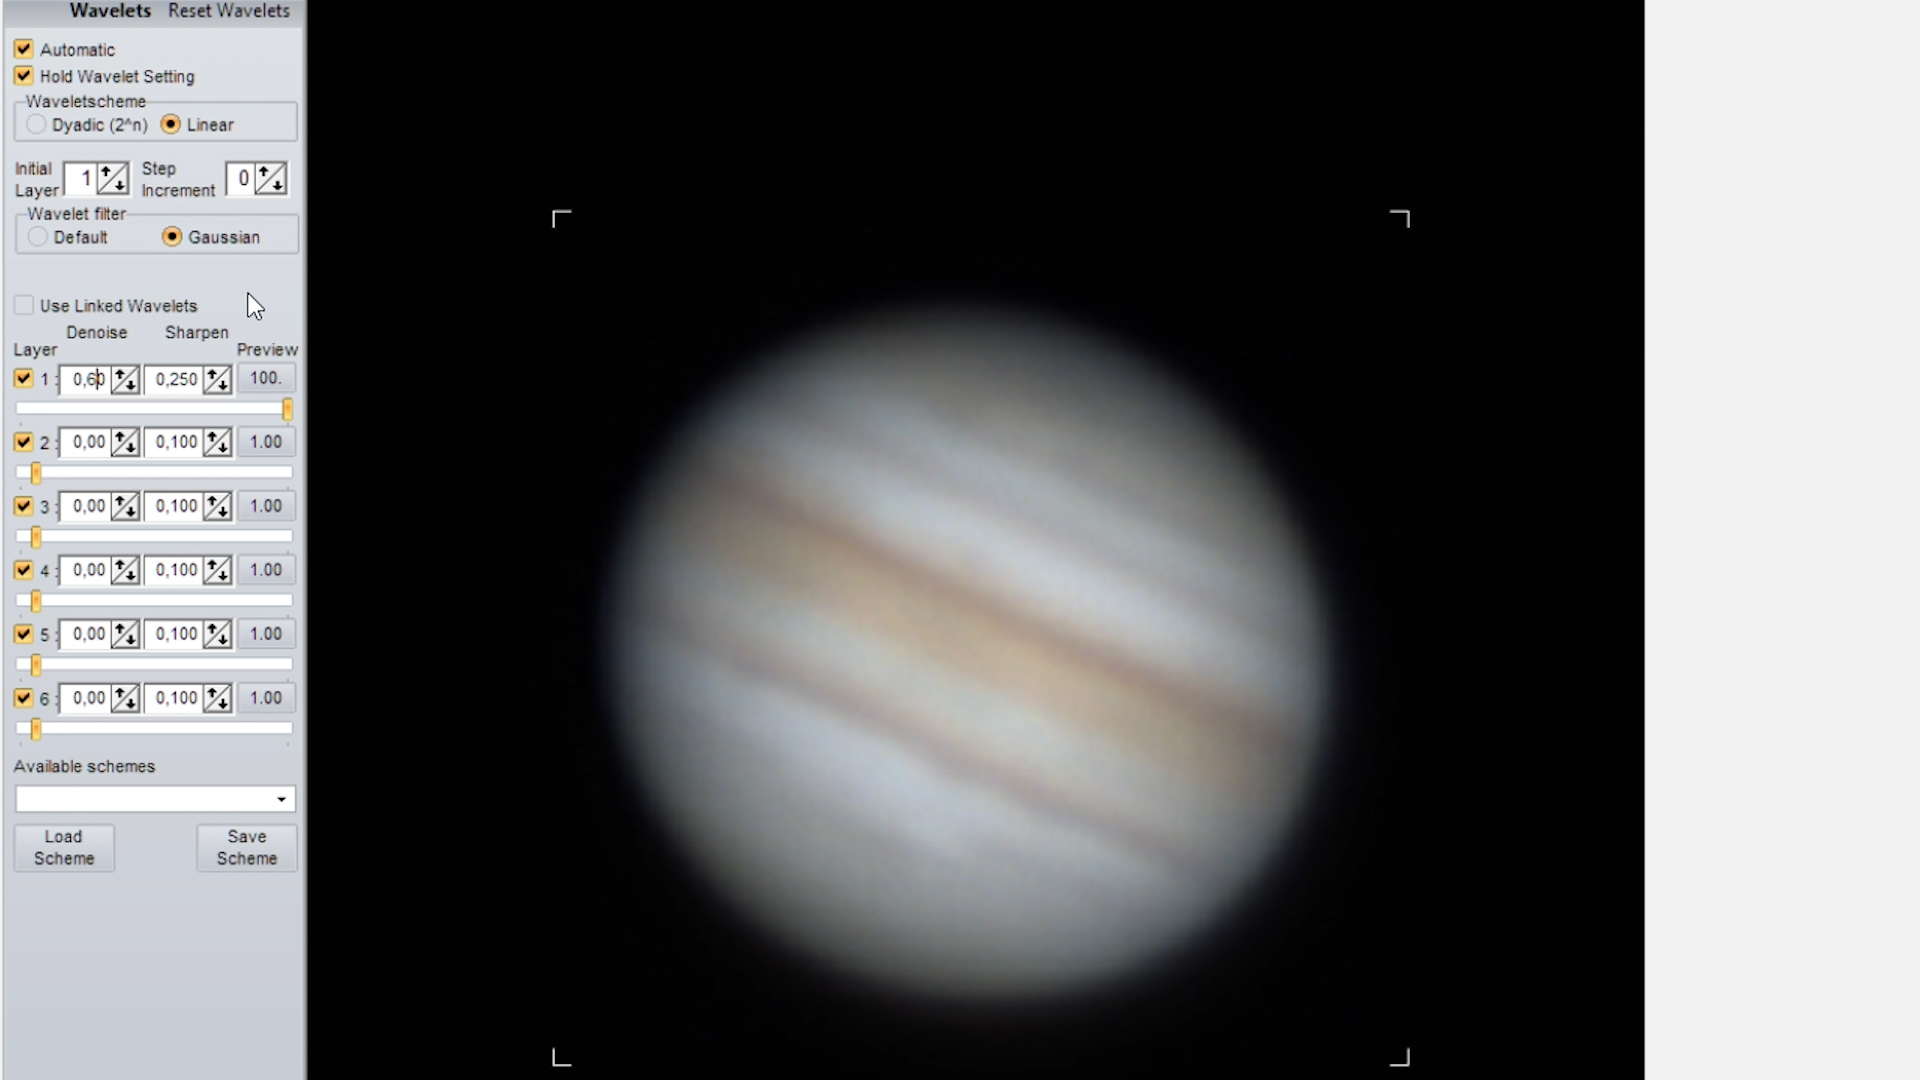
Wavelets Tab
People often say that the wavelets tab is where the magic happens in Registax, and they would be right. A simple way to describe wavelets is that Registax divides your one-dimensional picture into six separate layers. Each of these layers can be sharpened and/or denoised individually, without necessarily affecting the other layer. This gives you much more control over the sharpening and noise reduction process of your picture. I’ll do my best to explain the controls in the wavelets tabs to the best of my ability. After that, I’ll show you three different examples of how I’ve set up the wavelets tab to process the stacked picture of Jupiter created in Autostakkert.
Selecting a processing area
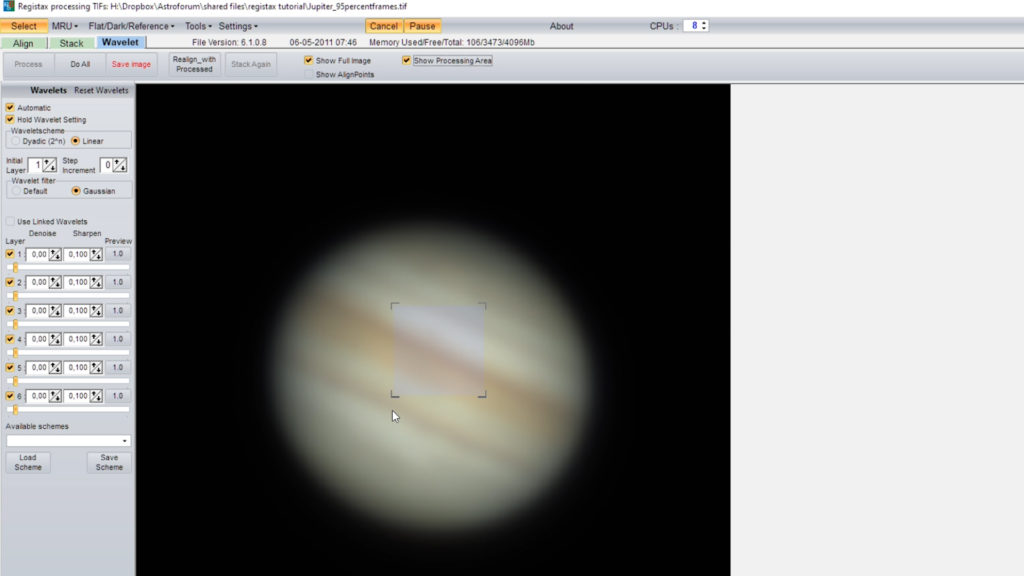
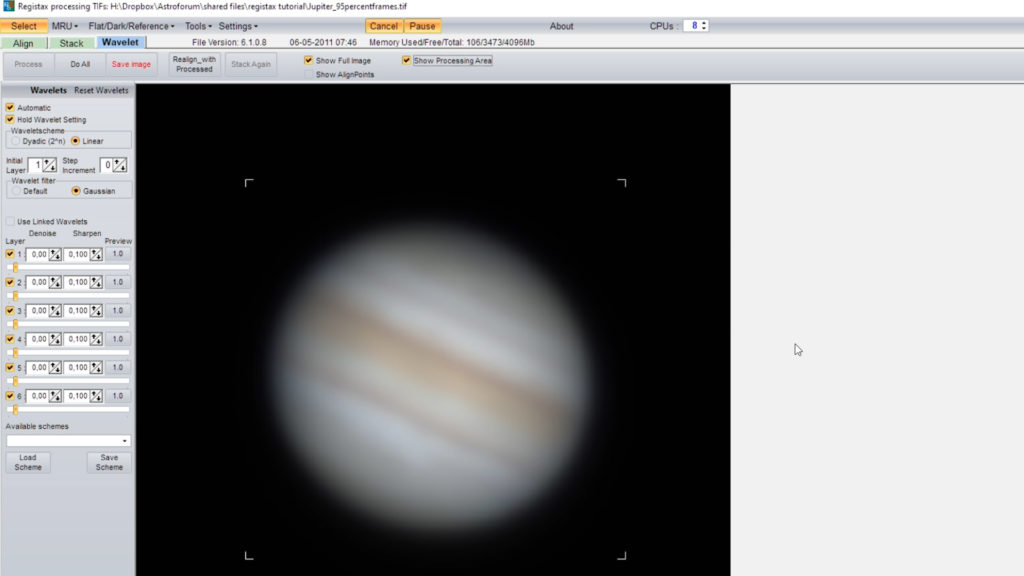
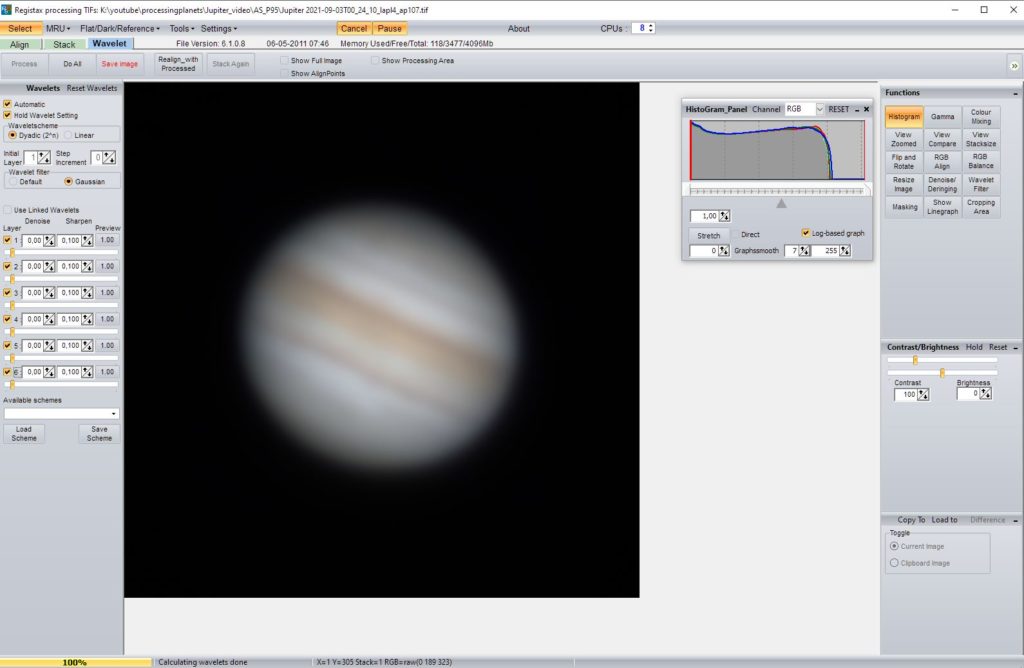
The Registax Wavelets tab should already be highlighted when dragging and dropping your picture into Registax. If, somehow, this is not the case, simply left-click on the “wavelet” tab near the top left of your screen. Directly below the tab, you’ll find two buttons “Do all” and “Save image”. By clicking the “Do all” button, you can make sure that all changes that we are about to make in the wavelets tab will be applied to the entire picture. Let me attempt to explain this. Registax makes a difference between a so-called “processing area” and the full picture. Any kind of changes we make in the wavelets tab, which I’ll discuss in a minute, will only be applied to the so-called “processing area”, and not the entire picture. This is especially useful when dealing with larger, more detailed pictures, like the surface of the moon, when it may take some processing time to apply changes to the entire picture. By selecting a smaller processing area, the changes are first applied to that area only, which increases processing speed. Once you’re satisfied with the results, you can click the “Do all” button, and the changes will then be applied to the entire picture.
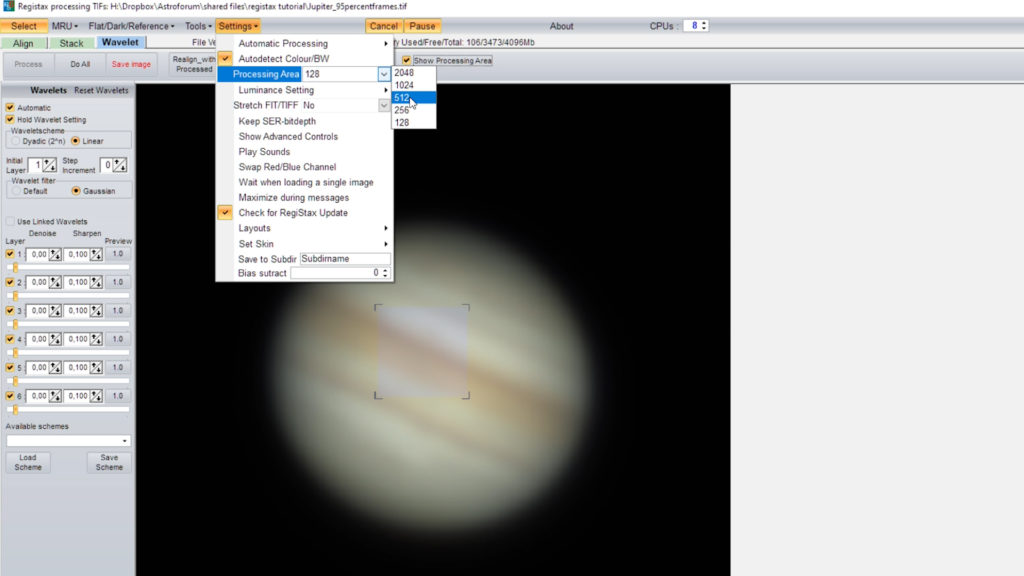
As for planets, many of us will end up with pictures that are less than 1000 x 1000 pixels anyway, so processing speed will already be rather fast. So for smaller planetary pictures, it is best to set up a processing area that already encompasses the surface of the entire planet. You can change the size of the processing area in settings, by selecting the different sizes in the dropdown box of the “processing area”, with the smallest area being 128 pixels. You can change the position of the processing area by left-clicking on the picture. This will highlight the area in the picture which will be processed. As said before, I would recommend you select a processing area that encompasses the entire planet. In the case of our picture of Jupiter, a processing area of 512 is already enough to cover the entire planet, so let’s select that processing area. Remember that every time we will make some changes in the wavelets tab, these changes will be directly applied to the processing area.
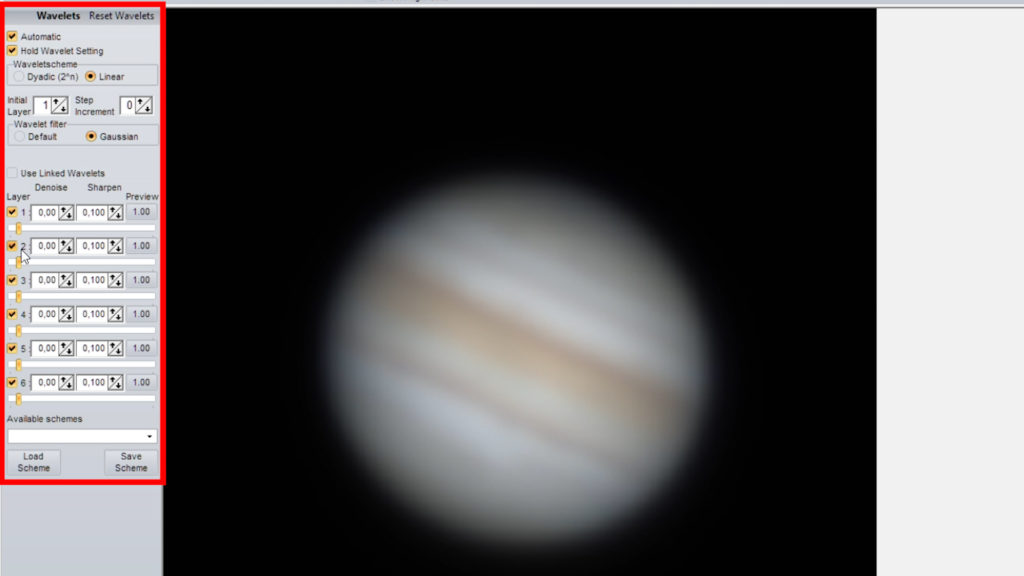
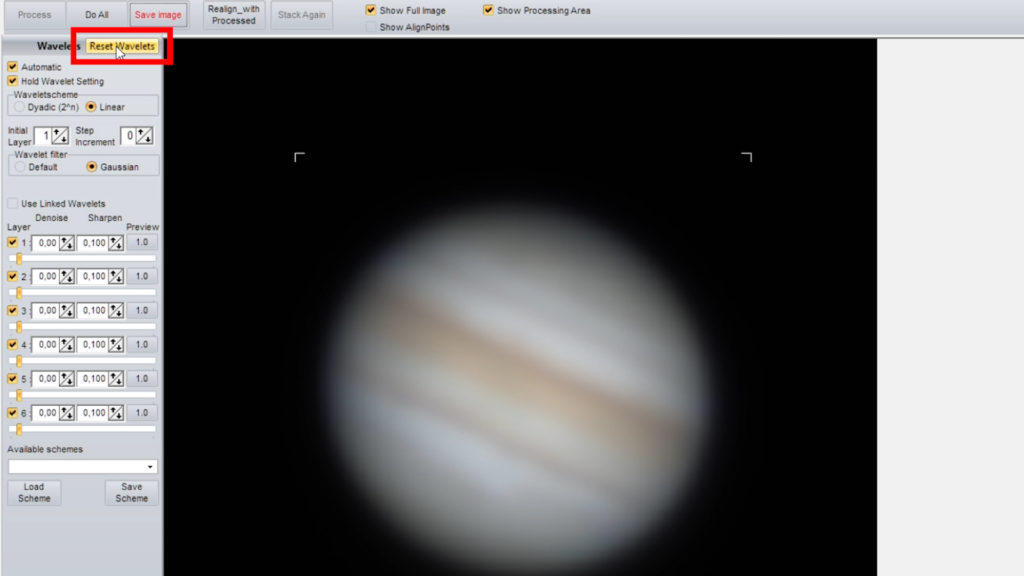
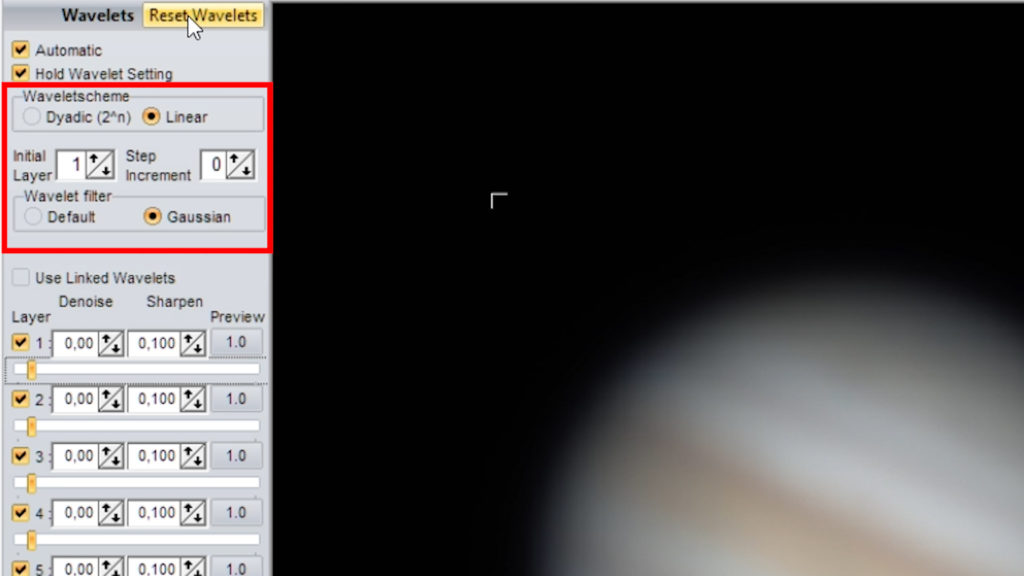
Note that there are some additional functions at the top of the wavelets tab. There are two checkboxes on the top left of your screen: “automatic” and “hold wavelets setting”. I would recommend you leave these checked, as they are by default. Automatic relates to the automatic application of the changes we are going to make to the processing area, which in practice will give us a real-time view of the changes in the picture. The “hold wavelets setting” relates to memorizing the settings in the wavelets tab when opening up a new image. We also have a “save image” button to save our images in tiff, png, jpeg, fit, or bmp format once you’re satisfied with the results. Also, notice the “reset” wavelets” button. This is nice to have when you are playing around with the wavelets options, and at some point want to start over. You can simply click the “reset wavelets” button and this will reset all wavelets to their default settings.
Wavelet filters
Let’s now discuss the wavelet schemes and wavelets filters. Wavelet filters can be explained in one sentence, you want to use the default “gaussian” setting, as this will allow you to denoise and sharpen your picture for each of the six layers. The default option was created in earlier versions of Registax and is inferior as it does not include the option to denoise each of the layers. As for wavelet schemes, this is more complicated so let me try to explain what it does and give you a couple of examples.
Layer adjustments: Denoise, sharpen, and slider
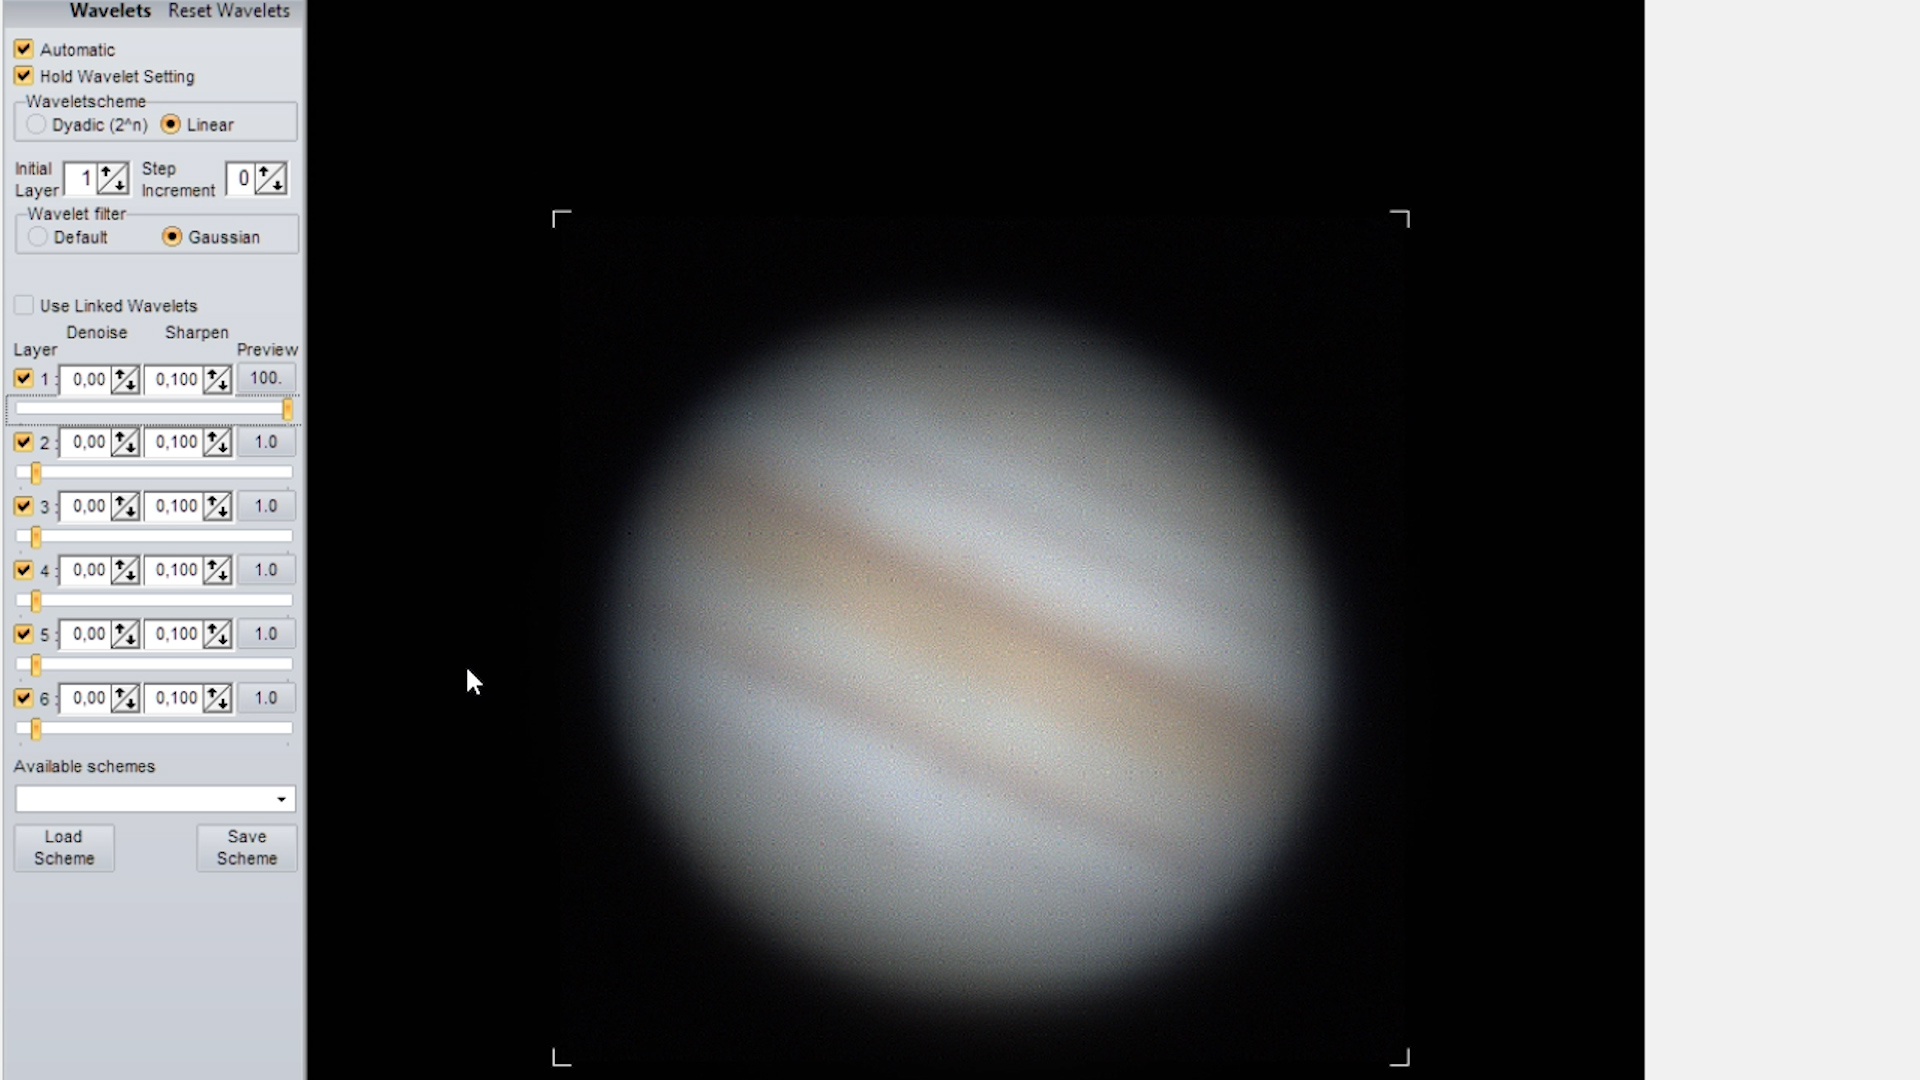
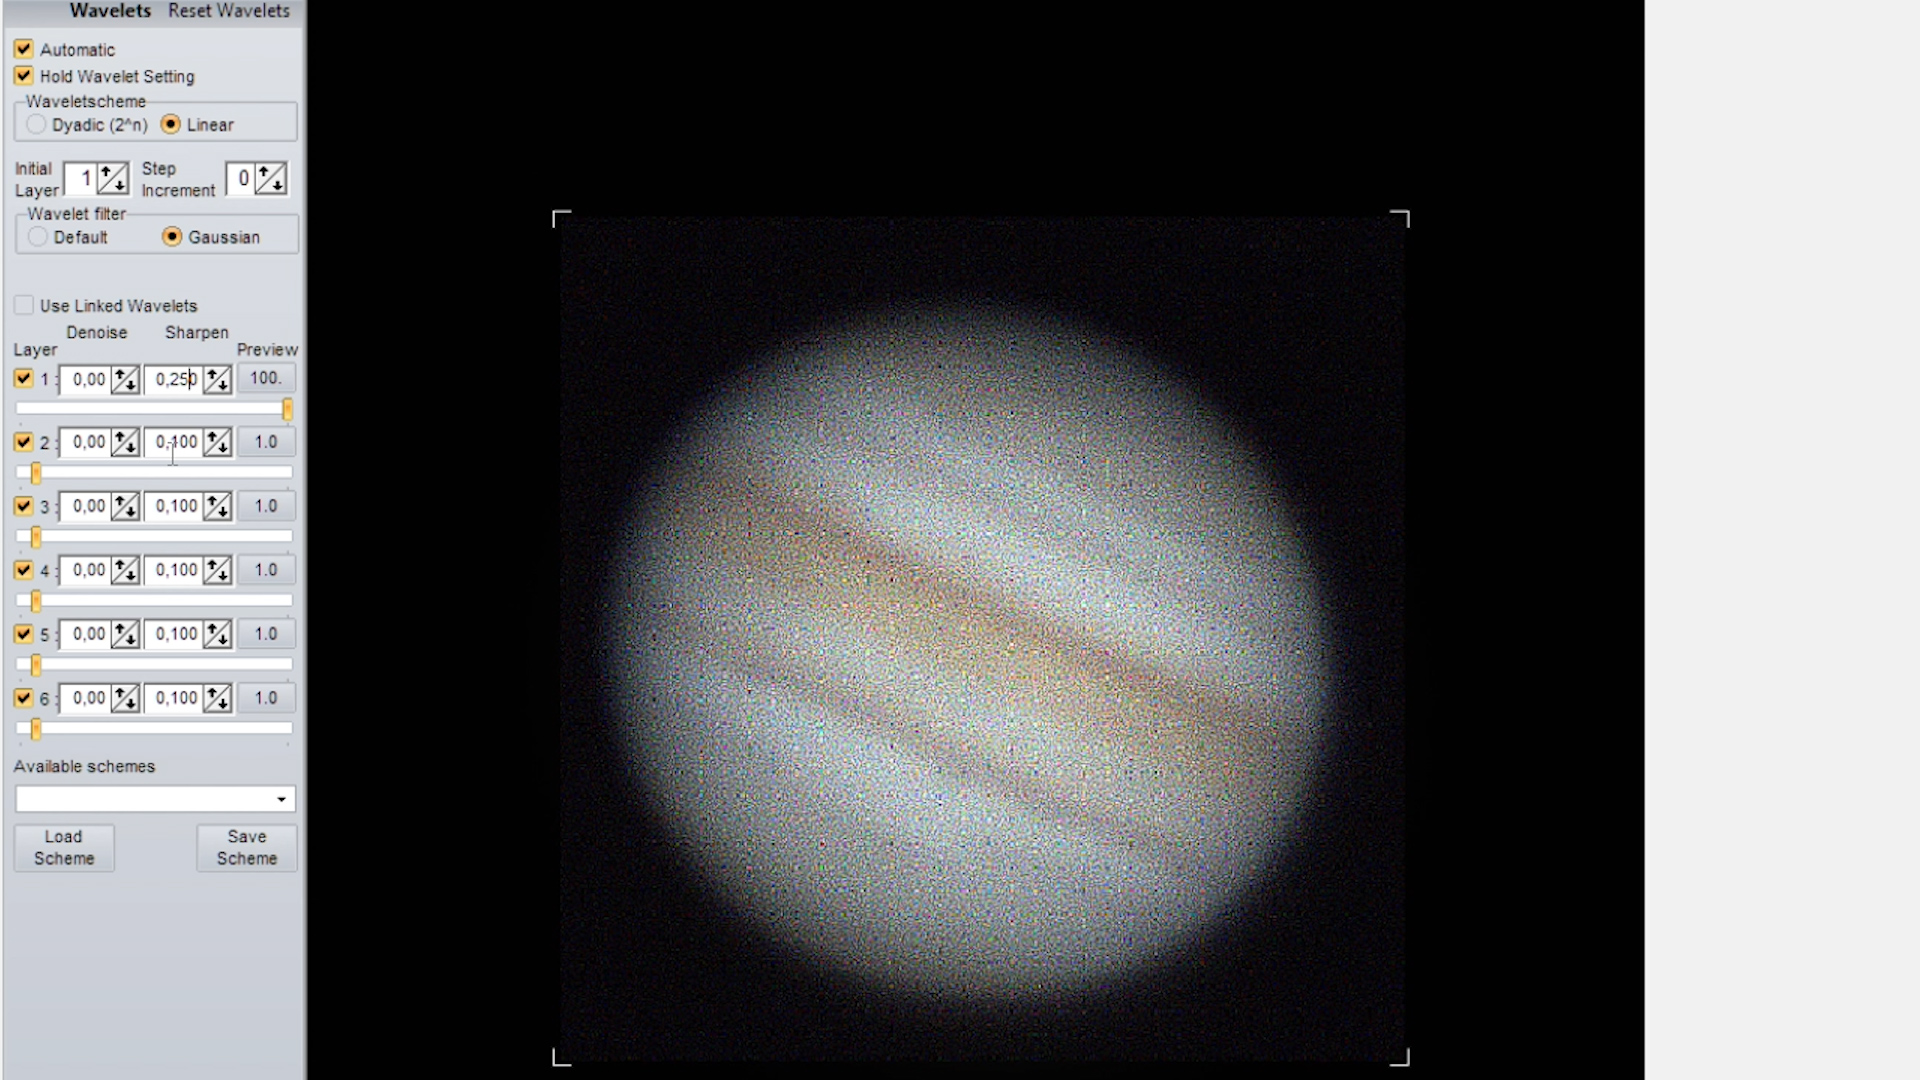
Each layer in Registax has three functions; sharpen, denoise, and the slider, so let me quickly explain what they are for. Let’s reset all the wavelets to default. First, the slider indicates the degree to which each of the sharpen and denoise settings of that layer will be applied to the picture. So let’s start by moving the slider of layer 1 all the way to the right. This simply means that you have applied a (default) sharpen of “,100” to the first layer of your picture at 100% strength. Now, let’s increase sharpen to “0,250”. You can use the textbox or the up and down arrows to adjust the value. Note that the picture is more aggressively sharpened, which also introduces more noise to the picture. You can deal with that increase in noise by increasing the value of the denoise setting. For this example, let’s set denoise to “0,3” by typing it in the texbox or by using the up and down arrow keys. As soon as apply the denoise, you’ll notice that the noise is greatly reduced in the picture. Now. let’s change the slider to about the midpoint of the layer (about 50%). You’ll notice that the degree to which sharpen and denoise is applied to that layer is reduced in half. You can adjust each of the layers in a similar fashion until you’re satisfied with the result. When you get lost in applying settings across layers, simply pressing the reset wavelets button will allow you to start over.

Understanding Wavelet schemes
Dyadic wavelet scheme
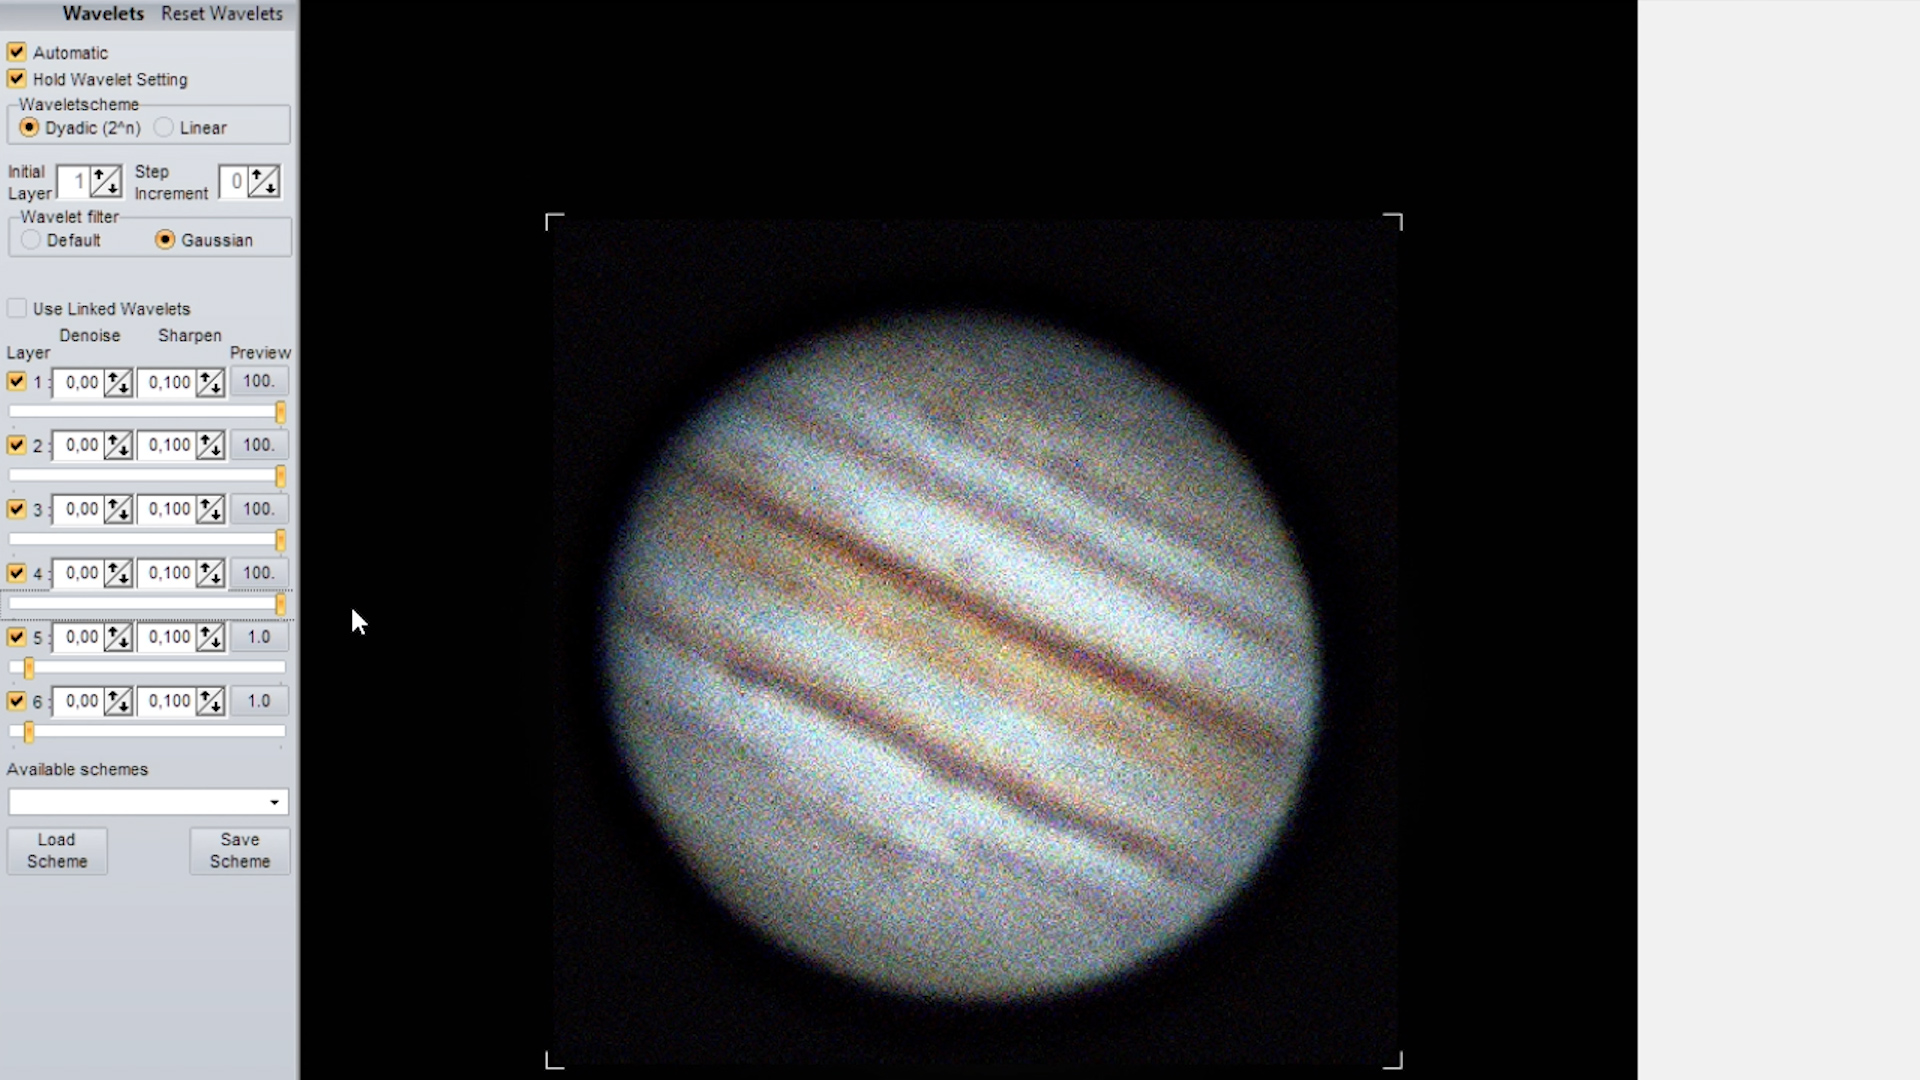
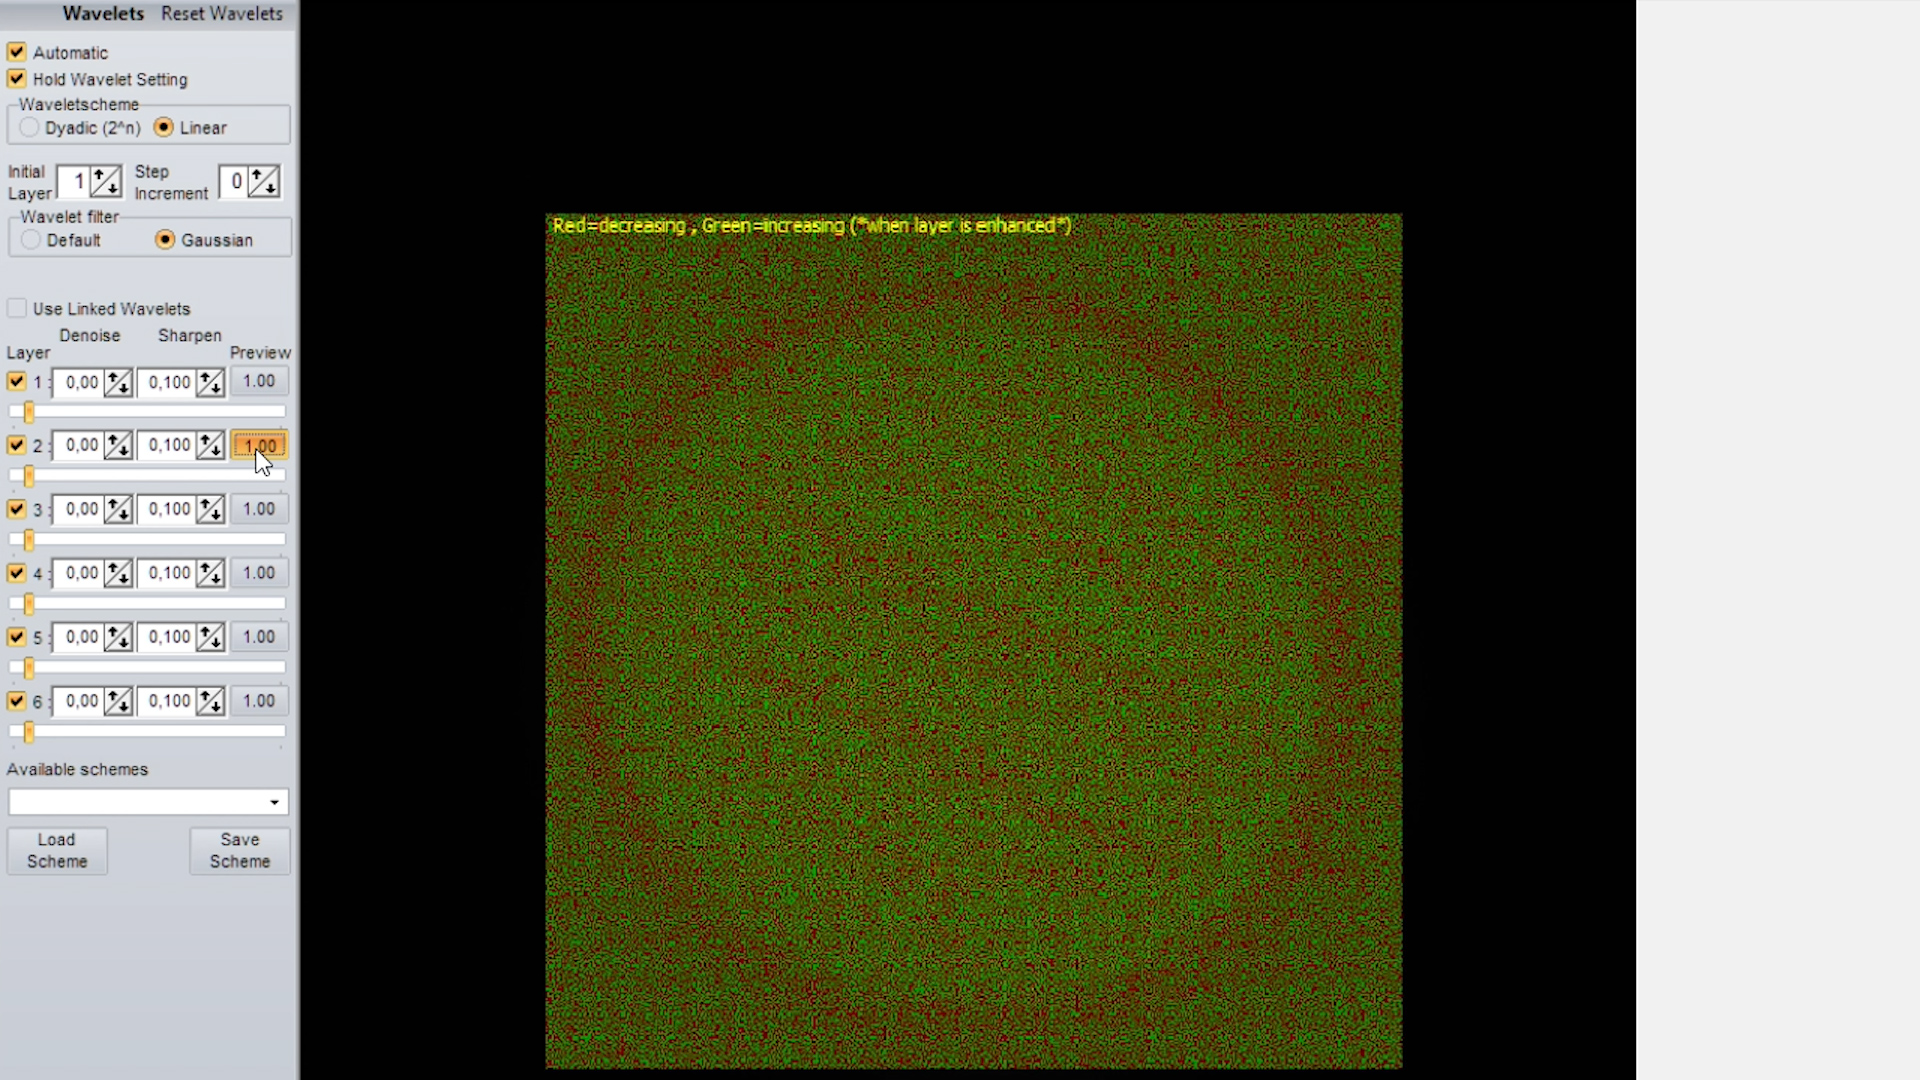
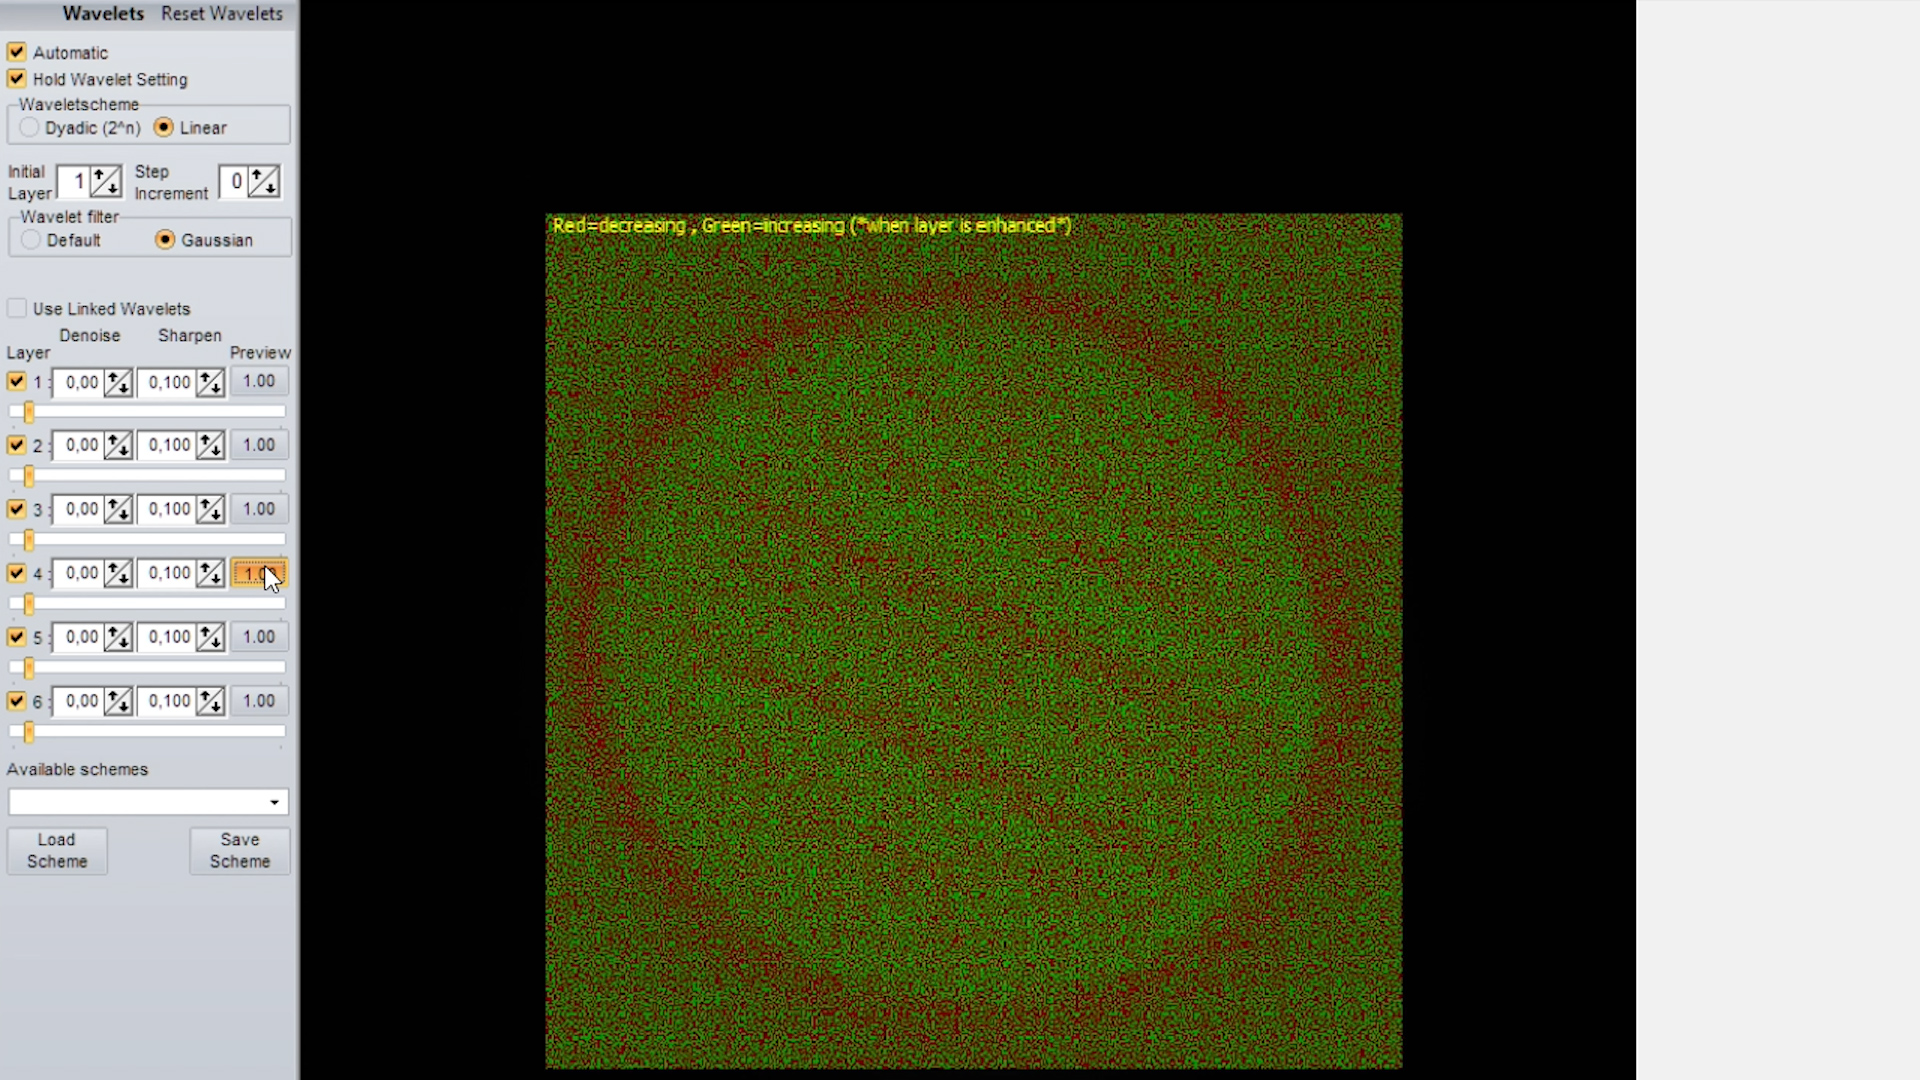
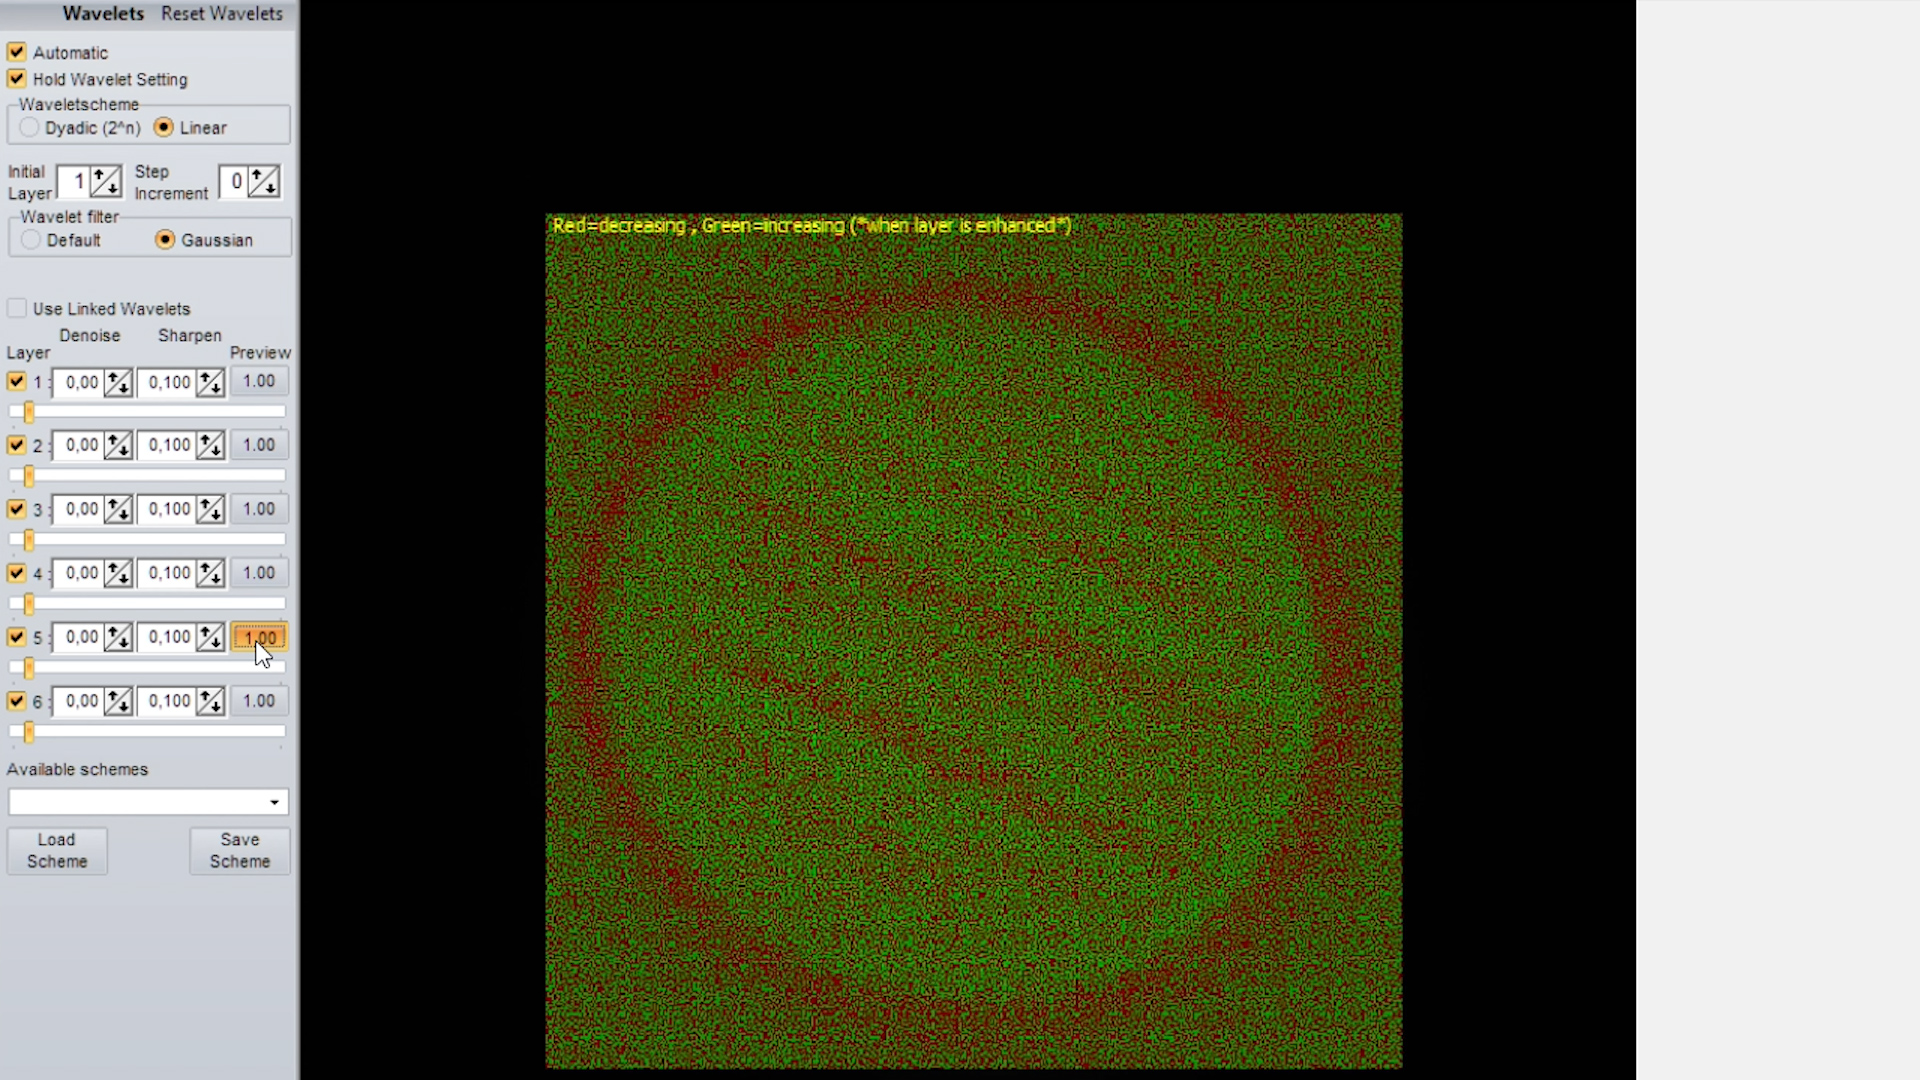
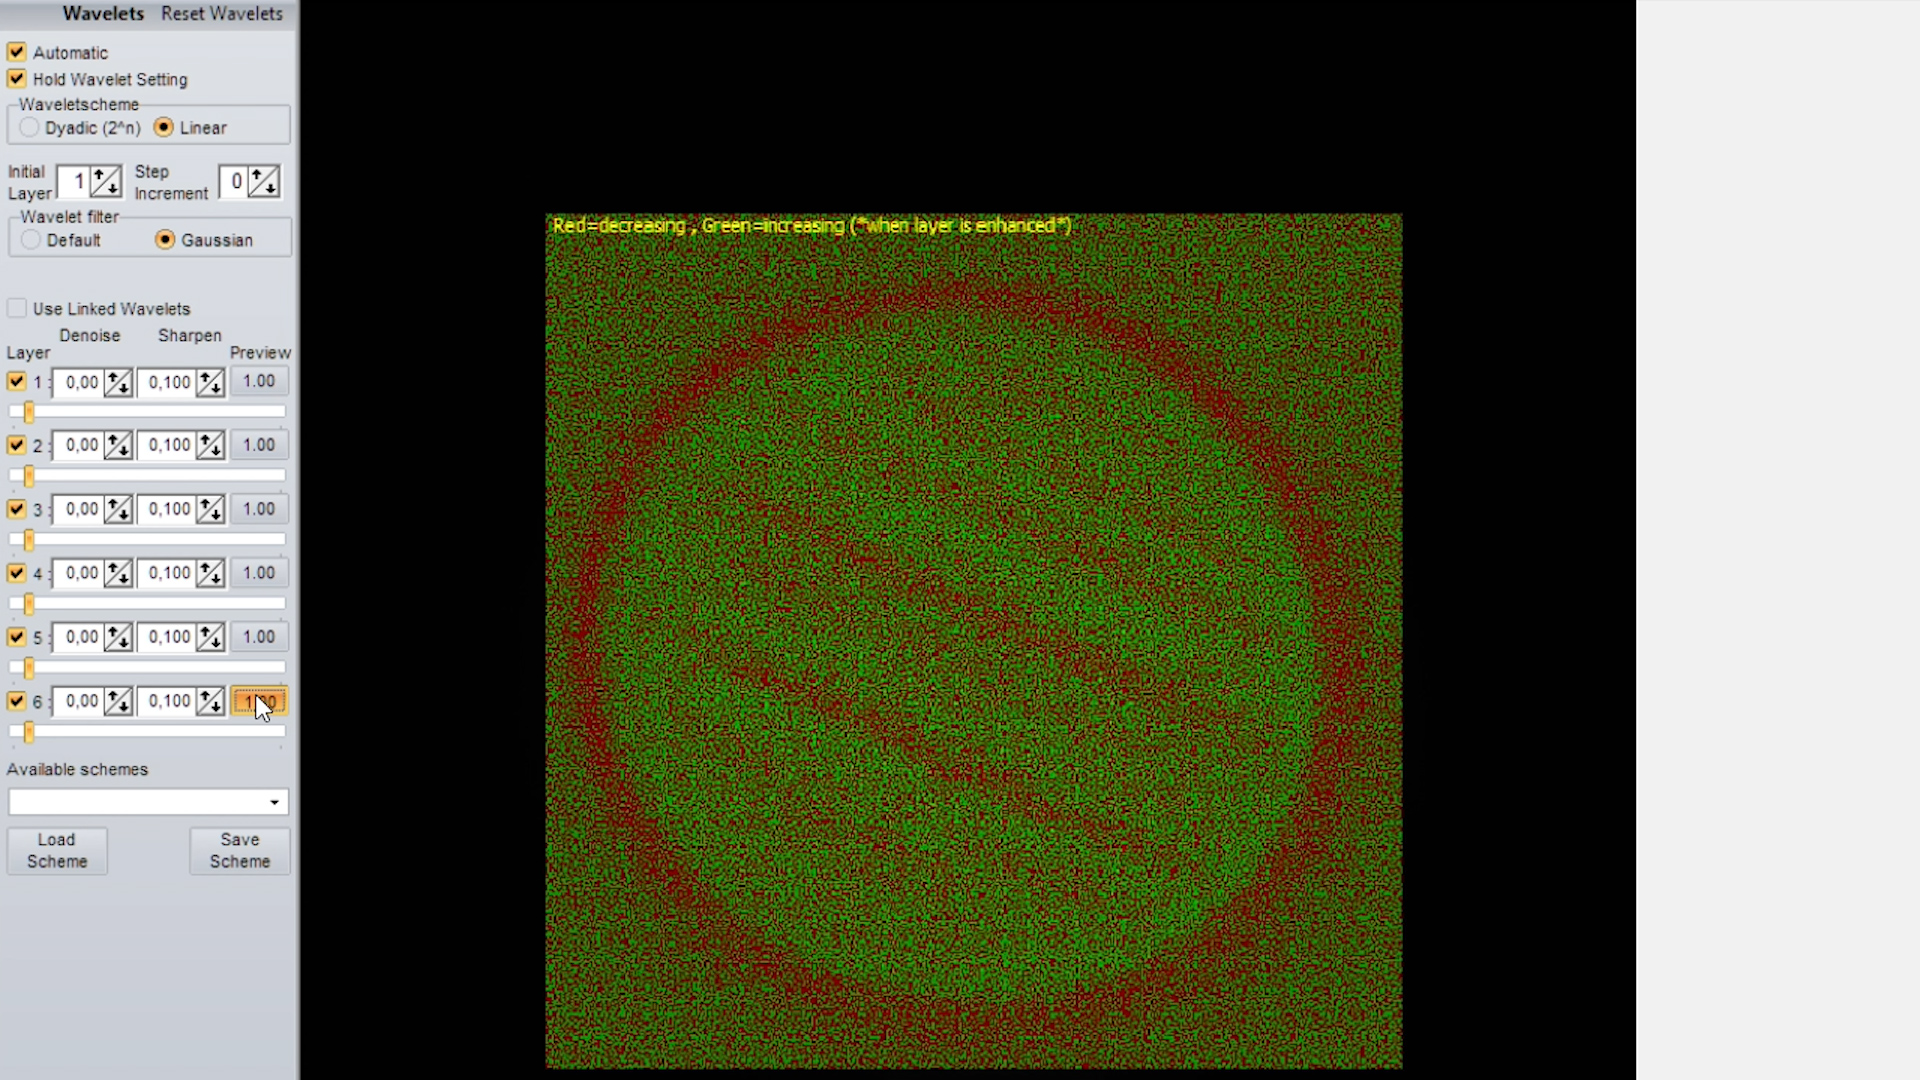
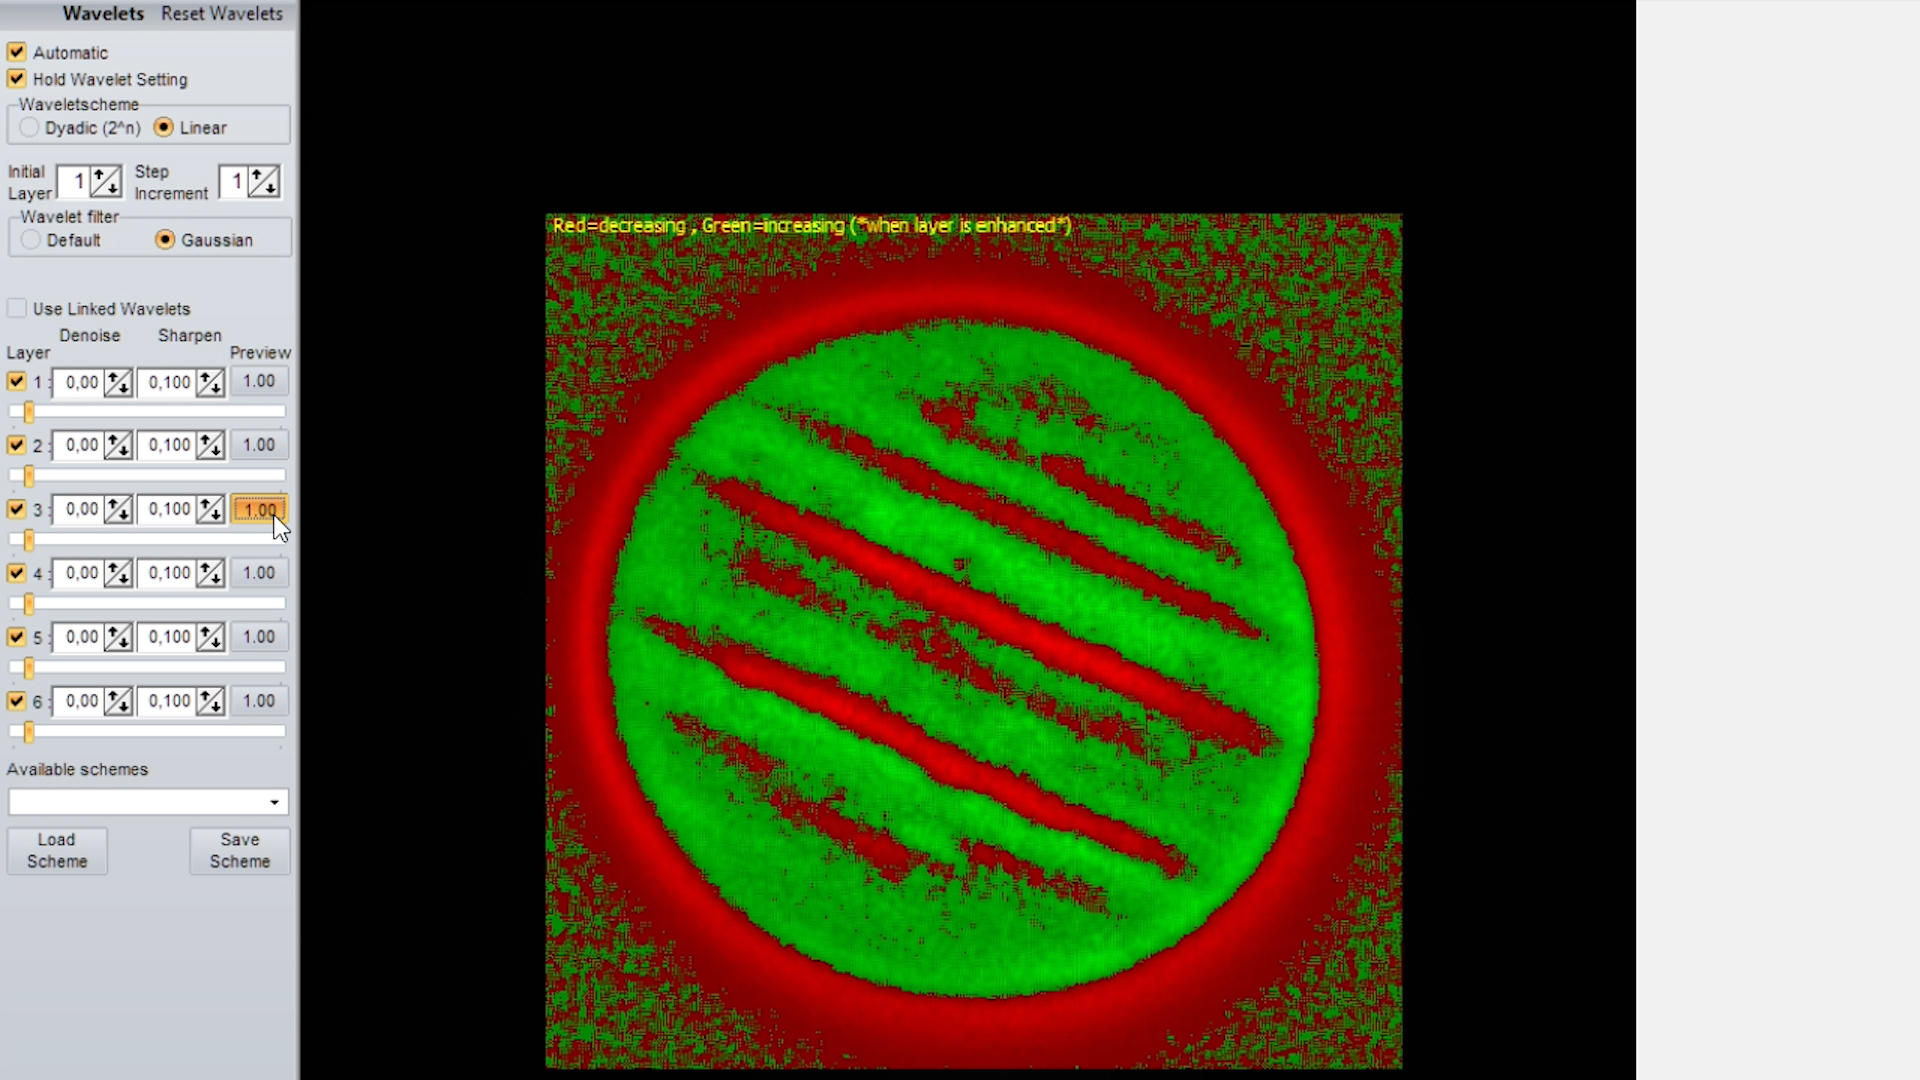
There are two wavelets schemes to choose from, dyadic and linear. When choosing Dyadic, this will load a scheme for the six layers where each layer will have a 2x increase in the size in pixels that will be affected as compared to the previous layer. When selecting dyadic and clicking on the preview button, the green dots represent the pixels that will be affected in the picture by the settings of that particular layer. Please note that with each consecutive layer, you’ll see a sizable increase in green dots when using the dyadic scheme. So, as compared to the first layer, the second layer affects 2x the size in pixels of the first layer, the third layer will affect 4x the number of pixels, the fourth layer affects 8x, the fifth 16x, and the 6th layer affects 32x the number of pixels as compared to the 1st layer.
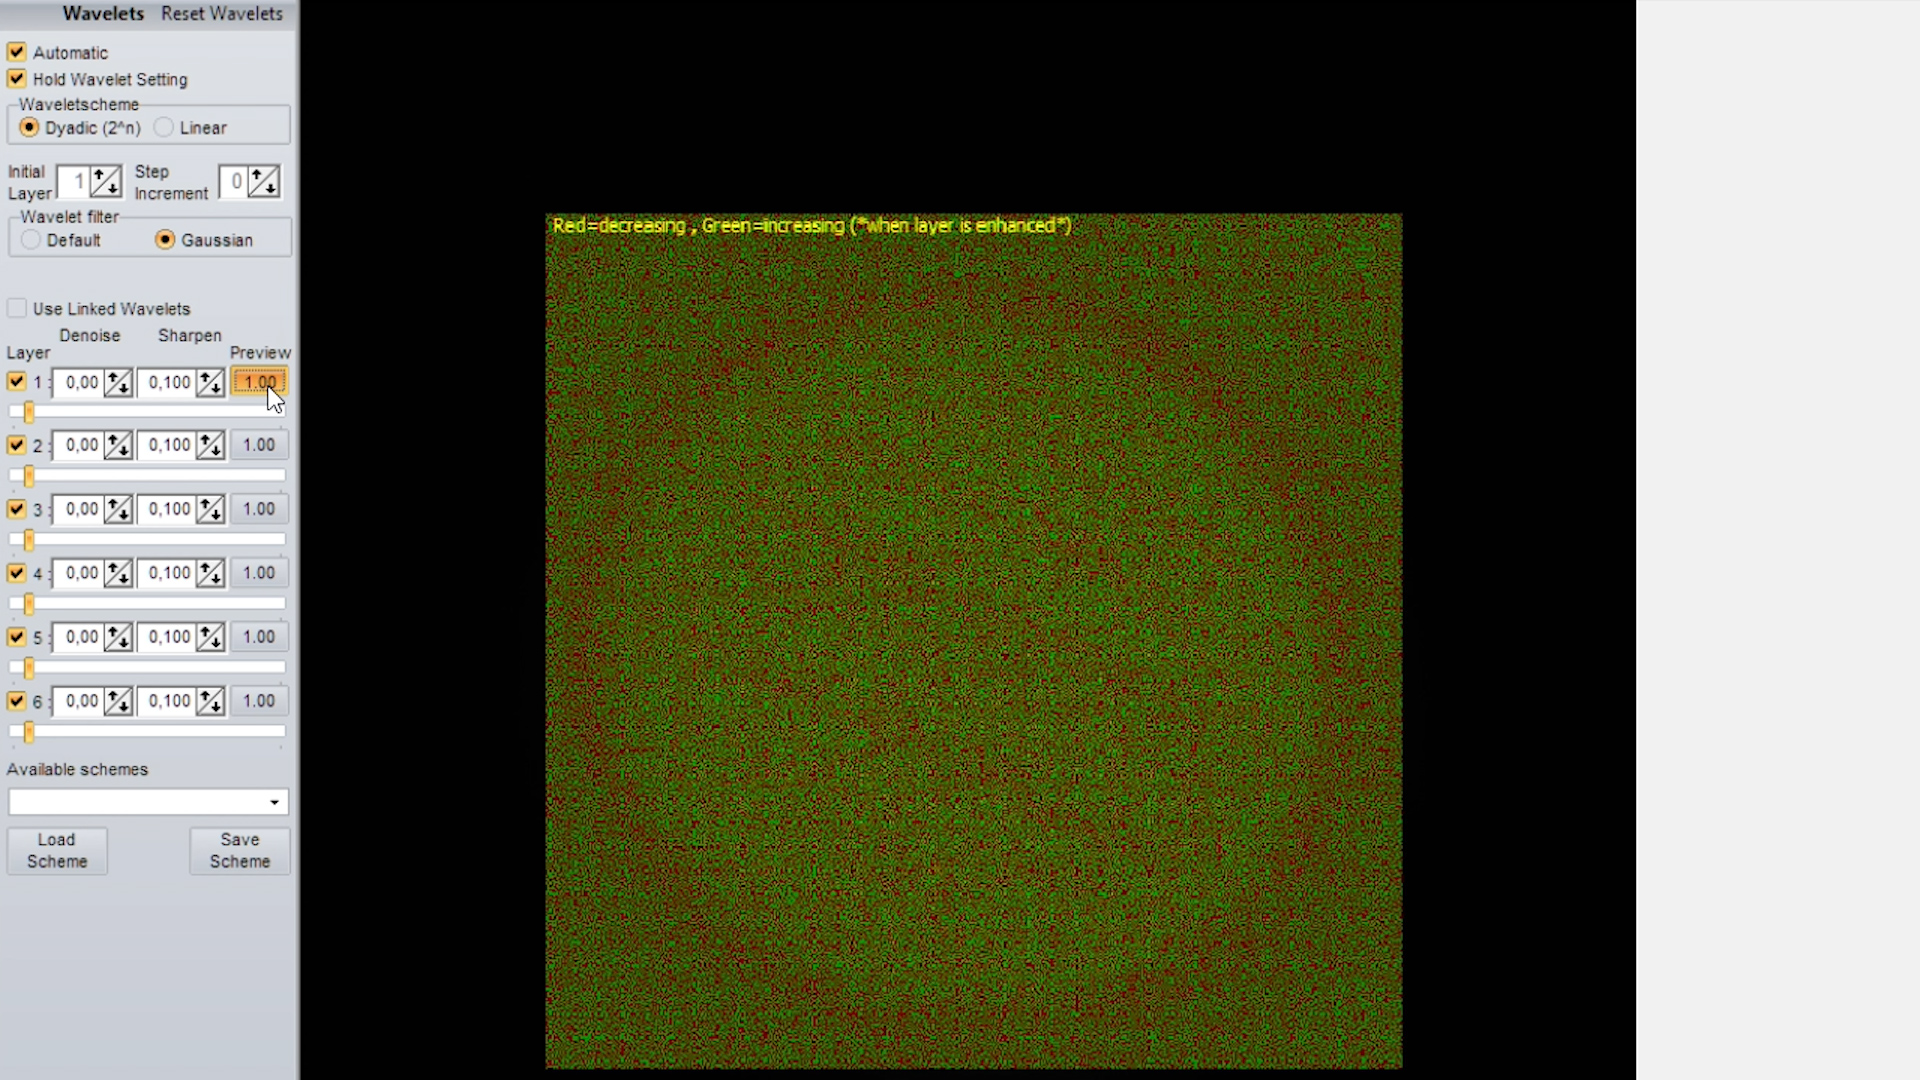
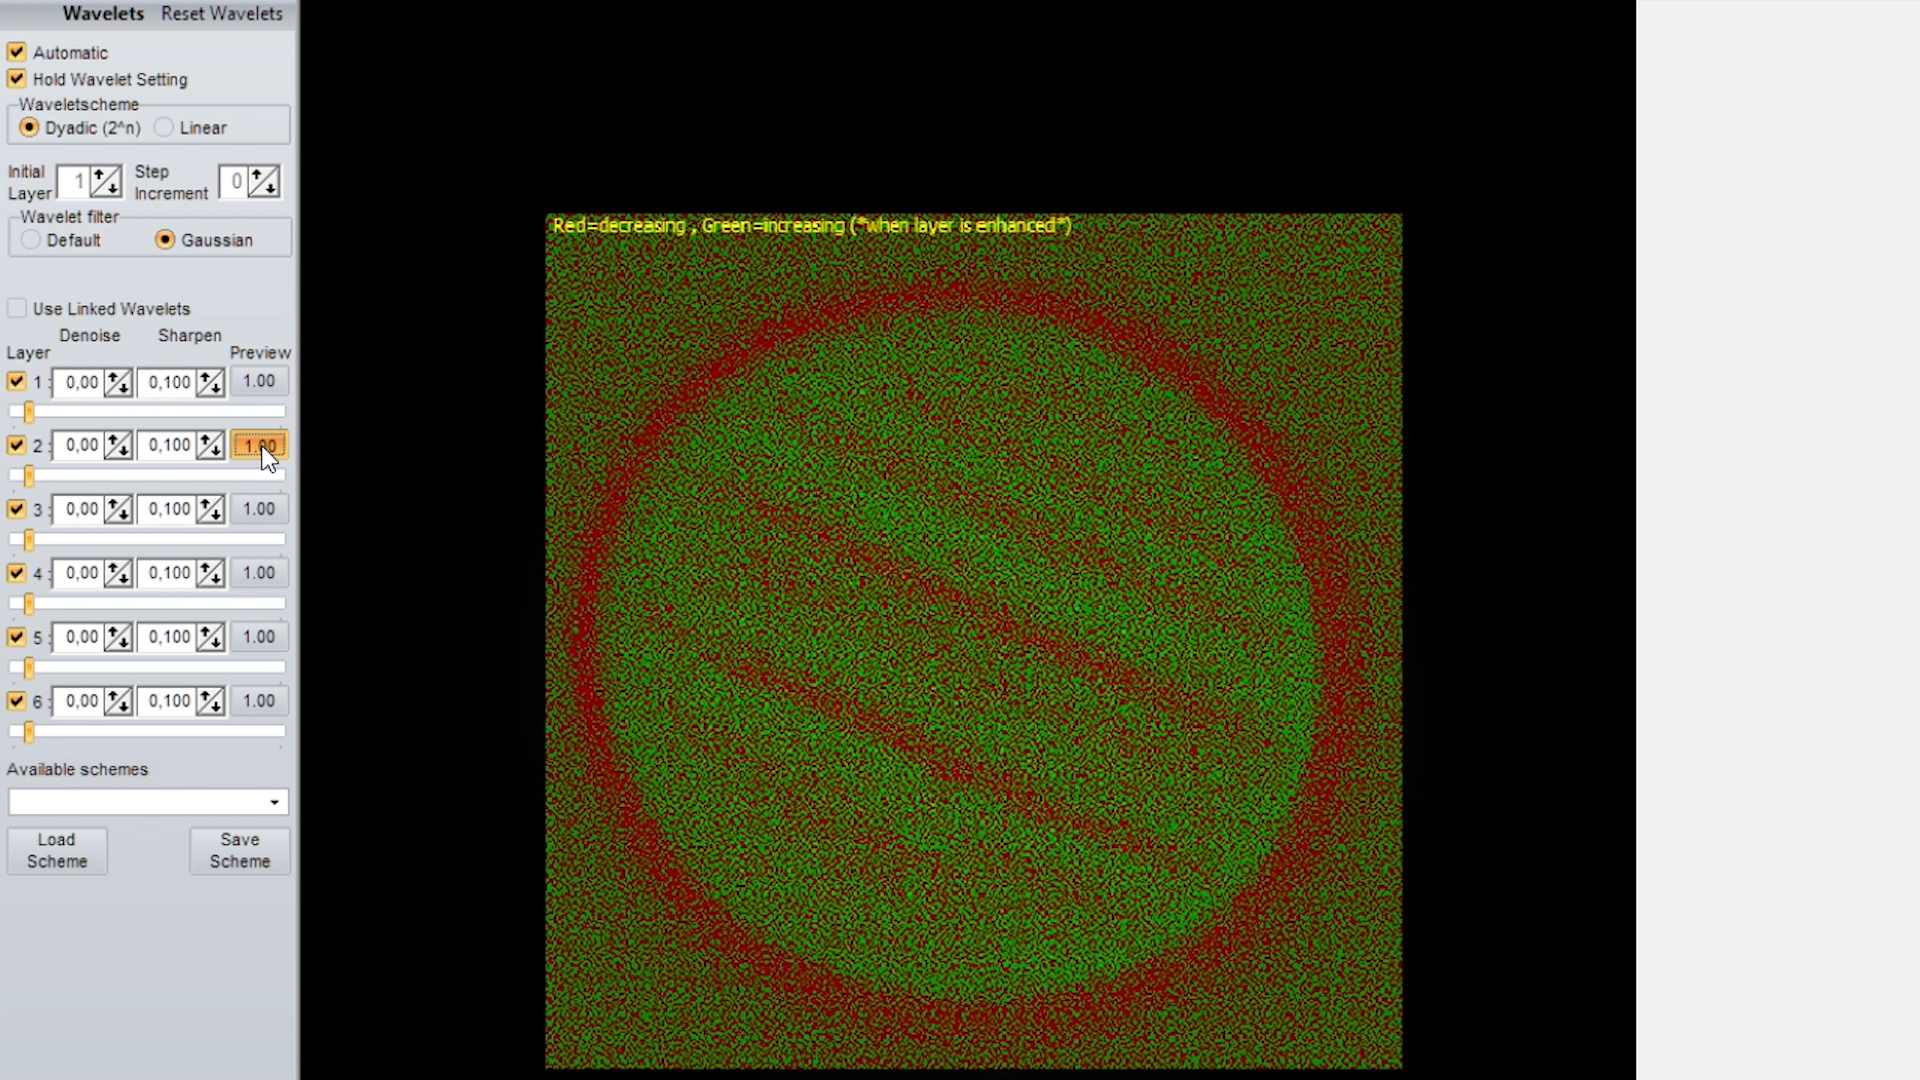
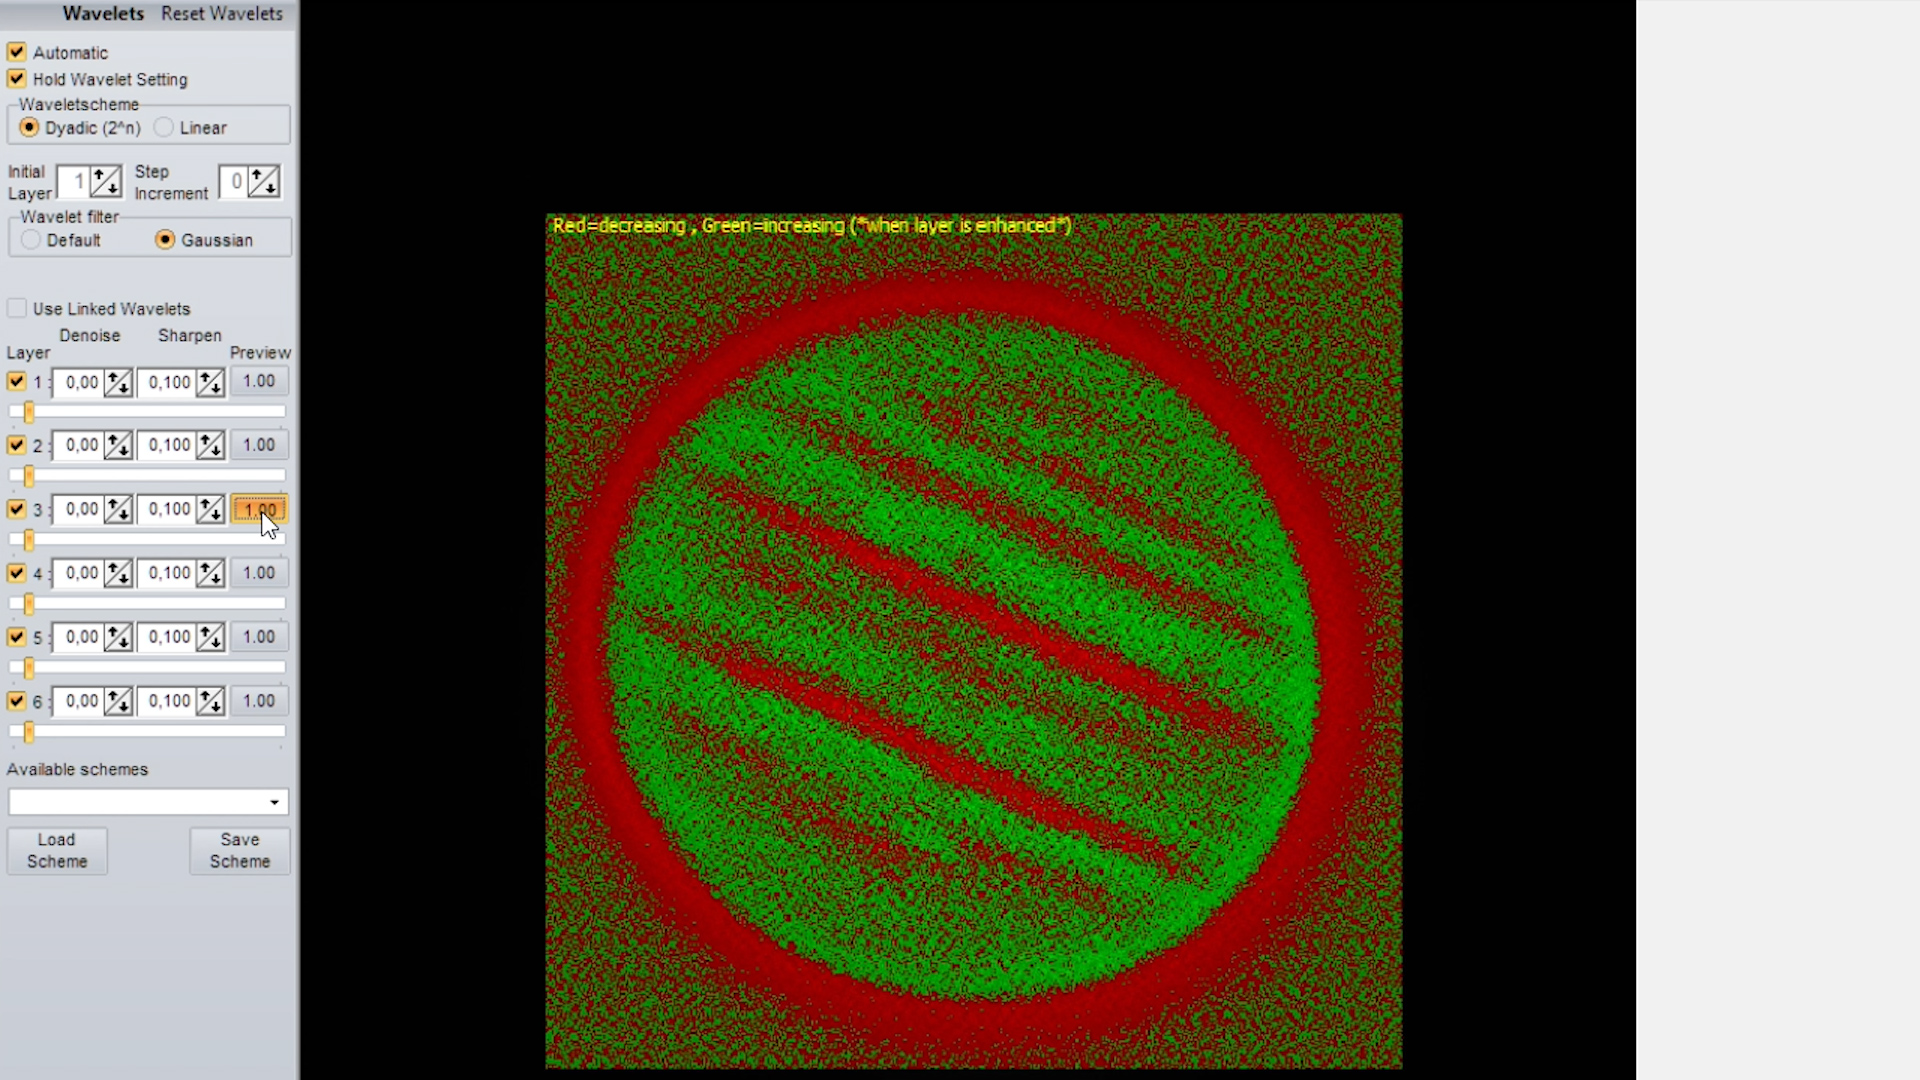
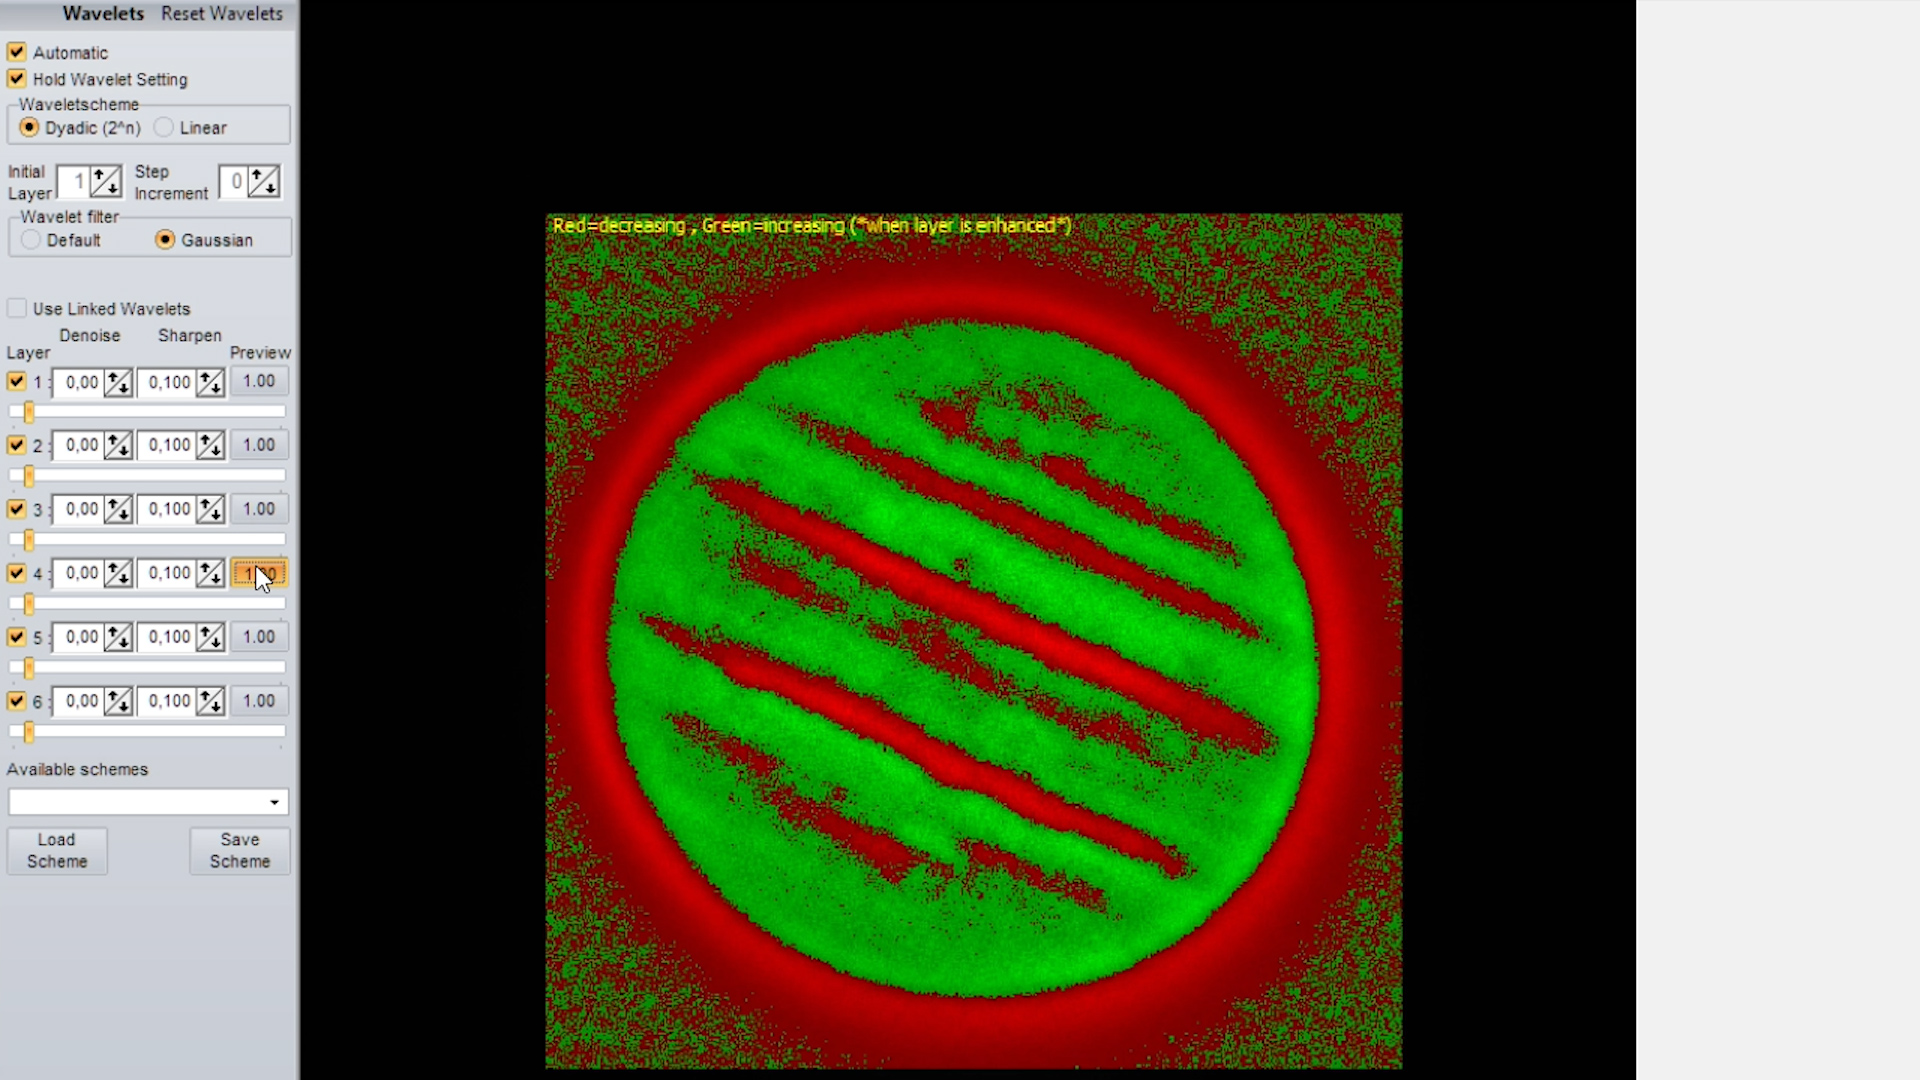
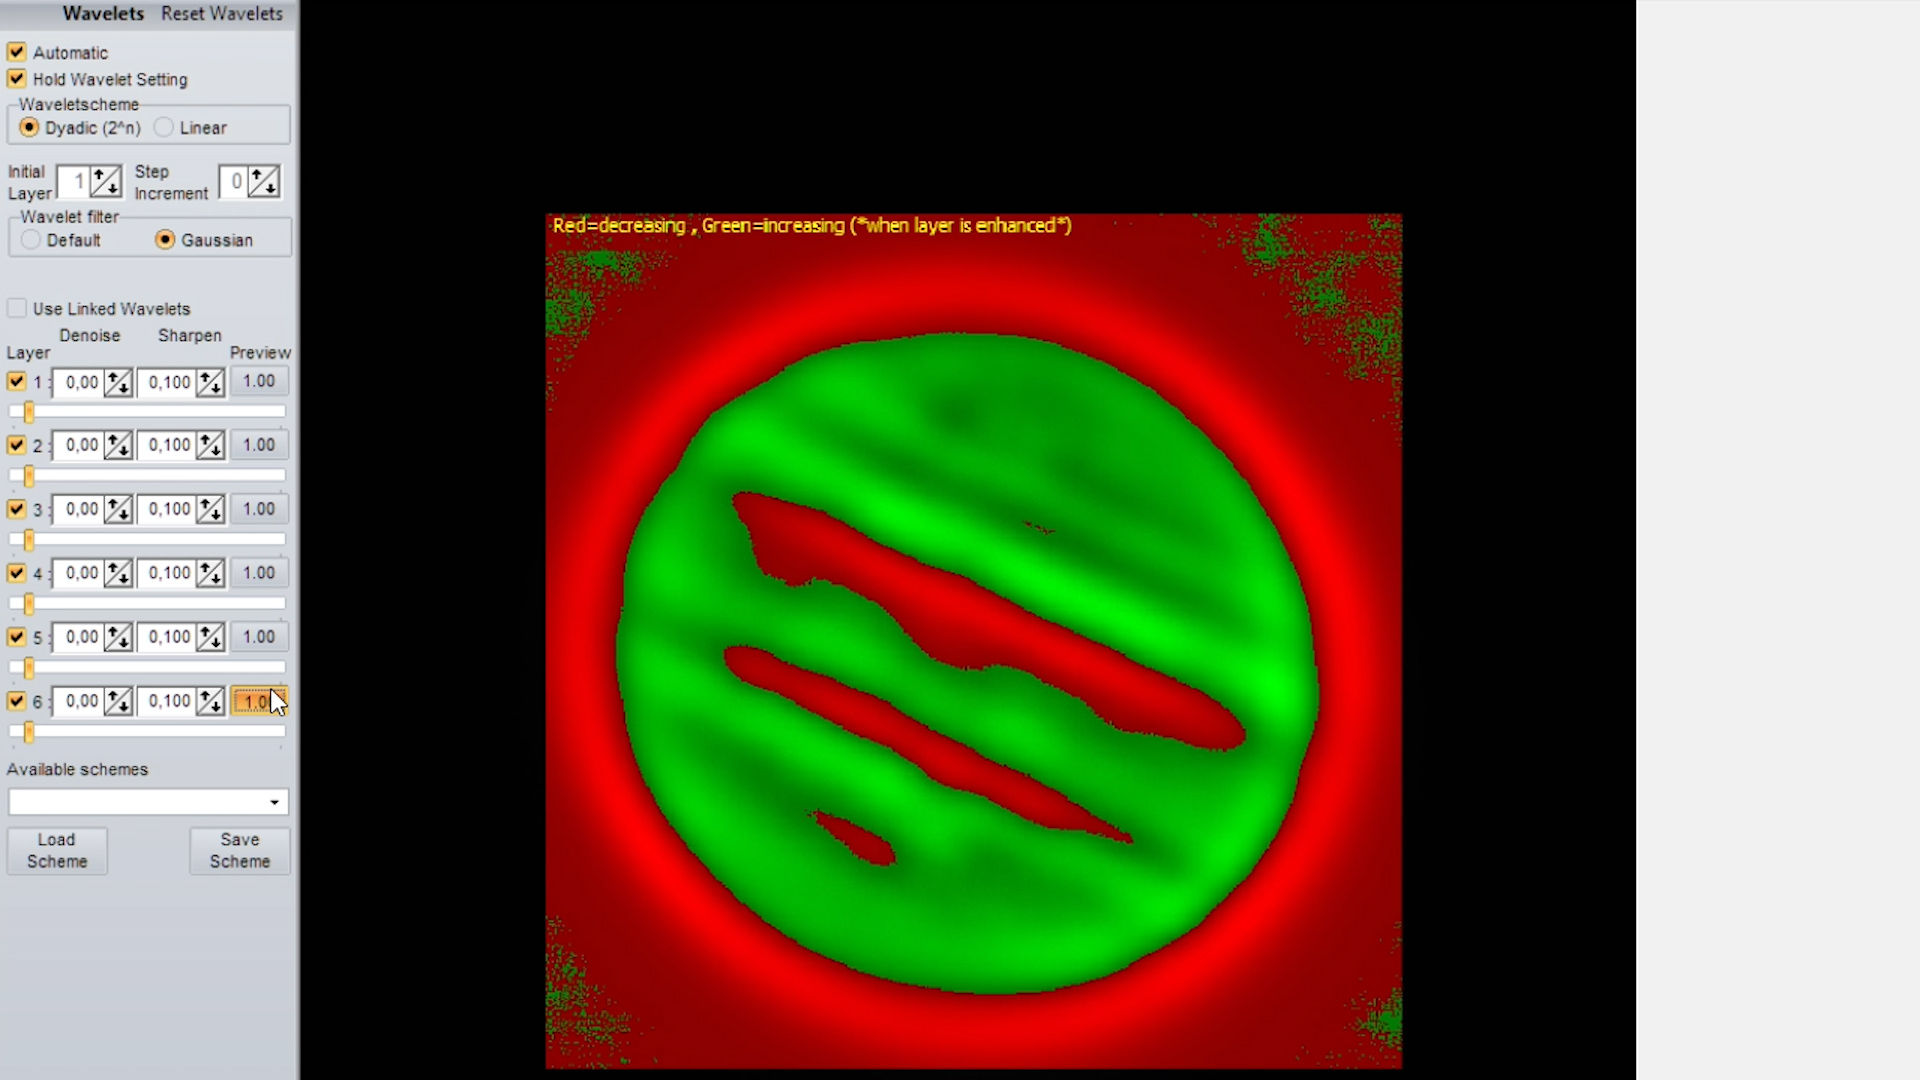
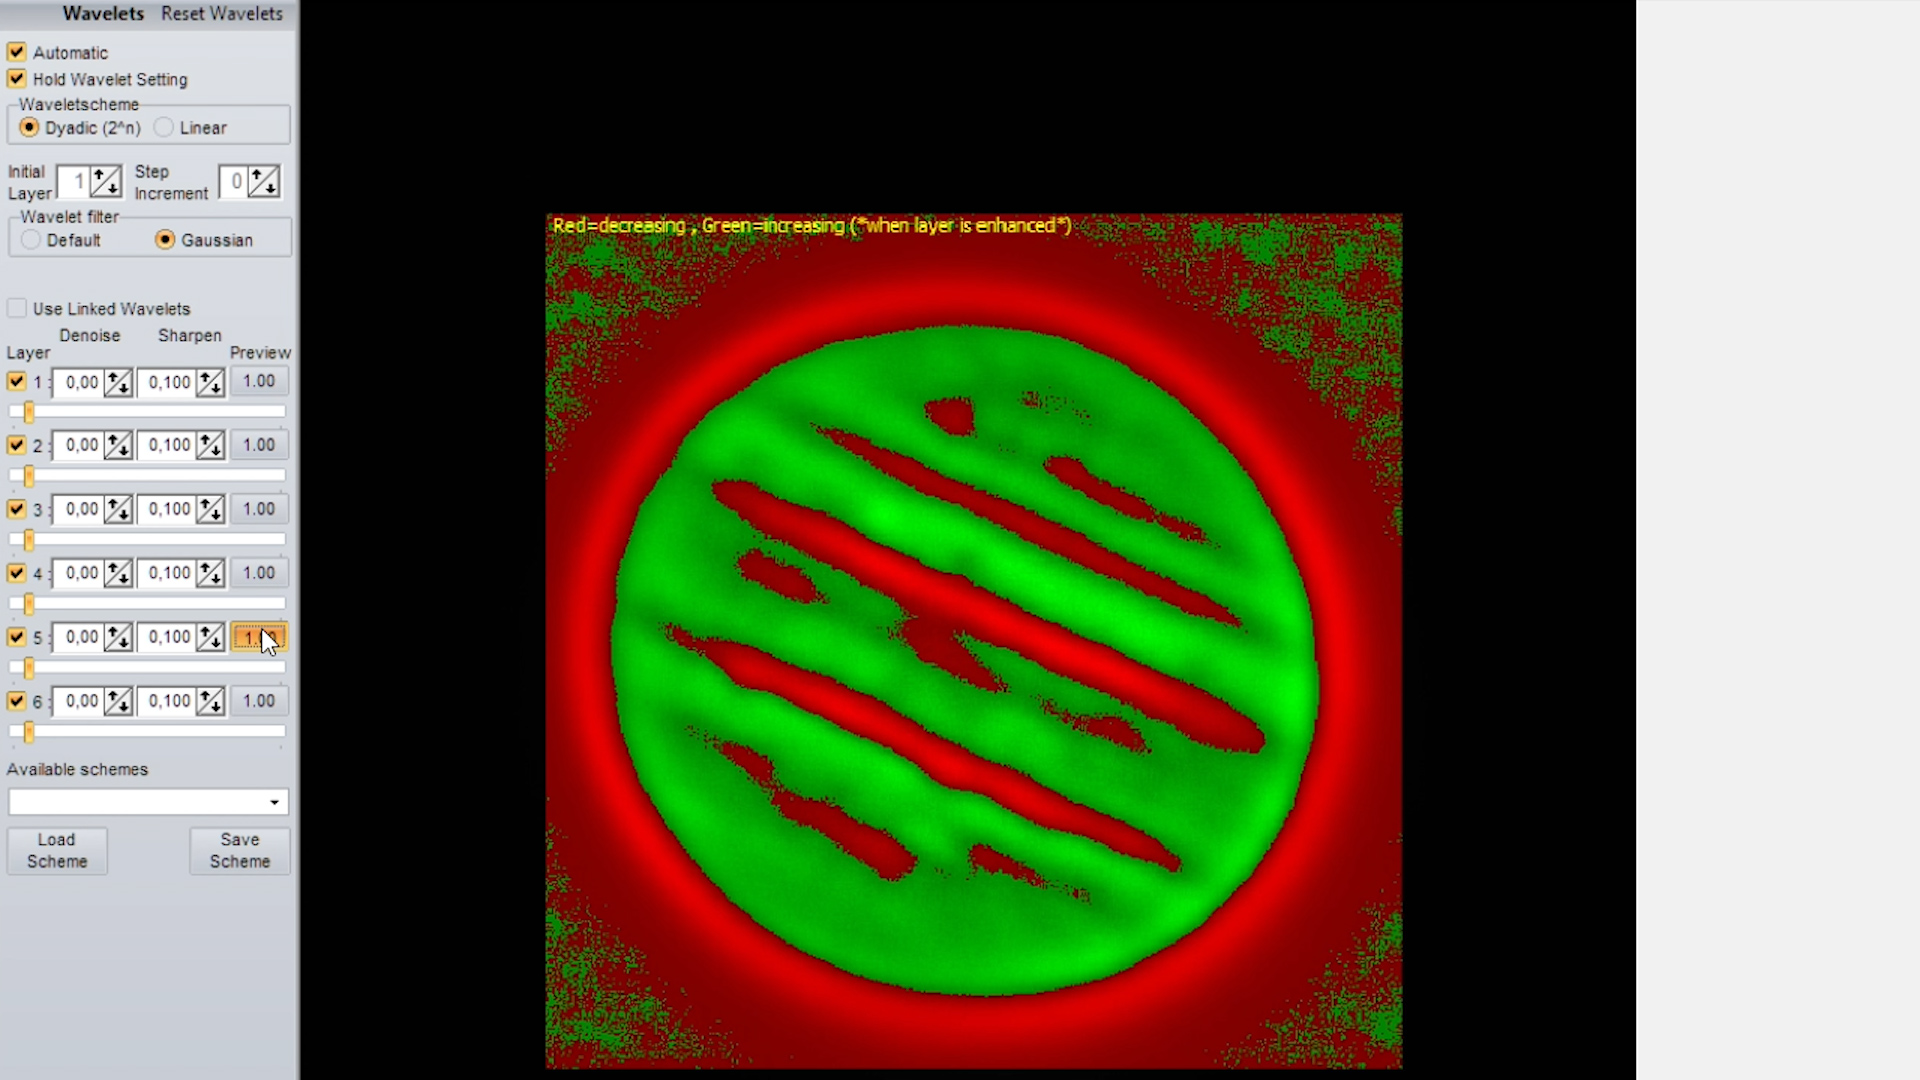
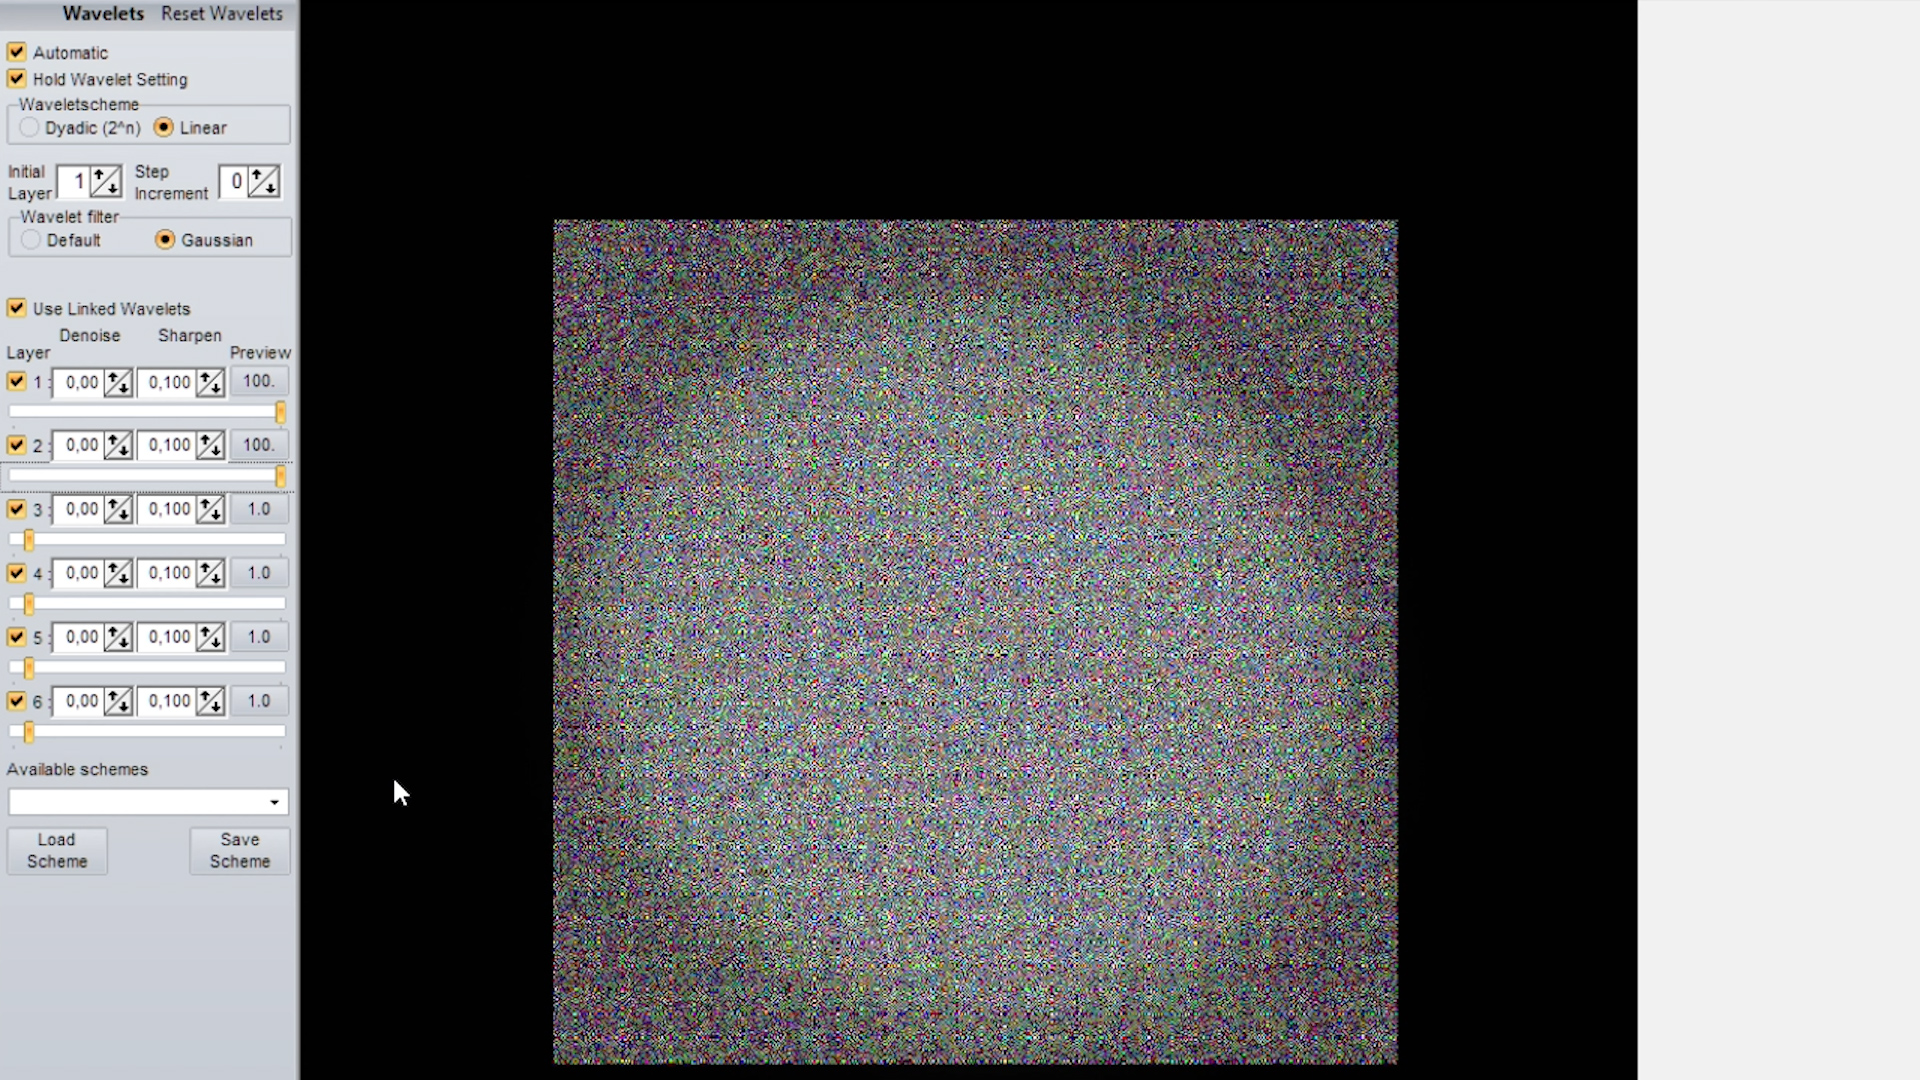
To demonstrate the dyadic wavelet scheme further, let’s drag each of the six sliders for each layer completely to the right. By doing so, we will apply the default setting of 0 denoise and .1 sharpening to the full extent for each of the layers. Also be aware that each of the layers is checked, meaning that the changes made in that layer will be directly applied to the picture. When dragging the first slider to the right, you’ll notice a slight increase in sharpness and noise in the picture. When dragging the slider of the second layer to the right, there’s a 2x increase in sharpening as compared to te first layer. Dragging the slider of the third layer to the right results in a 4x increase in sharpness as compared to the first layer. We can now clearly see the different cloud bands of Jupiter, but notice that the noise is also increased and some parts of Jupiter appear to be completely washed out. Dragging the slider of the fourth layer to the right results in an even more aggressive sharpening and an accompanying increase in noise. When dragging the final two sliders to the right, Jupiter is completely washed out and the picture is severely clipped. Let’s reset the wavelets by clicking on the reset wavelets button on top.


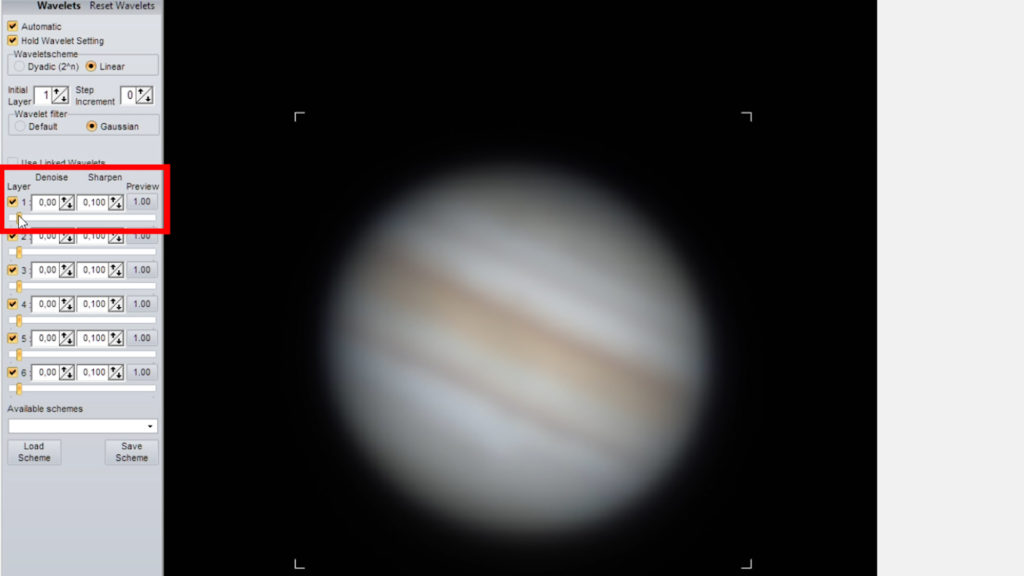
Linear wavelet scheme
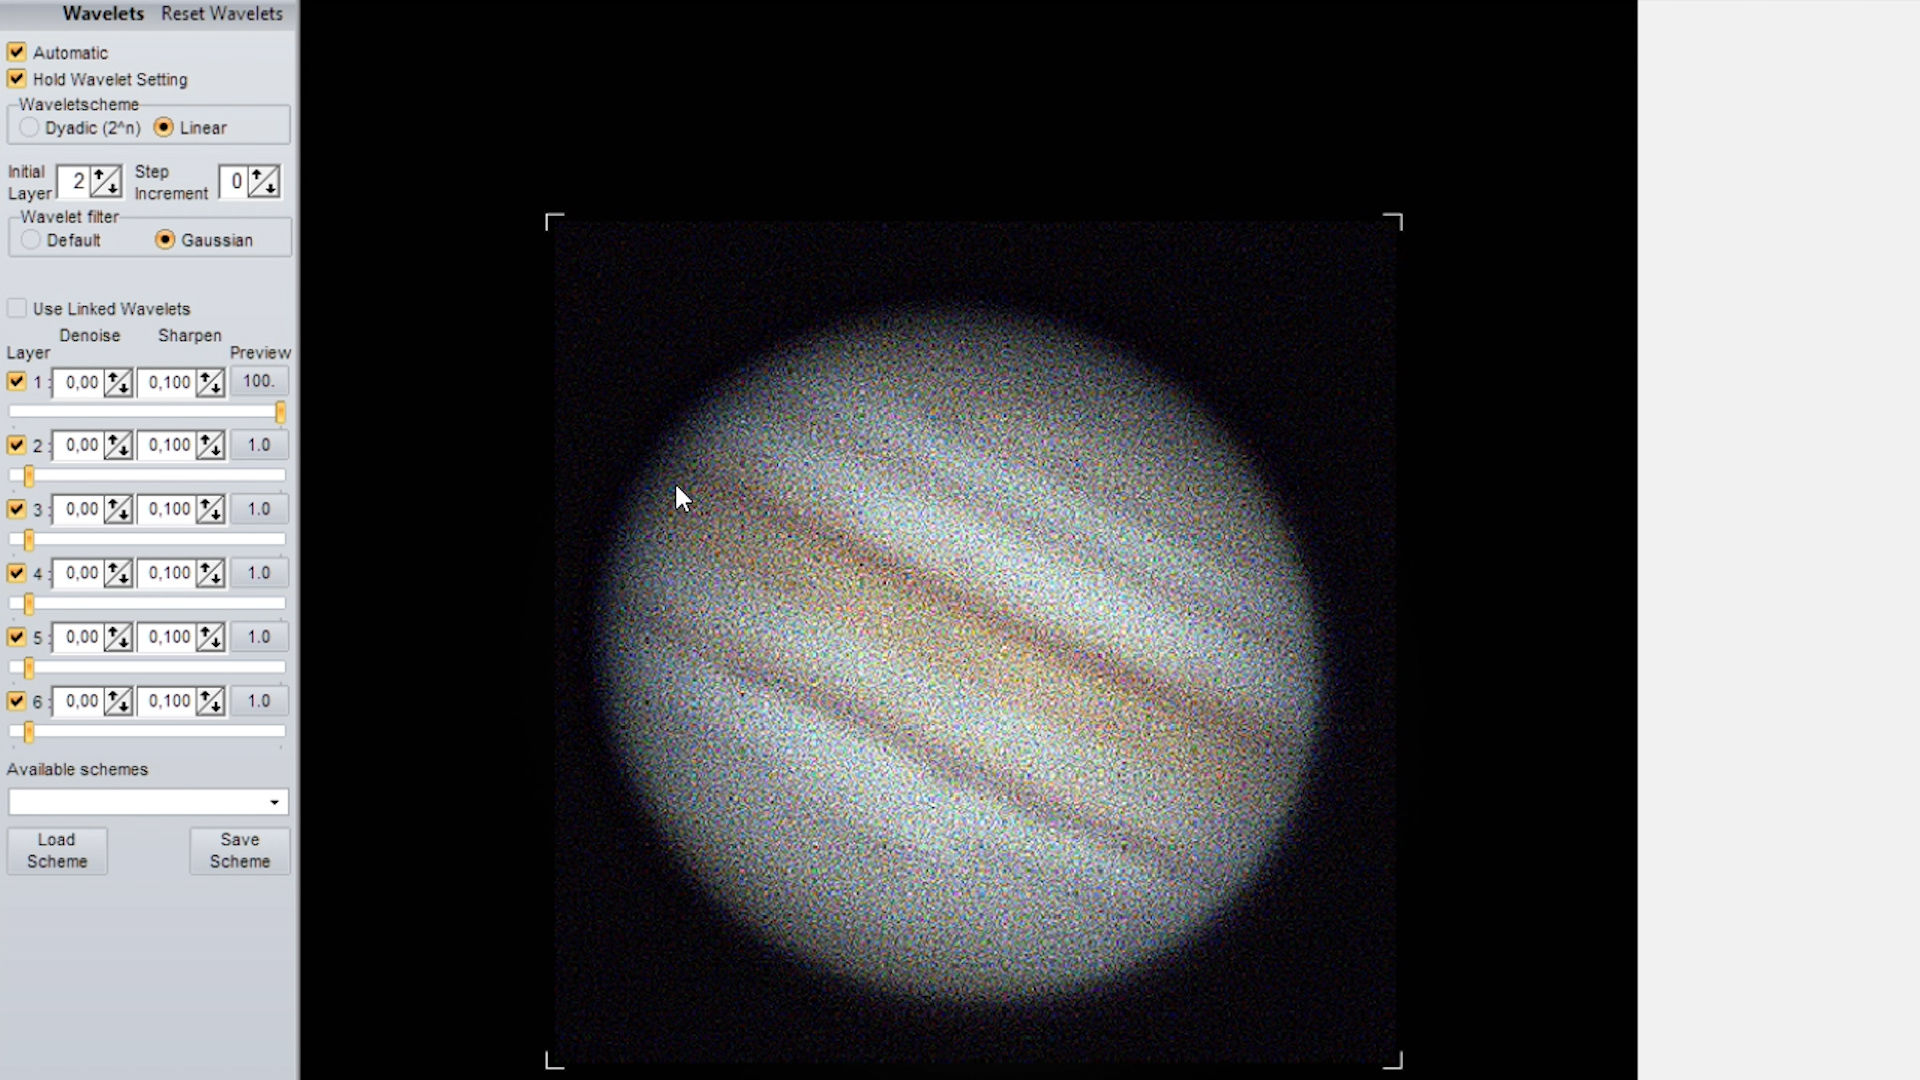
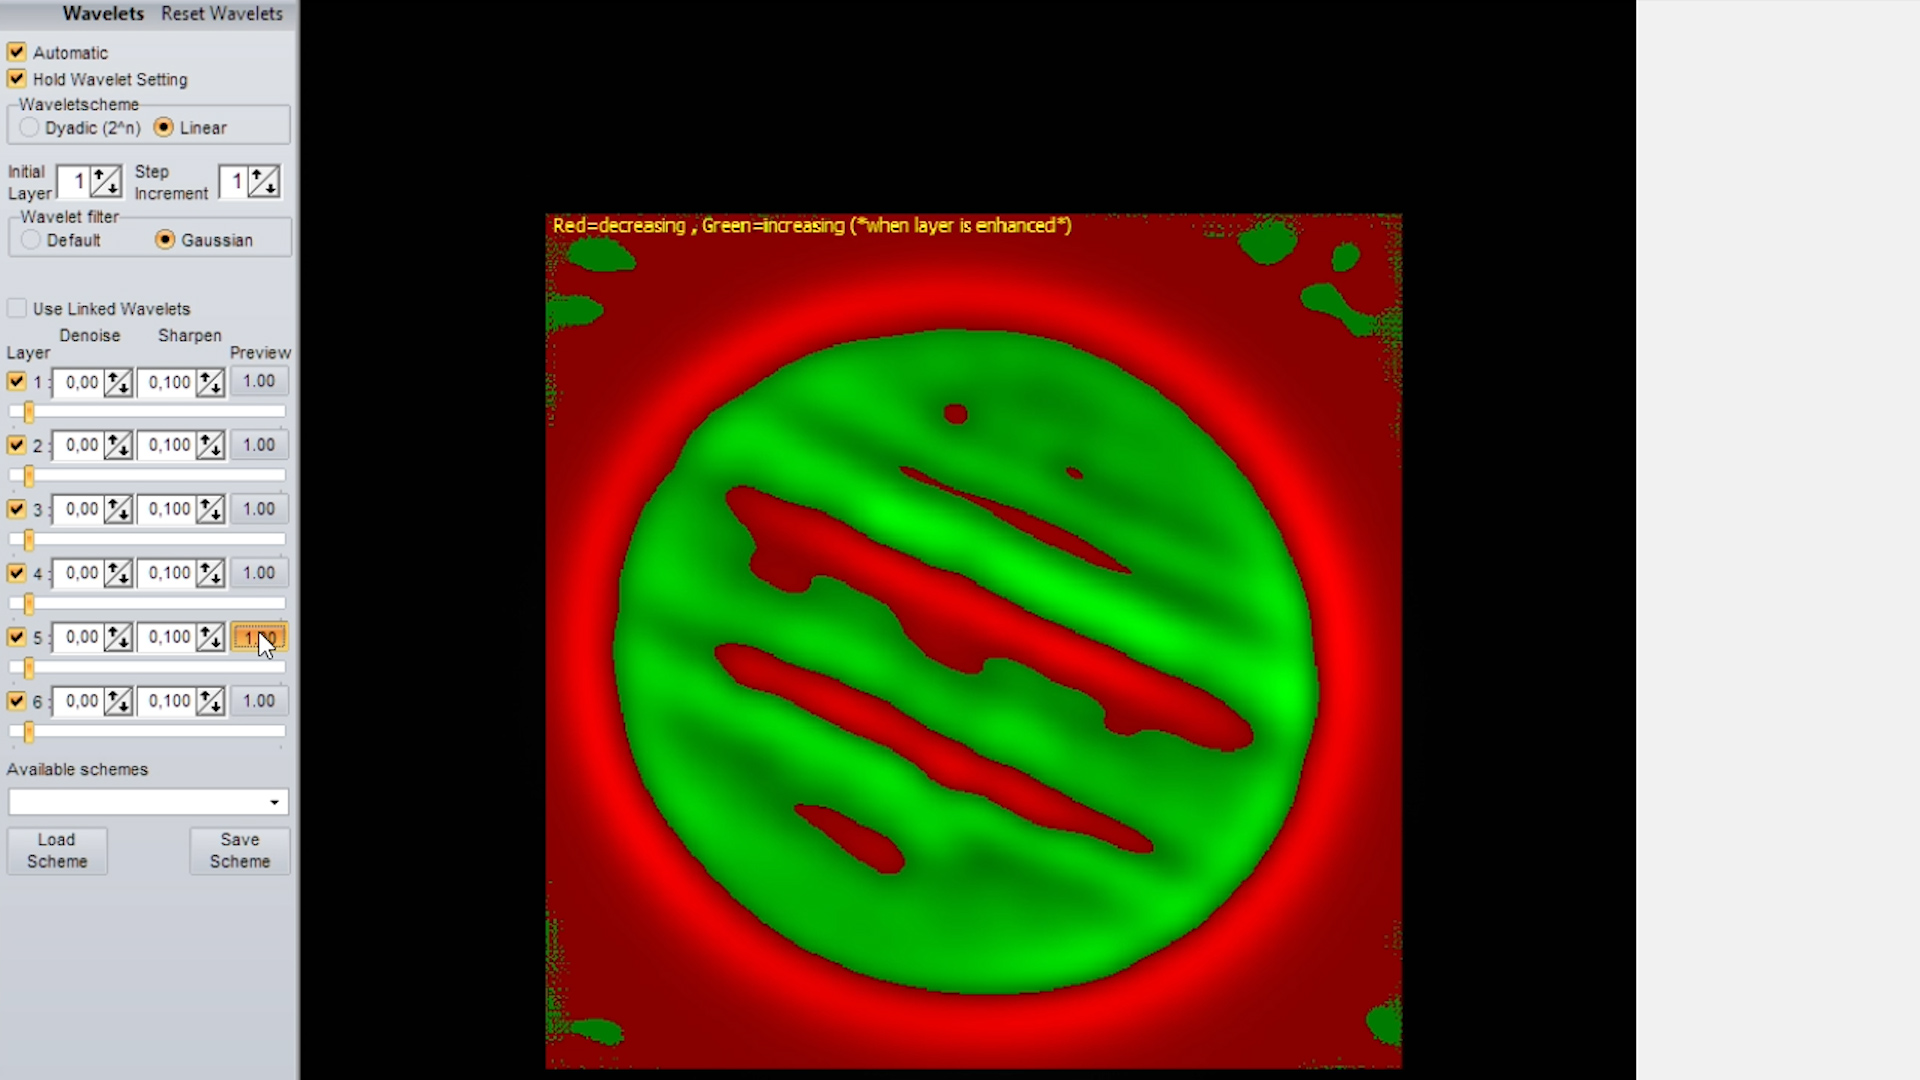
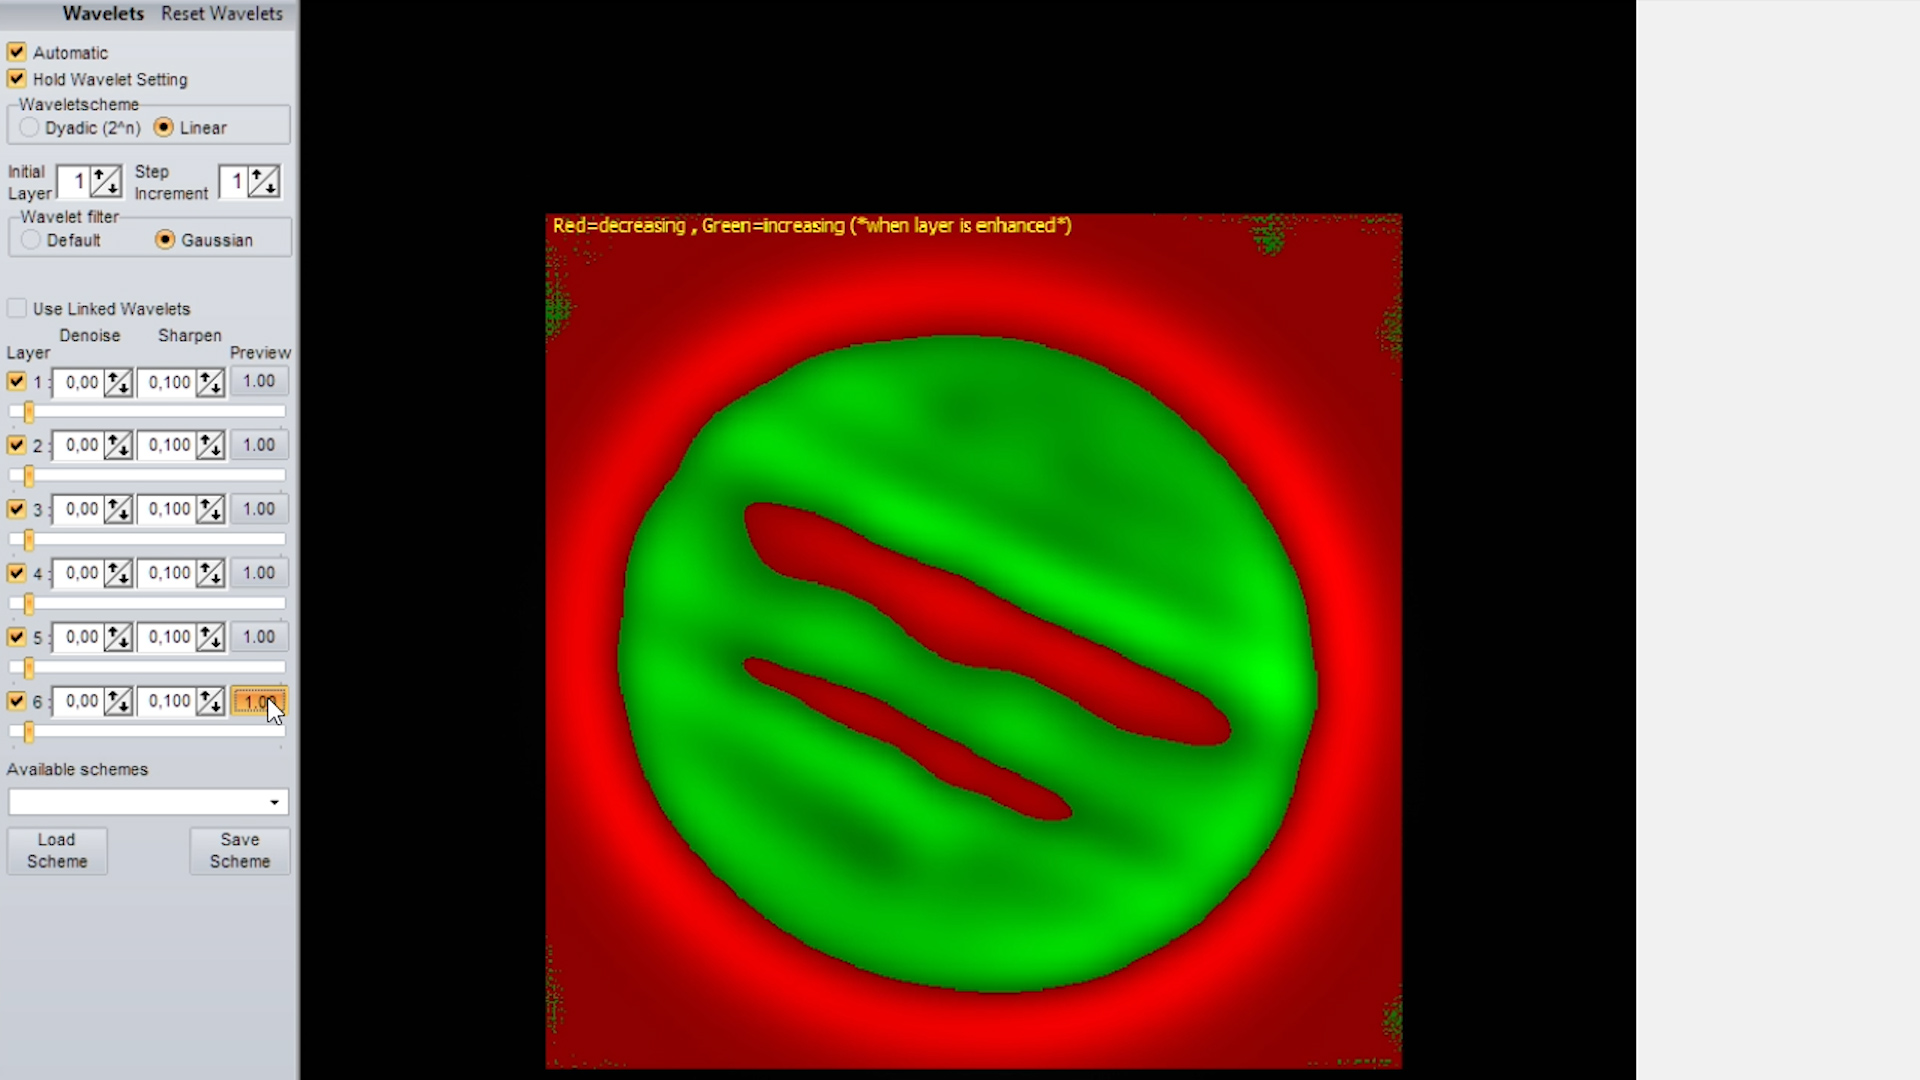
Now, let’s select the second wavelet scheme “Linear”. You’ll notice that two additional boxes are highlighted, being initial layer and step increment. The initial layer represents the size of the filter you want to use for the first layer. A higher number means that more pixels are selected which will affect the picture. To demonstrate this, let’s move the slider of the first layer to the right with the default settings of denoise at 0 and sharpen at 0,1. You’ll notice an exact same increase in sharpening as compared to dragging the slider of the first layer to the right, in the dyadic scheme. You can also click on the preview button for that first layer to see how many pixels are selected for that first layer. Now, let’s set the initial layer to 2. You’ll clearly notice a much more aggressive sharpened and noisier picture as compared to the previous setting. When clicking on the preview button, you’ll notice that the green dots which demonstrate which parts of the picture will be affected, have increased in size. So, what we learn here is that when the initial setting is increased, the size of the filter and thus the effect of the first layer on the picture is also increased.
Let’s reset the wavelets and move on to the “step increment” option, which is set to 0 by default. Step increment relates to the increase in size of the filter for each of the consecutive layers. When leaving this to 0, each layer will have the smallest increase in size that will affect the picture. Note that there are some slight increases in size between each of the filters, but this increase is very small. We can further explore this by dragging each of the six sliders to the right, which again will result in the application of .1 sharpen to each of the six layers. You’ll notice that the size of each filter becomes somewhat bigger with each consecutive layer which affects the picture. However, this increase is much smaller as compared to using a dyadic scheme. In fact, Jupiter looks pretty nice with all the slider pulled to the right in this setting. Let’s reset the wavelets again and put the step increment to 1. Now, each of the filters will have 2x the size of the previous one, effectively giving us a dyadic scheme. You can see very similar results as compared to the dyadic scheme demonstrated earlier, both when clicking on the preview button for each of six layers, and when dragging each of the sliders to the right. I’m not the developer of registax, but I’m assuming that a step increment of 2 actually relates to a 3x increase in size for each consecutive layer. in this setting, Jupiter looks already severely clipped in the second slider. Let’s reset the wavelets again.


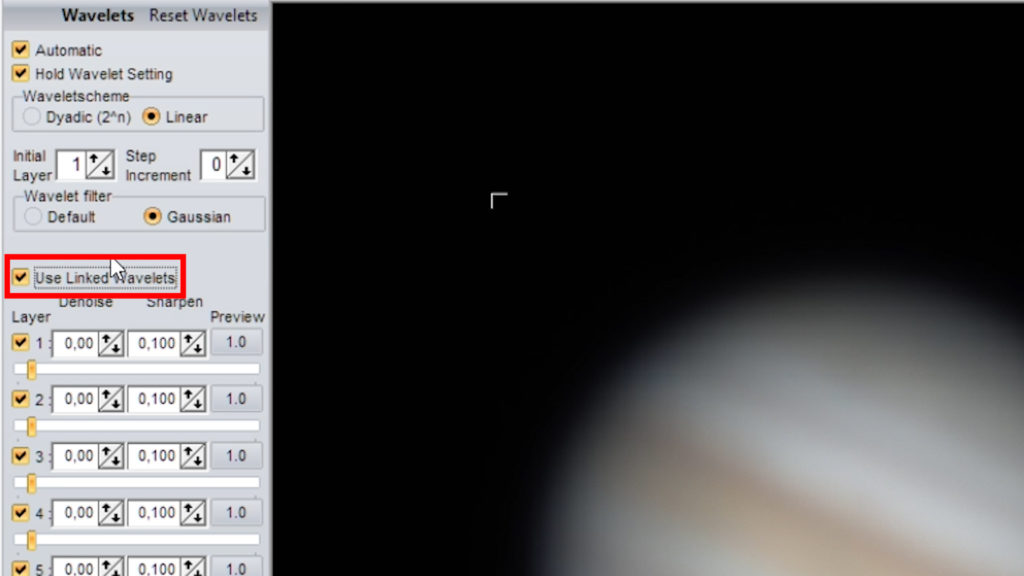
Linear scheme with “Linked Wavelets”
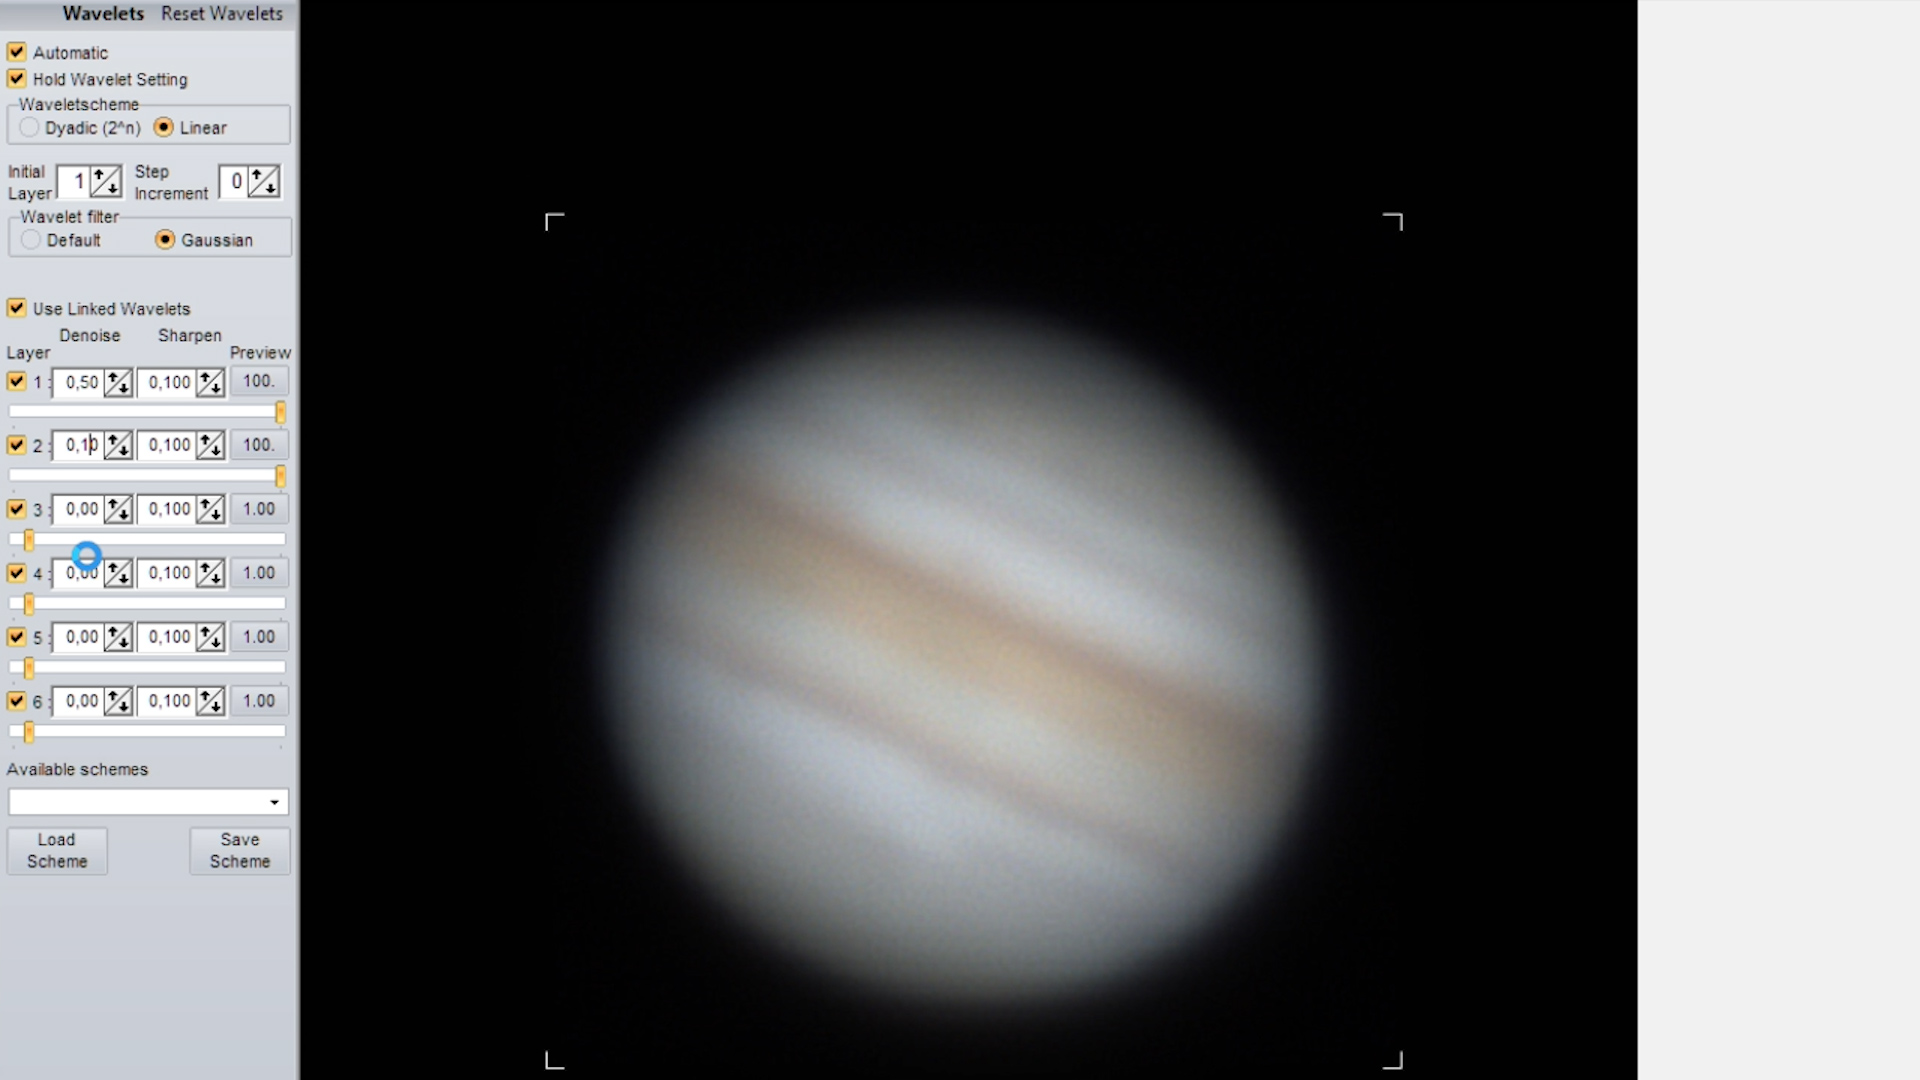
Below the wavelet filter, you can check an additional box called “use linked wavelets”. Now, this option still is somewhat of a mystery to me. The wavelet schemes we’ve discussed above rely on the gaussian sharpen filter, which is distributed across the six layers. When checking “use linked wavelets” the stacked image is supposed to be divided over the six layers, based on the specific settings (denoise, sharpen, and slider) of each layer. This creates an entirely new approach to sharpening and denoising the picture. Let me show you what it means in practice. Let’s reset the wavelets to default, with a linear scheme, initial filter to 1 and step increment to 0, and check “use linked wavelets”. When moving the first slider to the right at the default setting (0 denoise, .1 sharpen), this results in a very noisy picture. When dragging the second slider to the right, the noise will completely wash out the picture. Interestingly, when changing the denoise setting in the first layer to .4, most of the noise magically disappears, and we are left with a much sharper image of Jupiter. As there is still some noise left, adding .4 denoise at layer 2 takes care of the rest of the noise. Dragging the slider of the third layer to the right re-introduces some of the noise, but when adding some noise reduction, this noise can again be reduced. As it produces a good picture, it appears useful to experiment with the linked wavelets option to check if you could enhance your results as compared to the other options. Let’s reset the wavelets again.


Two examples of how to process Jupiter in Registax using Linear, and Linked Wavelets schemes
Lots of folks ask me if there is one best way, or a scientific way, to process stacked images of The Planets using Registax. Unfortunately, after having used Registax for many years, I don’t think there is one best way to process planets in Registax, given the multitude of options you have to process the images I just showed you. Also, throughout the years I’ve noticed that using a different camera, telescope, and the number of frames in the stacked image are all variables that can influence which settings in the wavelets schemes produce the best final result.
This being said, let me share some preferred ways I developed over the years to process my images. I stopped using the dyadic option, as I find the dyadic differences in size between the layers that affect the picture too big. I often stick to selecting either linear wavelets at its default setting, with an initial layer of 1 and a step increment of 0. And I do experiment with the linked wavelets option. So let me give you two concrete examples of how I processed this particular picture of Jupiter in the wavelets tab, using a linear wavelets scheme, and a linear wavelets scheme with linked wavelets.
Processing example of Jupiter using Linear wavelets scheme in Registax
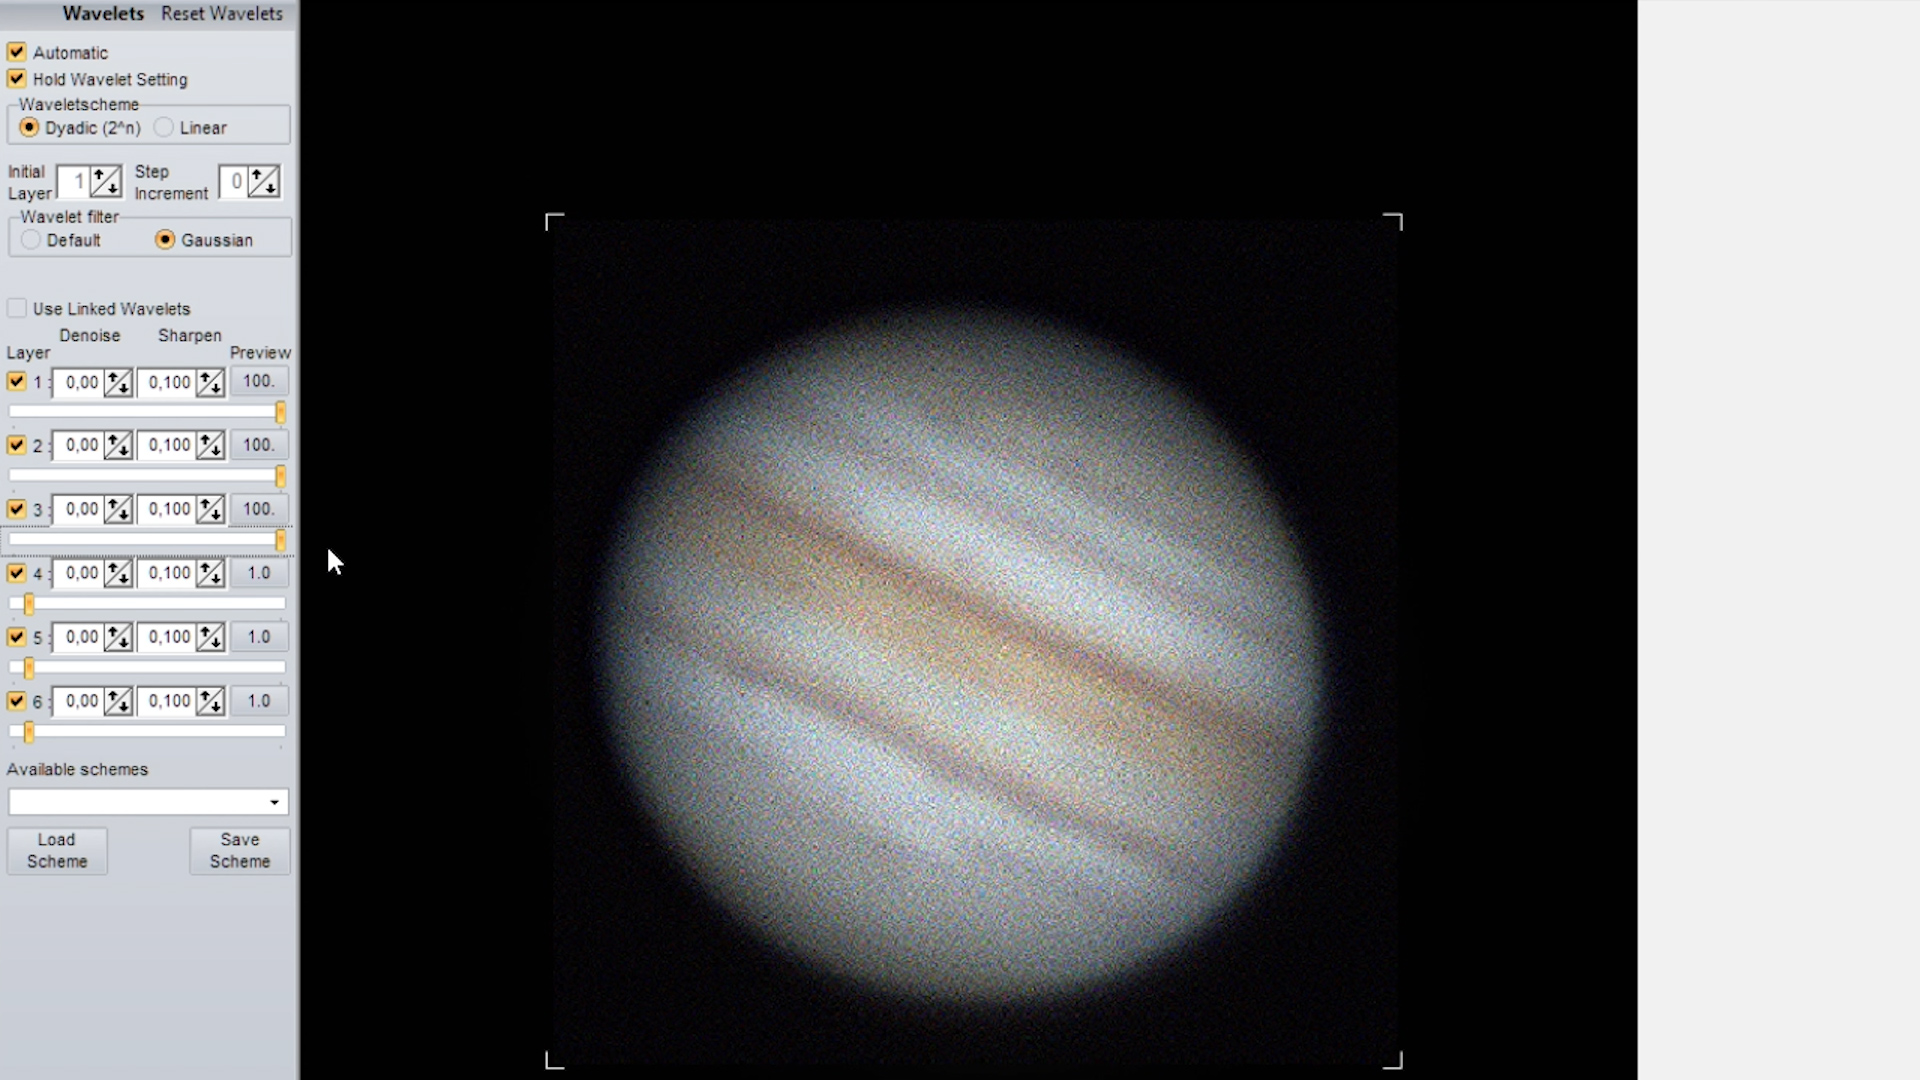
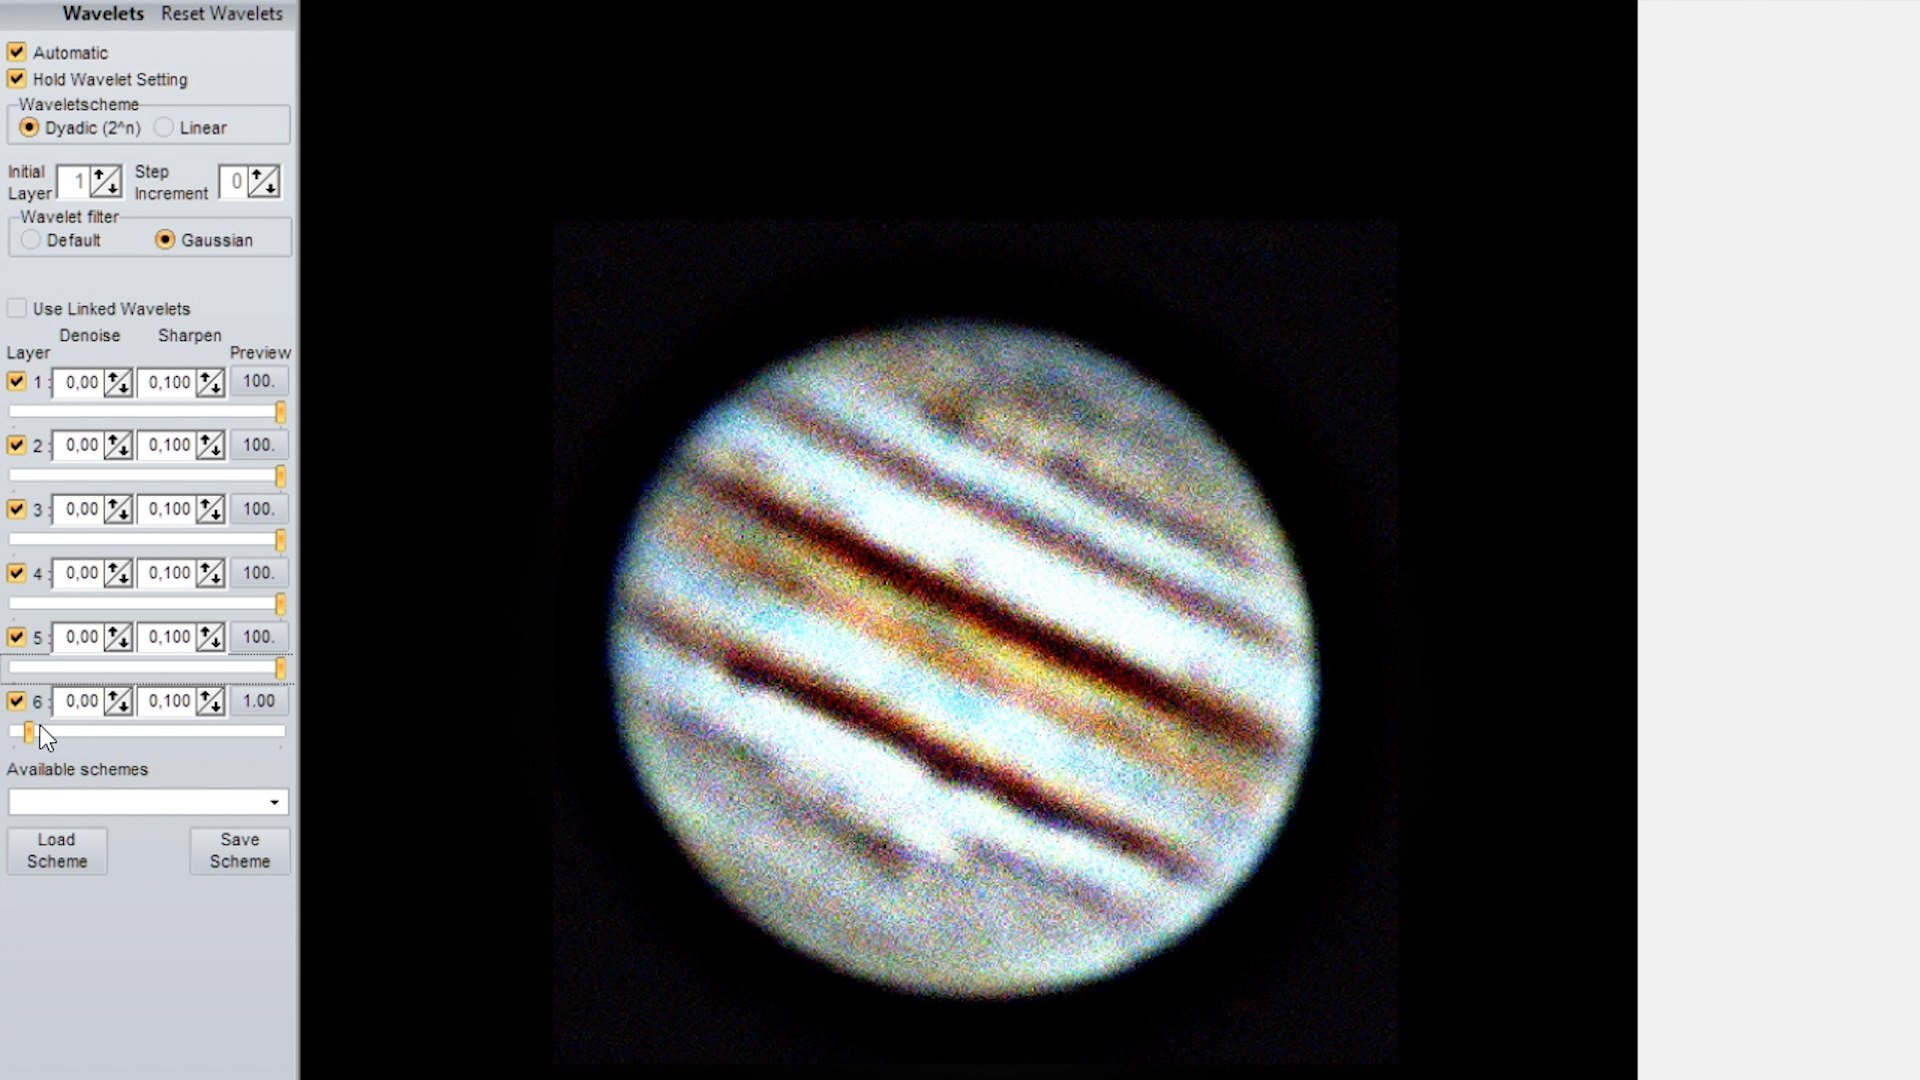
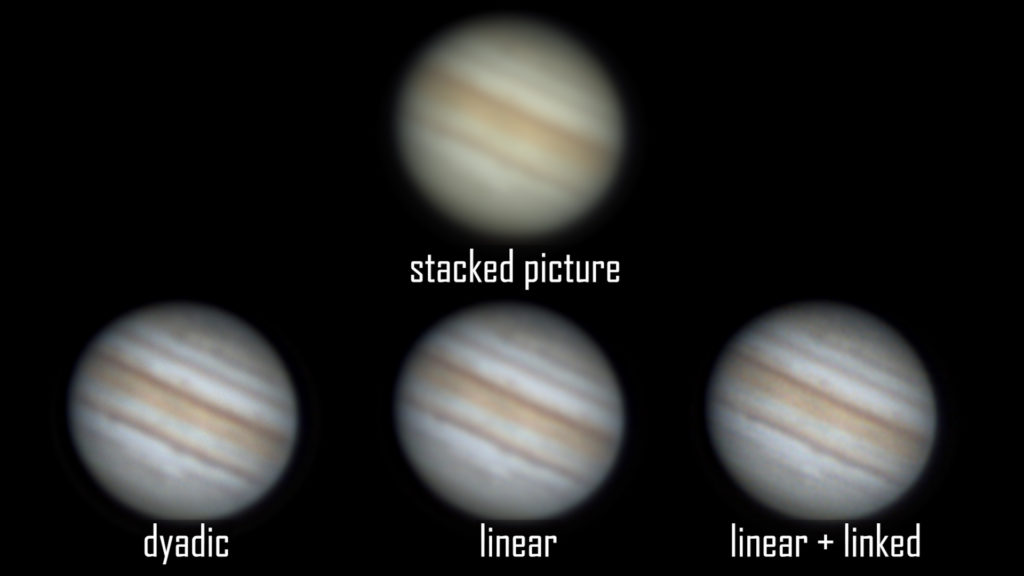
Here’s my first processing example using linear wavelets to sharpen my image of Jupiter at its default settings, with an initial layer of 1 and a step increment of 0. This setup provides a scheme where the size increase across layers is minimal, which increases the sensitivity with which I can process the picture across layers. This processing scheme makes it easier to apply changes to the picture, without the risk of getting an overprocessed image of the planet as compared to using the dyadic wavelets scheme.
So here is one example that works well for me. In this example, I reduce the effect of each consecutive slider with 10%. So I started to drag the slider of the first layer all the way to the right, putting it at 100%. Then, I put the next slider to 90%, and the next one to 80%, 70%, and 60%, and the final slider of layer 6 to 50%. Using this setup, allows you to make very small and sensitive improvements to the picture, without the risk of overprocessing your picture. You can precisely set the percentage of the slider using your mouse wheel. This already results in an image that is a bit sharper than the stacked image produced by autostakkert. Next, I apply the strongest sharpening setting the the first layer, in my case 0,200. I put the second layer to 0,150, and the third and fourth layers to 0,130. The final two layers are at 0,110. This leads to an even sharper, but noisy picture of Jupiter. As the sharpening settings are highest in the first layers, I set the denoise in the first three layers to 0,15, and to 0,10 in layers four through six. This takes care of the noise. Now, we can clearly see the cloud bands and the red spot of Jupiter, and the picture is much improved as compared to the stacked image we got from autostakkert.
Processing example of Jupiter using the linear, linked wavelets scheme in Registax
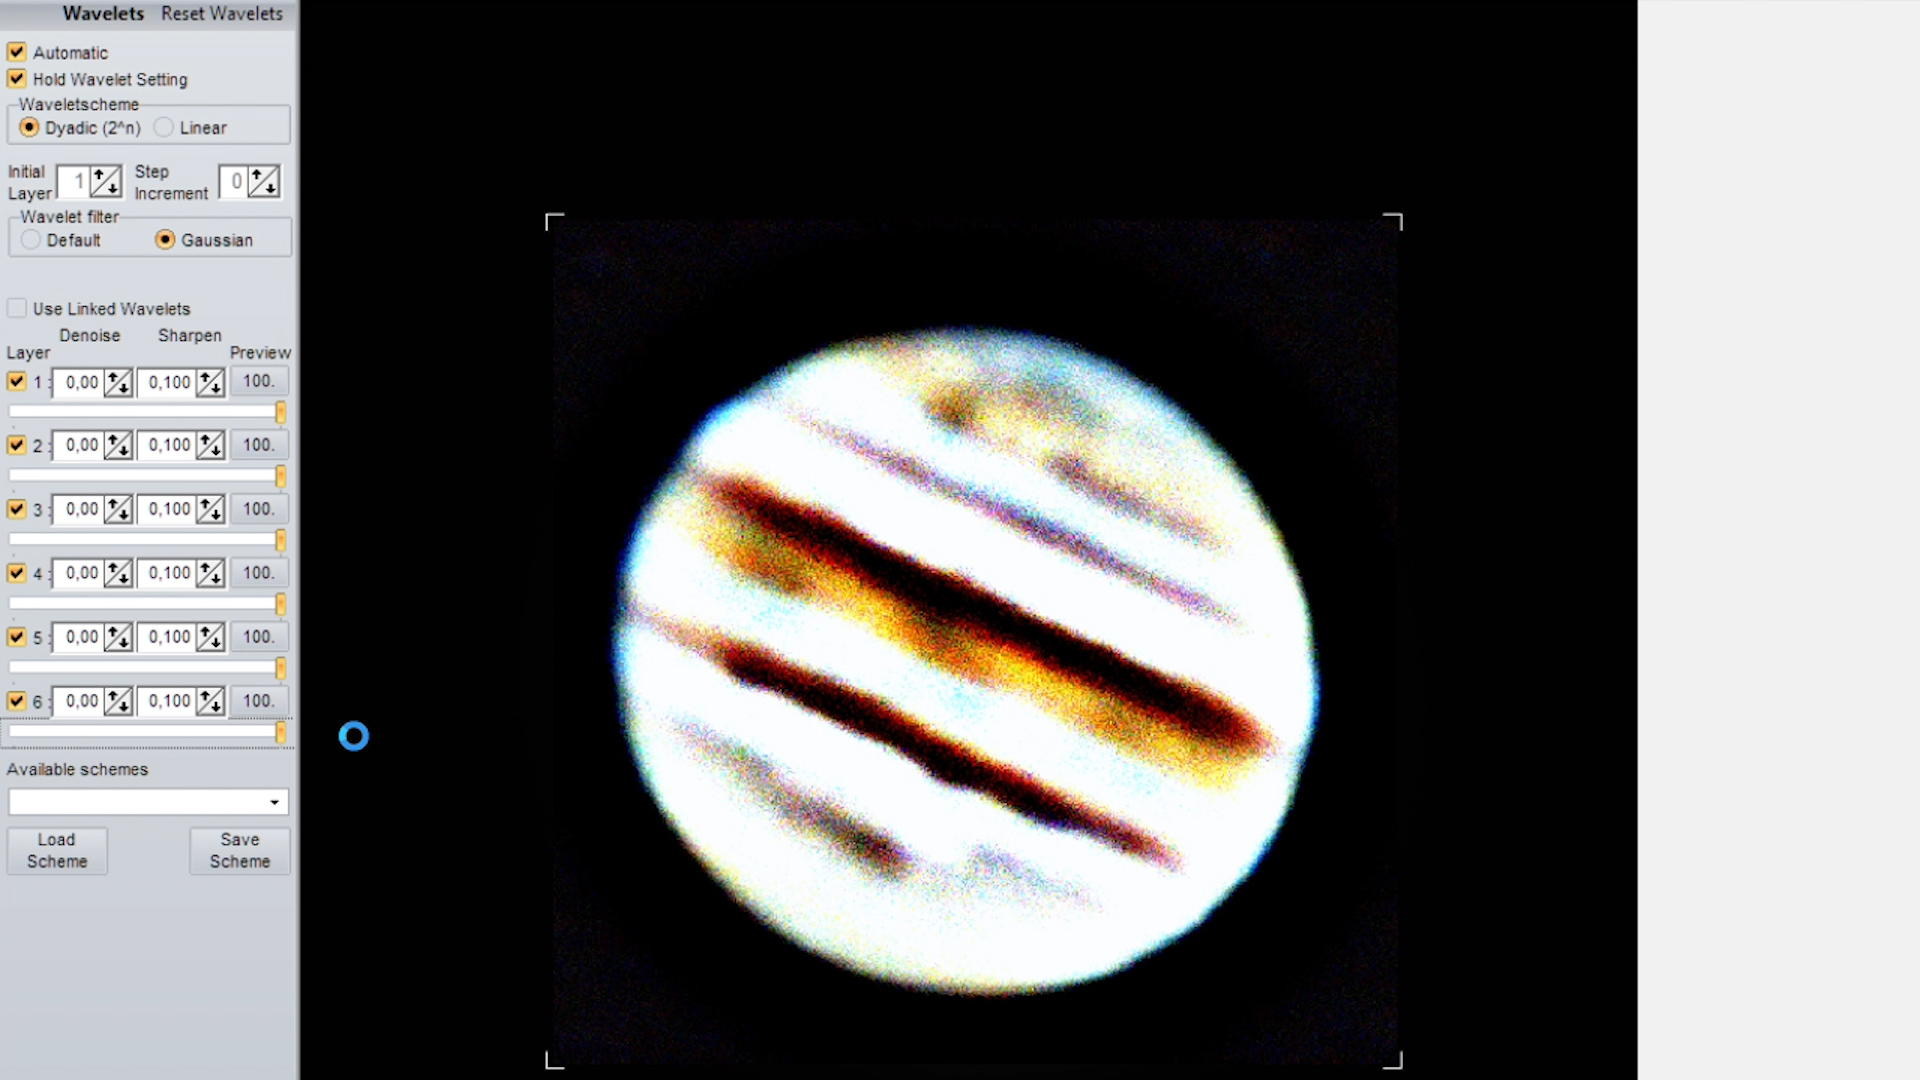
Here’s my second example, where I use the “use linked wavelets” in a linear wavelets setting at default, meaning the initial layer at 1 and the step increment at 0. I Ieft the sharpening setting for each of the layers to its default 0,100, but I set the denoise to 0,3 as the linked wavelets option creates a lot of noise in your picture. Next, I decreased the effect of each of the consecutive layers by 20%, so i put the slider of layer 1 at 100%, layer 2 at 80%, then 60, 40, 20, and the final layer at just 10%. This produced a very nice end result for me, with both the cloudbands and the red spot being much more clearly visible as compared to the stacked image produced by autostakkert.
Picture and workflow comparison
When comparing the two processed picture, I have to say that I like the processed picture with “use linked wavelets” turned on. Although it is tricky to combat the noise produced in this mode, it does appear to result in a very sharp picture, perhaps even somewhat sharper as compared to using the default linear wavelets scheme I showed you. I do have to say that the default linear wavelets option is easier to use , as the sensitivity with which you can improve the picture across layers is much higher as compared to using a dyadic scheme or when checking “use linked wavelets” on. The dyadic wavelets scheme is most difficult to execute in my opinion, as it introduces huge variations in size across the layers which makes it difficult to manage. At higher layers, small changes have a huge impact on the picture. It is also difficult to not end up with an overprocessed image using dyadic wavelets. Anyhow, when you are happy with the resulting picture, you can simply click on “save image”. I always use a 16 bit *.tiff format. In addition, you can also save the wavelets scheme by clicking on “save scheme”, so you can load this scheme in the future when processing other images of the planets.
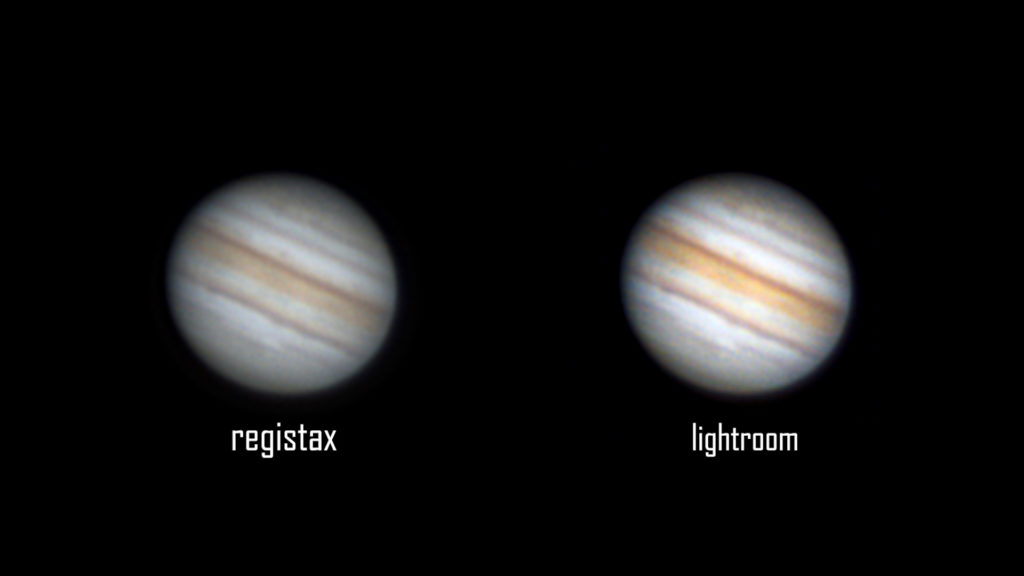
Final processing in Photoshop or Lightroom
I usually make some minor final adjustments to the picture created in Registax using other photo editors like photoshop. In this final picture, I increased the saturation to get a bit more color in the cloud bands, and I applied a tiny bit of gaussian sharpening and noise reduction. This is the resulting final image.
So this is the final lecture of my introduction course to image the planets. If you have any feedback on the course itself, or if you want to ask me additional questions based on this course, feel free to contact me by reacting to this video, or by emailing my astroforumlive@gmail.com. I hope this course was useful to you and I hope you have some clear skies ahead to image the planets. Thanks again for joining my channel, and talk to you soon!
Clear skies!
Wido – Astroforum
Hi Wido, love your videos …brilliant. I have a slightly different need. I want to buy a telescope for my 3 young children. my eldest is 11 and visually impaired. I want to be able to show images on a screen.
Can this be done? I don’t want to buy a telescope for eldest, not to be able to participate.
Hi John, sure. You can buy a planetary camera and connect that to your telescope the same way as you do with an eyepiece.
Once connected, you can run a USB cable between the camera and your computer or laptop. There are also wifi options, but these are more expensive.
The planetary cameras are perfect for the moon and planetary imaging. For deep-sky, it is not very good as the cameras lack cooling.
But…for some casual deep sky viewing with a screen, where you can stack pictures with free software like sharpcap, it’s definitely nice to show some bright DSOs.
Here’s a table with planetary cameras: https://astroforumspace.com/zwo/
For a couple of months, I’ve been using a new one, the asi678MC – check: https://astroforumspace.com/zwo-asi678mc-review-first-light-pictures/
Clear skies!
Wido
Hi John,
I guess I missed this post, sorry. Yes, it’s definitely possible to buy a telescope and camera so they can watch the live images from a computer screen.
Don’t know what kind of budget you were thinking of, but a regular planetary camera and a telescope will give you good views of the moon and small views
(which can be zoomed) of the planets. If you want to go beyond that, you need to think about a serious investment as you’ll need a good quality mount to track the night sky. Another option is to take long exposure pictures with a dslr camera (e.g. 20 seconds at iso800 or higher) and show that to your kids. Good luck, happy holidays!
Wido — thanks for creating and sharing tutorials on processing planet images.
Autostakkert most helpful bits were: adjust image size to reduce processing time, explain reference frame settings, and relationship between image scale and the drizzle setting.
Registax most helpful bits were: RGB align and balance settings, and excellent recommendations on wavelets adjustment.
Happy Holidays!
Thanks so much for the tutorial. What is the deringing function for? Does it remove the light and dark ring I have around my photos of Jupiter (probably due to very small aperture of my scope)?
Yes, that’s what its for.
Thanks very much for the effort you put in to this tutorial, Wido. This one and the Autostakkert tutorial saved me a lot of time because of your clear explanations.
I appreciate that Peter, thanks!