People often ask me how much they’d need to spend to start astrophotography. The answer is that it really depends on your budget, interests, and goals. You can already start astrophotography with a consumer-level DSLR camera on a tripod for about $/€500, like a Canon 2000D (Rebel T7). If you want to photograph the night sky through a telescope, it gets much more expensive. My first dedicated telescope setup consisted of a computerized Celestron Advanced VX mount, a TS Photoline 80/480mm refractor telescope, and a DSLR camera, total cost was about $/€ 2500. When you want to take multi-minute exposures through a telescope to catch the dimmest light in space, you’ll need an additional guide camera and guide scope which will cost at least an additional $/€ 250, so that’s $/€ 2750. At some point, you probably want a dedicated, higher quality cooled astrophotography camera and that will set you back at least an additional $/€ 800 (excluding the DSLR, that’s $/€ 3050). A dedicated mono camera with a filter wheel and high-quality filters (broadband, narrowband) will get you even higher-quality pictures. That will cost about $/€ 1750 extra and would bring your total cost to about $/€4000. Finally, ‘aperture fever’ may make you want to switch to a heavier telescope with a bigger aperture and longer focal length (I bought the Edge HD 8″), as this gives you the ability to zoom in on the tiniest objects in space. For such a setup you’ll also need a heavier, solid equatorial telescope mount, and then you’re easily going over $/€ 5000.
In the overview v/blog, I’ll present each of the six setups in more detail, including the costs involved. Below, you’ll find affiliate links to each of the six setups presented in the v/blog, so you can check out the latest prices (unfortunately, prices are not getting any cheaper soon with rising energy prices and supply chain issues due to COVID). I hope this overview paints an honest picture of the choices you can make and the potential costs involved when starting deep-sky astrophotography.
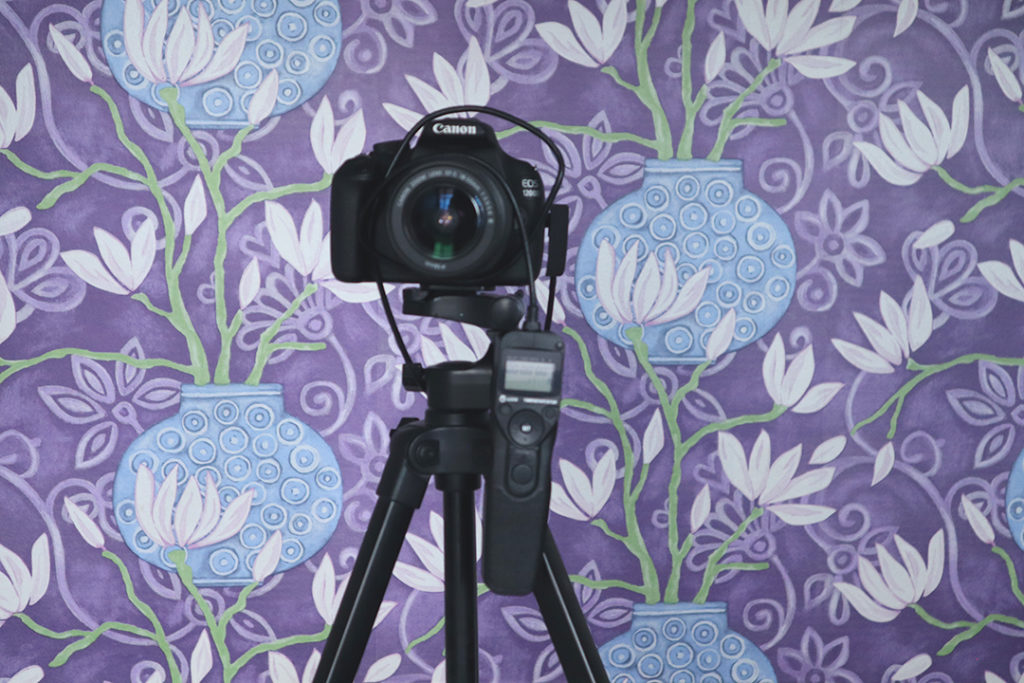
Setup 1: DSLR Camera + Tripod + Intervalometer ( $/€ 500)
USA/WORLDWIDE:
Starting astrophotography with a DSLR camera has several advantages:
- Multifunctionality –> You can use it for daytime and nighttime photography;
- Affordable–> consumer-level cameras ‘only’ cost a couple of hundred euros or dollars;
- Familiar–> most people already know how to take pictures with a DSLR camera;
- Portable –> DSLR cameras are easy to take with you on a holiday/camping trip where you can take pictures of the night sky from awesome dark sky locations
If you want to take your first steps into AP with a DSLR camera, you should also get a sturdy tripod to prevent any vibrations while taking long-exposure pictures. In addition, it also helps to buy a simple intervalometer to enable continuous shooting without the need to touch your camera to prevent vibrations. If you’re just starting out, I’d recommend buying a consumer-level camera that doesn’t break the bank. At the time of this v/blog, there are some very decent consumer-level DSLR cameras available like the Canon Rebel T7, also called the 2000D, with a stock 18-55mm EF-S lens, tripod, and intervalometer for about $500 dollars or euros.
Taking pictures of the night sky with a DSLR camera is relatively easy to learn. It involves learning how to manually focus on the stars, and how to use the manual mode to set up your ISO level and exposure time. It probably only takes you a couple of days to learn these things, after which you can engage in fun astrophotography projects. For example, I’ve used my consumer-level DSLR camera over the past years to take star trails and time-lapse videos of the night sky, as well as photographing the milky way from dark sky locations during my holidays in Greece and France.
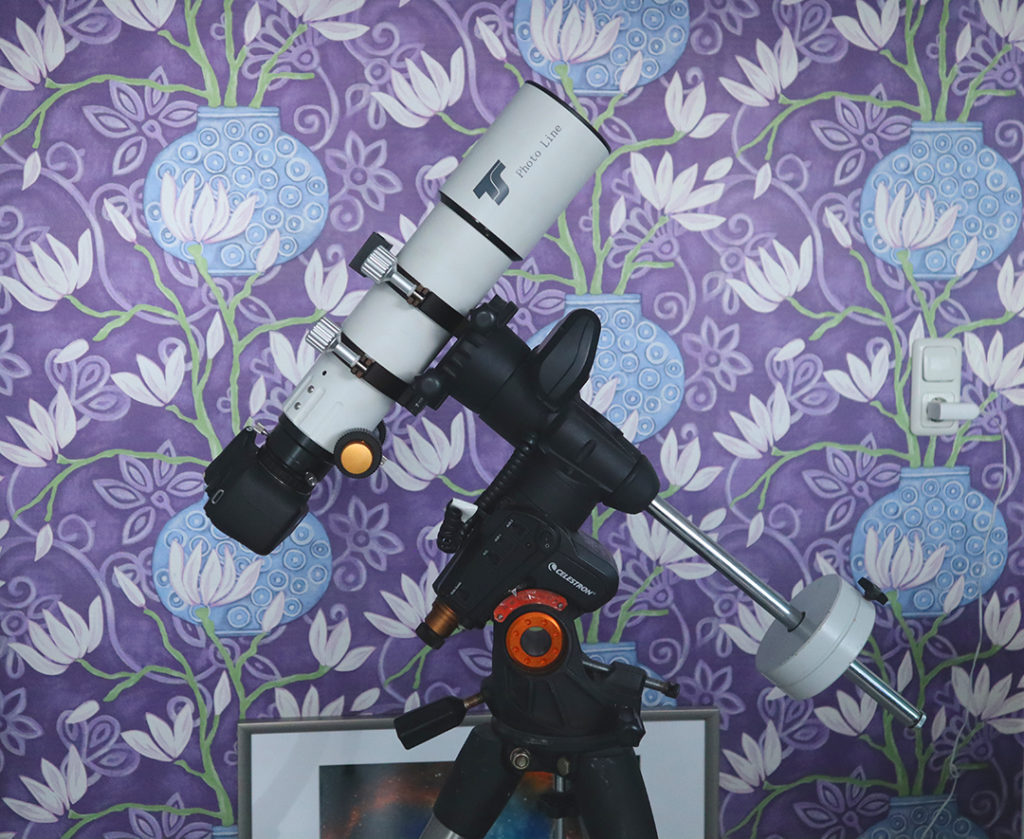
Setup 2: DSLR camera + Refractor Telescope + Computerized Telescope Mount ($2500)
USA/WORLDWIDE:
EU/WORLDWIDE:
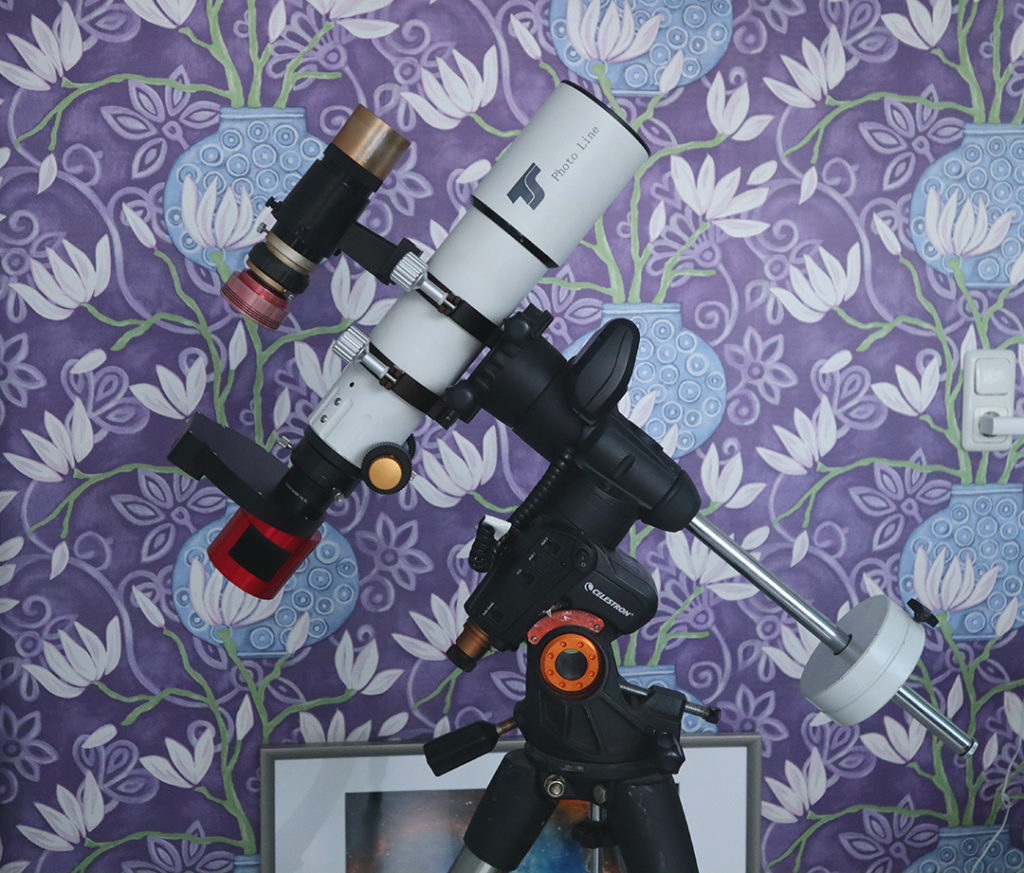
My first dedicated astrophotography gear consisted of a telescope and computerized astrophotography mount. My first telescope was a Teleskop Service 80/480mm APO refractor telescope and my first telescope mount was the Celestron Advanced VX Mount, which altogether cost me about $2000 dollars or euros, that’s about 1000 for the telescope and 1000 for the mount. I kept using my consumer-level Canon DSLR camera which you can easily attach to a telescope with a so-called T2 ring which is available for only $15. So let me get into the main advantages of using a telescope mount and a telescope.
A good quality computerized equatorial telescope mount like the Celestron Advanced VX mount has a couple of advantages:
- It can automatically find objects in the night sky with a computerized goto system;
- It also automatically tracks the path of the object you want to photograph in the night sky as it compensates for the earths rotation. This mount will keep the object you want to photograph centered in the field of view of your camera, so you can take longer exposure pictures.
There are also a couple of advantages in buying a high-quality refractor telescope like my TS 80/480mm photoline over using a regular camera lens with your DSLR camera:
- This telescope has a focal length of 480mm to magnify deep sky objects. That is beyond most zoom lenses you can find for your regular DSLR camera;
- The 80mm aperture and the high quality apochromatic FPL-53 lenses provide a well color corrected picture of objects in the night sky, often better than most camera lenses can provide;
- The telescope length is only 375mm and can weighs about 3 kg or 7 lbs;
- The telescope doesn’t require any maintenance beyond regular clearning.
If you’re going to take this step, you’ll need to invest a considerable amount of time to learn how to set up and operate your equatorial mount. This includes knowing how to focus your telescope, how to polar align your mount, and how to use the hand controller or remote software to find and track objects in the night sky with the mount. There are lots of software tools to choose from, like astrophotography tool, Nina, or sequence generator pro to automate your astrophotography sessions. It really took me a couple of nights to get the hang of it, so take into account that there definitely is a learning curve and you’ll need to invest some time.
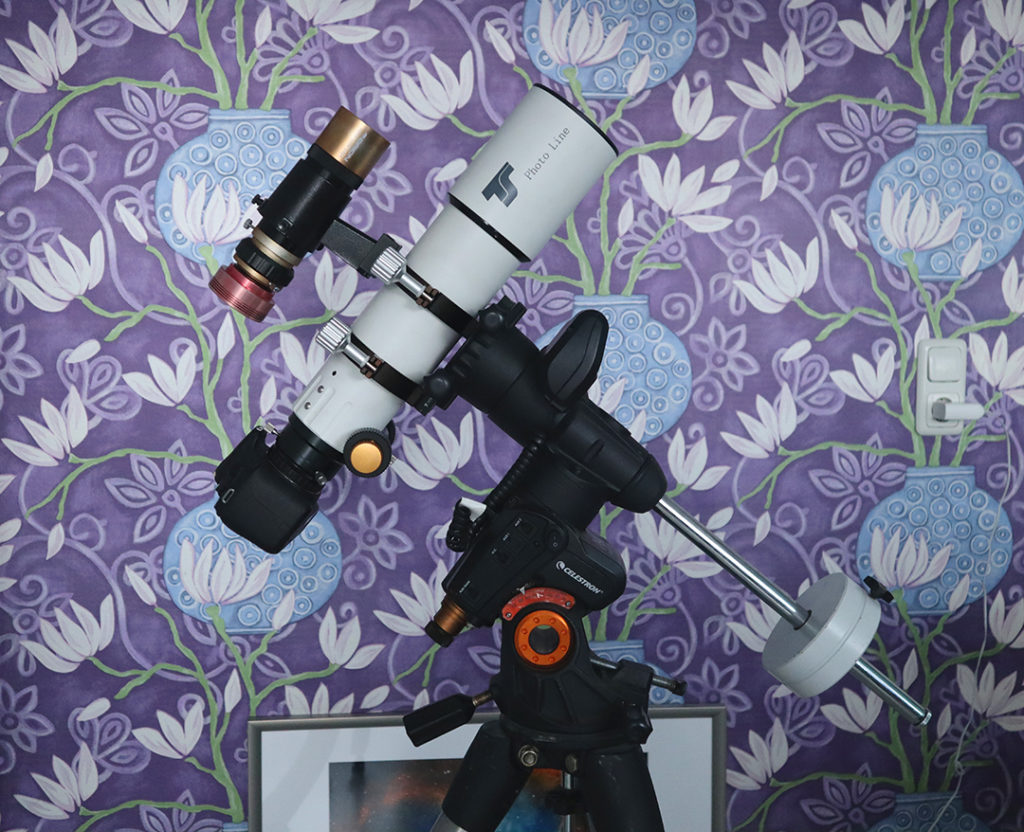
Setup 3: DSLR camera + Refractor Telescope + Computerized Telescope Mount + Autoguiding ($2750)
USA/WORLDWIDE:
- TS Photoline F/6 refractor Telescope
- Celestron Advanced VX Telescope Mount
- Canon Rebel T7 (2000D)
- Orion 50mm mini guide scope
- ASI120MC Guidecam
EU/WORLDWIDE:
- TS Photoline F/6 refractor Telescope
- Celestron Advanced VX Telescope Mount
- Canon Rebel T7 (2000D)
- Omegon 50mm guide scope
- ASI120MC Guidecam
With the setup we’ve just discussed, you’ll be able to take up to about 60-second exposures of objects in space. Longer exposure times still result in blurry pictures as most equatorial mounts do have some error in tracking objects in the night sky. To achieve even longer exposures, you’ll need an extra guide scope and guide camera. In my case, I bought the Orion 50mm mini guide scope and the ZWO ASI120mc guide camera, which altogether costs an extra 250 euros (dollars).
Autoguiding basically involves tracking a star with an additional guide camera and guide scope that you can attach to your telescope. The guide camera will track the position of a star that is close to the object you want to photograph. Every time the star moves its position, the guide camera can send a signal to your mount to correct its position. With the help of auto-guiding, it is possible to take multi-minute photos to catch even the dimmest light in deep space. Of course, you’ll need to learn how to set up and use auto-guiding with software tools such as PHD2.
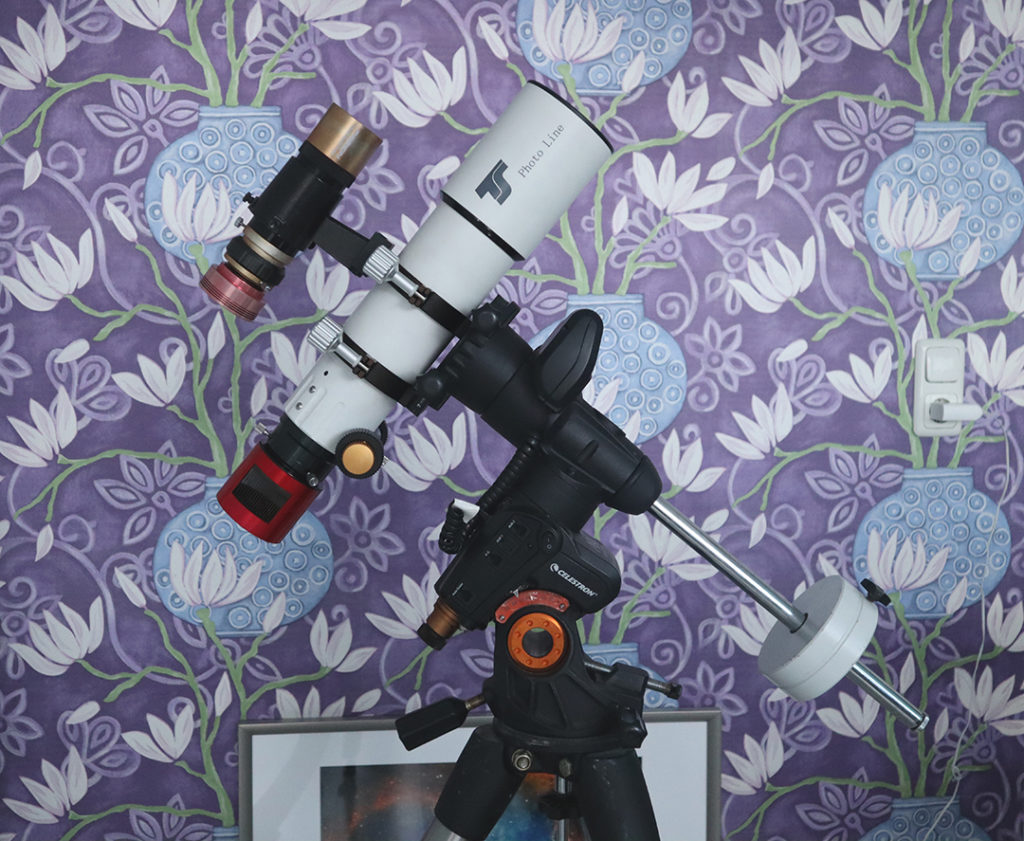
Setup 4: Cooled astro-camera + Refractor Telescope + Computerized Telescope Mount + Autoguiding ($3050)
USA/WORLDWIDE:
- TS Photoline F/6 refractor Telescope
- Celestron Advanced VX Telescope Mount
- ZWO ASI 183MC Pro
- Orion 50mm mini guide scope
- ASI120MC Guidecam
EU/WORLDWIDE:
- TS Photoline F/6 refractor Telescope
- Celestron Advanced VX Telescope Mount
- ZWO 183MC Pro
- Omegon 50mm guide scope
- ASI120MC Guidecam
At some point, you probably want to replace your DSLR camera with a dedicated, cooled astrophotography camera. One major downside about DSLRs is that the sensor cannot be cooled. So during astrophotography sessions, your camera tends to heat up and that leads to noise in your long exposure pictures. With a dedicated cooled astrophotography camera, you can cool the sensor of your camera to about -45 Celcius below ambient temperatures, which really helps to keep the noise down, resulting in a higher quality picture. In my case, I bought the ZWO ASI178MC Cool Camera that is no longer available. A very similar, high-quality camera that is still available is the ZWO ASI183MC camera which costs about $799 or 999 euros. At this point in time, I also bought my first light pollution filter to block city light pollution and my first hydrogen-alpha filter to photograph hydrogen gasses while blocking out light at other wavelengths which really increases your signal-to-noise ratio.
Setup 5: Cooled mono astro-camera + Filterwheel + Filters + Refractor Telescope + Computerized Telescope Mount + Autoguiding
USA/WORLDWIDE:
- TS Photoline F/6 refractor Telescope
- Celestron Advanced VX Telescope Mount
- ZWO ASI1600MM Pro Camera + LRGB broadband + 7nm Ha, Sii, Oiii 1.25″ narrowband filters
- Orion 50mm mini guide scope
- ASI120MC Guidecam
- ZWO 8 pos. filterwheel
EU/WORLDWIDE:
- TS Photoline F/6 refractor Telescope
- Celestron Advanced VX Telescope Mount
- ZWO ASI1600MM Pro Camera
- Omegon 50mm guide scope
- ASI120MC Guidecam
- ZWO 8 pos. filterwheel
- ZWO LRGB broadband filters
- ZWO 7nm Ha, Sii, Oiii narrowband filters
As the next step in my astrophotography hobby, I decided to buy a dedicated cooled mono astrophotography camera, including a dedicated filter wheel and filters: the popular ZWO ASI1600MM Pro with an 8 position filter wheel, ZWO LRGB broadband filters, and 7nm Ha, Sii, and Oiii narrowband filters.
One question you probably have is why someone would buy a mono camera for their astrophotography hobby. There are a couple of advantages. With mono cameras and filters, you have more control over what part of the light spectrum you want to capture. For example, when using a red filter in combination with a mono camera, you’ll be able to collect light in the red part of the light spectrum while rejecting light that is emitted at different wavelengths. In addition, you can also engage in narrowband imaging to capture light that is emitted in specific wavelengths. For example, lots of nebulas contain hydrogen gasses that emit light at very specific wavelengths in the light spectrum. By using narrowband filters, you will be able to collect light in those specific wavelengths, while rejecting light from all other wavelengths. This often results in higher quality pictures as the so-called signal-to-noise ratio is much better compared to using a color camera for astrophotography. One downside is of course that you need more time to collect light from a particular object at different wavelengths. In addition, you’re adding more complexity to your astrophotography sessions, as you need to integrate the mono camera with the filter wheel and telescope, and you really need to think about what filters you want to use to capture different objects.
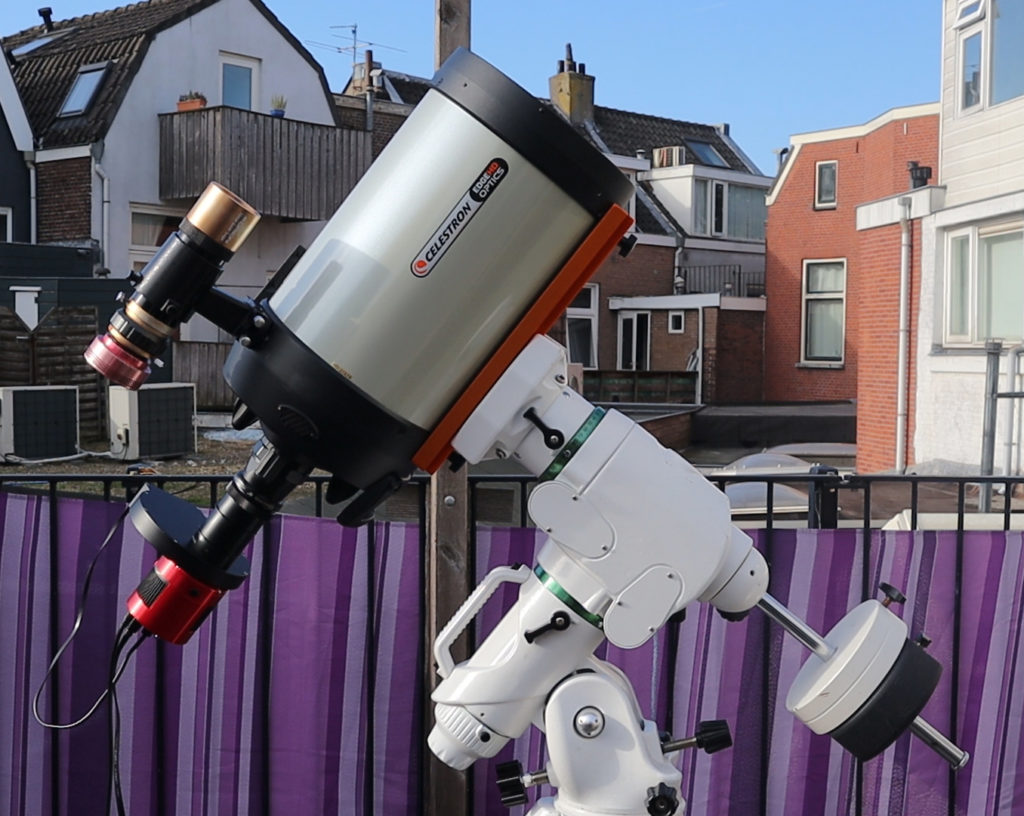
Setup 6: Cooled mono astro-camera + Filterwheel + Filters + Edge HD 8″ Telescope + EQ6-R Pro Mount + Autoguiding
USA/WORLDWIDE:
- Celestron Edge HD 8″ Telescope
- SkyWatcher EQ6-R Pro Telescope Mount
- ZWO ASI1600MM Pro Camera + LRGB broadband + 7nm Ha, Sii, Oiii 1.25″ narrowband filters
- Orion 50mm mini guide scope
- ASI120MC Guidecam
- ZWO 8 pos. filterwheel
- .Celestron .7 reducer
EU/WORLDWIDE:
- Celestron Edge HD 8″ Telescope
- SkyWatcher EQ6-R Pro Telesope Mount
- ZWO ASI1600MM Pro Camera
- Omegon 50mm guide scope
- ASI120MC Guidecam
- ZWO 8 pos. filterwheel
- ZWO LRGB broadband filters
- ZWO 7nm Ha, Sii, Oiii narrowband filters
- Celestron .7 reducer
About one year ago, I decided to buy a new telescope, this Celestron Edge HD 8″. Some of the main reasons to buy this telescope are that it has a bigger aperture of 203mm as compared to my 80mm refractor, so I can collect more light and take higher resolution pictures of objects in the night sky. Also, the Edge HD has a longer focal length as compared to my refractor telescope, so I can better magnify tinier objects in the night sky such as smaller galaxies and the planets in our solar system.
As this telescope is heavier and has a longer focal length, I also chose to upgrade my mount to a SkyWatcher EQ6R-Pro. This mount is able to track the objects in the night sky more precisely which is important when taking multi-minute photos using a long focal length. It is also able to carry heavier telescopes. Together with my ASI1600mm Pro, filter wheel + filters, and an extra .7 reducer this setup costs more than 5000 dollars or euros.
Final thoughts
Astrophotography can be a real money pit. I didn’t even mention gear such as automated focusers, rotators, or a potential dome in your backyard for your telescope. So it is important to think about a budget. How much are you willing, or allowed to spend on your astrophotography hobby? I do want to note that a simple DSLR camera and tripod can be as much fun as photographing with an ‘advanced’ setup. It is much easier to set up, you can take it anywhere you want and shoot the night sky from beautiful locations. Expensive setups also require more training and inevitably lead to more frustration, but the resulting pictures are high-quality ‘poster-worthy’ pictures of the night sky. I hope this v/blog gave you some insight into the costs of astrophotography and the choices I’ve made to build up my astrophotography gear over the years. I have provided affiliate links to the different setups and gear I use, for which I will get a small commission for redirecting you to their shops – you’ll pay the same price. I always advise you to do your own research when buying astrophotography gear.
See you next time, clear skies!
Wido – AstroForum