Autostakkert3! is probably the best free software program to create a stacked image from your video captures of The Planets. In this tutorial, I first demonstrate how to import, set up, and analyze the quality of your video frames in autostakkert3! I’ll show you how to set up image stabilization, the quality estimator, and how to place alignment points using either the semi-automatic “Place AP grid” option versus manually placing alignment Points. Next, I’ll explain how to create a stacked image. This includes a discussion on how to interpret the quality graph, and how to choose the number of frames to stack. I’ll also discuss options to setup the reference frame, as well as the other (advanced) options that are useful to create a stacked image in autostakkert3!
Some disclaimers before starting
Before starting this tutorial there are a couple of disclaimers I need to make. I’m not an expert on planetary processing, and I’ve captured my videos under light-polluted city skies in The Netherlands with the Planets close to the horizon, so we are definitely not working with the highest quality data. Nevertheless, I will show you what I know. If you want to add your knowledge on how to process the planets, or if you have additional questions, feel free to leave a comment in the comment section so we can all learn from one another. If you’re completely new to planetary imaging, I recommend you first take a look at my v/blog about top 10 tips to capture The Planets, and perhaps also this v/blog about best telescopes to start planetary imaging.
Downloading Autostakkert and my video of Jupiter
Autostakkert! is a free software tool developed by a very kind software engineer from The Netherlands, Emil Kraaikamp. Autostakkert is an excellent tool to create stacked images from video files of the Sun, the Moon, the planets, and even deep-sky astrophotography objects. You can download the software for free from the autostakkert website. Please don’t forget to donate Emil a cup of coffee to show your appreciation. Emil is currently working on the 4th version of Autostakkert, so the more donations he gets, the sooner he can release the 4th version of this awesome freeware. You can DOWNLOAD my VIDEO of Jupiter here if you want to follow along with this tutorial using the same data. For those interested, I captured this one-minute video of Jupiter with my Celestron Edge HD 8″ telescope, my ZWO ASI178MC camera with a 2.5x Barlow lens, and my SkyWatcher EQ6-R Pro mount. You can find a complete overview of my astrogear here. Let’s go!
Opening Video Files
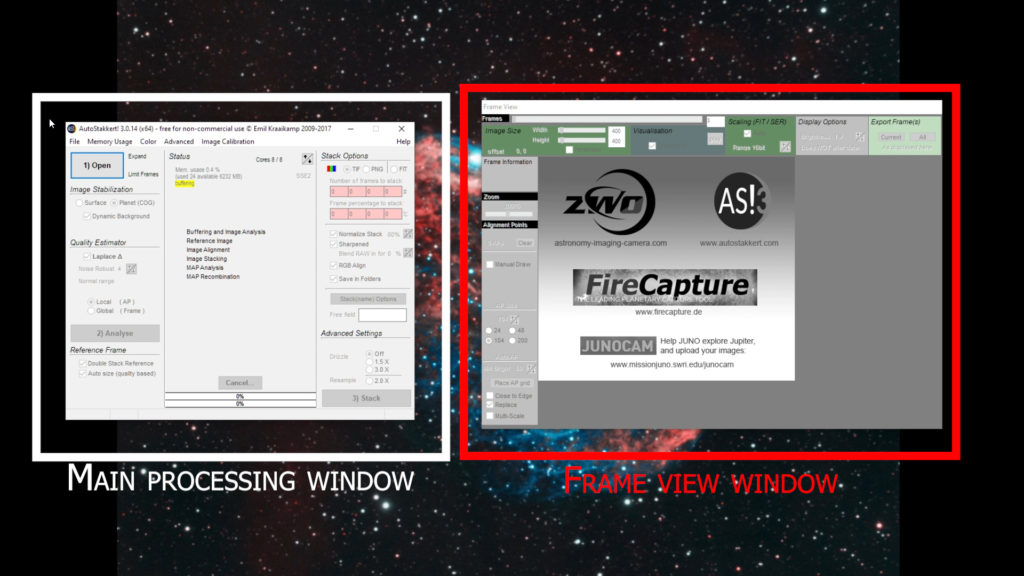
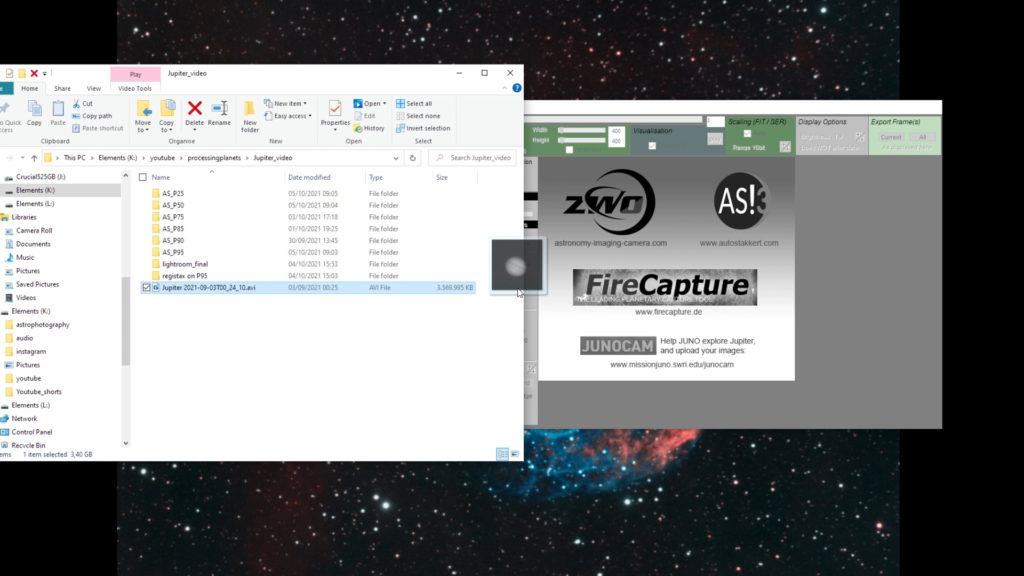
Upon opening the program, Autostakkert shows two separate windows. The main window on the left shows you all the processing options, and a second “frame view” window on the right shows the video you want to process. You can either select a video by dragging and dropping your video on the frame view window, or as an alternative, you can click on the open button on the main processing window and select the video you want to process. Either one of those steps will open up the video in the frame view window, and it will show you the first frame of that video.
Resizing a video
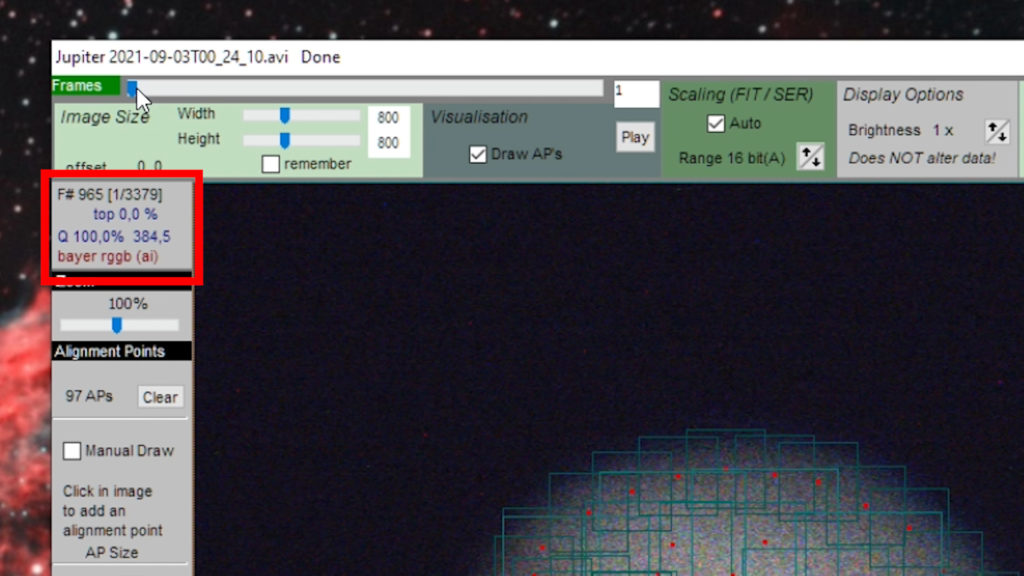
You can significantly speed up the processing speed in autostakkert by decreasing the width and height of the video in the frame view window so that it only encompasses the planet. You can do this by adjusting the width and height sliders in the frame view window, or by typing a value next to the sliders in the value box. For this video, let’s select a width and height of 800 pixels.
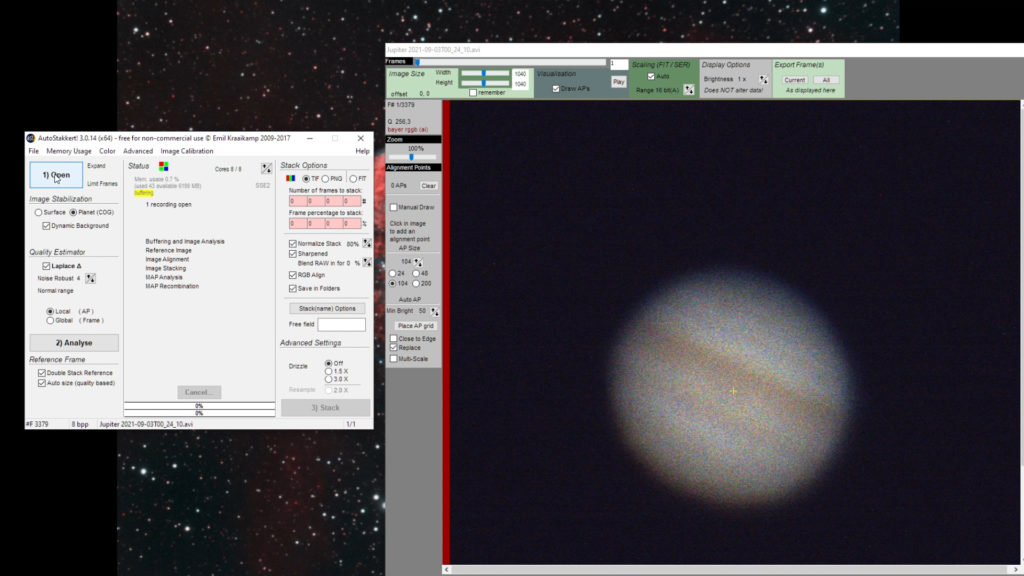
In “planet” mode, the planet will be automatically centered in the frame view window. You can alter this view by holding down the shift key, and left-clicking on your mouse while dragging the planet around. This may be useful when you have captured a couple of the Galilean moons of Jupiter that may be off-center. In this video, we, unfortunately, don’t have any extra moons, so we can easily re-center the planet by clicking on “offset” in the frame view window.
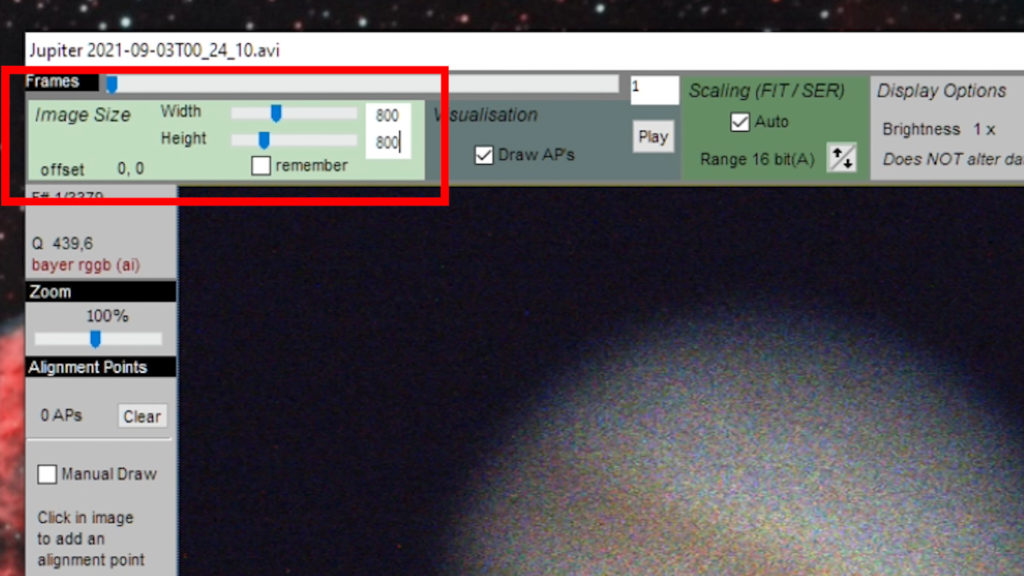
Image Stabilization
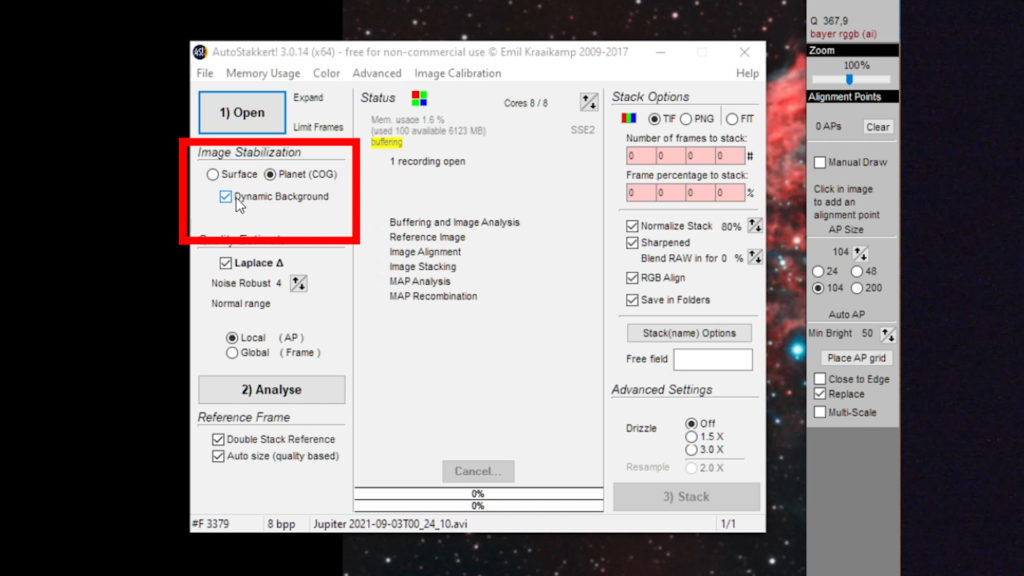
The first action Autostakkert needs to perform is to assess the quality of each of the video frames. But before autostakkert can actually perform that assessment, it first needs to stabilize the individual frames of your video. When playing your video by clicking on the play button in the frame view window, you’ll notice that the planet wobbles a bit. This is partly due to atmospheric turbulence and possibly also because my mount had some tracking errors while capturing the video. Autostakkert can adjust for those errors by stabilizing the individual frames of the planet in the video, so let’s perform that action first. By default, “planet” is selected as an option in the image stabilization section of the processing window. In this mode, autostakkert will automatically detect the threshold that separates the bright pixels of the planet from the dark background. As an extra option, you can select “dynamic background”. This option will automatically determine the background value. I recommend you use this option, especially when you captured videos with varying brightness of the background. This can for instance be the case when you’ve captured some videos of the planets during twilight.
The other option for image stabilization is the “surface” option. This option should be used to process close-up videos of the Moon or the Sun. I will show you how to process a video of the lunar surface in the future tutorial, so if you want to follow that tutorial as well you’re welcome to subscribe to my YouTube channel.
Quality Estimation of video frames
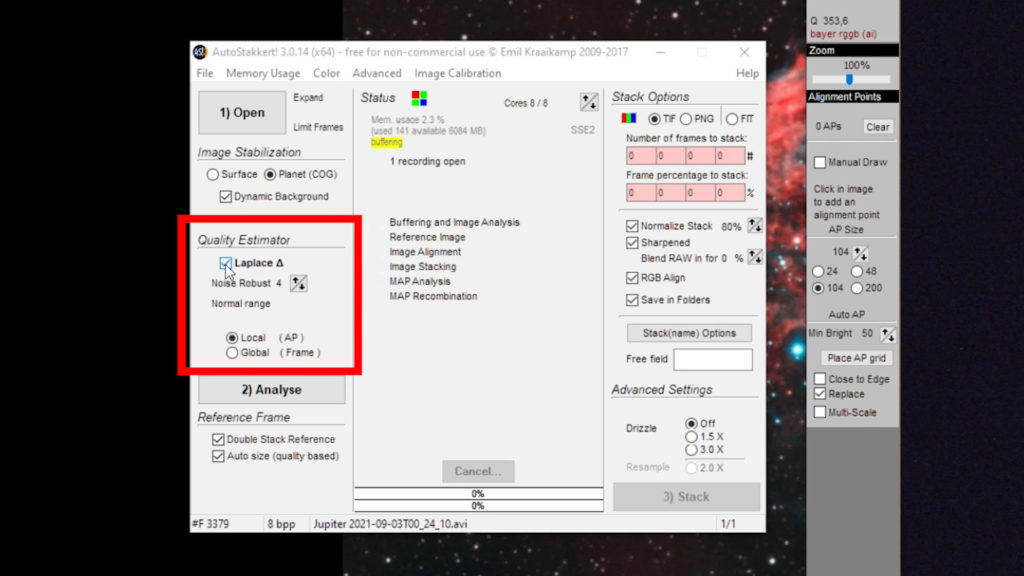
The quality estimator in the processing window is automatically set to “Laplace” in autostakkert3! with the option to set a noise-robust value. The smallest noise-robust setting of 2 will analyze a small 2×2 area of the frame, whereas the maximum value of 8 will analyze a much larger area. The smallest 2×2 setting is best used when you have exceptionally good seeing conditions and a very high signal-to-noise ratio, meaning that the planet stays in position, it doesn’t wobble around across the frames of your video, and you can see lots of surface details. Obviously, this is not the case in our video, we definitely have some mediocre seeing conditions, and the planet frames are quite noisy. I will therefore leave the noise-robust setting at the default setting of 4, which works well for most videos.
Note that the quality estimator is set to local, with the option to switch to global. The best results are often achieved by using the local estimator. Autostakkert will then select the best areas of each alignment point for every frame in the video, whereas Global will assess the quality of every frame as a whole. So I will select local. In order to be able to use alignment points, we first have to set up these alignment points in the frame view window, so let’s do that first.
Placing Alignment Points (AP)
By setting up Alignment points (AP) across different areas of the planet, you can define regions of the planet that Autostakkert will track to compensate for seeing distortions. For example, when playing the video in the frame view window, you’ll notice that the planet wobbles around quite a bit and so the planet features will change position in every frame. As this wobbling differs not only between frames but also within frames, across different areas of the planet, it is wise to set alignment points. Autostakkert will try to analyze the changing position of the features for every alignment point in every frame and will try to put them back into the same positions across frames to compensate for the seeing distortions. Ideally, you should end up with a stacked picture of the planet as it would be without seeing distortions.
How to automatically place Alignment Points with AP Grid
The major question here is how many APs you should use and where you should place them so let’s discuss this. First of all, if you don’t want to go through the effort of manually adding alignment points, autostakkert produces quite good results when using the “place AP grid” option in the frame view window. You can determine the size of the alignment point squares to be 16 pixels or higher by using the up and down arrows in the frames view windows, or by scrolling your mouse wheel.
Depending on the size of the planet in your video, you want to experiment with which AP size works best. Smaller alignment points work very well when seeing conditions are good and you can see sharp surface features in your frames, while larger alignment points work better when features of the planet are blurry due to poorer seeing conditions. In this particular video, we have mediocre seeing conditions and a rather blurry picture of the planet, so in this case, a good option would be to use an AP size of 64 which can cover larger areas to detect different features and contrasts.
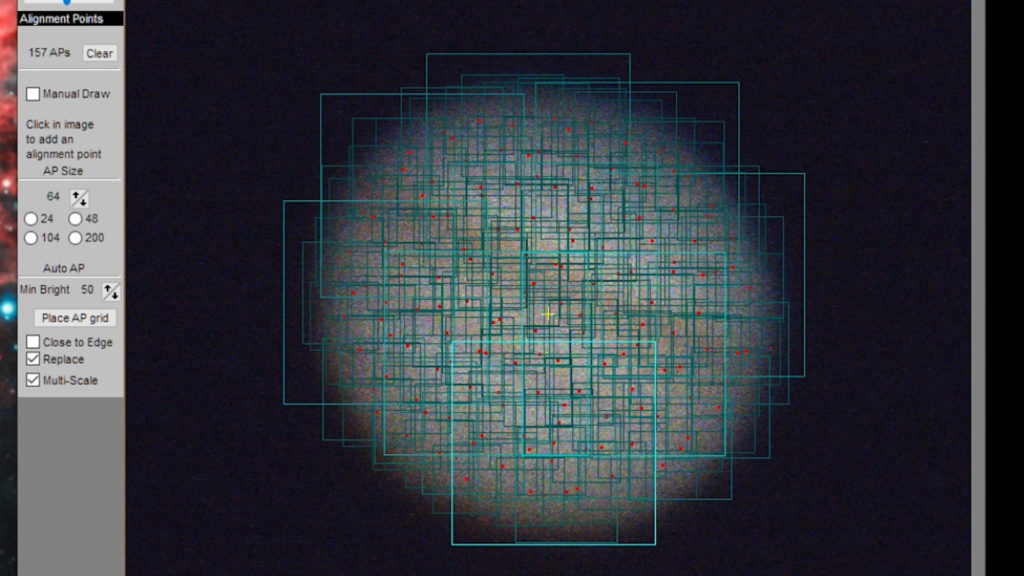
If you’re unsure about which size would work best, a good option is to use the multi-scale option. When selecting this option, autostakkert will create a three-dimensional AP grid with larger AP squares placed on top of smaller APs. Whenever a smaller AP doesn’t provide enough information, autostakkert will use the information of the larger alignment point on top of the smaller one, as well as information from the adjacent alignment points, to determine the best position for that area. A final thing to check is the minimum brightness setting in the frame view window. You don’t want alignment points to be too close to the edge of the planet. If that’s the case, Autostakkert will have issues in determining the correct position of the edge of the planet when the majority of the AP area covers the black background rather than the planet. By increasing the minimum brightness in the frame view window, you’ll notice that AP’s will be placed more towards the inside of the planet. For this particular video, let’s set the AP size to 64 pixels, with multi-scale checked on, and minimum brightness of 50. When clicking on “place AP grid” you’ll notice that this produces a nice grid of smaller and larger alignment points that primarily cover the planet.
How to manually add Alignment Points
Unfortunately, it is hard to completely automate the alignment point process. Planetary imagers, including Emil Kraaikamp who is the developer of autostakkert, have indicated that manually placing APs can often result in a higher quality stacked image of the planet as compared to using the automatic AP grid option. You can easily add alignment points by left-clicking on the frame of the video. If you’re unhappy about the size of the AP, you can either increase the size by using the mouse wheel, or by clicking on the up and down arrows in the frame view window to increase or decrease the size of the AP.
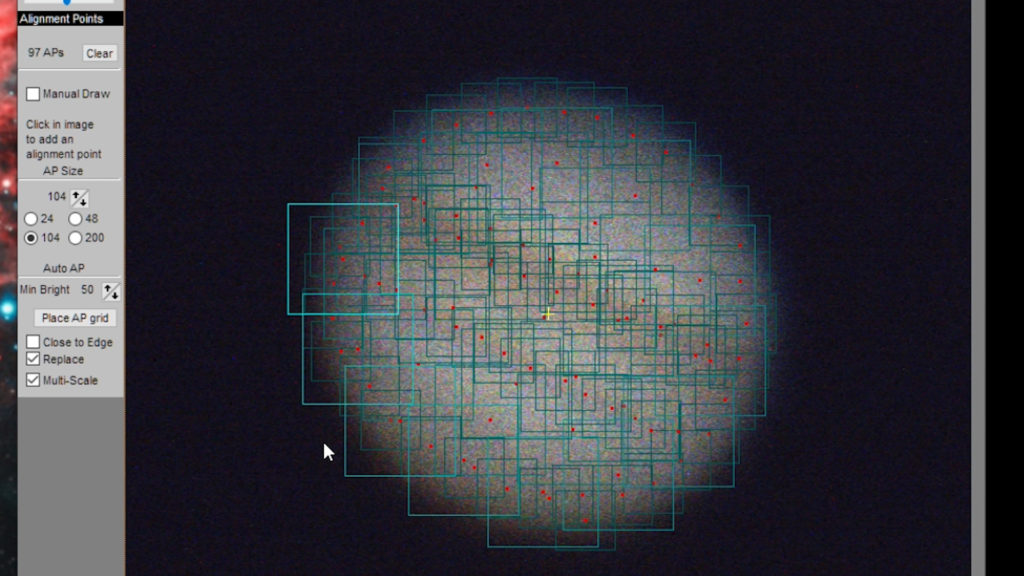
There are a couple of tips you should take into account when manually adding APs. First, as already said before, we should avoid placing alignment points too close to the edge of the planet. So in this video, let’s place some 56 pixel-sized AP points toward the edges of the planet. These alignment points close to the edge of the planet should mainly cover the planet itself and not the black background. Second of all, it is best to place APs in high contrast areas, such as around the shadow of a moon on Jupiter. We don’t have such contrast-rich areas in this video, unfortunately, but it is a good idea to place some smaller APs on the edges of the main cloud bands across the surface of Jupiter. So let’s also place some 56 sized AP points across the surface of Jupiter, where the darker cloud bands of Jupiter are meeting the lighter areas. Remember that AP’s should always have sufficient overlap, so that if one alignment point doesn’t provide enough information, the information of adjacent alignment points can be used. Finally, it is also recommended to add alignment points so that they cover the entire surface of the planet. So let’s place some larger 104 sized alignment points on top of the smaller ones, making sure every part of the planet is covered.
How to analyze the quality of the video frames
After placing the APs, it’s time to press the “analyze” button. Autostakkert will now assess the quality of every alignment point of every frame in the video. When the image analysis is completed, the label of the Frames slider turns green and the frame view window shows all frames sorted by their quality, from best in the beginning of the video to worst at the end of the video. The main processing window will also show a quality graph indicating the frame quality over time, and the distribution of the sorted frames in a green line. The green line is rescaled so that the best frame is always set to 100% on the top left and the worst quality frame is always set to 0% on the bottom right. For this particular video, autostakkert shows a rather linear decrease in quality from the best frame on the top left to the lowest quality frame on the bottom right. Also note that the frame view window also shows a quality value for each of the frames in the video. So in my case, the best quality frame has a value of 384 and this value goes down when moving the slider to the right for the lower quality frames.

How many frames to stack (stack options)?
Now that the quality assessment is done, it is time to stack your frames. One very nice feature of Autostakkert is that it can create multiple stacked images from one video, using a different number of frames and/or different percentages. You can use the boxes in the “Stack Options” in the top right column of the main processing window to either put a value in for the number of frames to stack or a percentage of frames you want to stack. You can put values in each of the four boxes in the “number of frames” and “percentages of frames” options. When you fill out multiple options, autostakkert will create multiple stacked pictures of the planet.
The first major question is how many frames we should stack. One general rule of thumb that usually works well is to stack about 50% of your highest quality frames, especially when the quality of your frames are similar across the video. However, when there’s a lot of variation in the quality between the frames in the video, it may be better to select a smaller percentage. For example, when comparing the quality of the frames in this particular video, you’ll notice that there are only minor differences between the highest quality frame in my video with a value of 278, and the lowest quality frames which are around 254. So all pictures are about the same quality. With such small differences in quality between the frames, you may be better off stacking a high number of frames, as more frames will provide more input to create a higher quality stacked picture of the planet. Also, using a higher number of frames usually provides a stacked image that can be better processed using other software, like Registax6, as compared to using only a small number of high quality frames. It is also good practice to experiment a bit, so let’s create stacks of the best 95%, 50%, and 25% of the frames of this video.

Reference Frame setup
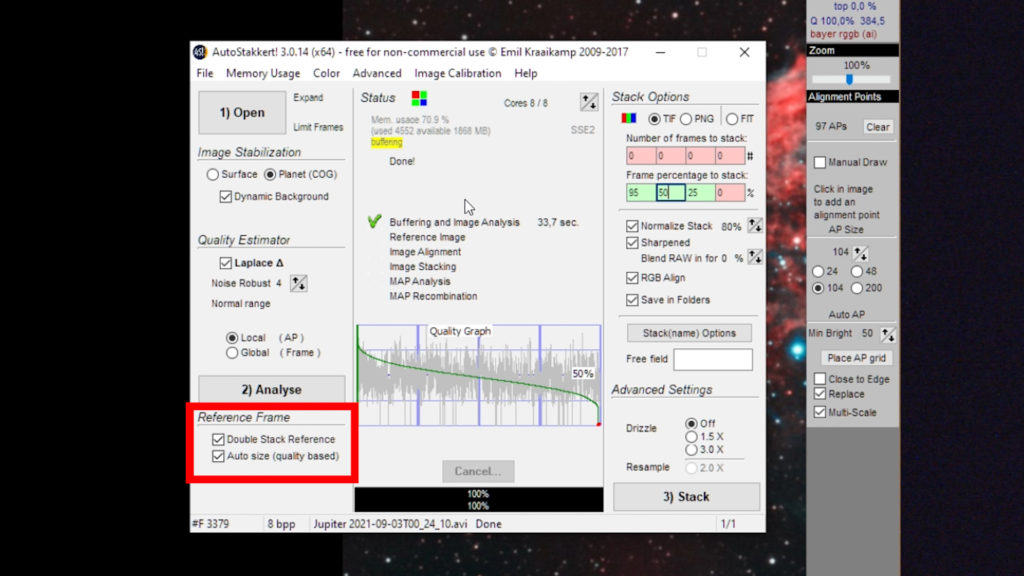
Before clicking on the stack button, note that there are different options to create a “reference frame”. Now, the term “reference frame” doesn’t quite cover that what autostakkert does. Autostakkert will NOT select just one frame as a reference frame, but instead it will create a stacked picture from a larger number of “best quality” frames in your video. For example, when selecting “auto-size (quality based)”, autostakkert will select and stack about 50% of your highest-quality frames to create a “reference stack”, to which all the frames are aligned and stacked. This default option works quite well in most cases, but if you want to determine the number of frames for the reference stack yourself, there is an option to switch off auto-size and use a slider to select the number of highest quality frames you would like to use as a reference. For this tutorial, we’ll select “auto-size”. There is a second option to check “Double stack reference”. When choosing this option, autostakkert will create two reference stacks instead of one, where the first stack serves as input to create a second stack, which should create a higher-quality reference stack. This process will take more time, but as it may lead to a higher quality reference stack, we’ll select “double stack reference” as well.
Other (advanced) settings
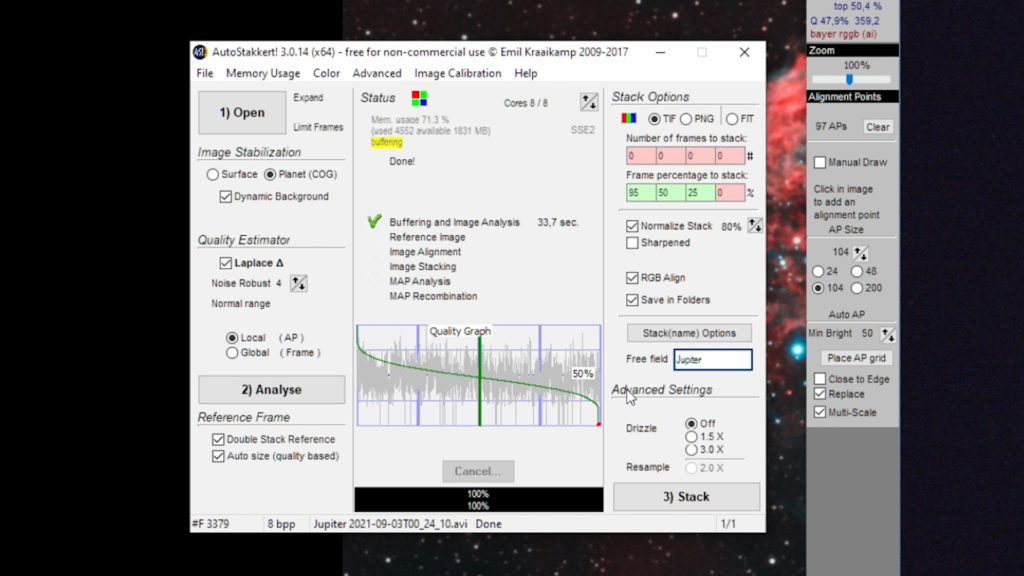
There are also a number of options in the right column of the main processing window we need to discuss. The first option is named “normalize stack”. We’ll check this option, as it will set the brightness of the image to a fixed percentage and as such it will compensate for brighter than normal backgrounds. Next, autostakkert offers a “sharpened” option. When selecting this option, autostakkert will produce a second, sharpened stacked image of your planet. When checked on, you can also decide to blend in a percentage of RAW images which may increase the sharpness of the picture. In this tutorial, we will NOT select the “sharpened” option, as we will use registax 6 to further sharpen our stacked image created by autostakkert.
Next RGB align will align the red, green, and blue channels after stacking the image, creating a good color balanced picture of the planet, so we’ll select that option. There is also an option to select “save in folders”. This is useful when you’ve requested more than one stacked image in the “stack options boxes”. Autostakkert will create separate folders for each of the stacked pictures, so we’ll select that option as well.
Finally, autostakkert3 has two “advanced settings” options: “resample” and “drizzle”. Resample will simply provide an enlarged picture of the planet, without increasing the resolution of your picture, so we will not use that option. Drizzle, however, is a more sophisticated option you might want to consider, especially when you have undersampled data. A lot of folks end up with rather small images of the planets as they are very tiny objects in the night sky. Drizzle in autostakkert relies on small movements in your recording to fill in missing information between pixels across frames and can help to produce a higher resolution final picture of the planet. As my video is probably more oversampled (at .1″ per pixel) than undersampled, I will not select the drizzle option for this video. As a rule of thumb, planets are best captured with .1 arc seconds to about .25 arc seconds per pixel. If you have captured the planets at a higher arc second per pixel, it is wise to experiment with drizzle. For this video, we simply select advanced settings to “off”. Now, we are ready to hit that stack button and look at our results.
Let’s compare the stacked pictures
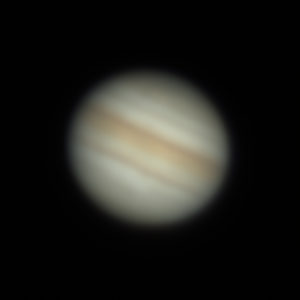
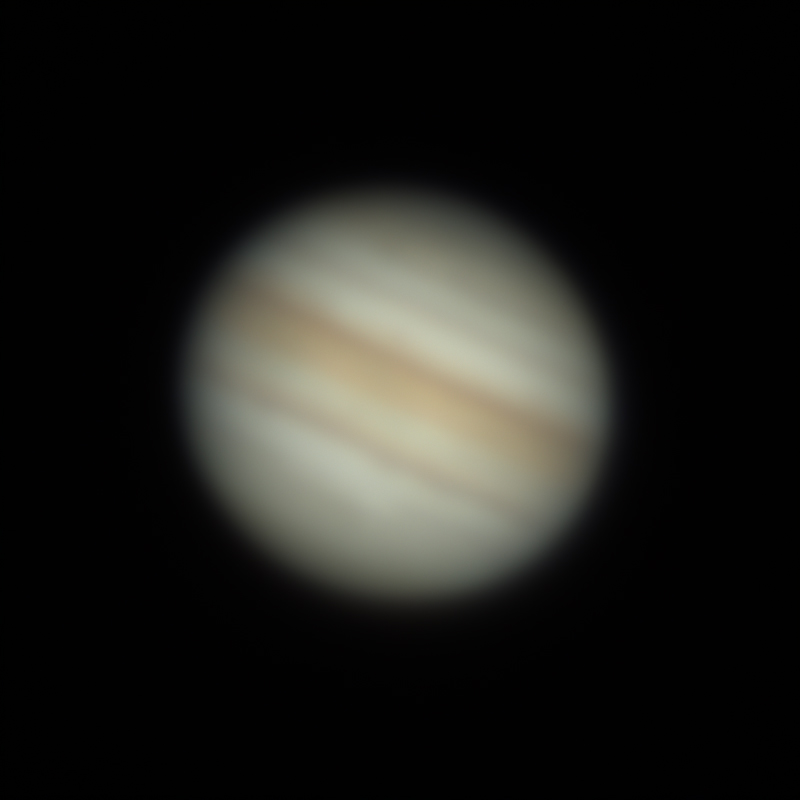
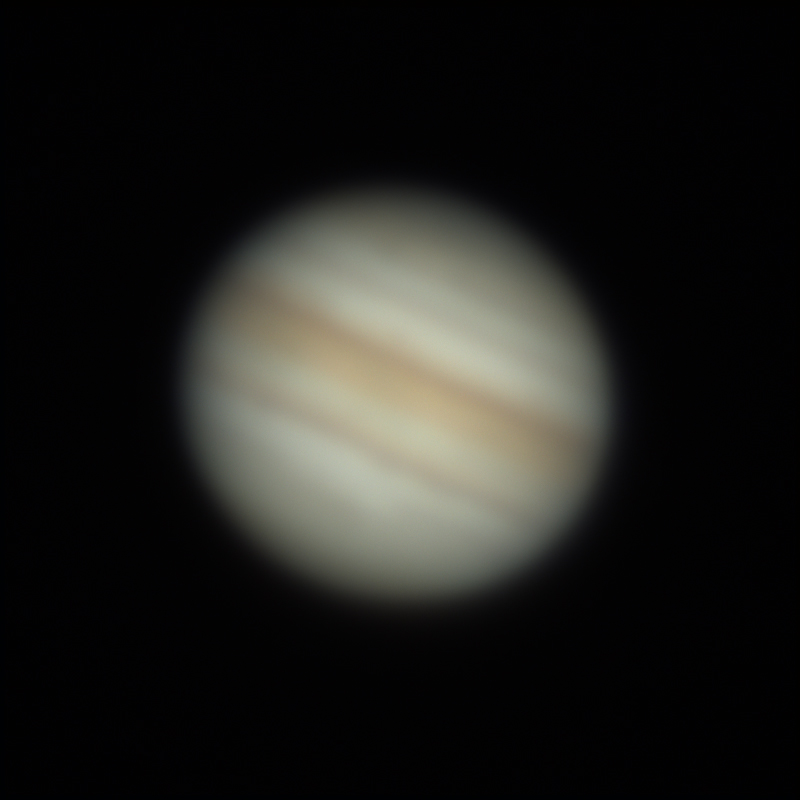
Let me show you the resulting stacked pictures of Jupiter when using 25%, 50%, and 95% of the video frames. In this case, there is not a whole lot of difference between the pictures. The 25% stacked picture looks a bit sharper as compared to the 50% and the 95% stacked pictures, but the differences are pretty small. This was to be expected, as the quality of the best frames was only slightly better than the quality of the worst frames in this one-minute video of Jupiter. In this case, I will select the 95% stacked picture of Jupiter for further processing, as includes a higher number of frames really makes processing in other software programs like Registax easier. In a second tutorial, we will use the 95% stacked image of Jupiter for further processing in Registax.
25% stacked 
50% stacked 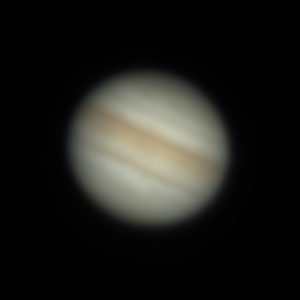
95% stacked

Now that we’re done in Autostakkert3!, we can move on to further process the stacked image in another free software program called: Registax. I’m working on a PART 2 of this tutorial (will release it soon) where I will discuss Registax. When it is finished, I’ll link to it here.
I hope this tutorial was useful for you. If you have anything to add to this tutorial, you’re welcome to comment in the comment section below so we can all learn from each other.
Clear skies!
Wido – AstroForum.
Love your channel! I was wondering if you had any more raw data available for downloading and processing such as your jupiter video. I am new and need a lot of practice with the software before getting real. Thank You
Hi there,
Yes, I do have some deepsky pictures as well, check: https://youtu.be/J4vyjMI-9cc
Great channel! I emailed you a couple months ago inquiring about data to “practice”with. I am a beginner and am mainly interested in lunar data to begin with. If that goes well, I will eventually work my way outward. I have a two part question. Do you have any lunar data available I can work with? Also, when will you be releasing that lunar processing video? Thank you! and greetings from Az.
Hi Harry, thanks! I didn’t release a video on how to process the moon yet, I’ll put that on my to-do list.
I do have some videos of the moon and I’ve put one in my dropbox for you (and others) to download and play with.
It’s a nice video of the Copernicus crater, you can download it here, file is about 2GB: https://www.dropbox.com/sh/wpsren1i8vnbae1/AAB3hICqvrP-fuDUfddB9znGa?dl=0
The file is in *.ser format and you can open it in autostakkert and/or registax.
Hope this helps!
Cheers,
Wido.
Great tutorial. I have a problem when capturing as some frames are incomplete (half black or have bars across them) and when alalysing the footage it ‘sees’ these frames as best quality. How can they be removed from the footage?
perhaps delete these frames from the video altogether with a video editing program before going back to Autostakkert?
For a reason that I don’t understand, when I call up the ser file in Autostakkert3, the image shows diffraction rings all over the planet. This doesn’t happen with Autostakkert2. What could be wrong? Thank you, Joe Bauman
Hi Joseph, I wouldn’t know…did you also notice it in your live videorecordings?