One of the first things you want to learn as an amateur astrophotographer living in urban areas is how you can reduce artificial light pollution. This light pollution tends to reduce the signal to noise ratio in your astrophotography pictures and introduces a nasty brown-yellowish glow.
The answer on how to reduce light pollution lies in the use of light pollution filters. There are many filters on the market which can be a little daunting. In this blog, I will first discuss what light pollution is and what kinds of filters are available to reduce ‘city glow’ from various artificial light sources. Thereafter, I’ll review my own light pollution filter – the Hutech IDAS LPS D1 – that I’ve been using to combat light pollution while imaging ‘broadband’ targets such as the Andromeda galaxy.
Before moving on there is one thing to remember: The best filter you can use is the ‘gas filter’. Nothing beats imaging from a dark site under bortle class 1-3 skies. So if you have the opportunity, get in your car and drive to a dark(er) site, you will not regret it. Unfortunately, we all have our busy lives so we often use our own backyard or balconies from (sub)urban areas. If this reflects your situation, then keep on reading :-).
What kind of filters are out there on the market?
So, let’s assume you are stuck in the a (sub)urban area and you are looking for a light pollution filter. When you go online, you will find many names of filters that may be useful to combat light pollution, such as:
- Ultra High Contrast (UHC)
- Light Pollution (LP)
- Light Pollution Suppression (LPS)
- City Light Suppression (CLS)
All those different names may make it more difficult for you to make a decision on what kind of filter best fits your needs. So in this blog, my main goal is to inform you on what light pollution is and how light pollution filters work, so you can make a more informed decision on what filter best suits your particular needs. I will start this blog by explaining what light pollution is: What kind of light sources are we trying to block? After that, I’ll show you how to read the transmittance profiles of different light pollution filters that are available. Next, I’ll discuss different kinds of filters that can be used in combination with different cameras and filterwheels. As a last step, I’ll review the light pollution filter that I’ve been using for the past couple of years, my Hutech IDAS LPS D1 filter. I’ll share uncalibrated pictures taken with/without a light pollution filter on the same night using my Canon EOS 1200D with my 50MM lense, so you can see for yourself how this filter blocks much (but not all) of my city light pollution. Hopefully, after reading this blog, you will be able to choose the light pollution filter that suits your needs. If you don’t like to read, you can watch this video below if you can tolerate my Dutch accent :-).
What is Light Pollution?
Our universe is ‘talking’ to us by emitting light in different wavelengths, from gamma rays to radio waves. Gamma rays are produced by the hottest and most energetic objects in the universe, such as neutron stars, and supernova explosions. On the other part of the electromagnetic spectrum, we find radio waves that are produced by a wide variety of astronomical objects such as black holes, pulsars, and star formation regions. As astrophotographers, however, we are primarily interested in the visible part of the light spectrum to create beautiful colored images of astronomical objects in the night sky. The visible light spectrum lies in between the 400 nanometer (nm) to 700nm range. One nm equals one billionth of a meter – so in other words – it’s pretty small.
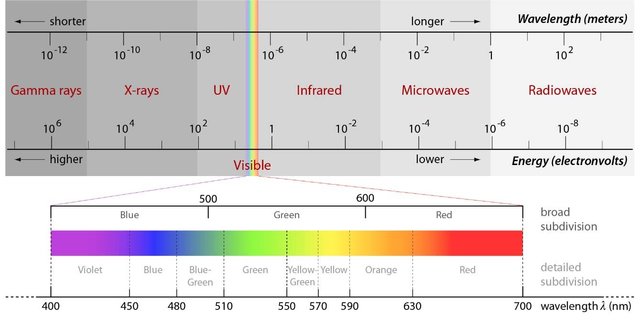
You can see from the above figure that we’ll find the violet and blue light in the 400-500nm range, the green and yellow light in the 500-600nm range and the orange and red in the 600-700nm range. In an ideal situation, we would be able to image under completely dark skies, without any artificial light pollution. This would give us the opportunity to get all the data (photons) from a particular Deep Sky Object in the visible part of the light spectrum. Unfortunately, in (sub)urban areas we have to deal with what we refer to as skyglow, or light pollution. I find this terminology a bit misleading as it implies that only one light source, being ‘the city’, produces the city glow. In reality, there are many different artificial light sources such as traffic lights, vehicles, streetlights, neon signs and LED lights that all emit light at different wavelengths of the visual light spectrum.
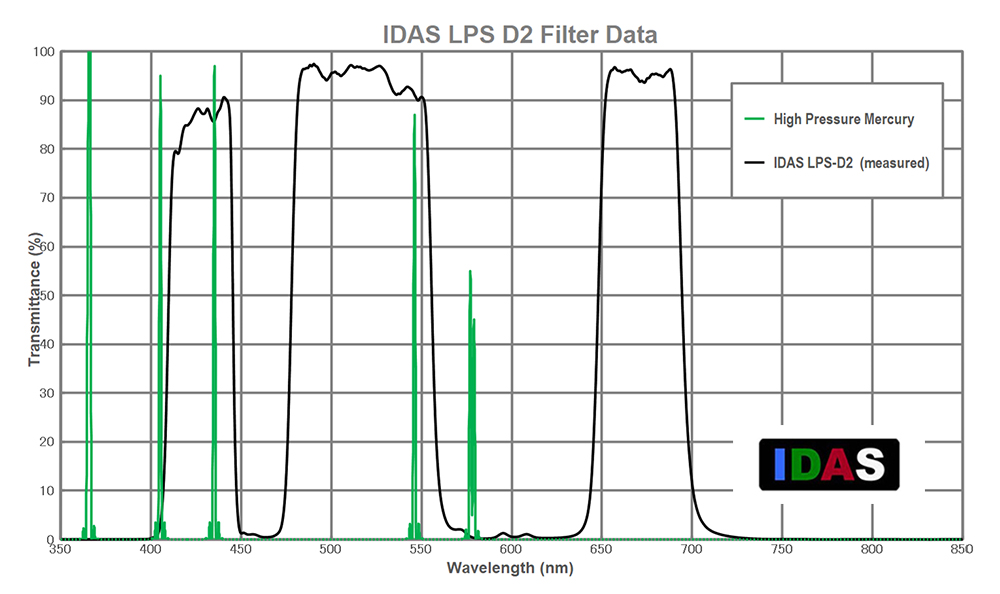
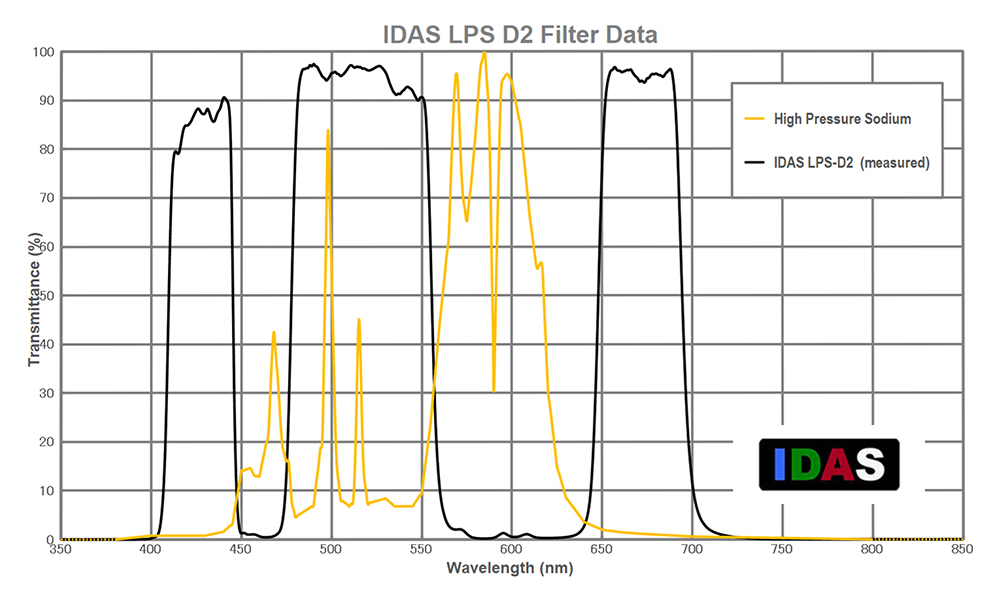
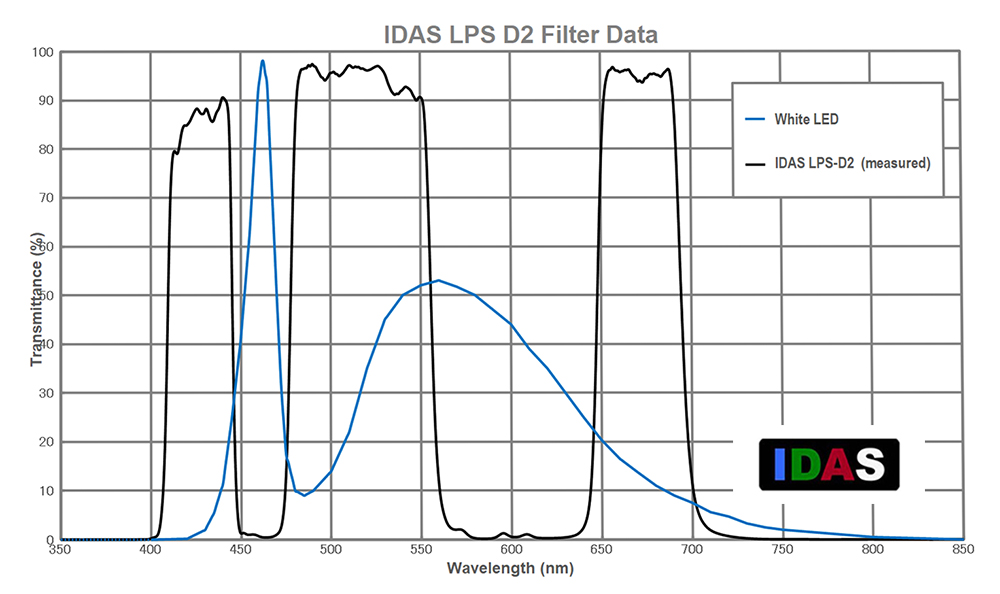
Below, you can see four images from astro hutech (an organisation that produces filters). On the horizontal axis you’ll see our visible light spectrum in nm, ranging from 400nm to 700nm. The vertical axis shows the transmittance of light. For now, let’s just focus on the colored lines in these pictures. The higher the colored line moves up the vertical axis, the more light is being transmitted on that particular wavelength. The green lines in the first picture represents light emitted from mercury lights at various wavelengths. So we clearly see a transmittance of mercury light at 400nm, close to 550nm and at the 575nm wavelengths. Mercury lights may be caused by sources such as traffic lights and neon signs. The orange line in the second picture represents the narrow 585 wavelength of low pressure sodium lights. The yellow lines in the third picture represent the high pressure sodium lights which are mostly visible between the 550 to 650nm wavelengths. You’ll find high pressure sodium lights most often in streetlights (yellow) and industrial areas (the orange glow). The blue line represents LED lights (residential, industrial lights) which are becoming more and more popular, but affect a large region of the visual light spectrum.

To block or not to block light pollution? That is the question
Now that we know at what wavelengths these artificial light sources affect the visual light spectrum, it becomes clear that light pollution suppression is a tricky business. On the one hand, light pollution suppression filters such as the Hutech IDAS LPS D2 can be used to block out almost all of the city glow. However, this also comes at a disadvantage. So called ‘broadband’ DSO’s such as planetary nebulae, galaxies, and star clusters emit light on similar wavelengths to those that are blocked by the filter, preventing us from receiving all information from those DSO’s. For example, a popular target is the Andromeda galaxy. Using this filter, you can still capture andromeda, but it will create a less accurate colored image.
How to choose the ‘right’ Light Pollution Suppression Filter
Light Pollution Suppression Filters come in all names, shapes and sizes. As already mentioned in the introduction, here are a few names:
- – Ultra High Contrast (UHC)
- – Light Pollution (LP)
- – Light Pollution Suppression (LPS)
- – City Light Suppression (CLS)- Nebula
These names may all refer to filters that help to block out some, or all, artificial light. My first tip would be to not focus too much on the names given to those filters, but instead look at the transmittance profiles for each of the filters to understand what wavelengths are being blocked. It’s impossible for me to get into all the different filters that are available, so I will just provide two specific examples. Let’s zoom in on one of the pictures that I already included in the above picture – the IDAS LPS D2 filter.
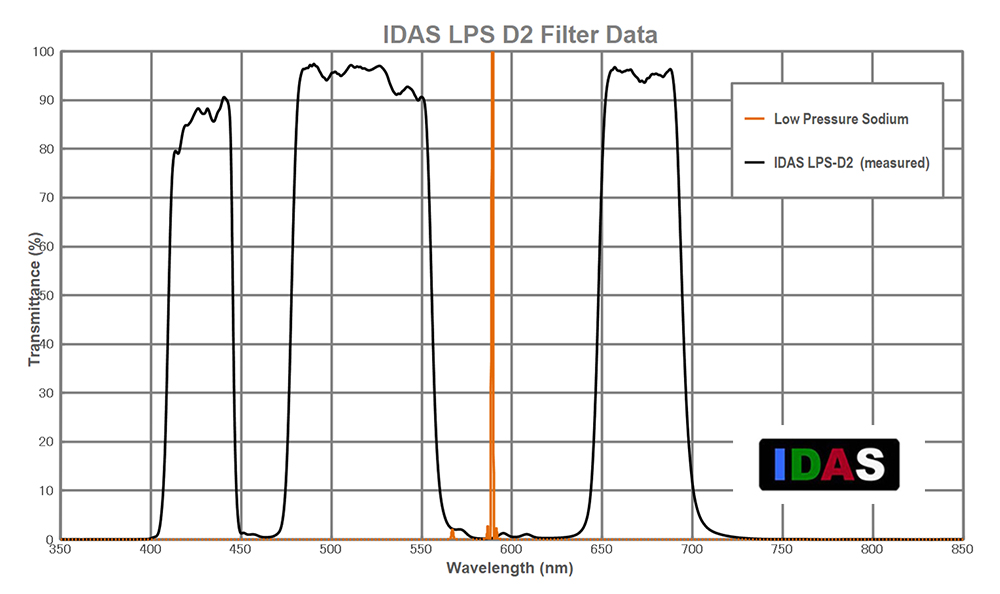
Now let’s focus on the black lines of the picture, which represent the transmittance profile of the IDAS LPS D2 filter. Again, the horizontal axis show the wavelengths of the visible light spectrum and the vertical axis shows the transmittance percentage, which basically means that the higher the transmittance percentage, the more light is transmitted by the filter which can be captured with your camera. You can clearly see that some parts of the light spectrum are transmitted whereas others are being blocked. In particular, it becomes clear from this transmittance profile that almost all of the light between wavelengths in the 450 to 470nm range and the 570 to 630nm range is blocked by the filter. Note that when you compare this to the first picture in this blog, these ranges particularly refer to the blue, yellow and orange part of the visible light spectrum. Let’s keep that in mind and look at the profile of the second filter, the IDAS LPS D1.
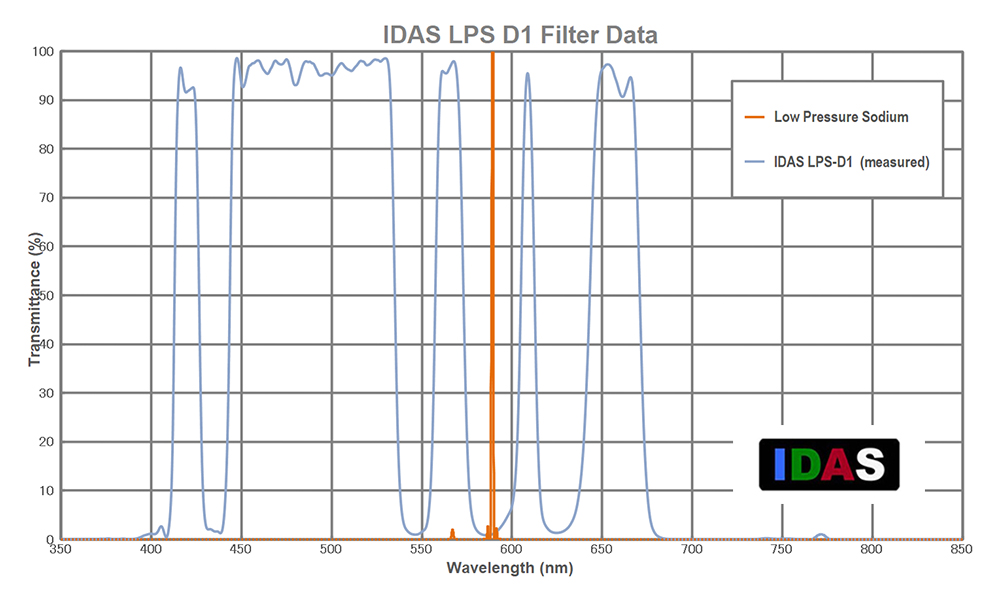
The main difference between the D2 and the D1 transmittance profile is that the D1 transmits more light. In addition to the transmission areas of the D2 filter, the D1 filter has two additional peaks where it also transmits light from the 550 to 584nm and the 600 to 620nm range. In other words, it also transmits some of the yellow and orange light. This fact has both pros and cons. On the one hand, by transmitting these wavelengths, the D2 will capture light pollution (yellow, orange) from some of the artificial light sources we just discussed. On the other hand, it also allows us to capture yellow and orange light that are also transmitted by some of the popular broadband DSO’s – especially galaxies – we all love to capture (e.g., Andromeda galaxy, Dumbbell Nebula etc.). So ultimately it will be up to you to decide what is best suited for you. Are you also interested in broadband DSO targets such as galaxies and star clusters? Then the D1 will give you a more accurate representation of the colors of those galaxies, but it will also come at the cost of some artificial cityglow being in your picture – depending on how heavy your light pollution is. The D2 will block out the yellow and orange colors all together, so you end up with less cityglow, but also a less accurate colored picture of DSO’s that transmit light at the wavelengths (yellow, orange) that are being blocked.
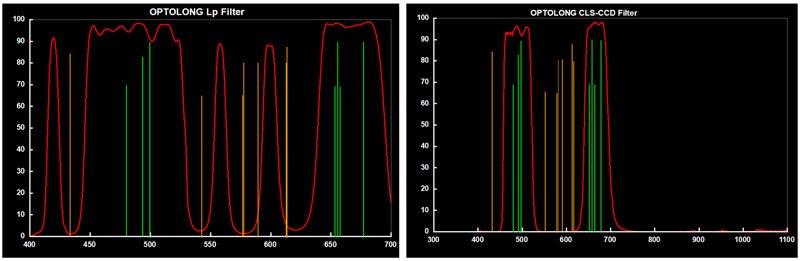
Note that there are a lot of filters out there, and that I just take the IDAS filters as an example to explain differences in their transmittance profiles. Let me also include the optolong transmittance profiles as well, as these particular filters seems to be gaining popularity among amateur astrophotographers. Optolong uses two types of light pollution filters: The Optolong-LP and the Optolong-CLS filter. As you can see, the CLS filter is comparable to the IDAS D1 filter whereas the LP filter has a similar profile as the IDAS D2 filter.
Clip-in, 1.25″ and 2″ filters
Light pollution suppression filters also come in different shapes and sizes, depending on the gear you use for your astrophotography. For example, a clip-in filter can be used in combination with your DSLR. The clip-in filter is placed inside the body of your DSLR and you can mount your lense on the body after putting the clip-in filter into the correct position. Please note that not all lenses are compatible with such clip-in filters. For example, my stock EFS lense (18-55mm) has an extended piece that goes further into the body of the camera, making it impossible to use that lense in combination with the clip-in filter. My EF 50MM lense does fit in combination with a clip-in filter, something to keep in mind. The 1.25″ and 2″ filters are often threaded onto a filter wheel which you can place in front of your camera. I would recommend using a filter wheel if you are planning to buy different filters. The filter wheel makes it easier to switch between filters during an imaging session. In this part of the video, I’ll show you how to install a clip-in filter in a body of the Canon 1200D and a 1.25″ filter wheel.
Testing the IDAS LPS D1 filter with my Canon 1200D
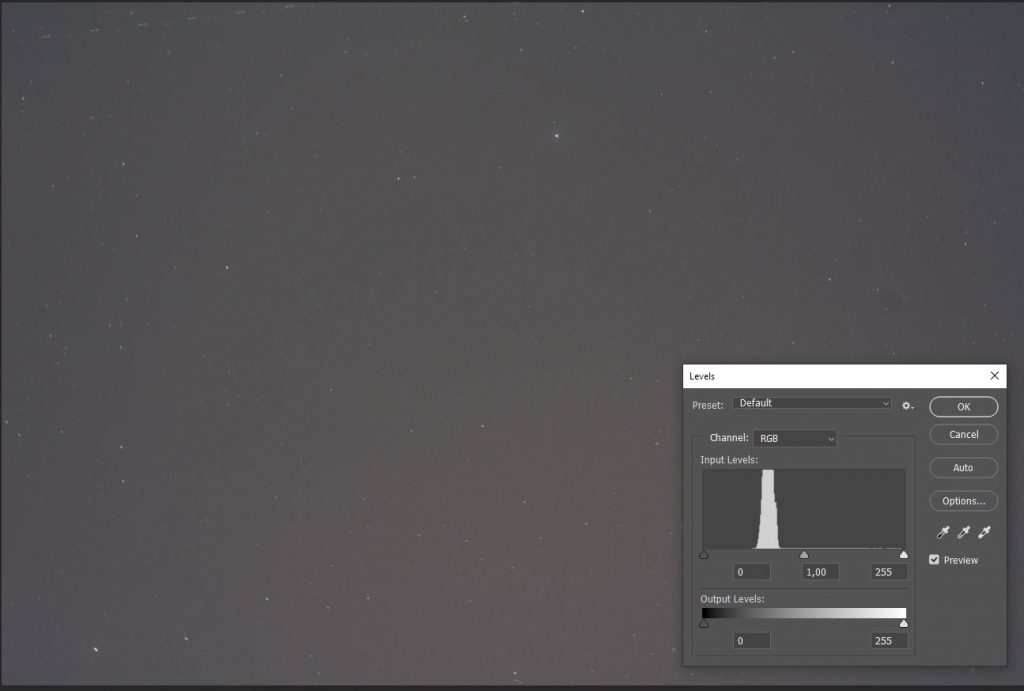
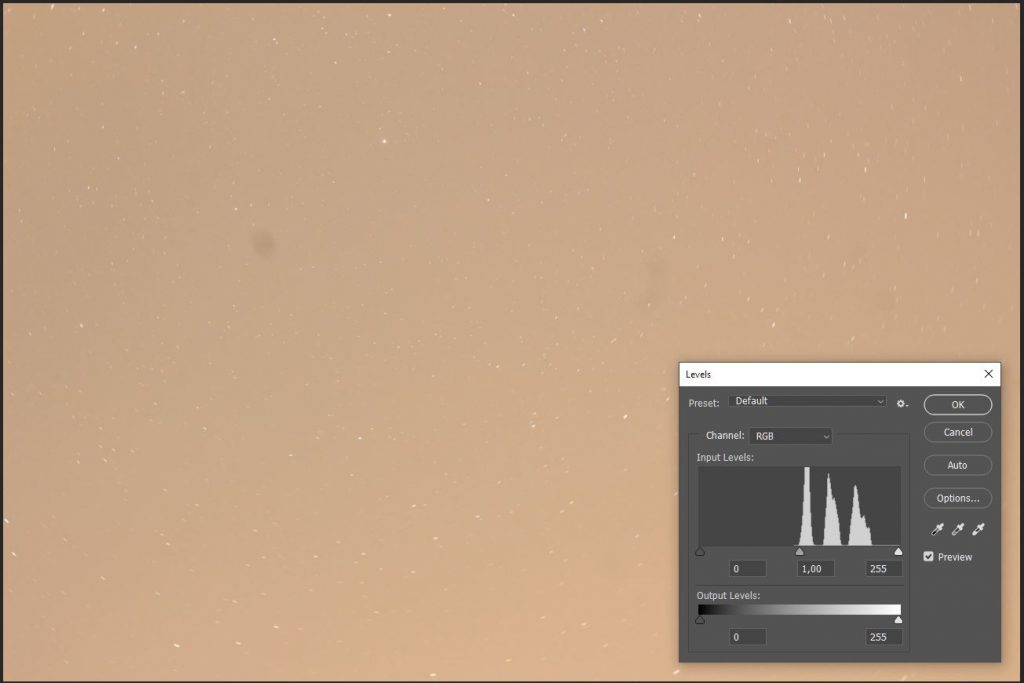
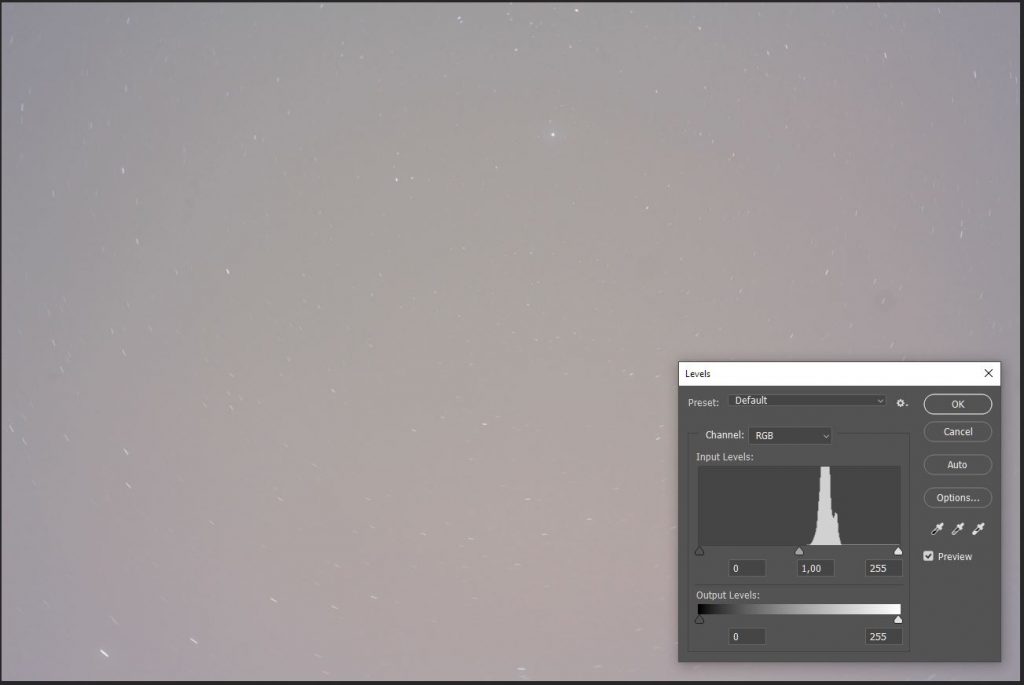
I have included some test shots of my own IDAS LPS D1 filter, so you can see differences between images taken with with or without this particular light pollution filter. Remember, I’m imaging under bortle class 8 skies. These are uncalibrated pictures, taken with my Canon EOS 1200D and my Canon EF 50mm lense on a static tripod, which was pointed at polaris. All pictures were taken on the same night with the same gear and similar temperature. All of the pictures are raw, uncalibrated and single images (no stacks, no dark or flat frames). I’ve included the information of the histogram using in photoshop CC, so you can see where the RGB information is located in the histogram. So let’s start with the pictures taken with a relatively fast f-ratio of 2.8 at ISO 800. Exposure times used are 60 and 120 seconds, with and without the IDAS D1 filter.
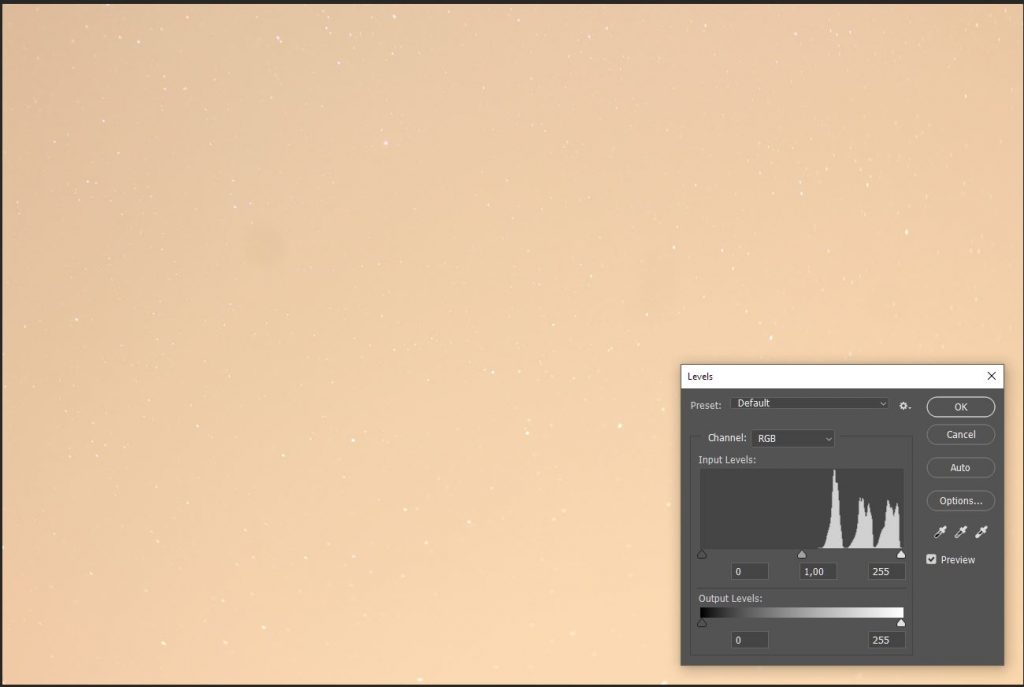
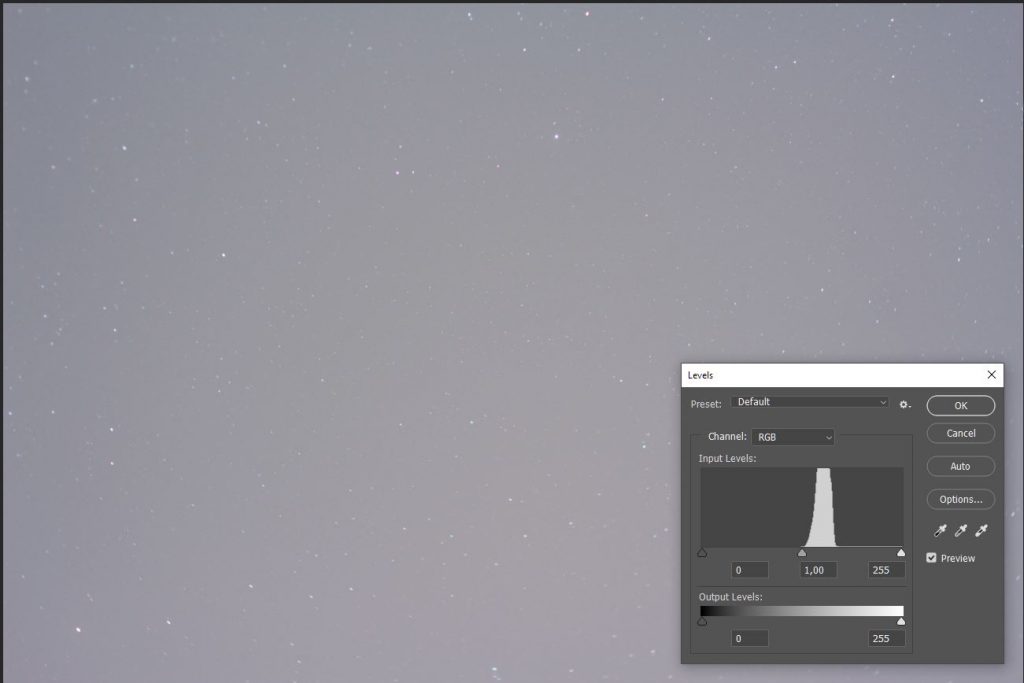
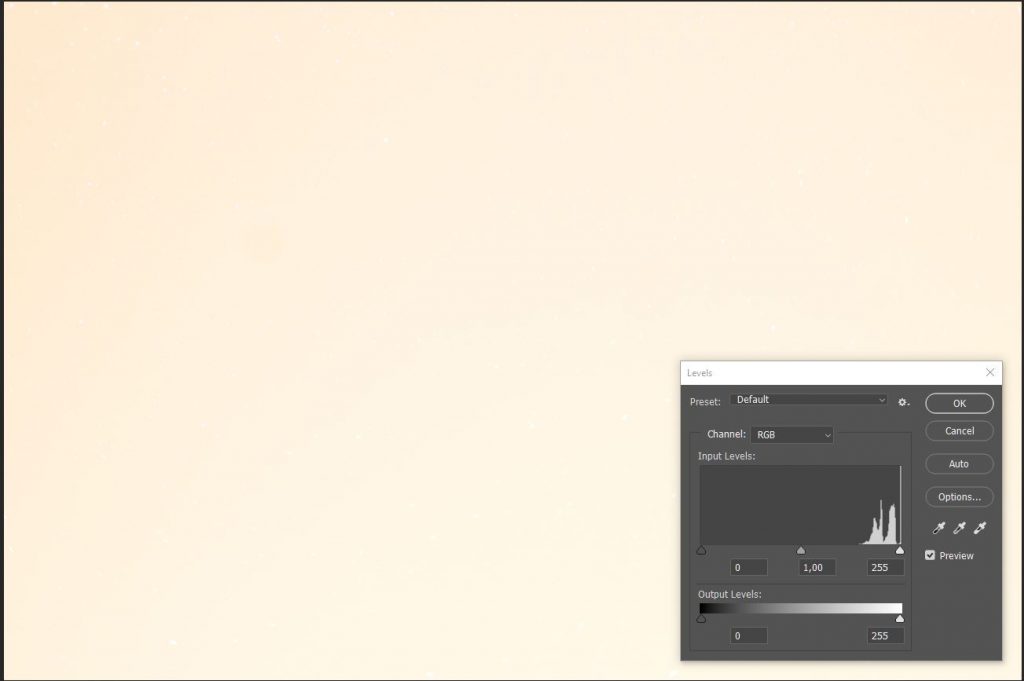
The differences are pretty clear. The pictures without the filter show the yellowish city glow in the picture, whereas the IDAS LPS D1 effectively blocks out most of the city glow, thereby creating a higher contrast picture. Also, it is interesting to see that the red, green, and blue channels are further apart in images without the filter as compared to those with the IDAS LPS D1 filter, probably because most of the artificial light sources that are creating that diversity are blocked. When we look at the pictures taken at 120 seconds at f/2.8 without using a filter, the information from the red channel is completely washed out. In contrast, all of the information of the RGB channels is still available in the picture at 120 seconds with the IDAS LPS D1 filter. Of course, F/2.8 is pretty fast and most of use telescopes with a lower F/ratio. So below are a couple of raw images using F/5.0 at ISO 800.
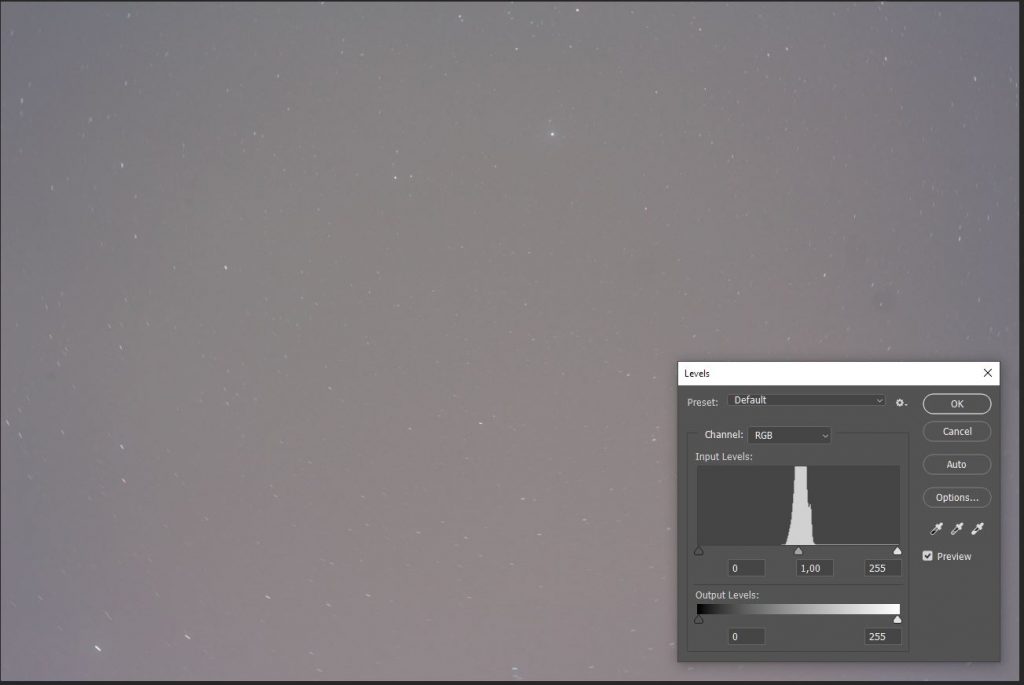
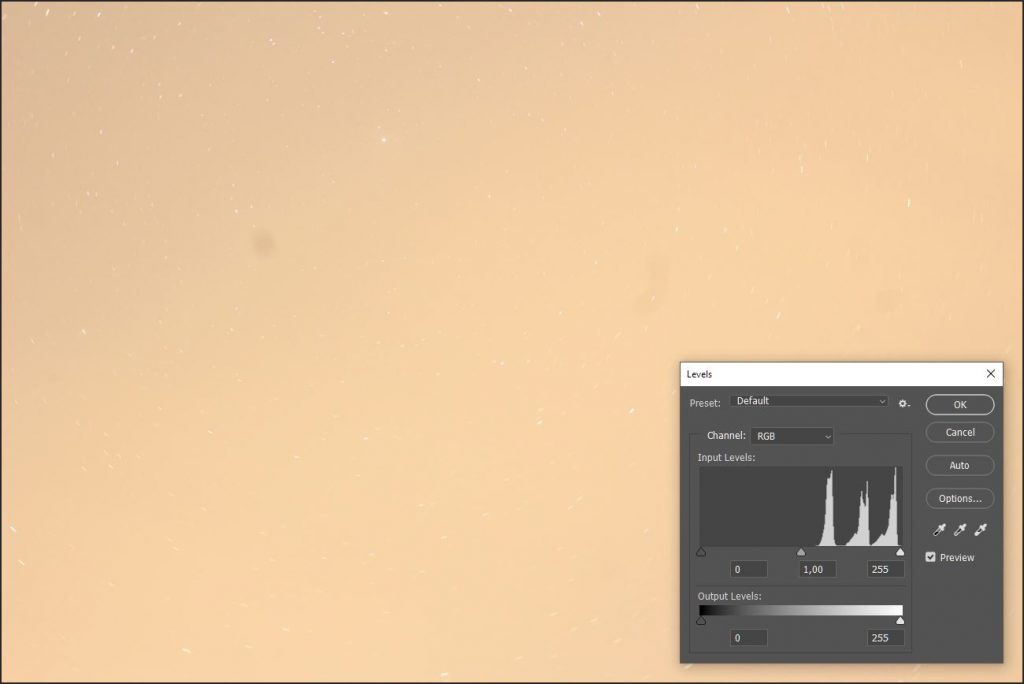
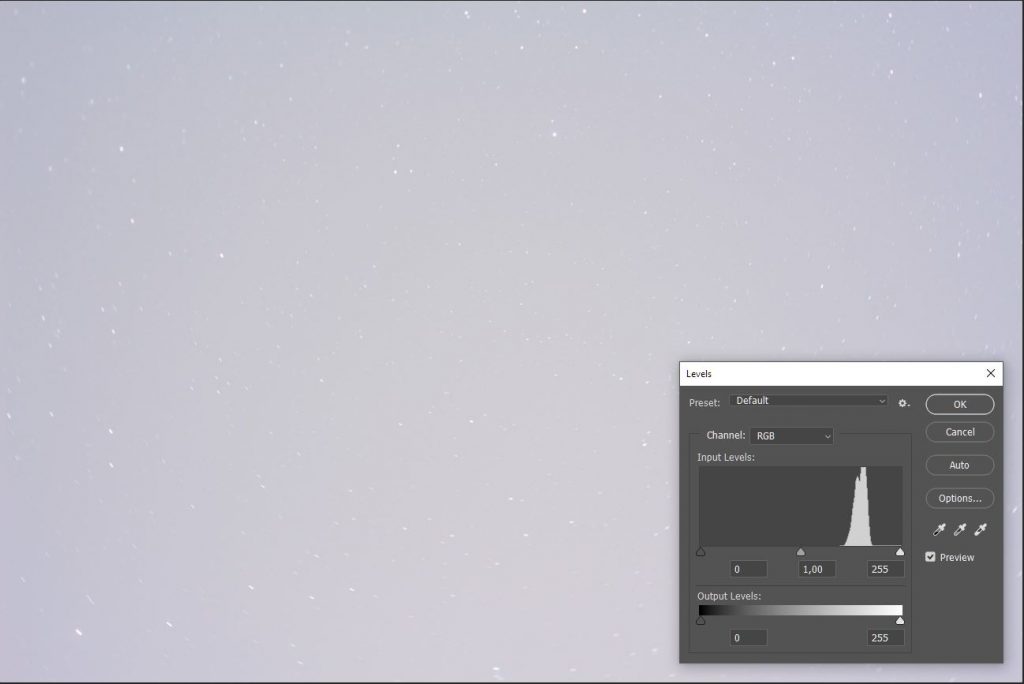
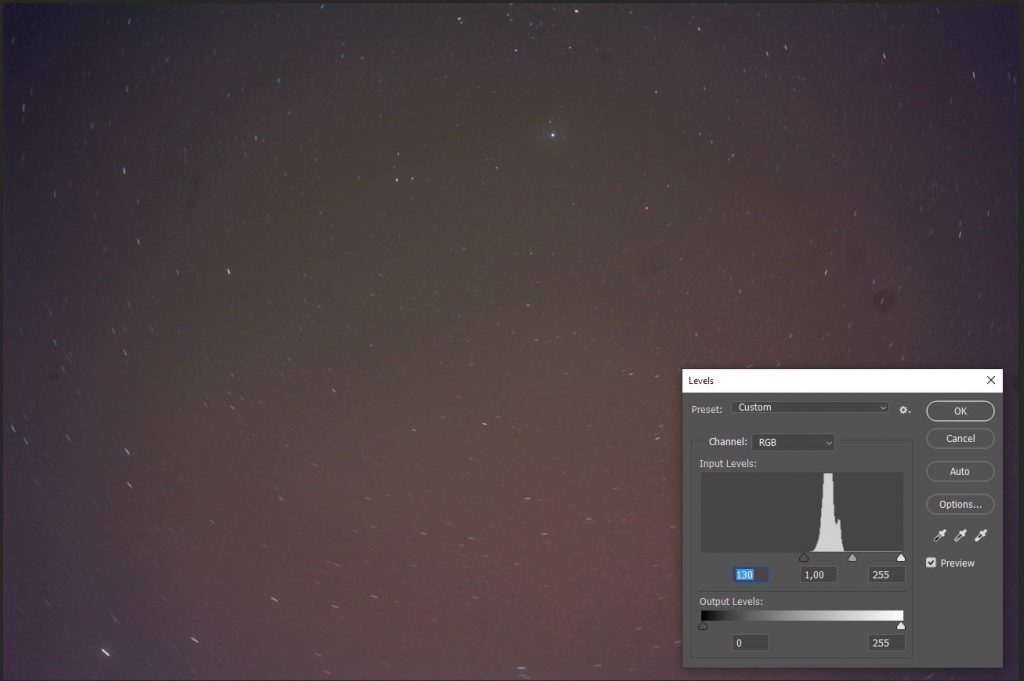
There are three specific advantages when using the IDAS LPS D1 filter. First, it blocks most of the city glow that is clearly noticeable in the unfiltered pictures, resulting in a higher contrast picture. Second, because much of the city light is blocked, the RGB levels are closer together as compared to the unfiltered images, when all light pollution sources are included in the picture. Third, the information of the picture without using the filter is shifted much further to the right in the histogram, meaning that the filter enables us to take longer exposures without losing or clipping information. In fact, I could take up to 300s pictures using F/5 at ISO 800 that still included all of the information under bortle class 8 skies.
Calibrated image
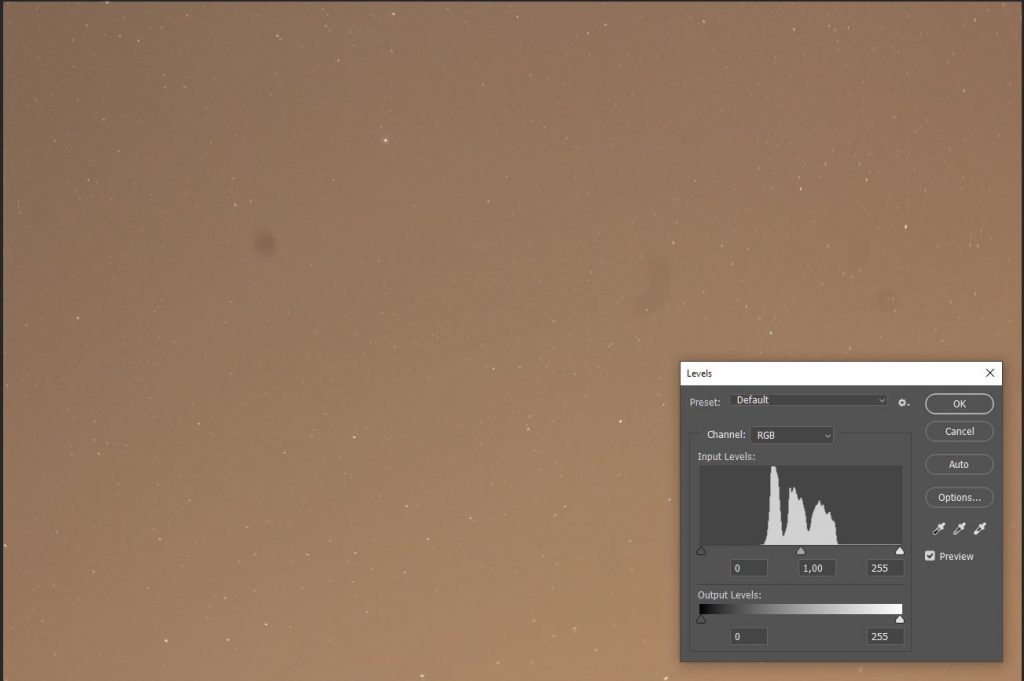
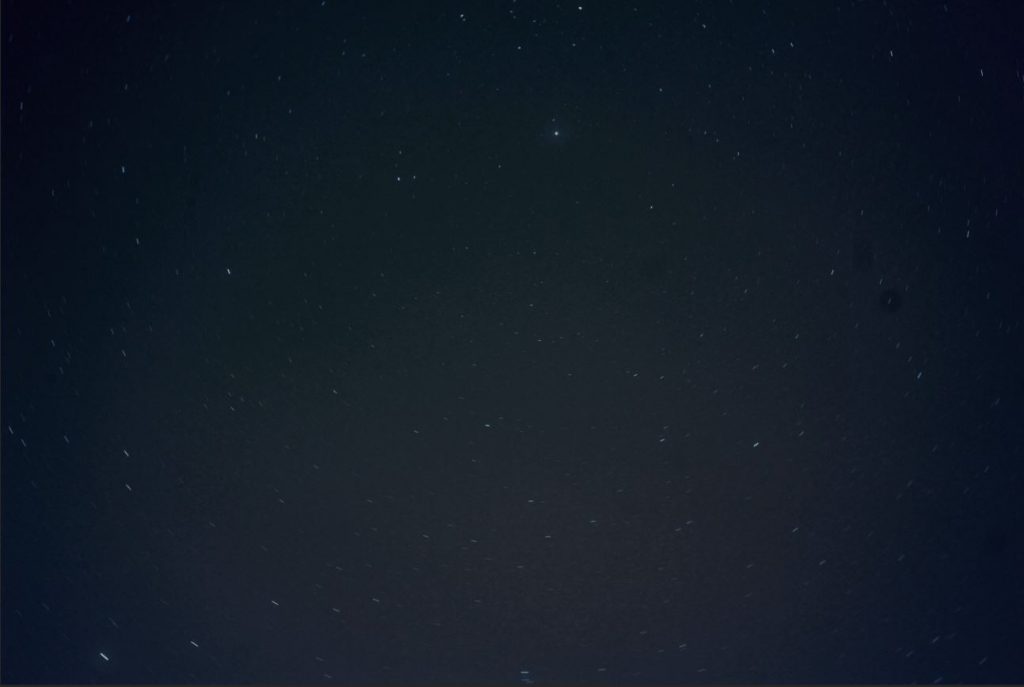
I re-adjusted the black point of the 180s uncalibrated picture using photoshop CC, as demonstrated below. You can clearly see that some of the city glow becomes visible. This is due to the fact that the IDAS LPS D1 filter transmits some of the light that is in the yellow and orange part of the light spectrum, as discussed before. A disadvantage is that we have this artificial light glow in the picture. An advantage is that we are actually capturing yellow and orange light which are also present in many broadband DSO targets, especially galaxies and star clusters. By re-adjusting the color balance and the hue/saturation in the picture, this can be corrected as demonstrated in the second picture. Being on a static tripod, I could not correct the star trails around polaris :-).
IDAS HUTECH D1 – CONCLUSION
I hope this blog helped you acquire more knowledge on light pollution and light pollution filters. Clearly, light pollution filters become a must when you are imaging under heavy light polluted skies like me (Bortle class 8). The best option is still the ‘gas filter’, and go to a dark site to do your imaging. Unfortunately this is not always an option when having a family, kids and work. This leaves us with light pollution suppression filters. Personally, I’ve opted for the IDAS LPS D1 filter and I have no regrets. As mentioned, the D1 will catch some artificial yellow and orange light which enables you to collect data in these wavelengths from broadband DSO’s. A disadvantage is that some of the artificial (yellow, orange) light glow will be in your picture as well. A filter such as the IDAS LPS D2 and other Ultra High Contrast filters would completely block out all yellow and orange light from your picture, creating a less accurate color of your DSO. An advantage is that you won’t have to deal with artificial light glow. Ultimately the choice is yours of course. There are many filters out there on the market. I encourage you to do your own research, check reviews and engage in conversations with fellow astrophotographers who have bought and used the filter you are interested in.
Clear skies!
Link to D1 and D2 filters:
Hutech IDAS LPS D1:
- Clip-in filter: https://bit.ly/2RVQH6r
- 1.25″ filter: https://bit.ly/396Lyhy
- 2″ filter: https://bit.ly/2Oq7Jr0
Hutech IDAS LPS D2:
- clip-in filter: https://bit.ly/2GTyOPi
- 2″ filter: https://bit.ly/399MPoj
Hi Wido
I have been reading through this information very interesting. It feels like filters are one of the more complex aspects to get my head around, there seem to be so many options and variations. With my DSLR I am only really interested in light pollution filters, I have recently ordered this filter https://www.astronomik.com/en/filter-gegen-lichtverschmtzung-filters-against-lightpollution-lpr/cls-ccd-filter.html and I am hoping to give this a test and see if it makes much difference to my images.
I guess there is also the option of mixing or layering images taken with and without the filters to see if I can get something different from both. Would I need to take flats/darks separate with the filter if I did this ??
Enjoying your videos and I’ve recently setup a little blog and youtube(https://www.youtube.com/channel/UCGV9niqrT8l04kR1azPtCzw) to try and show my progress as a total beginner. I think your channel is certainly one of the best resources out there.
I am hopefully getting a guide camera this week !!! ZWO 120mm. I’m not sure about Europe but over this 2020 most stores here have been out of stock in everything. I think everyone has become an astrophotographer.
Cheers
Ollie
Hi Ollie, thank you for your kind words. I think that the light pollution filter is a good way to start, you’ll definitely see some improvements if you live under light polluted skies. A next step would be an H alpha filter, that really helps to bring out the hydrogen gasses that are present in the many nebulas. And yes crazy due to Covid-19 and increased popularity in astrophotography which you can go without leaving your house really increased delivery times of equipment. Clear skies and stay safe.
Is this a light polution my problem? My Seestar S 50 has failed repeatedly to take pictures. Even Andromeda was a failure! It goes into a loop of shooting, identifying, shooting, etc. Then after about 8 tries says “failure” and stops dead. Light filter makes no differnce. If I push it take photos, I get “Stacking Failure- not enough stars”. My skies were visiblity 25 miles and we are Bortle 4.5 for all attempts. Five attempts were for Andromeda.
“This issue shouldn’t be happening. Did you make sure to level your tripod? If the problem persists, I would recommend reaching out to ZWO or the local shop where you purchased the telescope. It could potentially be a tracking issue. Best of luck!
Wido