So you’re thinking about getting into astrophotography and wondering what kind of astrophotography camera you should buy? Then you’ve come to the right blog!
In order to find the a camera that is best suited for your personal astrophotography aspirations, I’ll discuss four questions which you can answer with either yes or no, that should help you to narrow down you search. These four questions are:
- Do you want a dedicated astrophotography camera?
- What kind of objects are you interested in: solar system (planets, moon) or Deep Sky Objects?
- What level astrophotographer are you? Beginner or Advanced?
- Do you want to spend more or less than $1500 on a camera (in case of DSO cameras)?
Based on answering these questions with either yes or no, I’ve made a decision tree that leads to a different types of astrophotography cameras. So, you can already start thinking for yourself while reading the rest of the blog. Find the best astrophotography camera for you by using this Decision Tree:
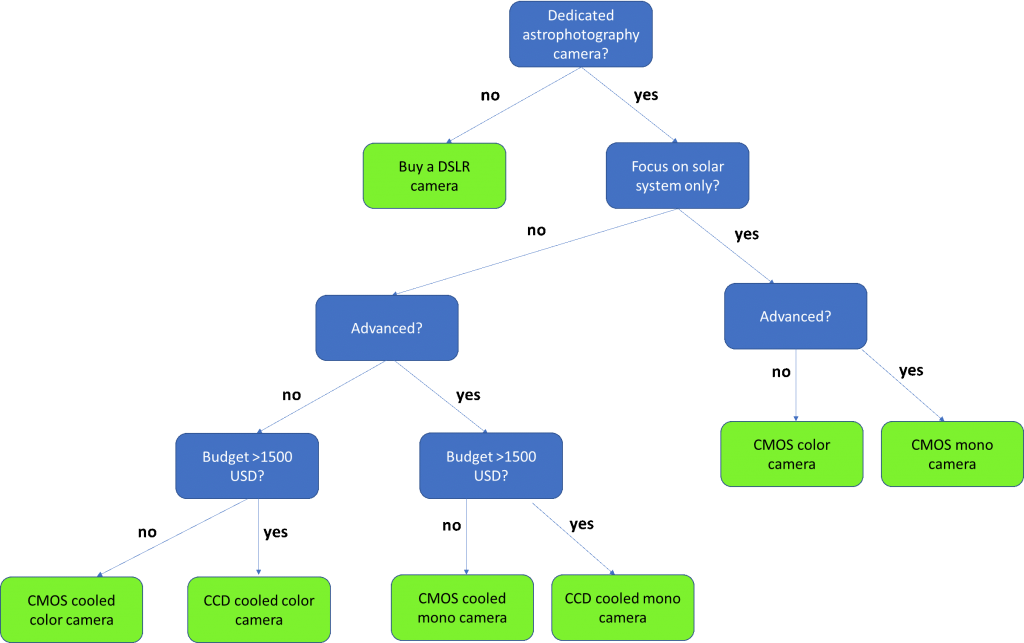
You can download my decision tree, including links to popular cameras in each of the green categories here. If you rather watch than read, check out this video:
If you like reading, you can skip the video and continue to read.
First question: Do you want a DSLR or a dedicated astro camera?
Let me defend the option to choose a DSLR (Digital Single Lense Reflex) camera for astrophotography for a moment. I’ll admit, I started my astrophotography adventure with a Canon Rebel T5, or a Canon EOS D1200 DSLR camera as they are called in Europe. Why? Because you can have a lot of fun with DSLRs – they are very versatile. But what are main advantages of using a DSLR?
DSLR cameras are great for daytime photography!
How about all those lovely pictures of your family, your holidays, your activities? You can take your DSLR with you and take high quality pictures during daytime. At night, you can use that same DSLR to take your first steps into imaging the night sky. How? Well, you’ll need a static tripod. Put your DSLR on a tripod and you can start taking some very nice widefield shots of the milkyway, or start making timelapse videos of the night sky. Another option is to shoot startrails. All very fun to do!
You don’t need a telescope and tracking mount right away.
That’s right, you can start doing all of the above activities with your DSLR on a static tripod, without the need to break the bank and buy an expensive equatorial mount and a telescope. Just photograph the night sky with different lenses. You can start using your kitlens that comes with your camera and their are some beautiful lenses available with a fast F-ratio if you are really looking for high quality pictures.
Simplicity
If you already own a DSLR, you probably also know how to use the settings in manual mode to adjust your ISO level, your white balance, and exposure time. You don’t have to go through a learning curve as compared to when you decide to buy a dedicated astrophotography camera.
You can use your DSLR with a telescope by connecting your camera to your telescope with an adapter ring.
After you have taken the step to buy a dedicated telescope and tracking mount you can still connect your DSLR camera to a telescope by using a so called adapter ring. I used a Canon T2 adapter ring to connect my Canon Rebel T5 to my first refractor telescope. You can start using software capturing programs to capture your nightsky images such as backyard EOS, Astrophotography Tool or Sequence Generator Pro – all such software tools can be used in combination with a DSLR . You will end up running a USB cable from the DSLR camera to your computer or laptop and work with capturing software to collect beautiful pictures.
Links to my first budget DSLR camera and available adapter rings:
MY DSLR CAMERA:
- Canon Rebel T5 USA: https://amzn.to/2Otweod
- Canon EOS 1200D Europe: https://amzn.to/2oeprnS
ADAPTER RINGS FOR DSLR CAMERAS:
- Canon T2 adapter ring: https://amzn.to/2Oouj4m
- Nikon T2 adapter ring: https://amzn.to/2IG0Fnk
- Sony T2 adapter ring: https://amzn.to/2vODCDq
So that all sounds excellent doesn’t it. Aren’t there any disadvantages? Well, yes, ofcourse. Two main one’s actually, one you can solve and the other you cannot. Let’s talk about that. There are two main problems when it comes to astrophotography with a DSLR camera…
Disadvantage 1: Your stock DSLR cannot capture the infrared spectrum of the light.
An IR, what? Yes, IR stands for InfraRed and cut stands for…well cut. The IR-cut filter on your DSLR camera blocks the infrared light from hitting your CMOS sensor which is great for daytime photography. However, when you want to image deep sky objects -and especially all the nice looking emission nebulae out there such as the horsehead nebula – most of that light can only be captured in the infrared part of the light spectrum. But, not to worry. If you are brave enough you can remove the IR-cut filter yourself. Or if you are not so sure – like me – you’ll send your camera off to a person that can do that for you. Problem one solved. Your CMOS sensor is now ready to capture that beautiful infrared light. Oh, yeah, that daytime photography thing is affected by this of course…meaning that every red shirt you wear will have this bright glow, which otherwise would not be present in your pictures. But if you’re like me, you can still use your modified DSLR for daytime and a little photoshopping will go a long way to making your daytime pictures acceptable. Let’s move on to the second problem, which is a real pain in the you know what.
Disadvantage 2: Taking long exposure images with your DSLR camera results in read noise
This is worrisome. Your DSLR camera has a CMOS sensor which will result in noisy images when taking long exposure photos of astronomical objects. This so called read noise are those red, green and blue pixels that appear on your photo. What can you do? There are two main solutions, none of which are ideal. First, you can try to dither your camera every two or three frames. Dithering is a process where you move your camera a tiny bit in any direction, so that your astronomical target is in a slightly different position on your frame. Capturing software usually have the option to perform this automatically (examples of such capturing software are backyard EOS, Astro Photography Tool and Sequence Generator Pro). By moving your camera a tiny bit, the read noise does not stay in one place. This is important when you stack your photos. Without dithering, the read noise on a certain pixel will be increased with each photo you add to the stack, whereas with dithering the noise is less of an issue as it is spread out across different pixels. A second option is to use so called “dark frames”. Dark frames are pictures taken with the lens cap of your telescope or lens on (hence the word dark) while using the same exposure time as in your light (normal) pictures. An ideal situation is when dark frames match the light frames in terms of exposure time and temperature. This would mean that after each light frame (normal photo) you would have to take a dark frame to compensate. Most DSLR astrophotographers do not like this option, as it will cut your imaging time in half. So instead, many DSLR astrophotographers take their dark frames at the end of their imaging session, or perhaps even at another day. The issue is that the temperature of your DSLR will fluctuate significantly throughout the night. So dark frames taken with a DSLR cameras will often not result in the exact same read noise that is on your light frames, making it difficult to cancel that read noise out during post processing. So, dithering and taking dark frames help, but you will always end up with some read noise in your pictures when using a DSLR. So, at one point you may want to take the next step and buy a dedicated astrophotography camera. That’s when the second question becomes important.
Second question: Do you want to take photos of the planets and moon, or deepsky objects?
So let’s say you want to move beyond your trusted DSLR. A next question would be, what kind of objects are you interested in imaging? Our planets and moon within our own solar system? Or (also) deepsky objects that are outside of our solar system, or even outside of our milkyway universe? Most people will probably answer this question with “both”. However, cameras that are suited for planetary imaging are not well suited for deep sky imaging and vice versa. We’ll get into that. Let me start by promoting planetary imaging first, because there is a lot to be said for buying a planetary camera.
The main advantages of planetary astrophotography are: – A planetary cameras are relatively inexpensive.
- You can do planetary imaging with any type of tracking mount (alt-az and EQ).
- The capturing time is short, only a couple of minutes.
- Capturing software and processing software are freely available!
Let’s get into each of these advantages.
Planetary cameras are relatively cheap. My first entry level planetary camera was a ZWO ASI 120 MC camera which is available on the market for about $160. When you are willing to increase your budget, you’ll probably end up buying either a ZWO ASI 224 MC / QHY 224 at around $270, or a ZWO ASI 178MC/MM at around $400. Note that this is a lot cheaper than buying a dedicated astrophotography camera as I will explain in the third question.
Short exposure time. A second big advantage is that you don’t have to spend a lot of time capturing the planets and the moon within our own solar system. This is because these objects are actually very bright. Each of these objects are within our own solar system and lit by our sun. So you need short (instead of long) exposures. In fact, most planetary astrophotographers will end up taking two or three minute videos of a particular planet. When taking videos it is important to understand that some planetary cameras have a higher FPS – Frames Per Second – rate than others. The higher FPS a camera has, the more pictures (frames) it is able to take every second. This means that you will end up with a video that has a higher number of pictures that can be used for further processing. This is very useful as it will improve the likelihood that you have captured sufficient frames that are of high quality. Another advantage of a short exposure time is that you have the option to work with a cheaper and less complicated alt-az mount if you want, instead of the more complex and more expensive equatorial mount.
Free software. A third advantage is that most planetary software to capture your videos (e.g., sharpcap, firecapture) and post process you videos (e.g., Autostakkert!, Registax) are free of charge. You don’t have to pay anything. So, in short, you will capture a video of out moon or planet for a couple of minutes. After that, you post process the video by selecting the frames that are of high quality and throwing away the frames that are of bad quality, and you will end up with a nice picture. The software used is freely available on the internet.
Do I need a color or a mono camera for planetary imaging?
The answer to this question depends on your astrophotography skills and your willingness to spend time and effort on capturing and processing data. The advantage of mono imaging is that you are not bound to the a RGGB Bayer filter that most color cameras have. RGGB (Red, Green, Green, Blue) means that on average, only 50% of the photons in the green light spectrum and about 25% of the photons in the blue and red light spectrum will be registered. Let me explain this a bit further. Imagine yourself being a red photon. If you hit a green or the blue filter of the bayer matrix, you are out of luck because you are in a different part of the light spectrum. Or in other words, the filter will not let you pass and you will not be registered on the CMOS sensor. In the words of Gandalf:” You shall not pass!”. In practice this means that – on average – 25% of all red and blue photons, and 50% of all green photons will be registered – because each pixel contains one red, one blue, and two green filters.
Now, this is not a major issue in planetary imaging because the targets are well lit and the capturing time is limited to a few minutes. Nevertheless, a mono sensor will be more successful in capturing the different parts of the light spectrum, because you will work with different filters. If you put a red filter in front of your mono sensor, 100% of your red photons will be registered on a mono sensor instead of just 25%. A disadvantage is that it will triple your capturing time because you will have to capture the red, the blue and the green part of the light spectrum to create an overall colored RGB image. This means that you will have to capture three videos with different filters (red, green, blue) in front of your camera. You will then process these three videos separately. before integrating each of the RGB mono images into one overall colored picture of a planet. Obviously, mono imaging is more complex and it takes more time, but it will result in a higher quality picture in the end. Pricewise, the color and mono cameras are about equal in price, so the main question you have to ask yourself is if you want to spend the extra time and effort to learn how to capture and process mono images. And you will have to pay extra for the filters.
I have listed some of the popular options for planetary cameras here:
PLANETARY COLOR CAMERAS:
- ZWO ASI 120 MC: https://amzn.to/2AToRP4
- ZWO ASI 224 MC: https://amzn.to/2VmRqgZ
- ZWO ASI 178 MC: https://amzn.to/326fbwC
- QHY 5L-II: https://amzn.to/3176bFT
- QHY 224C: https://amzn.to/325XDR5
- QHY 178C: https://amzn.to/2B3iokk
PLANETARY MONO CAMERAS:
- ZWO ASI 120 MM: https://amzn.to/325ocFU
- ZWO ASI 178 MM: https://amzn.to/2pem9Rl
- QHY 5LII: https://amzn.to/2ovAuZQ
- QHY 5III 178: https://amzn.to/2IDOAiF
Any disadvantages when buying a planetary camera?
So aren’t there any disadvantages? Sure, the main one being that you are limited to capturing objects in our solar system. Sure, you might extend that to some bright Deep Sky Objects (DSO’s) outside our solar system which do not need a long exposure time such as globular clusters (e.g., hercules cluster) and some planetary nebulas (e.g., dumbbell nebula) and perhaps some galaxies (e.g., whirlpool galaxy). But ultimately you would want to buy a dedicated DSO camera. You planetary camera will not go to waste though. Most planetary cameras are also excellent guide cameras. Always check whether your planetary camera supports guiding. The planetary camera, together with a guide scope, will help your mount to track the stars in the nightsky, resulting in razor sharp images while imaging through a dedicated DSO camera. So let’s move on to DSO imaging by getting into the third question.
Third Question: Are you a beginner or already advanced?
So let’s assume that you are primarily interested in deepsky astrophotography, and you want to buy a dedicated astrophotography camera. Any quality astrophotography camera will have a cooling system, allowing the sensor on the camera to cool down to arctic temperatures which will create less read noise in your picture. Also, by keeping the temperature constant, the read noise that does occur is easy to calibrate out by matching your images (light frames) with dark frames that are set at the exact same temperature and exposure time. This also means that in most cases, you will spend more money on a cooled deepsky astrophotography camera as compared to a planetary camera or a DSLR.
So if you are interested in deepsky astrophotography, I would first ask you if you are just starting out as a beginner or already have some experience. What do I mean with that? Well, let me ask you some questions. Do you already have an equatorial mount and are you comfortable setting up and polar aligning your mount? Are you already familiar with software to capture your images (e.g. Sequence Generator Pro, Astrophotography Tool)? Are you able to accurately guide your mount using a guide camera, telescope and (PHD2) guiding software, resulting in sharp images? Do you have experience with stacking and processing your images? If the answer to all these questions is yes, I would say that you are ready for a mono camera, and if the answer is “I’m still learning some of those skills”, I would recommend starting out with a color camera. Why?
Mono imaging will get you a higher quality picture in the end but it will take you three times longer to capture the image, due to the fact that you will have to capture each DSO object using red, blue and green filters (or narrowband filters). It also requires more stacking and processing time. You will create multiple stacked images for each of the filters you have used during your imaging session, which have to be stacked and processed separately, after which you will have to process and combine those separate (mono) stacked images to get a final colored image of your DSO. It is worth the effort though, as mono cameras are far better able to capture photons at a particular wavelength. As already explained above, mono images are able to capture every photon in the red, blue and green light spectrum, whereas the bayer matrix on your color camera will – on average – reject 75% of all blue and red photons, and 50% of all green photons. This being said, with a color camera, you don’t need to switch between filters (although you can if you want) and you will end up with one stack of colored images which you can further process to end up with a nice picture of your DSO. The choice is yours of course, but I would recommend starting out with a color if you have are new to astrophotography. If you are already comfortable with aligning your scope, guiding, and capturing your images, then I would say it’s about time to take it to the next level and buy a mono DSO camera. Of course, you would also need a filter wheel and filters (LRGB + perhaps narrowband filters).
Fourth question: Do you want to spend more than $1500?
My final question relates to your budget. Dedicated cooled DSO cameras are expensive, although the market is rapidly changing. For a good quality DSO camera, you will have to think in the rage of about $1000 or higher (at least, at this time of writing my blog…oktober 2019). It is perhaps useful to mention that choosing either a color or a mono camera of a similar brand and type camera will be almost equal in price. The major differences in price have to do with the sensor type: CCD versus CMOS. So let me explain this a bit more.
Sensor type: CCD or CMOS?
For years, CCD (Charge Coupled Device) cameras have dominated the astrophotography market, and for good reasons. CCD sensors have a number of advantages. First of all, most of the hardware of a CCD sensor resides outside of the sensor. This is an advantage, as a high quality 16 bit analogue to digital converter (ADC) is used, resulting in a high quality image. Moreover, as every pixel is being converted with the same amplifier, CCD sensors have excellent pixel to pixel reproducibility. Having external circuits outside the CCD sensor also means that very little signal (e.g. potential amp glow) is added to an image. As such, CCD cameras are ideal for nighttime imaging. There are two disadvantages when using CCD cameras. First, CCD sensors are usually slow, meaning that it will take more time to readout and download the image from the camera to your storage device (laptop, PC, tablet). Actually, for deepsky astrophotography this is not a real issue, as you will often take multiminute images of DSO’s anyway. The second disadvantage is more troublesome, and also the main reason why I don’t own a CCD camera: They are bl**dy expensive! A relatively small sensor size camera will already cost around $1500, meaning that you will be limited to a small field of view – also depending on the telescope you use of course. The price will increase with sensor size.
Now, let’s compare CCD to CMOS ( Complementary Metal-Oxide-Semiconductor) cameras. CMOS sensors have their technology integrated on the sensor itself. Instead of just one, high quality 16 bit ADC used in CCD cameras, the CMOS sensor typically has multiple lower quality ADCs (e.g. 12 bit) on every column on the sensor. The lower quality ADCs will result in a lower quality image as compared to the higher quality ADC on CCD cameras. One advantage of having multiple ADCs is that it results in a faster readout (download) as compared to CCD cameras. A disadvantage is that the integrated circuits on the CMOS sensor can produce so called ‘amp glow’, which basically means that some light from these circuits will show up on your images when taking multiminute pictures of a DSO. Another drawback is that using different circuits for each pixel can lead to slight variations between pixels. So why buy a CMOS camera? Well, for most of us…the main reason is price. The economics of scale makes a CMOS camera more affordable as compared to a CCD camera. CMOS sensors are mass produced for smartphones, DSLRs, tablets, and so on. Because of this, CMOS sensors are cheaper. A second reason is that a astrophotography camera suppliers like ZWO, QHY and ATIK have embraced CMOS and are working around the clock to improve the quality of their dedicated CMOS DSO cameras.
I mentioned $1500 dollars and this may be a bit arbitrary. At the time of writing, there are some high quality CMOS cameras in the $1000 to $1500 price range, such as the ZWO ASI 1600 MM pro. I have bought this particular camera myself and have been impressed by the high quality pictures it produces. I have made a separate review on this camera, check out my review here. Although there are some CCD cameras in the $1500 dollar range, they are mostly equipped with a small sized CCD sensor. This is somewhat problematic as you will not be able to capture popular large DSO’s, such as the horsehead nebula, the elephant trunk nebula, the rosette nebula as the field of view is often too narrow to capture the entire nebula in combination with a small sensor size. There is a solution around this by making so called mozaiks – taking images of different parts of the DSO and stitching those images together to produce one overall image. However, this makes processing your images more complex, so I like a large size sensor. When looking at large(r) sized CCD sensors, the prices quickly rise beyond $2000. So, my advice would be that if you want a high quality dedicated DSO camera without breaking the bank, CMOS cameras of around $1000 to $1500 dollars are probably your best bet. If money is not an issue for you, by all means, go for that high quality CCD camera.
There are some good CMOS and CCD cameras on the market, and I’ll mention some CMOS cameras here. I do not mention any CCD cameras, simply because I have no experience whatsoever in using them for astrophotography. Perhaps this will change in the future :-).
DEEPSKY CMOS COLOR CAMERAS:
ZWO ASI 294MC: https://amzn.to/2VvjIWJ
ZWO ASI 071MC: https://amzn.to/2VwMGWs
QHY 165C: https://amzn.to/2Vt6Non
QHY 168C: https://amzn.to/2pcV0hD
DEEPSKY CMOS MONO CAMERAS:
ZWO ASI 1600MM PRO: https://amzn.to/33e2G1Y
ZWO ASI 1600MM PRO + FILTERS + FILTER WHEEL: https://amzn.to/2ODdBhx
QHY 163M: https://amzn.to/2B1IXqo
I never tested CCD cameras. So I’m not recommending nor dismissing any CCD cameras until I do.
Final thoughts
Of course, I advise you to do your own research in finding the camera that suits your particular astrophotography needs. I hope the above questions will give you some perspective on what kind of astrophotography cameras are available, and what kind of cameras suit your personal astrophotography interests. I also recommend looking at images taken by a particular camera that you are interested in on astrobin, cloudynights, stargazers lounge, or any other fora out there so you get an idea of the capabilities of that particular camera. Good luck with your camera quest and as always I wish you clear skies!
Hi!
I am a beginner in astrophotography and I need to buy some camera. I will take photos through my Ritchey-Chretien 6 inch telescope on EQ-5 mount and I would to do deep-sky astrophotography. I got recommended Canon EOS 4000D and Canon EOS 400D. Do you think one of these cameras could be good? I do not want to spend more than 500 dollars.
Thanks!
Hi Emma, sure, you can start deep sky AP with a DSLR. I would go for the canon EOS 4000D, it has a larger sensor and full hd video (not necessary for deep sky but nice to have if you’ll be using the camera for regular photography and videos). The next step should be a dedicated cooled camera like the zwo294mc pro, but these are close to 1000 dollars. You’ll need to buy a T2 ring to connect the DSLR to your telescope. Clear skies!
Thank you!
I’m new to astro photography, but am an engineer, a long-time amateur astronomer, and past, part-time, professional photographer, so many aspects of the technologies and I what I’m now pursuing with AP are familiar. That said, there’s still some new stuff with which I have little or no experience. I’m reading your articles and have joined a local astronomy club, am attending observation sessions, and its members are helping a lot, but I also want to use what I have as much as possible as I start with AP before making multiple large purchases. I don’t yet know enough and nor have enough experience with where I want to go. So I’d appreciate it if you could help me with some specific questions:
I currently have a C-8 and would like to at least start AP with it, mainly for DSO. I’m seriously looking at purchasing an ASI2600MC Pro or ASI2600MC DUO camera. I’d like to start by using an F6.3 focal reducer (I’m calculating 0.6 arcseconds/pixel – is this under-sampled too much?) This would allow me to learn more and get some starting experience with AP as well as assessing where I want to go with equipment. One option is to change in several months to using a Hyperstar on the C-8. But initially, the focal reducer would let me leave the secondary mirror alone so I can also use it with eyepieces so friends and family can enjoy the fun experience of seeing a planet, asterism, etc., live through a scope. If I’m swapping the secondary in and out frequently, there are more handling risks involved as well as fine-tune, re-collimating with every swap.
I’m also concerned about reducer vignetting with the large sensor on these cameras, especially the DUO which additionally requires an adapter to mate the rear cell thread to the camera’s larger thread diameter due to the addition of the guiding sensor. Is it even reasonable to attempt this on my C-8 with a reducer?
In addition, I’m trying to find information on what I need for extender length to properly place the camera sensor at the scope’s focal plane. How to I determine this length and where can I purchase such extenders?
For software, I’m thinking of starting with Sharp-Cap; for post processing, I already know Photoshop well and am planning on starting with that.
Ultimately, I can imagine getting a second scope, perhaps a high-quality refractor and an EQ mount. As for the mount, I’m seriously considering going with a strain wave design for less weight and very low backlash. But I need to start someplace and don’t want to go whole-hog into purchasing a bunch of new equipment that can easily make identifying and locating problem issues more difficult when I don’t know the equipment well enough. So, I want to start with what I have and then methodically branch out to other equipment and techniques as I learn and can make more informed decisions.
Thanks again for any help and insight you can provider!