One of the first questions that probably comes to your mind when starting astrophotography is what kind of telescope you should buy at an affordable price. There are many types of telescopes on the amateur astrophotography market which can be quite overwhelming.
In my opinion, the best telescope choice to start your astrophotography is with an apochromatic refractor telescope. There are several advantages such as (a) an apochromatic refractor produces high-quality images of beautiful deep sky objects; (b) the smaller apochromatic refractors up to 80mm are relatively affordable; (c) refractors are lightweight and therefore easy to set up and use, and (d) refractor telescopes do not require any maintenance. As there are many different types of telescopes available, I will break down this blog into three parts where I discuss what the most important criteria are to look for when buying your first astrophotography telescope; what types of telescopes fit those criteria; and what affordable telescopes are available on the amateur astrophotography market today.
What beginners should look for when buying their first telescope for astrophotography
There are several things to take into account when buying your first astrophotography telescope, and I’ll mention the ones that I find most important. First of all, your telescope should produce a high-quality image of deep-sky objects. Second, your telescope should be ‘relatively’ affordable. Third, your telescope should be easy to set up and use, and fourth, your telescope should not require any maintenance. Before I start discussing these criteria in more detail, I have to warn you that your telescope is only one piece of the astrophotography puzzle. You will also need other gear such as a good tracking mount and a camera. It will also take time to master all of the astrophotography skills needed to accurately track and capture deep-sky objects. In short, mastering astrophotography is like running a marathon, it’s not a sprint.
1. Choose a telescope that produces good color-calibrated images of the night sky.
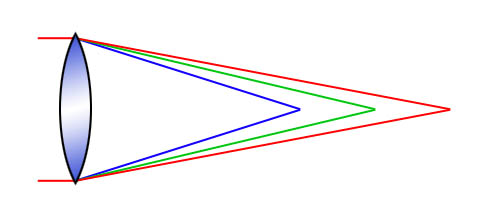
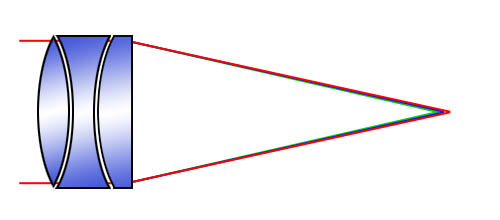
The first requirement is that you want a telescope that is able to produce high-quality pictures of deep-sky objects such as galaxies, star clusters, or nebulae. At least two problems may occur when you buy the ‘wrong’ kind of telescope that is unfit for astrophotography. The first problem is that some (refractor) telescopes will suffer from chromatic aberration, also known as “color fringing” or “purple fringing”. This is a common optical problem that occurs when a lens is unable to bring different wavelengths of the light spectrum onto the same “focal plane” – which in astrophotography is your camera sensor. As demonstrated in the picture below, chromatic aberration may occur when the red, blue, and green parts of the visible light will hit your camera sensor at a slightly different angle.
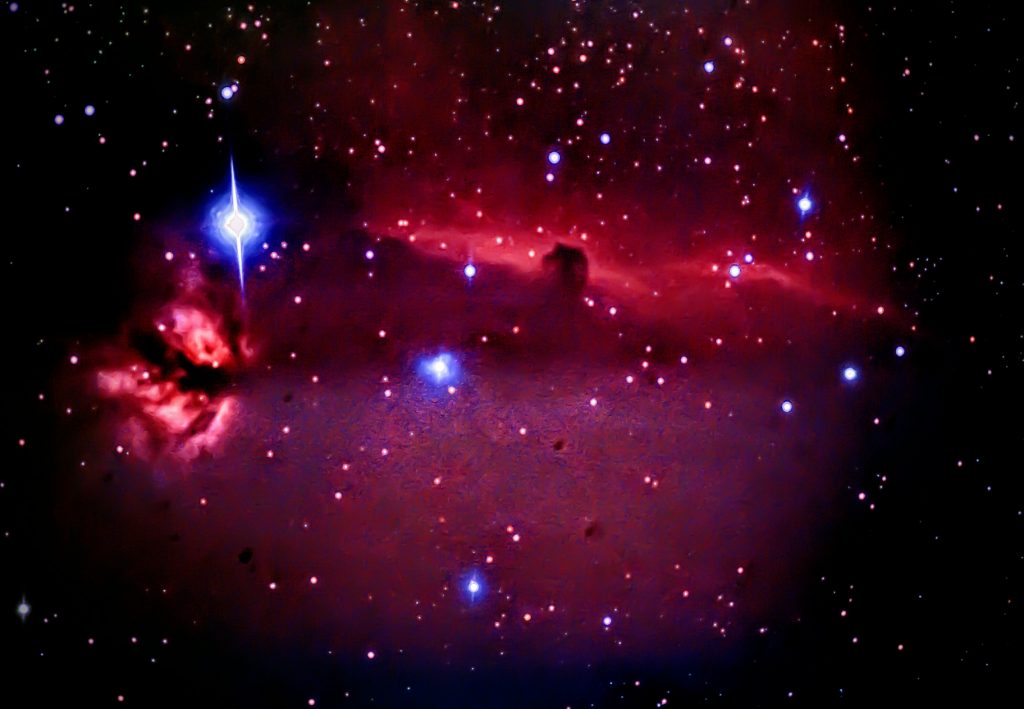
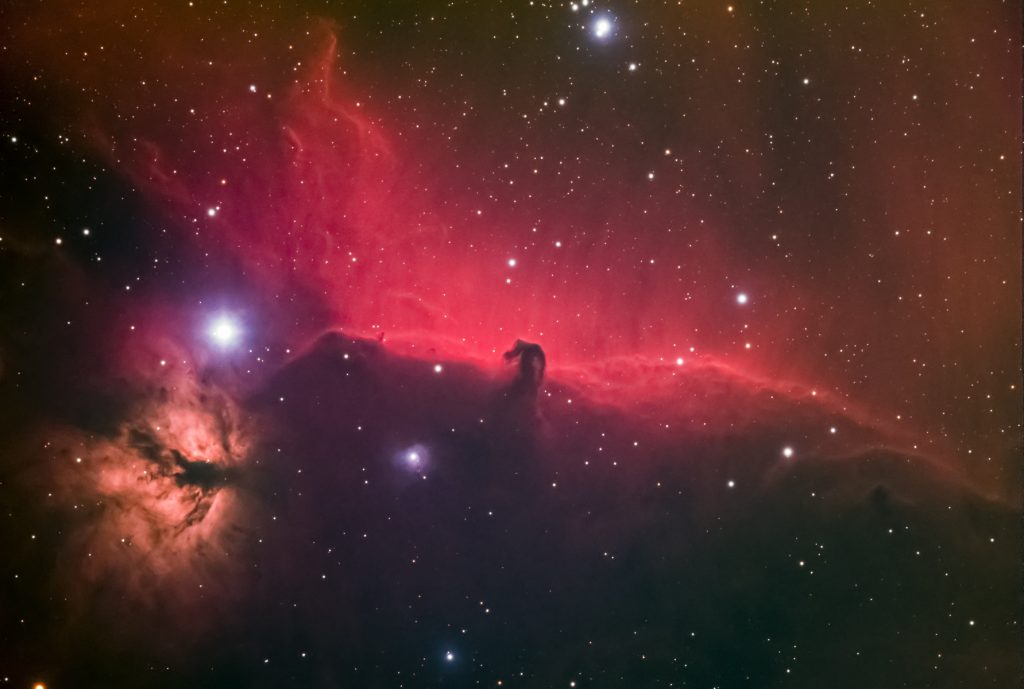
Chromatic aberration will result in colors that do not resemble the actual colors of the deep-sky object you want to capture. On top of that, chromatic aberration may result in nasty purple halos around your stars, something you want to avoid at all cost! Let’s compare my very first picture of the horsehead nebula taken with a telescope that suffers from chromatic aberration to another picture of the horsehead nebula I took with an apochromatic refractor that didn’t suffer from chromatic aberration so you can see the difference. So when looking for a lens-based, refractor telescope (further explained below) I would always advise you to look for an apochromatic refractor telescope.
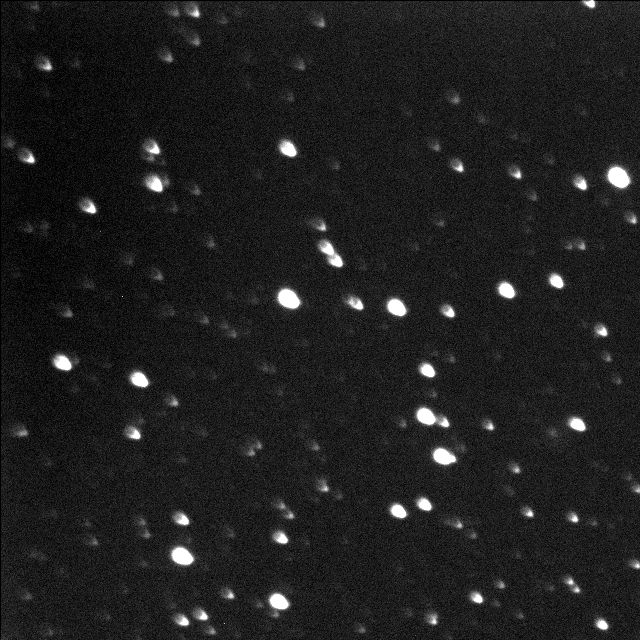
There may also be other problems besides chromatic aberration, such as off-axis coma, field curvature, or astigmatism. I’ll explain the most important issue that dominates in the more affordable, mirror-based Newtonian telescopes, which is coma. Newtonian telescopes often have a parabolic mirror at the base of the telescope. As a consequence, stars at the center of your picture will be nice and round, but towards the edges of the picture, the stars will be oval-shaped. Equipment such as coma correctors for mirror-based telescopes, or flatfield correctors for lens-based telescopes can be bought separately and used in combination with your telescope to eliminate off-axis coma (or field curvature) in your pictures.
2. Choose an ‘affordable’ telescope to start your astrophotography hobby
Although astrophotography is quite exciting as a hobby, it comes with some steep learning curves. As such, it may not be the best idea to spend your precious money on the best astrophotography telescope all at once. What if you don’t have the time or motivation to develop all kinds of skills such as how to set up and polar align your mount, how to auto guide and track the stars, how to connect software to your gear to effectively capture, stack, and post-process your images? You could end up with a very expensive telescope that may be hard to sell. Be advised, I will recommend telescopes that are nowhere near the cheap kind of telescopes you find in a toy store. As you will see, a decent beginner astrophotography telescope will already cost you about $500 to $1000! Of course, affordability depends on your financial situation and price may be more or less of an issue for you.
3. Choose a telescope that is easy to use and store
When you are just starting your astrophotography hobby, you want to practice as much as you can. For a lot of us, this means allocating some of our precious time to nights that bring us clear skies. It can sometimes take weeks or even months until this happens (in The Netherlands at least). When you do have some clear skies, you want a scope that is immediately ‘ready to go’. I mean, the telescope should not break your back when you carry it outside and put it on your tracking mount. It should also be straightforward to attach a camera and bring the telescope in focus. I often see that – at least for visual use – fellow amateur astronomers recommend a telescope with a large aperture for a low price – mostly Dobsonian or Newtonian reflectors. Although I do agree that a larger aperture is generally better for visual astronomy, I also see that lots of people end up with a big telescope that needs to be stored in the house, taking up space, and raising the eyebrows of husbands, wives, partners or whoever you live with. For many people, it can be quite cumbersome to carry a big and heavy telescope outside – let alone the efforts needed to put it on a tracking mount. My personal opinion is therefore that it is easier to start your astrophotography hobby with a telescope that is relatively compact and lightweight. Especially when starting astrophotography, it is nice to have a telescope that you can take outside, put on your mount, and attach a camera in a short amount of time without breaking your back.
4. Choose a telescope that doesn’t require a lot of maintenance
Another thing I would look for in a beginner astrophotography telescope is that the telescope requires little or no maintenance whatsoever. Let me ask you this. When you start your astrophotography hobby, do you want to spend your precious time ‘under the stars’, learning the ropes of this beautiful – and sometimes frustrating – hobby? Or do you want a telescope that can be out of alignment and requires maintenance? Of course, some of us really like to ‘tinker’ with our telescopes, and any kind of maintenance can be learned. But my point is that you probably want to spend your precious time learning how to image beautiful deep-sky objects rather than maintenance. I speak from experience as I once spend several nights under clear skies trying to collimate my telescope (get my telescope in focus). Not a nice feeling, especially not when you live in a climate like myself (the Netherlands) where weather conditions are such that we do not have lots of clear nights to go out and capture deep-sky targets, especially not during autumn and winter when clouds dominate the sky.
Main differences between telescope types: Refractors versus Reflectors
So now that we know what kind of criteria to look for in a good beginner astrophotography telescope, let me quickly explain the main differences between types of telescopes: refractors versus reflectors. Refractors are the telescopes you are used to seeing in cartoons and movies. Light enters the telescope through a lens situated in front of the telescope. The lens(es) then refract(s) that light onto either an eyepiece (for visual observations) or a camera sensor (for astrophotography). The quantity and quality of those lenses vary between refractors. Many stores sell cheap, achromatic refractors. Although these achromats are suitable for visual astronomy, I urge you to stay away from those when you plan on taking pictures of the night sky. Yes, they are very favorably priced. If you have a strong urge to buy an achromat, I urge you to scroll up and take another look at my first picture of the horsehead nebula, which should cure your urge to buy a cheaper refractor for astrophotography. Achromat refractors do suffer from chromatic aberration and produce false-color images of deep-sky objects, and will produce ugly purple halos around your stars. At a minimum, you should buy a refractor that has some Extra Dispersion (ED) glass – also known as doublet refractors. These telescopes will suffer much less from chromatic aberration as compared to achromat telescopes without ED glass. However, if you want a lens-based telescope that accurately displays the colors of the night sky without any chromatic aberrations, you want to look out for an apochromatic refractor telescope – or APO telescope in short. These refractors have three lens elements and will produce a highly accurate colored picture of the deep-sky objects you are interested in capturing. As most of the APO telescopes have three lens elements, they are also called “triplet refractors”. There is no limit to the number of lenses that can be used in a lens-based telescope. For example, you also have quadruplet refractors with four lens elements, that in addition to producing correct colors also compensate for potential coma or field curvature. However, the more lenses a lens-based telescope has, the more expensive they get. A triplet refractor – depending on its aperture – are within the $500 to $1000 price range which is far from cheap but may still be ‘affordable’ depending on your financial situation.
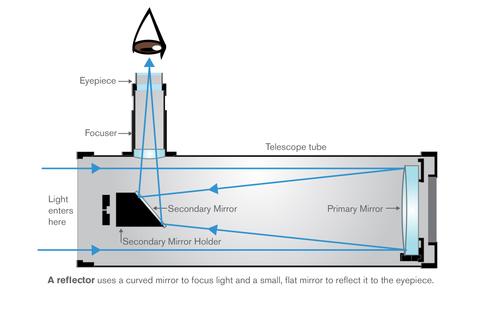
A reflector is a mirror-based telescope. The most popular (and cheapest) design of a mirror-based telescope is a Newtonian telescope. As the name suggests, this telescope was first invented by Isaac Newton. In a Newtonian telescope, the light that falls into the tube of the telescope is reflected by a mirror – also called the primary mirror – that sits at the base of the telescope, after which the light is reflected again by a secondary mirror, onto either an eyepiece (for visual use) or a camera sensor (for astrophotography). Mirror-based reflectors come in many shapes and sizes and they have their own advantages and disadvantages. For example, one advantage is that they generally do not suffer from chromatic aberration, as compared to some of the cheaper lens-based telescopes. Also, they generally offer a bigger aperture as compared to refractors at a similar price. some disadvantages are that the curved mirrors in many reflectors produce coma – oval stars at the edges of your images. A coma corrector can be bought and used in combination with your reflector to correct for this effect. Also, some of the more expensive reflector designs have parabolic secondary mirrors that counter coma and produce a nice ‘flat’ starfield across your picture (e.g., Richey Cretien telescopes). Another disadvantage is that the primary and secondary mirrors need to be perfectly aligned to capture high-quality pictures of deep-sky objects. When the mirrors are out of alignment, you will need to perform ‘maintenance’ on your telescope, also called collimation. Collimation basically is the process of aligning the mirrors of your telescope to bring light to its best focus on either your eyepiece (visual) or camera sensor (photography). Reflector-based telescopes come in many shapes and sizes, from the cheaper Newtonian designs to Richey Cretien, Schmidt Cassegrain, Maksutov and RASA telescopes.
Which affordable beginner telescope should you consider?
When taking into consideration all of the above, I would advise you to start your astrophotography hobby with a 50mm to 80mm apochromatic (APO or triplet) refractor which varies in price from about $500 to $1000 dollars, depending on the aperture, brand, and design. If the price is an issue, you could also choose a cheaper, Newtonian telescope. One of the advantages of buying a Newtonian (mirror-based) telescope is that Newtonians usually have a larger aperture and focal length as compared to similarly priced APO refractors, which is a plus when you want to capture some of the smaller objects in the night sky. Do take into account, however, that the ability to zoom in on smaller objects also makes potential tracking errors of your (equatorial) mount more visible in your pictures when taking long exposures of the night sky. Moreover, Newtonian telescopes are relatively ‘fast’ meaning that they have a low F/ratio (often F/5) which allows you to capture the photons of light from deep space relatively quickly. This being said, they do have some disadvantages that make me hesitate to recommend a Newtonian as your first telescope for astrophotography. The first thing is that Newtonian telescopes suffer from coma, so you will need to buy an additional coma corrector that can be paired with your Newtonian telescope to eliminate coma in your pictures. This will drive up the cost (usually a coma corrector can be bought at around $150). A second thing is that Newtonian telescopes will show diffraction spikes in your stars, due to the spider vanes in front of the telescope that holds the secondary mirror in place. A third disadvantage is that Newtonian telescopes need to be collimated – you will have to align the first and the secondary mirror before you’ll be able to capture sharp images of the night sky. Finally, Newtonian telescopes are usually bigger and heavier than apochromatic (lens-based) telescopes at a similar price range, making them more difficult to set up, use, and store.
Therefore, I would recommend you start your astrophotography hobby with an apochromatic refractor. The main advantages are that APO telescopes produce good color-calibrated (chromatic aberration-free) images of the night sky. Also, at the price range of $500 to $1000, they are lightweight, easy to use, store, and they don’t require any maintenance such as collimation. Much of these APO refractors have a smaller aperture and shorter focal length as compared to similarly priced Newtonians, which translates into a wide(r) field of view of the night sky. I would argue that this is a good thing when you start astrophotography. A wider field of view means that potential tracking errors produced by your (equatorial) mount will be less noticeable in your pictures. It also allows you to capture some of the bigger nebulae, star clusters, and galaxies in one single picture. Some famous examples are the horsehead nebula, the Orion nebula, the Rosette nebula, the Pleiades, and the Andromeda galaxy. This being said, most triplet apochromatic refractors do need a field corrector to get round stars across your entire field of view, which can be bought with the APO refractor (usually around the $100 to $150 price range). Below, I will mention SEVEN telescopes (two Newtonian and five APO refractor telescopes) that I would recommend to start your astrophotography hobby in 2021.
Top 7 Telescopes to Start Astrophotography in 2021
7. SkyWatcher Explorer 200P
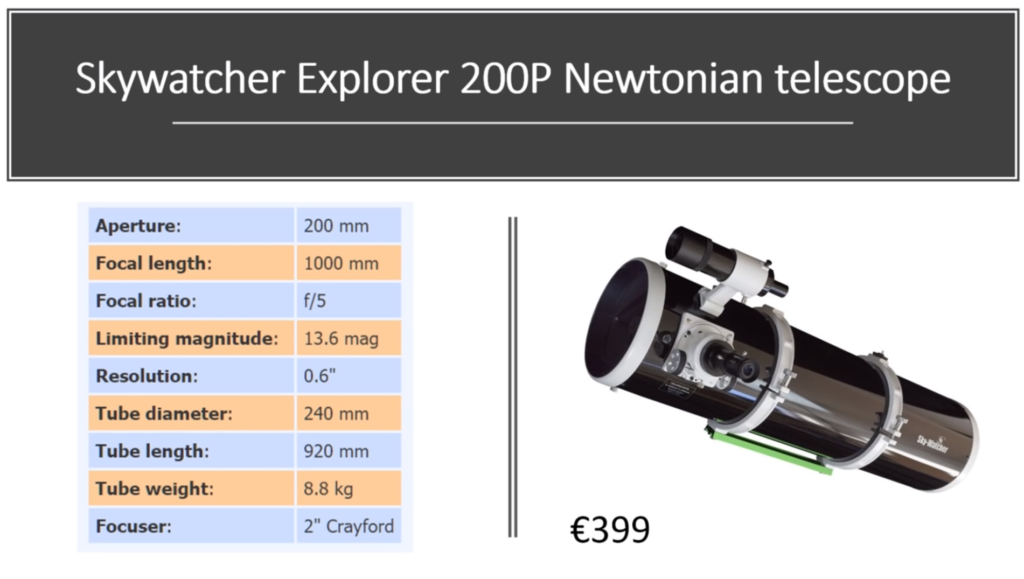
Check price and availability: SkyWatcher Explorer 200P Newtonian Telescope
A very affordable Newtonian telescope to start your astrophotography hobby. You’ll get a large aperture (200mm) and focal length (1000mm) that allows you to zoom in on some of the smaller deep-sky objects for an affordable price. Note you’ll probably want an additional coma corrector to get round stars across your entire field of view, and a collimator to align the telescope.
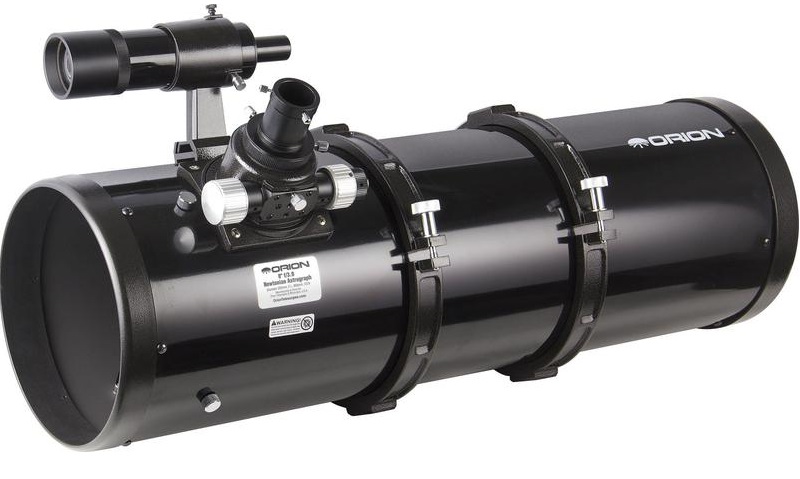
6. Orion 8″ F/3.9 Astrograph
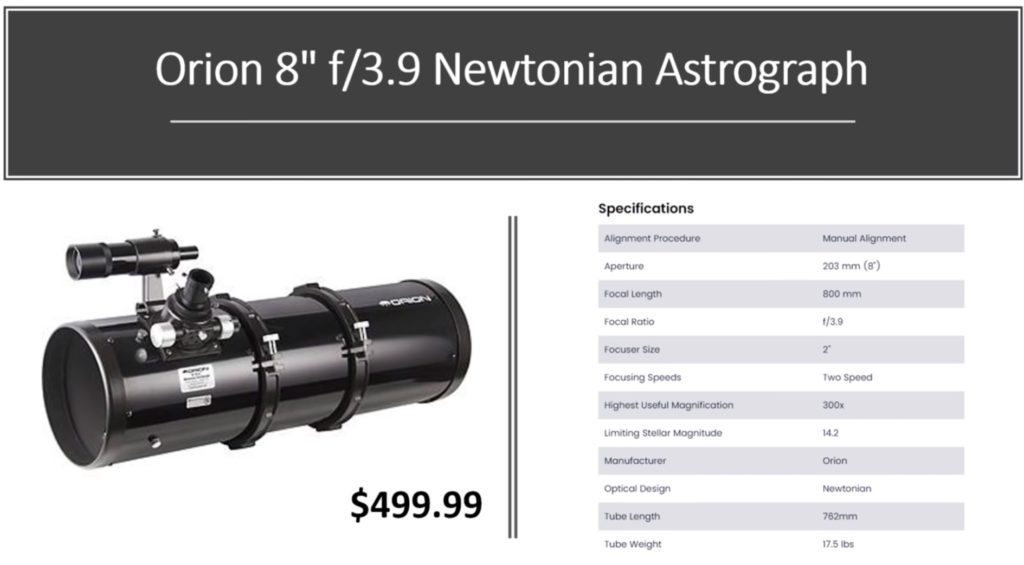
Check price and availability: Orion 8″ F3.9 Newtonian Astrograph
One of the fastest, affordable Newtonian telescopes on the market today to start astrophotography (F/3.9). This telescope will collect light at a very fast rate, resulting in a shorter exposure time needed to capture beautiful deep-sky objects. Note you’ll probably want an additional coma corrector to get round stars across your entire field of view, and a collimator to align the telescope.
5. Sharpstar 61mm Triplet Refractor
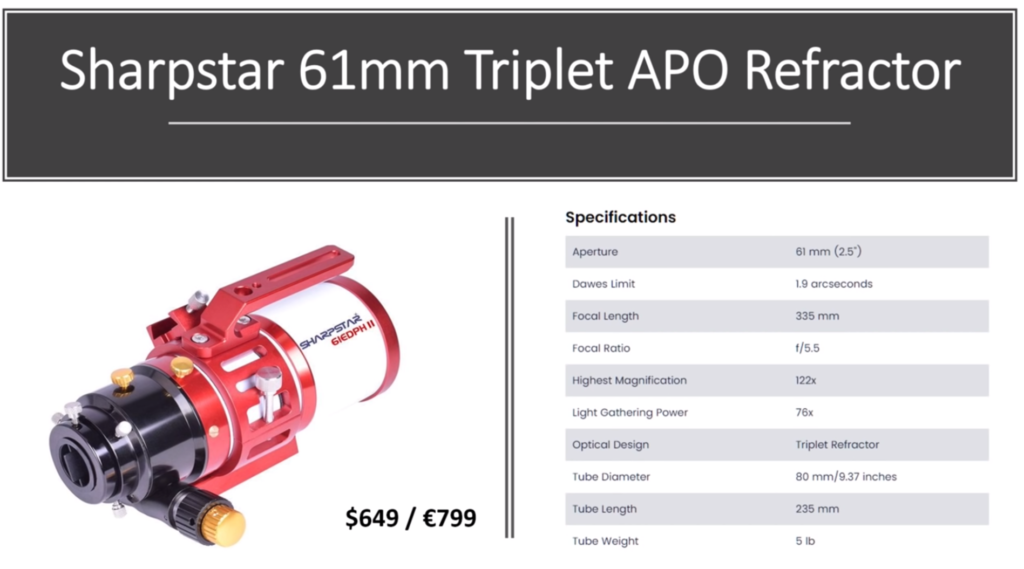
Check price and availability: Sharpstar 61mm Triplet Refractor
The perfect travel scope to start astrophotography. At about 2 kg (5 lbs) and only 235 mm, this telescope is easy to carry around and set up. The three lenses will provide you with a good color-calibrated picture of deep-sky objects and the focal length of 335mm is perfect for wide(r) field pictures of the night sky.
4. William Optics Gran Turismo 71 APO Refractor
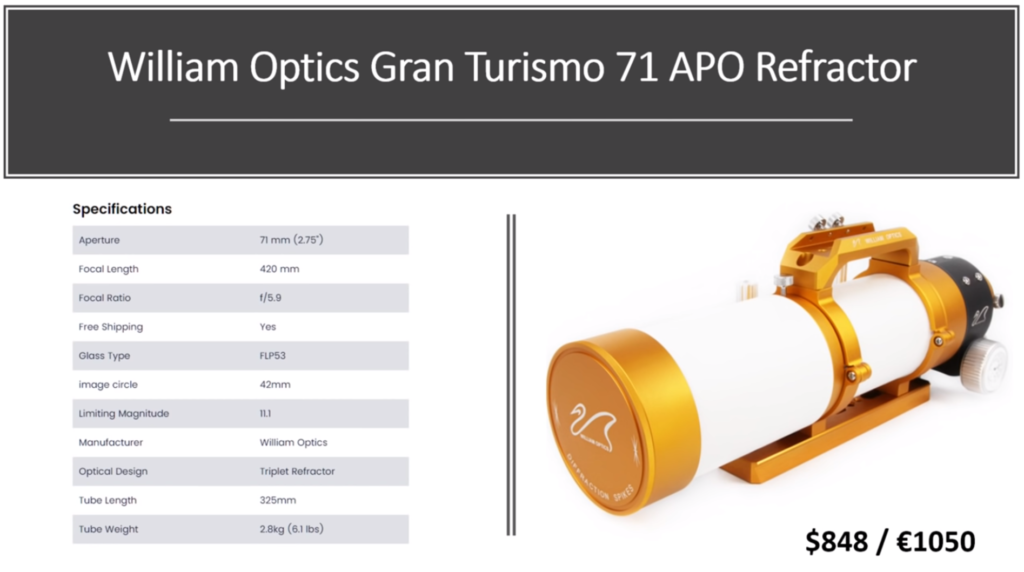
Check price and availability (USA/WW): William Optics Gran Turismo 71 APO Refractor
Check price and availability: (EU/WW): William Optics Gran Turismo 71 APO Refractor
The WO Gran Turismo has a high-quality FPL-53 glass element and is pretty fast for a refractor (F/5.9), enabling you to capture good color-calibrated pictures of the cosmos at a fast rate. It is also very portable at 2.8kg (6.1 lbs) and a focal length of only 420mm, making it easy to travel and store this telescope.
3. Explore scientific 80mm f/6 triplet refractor
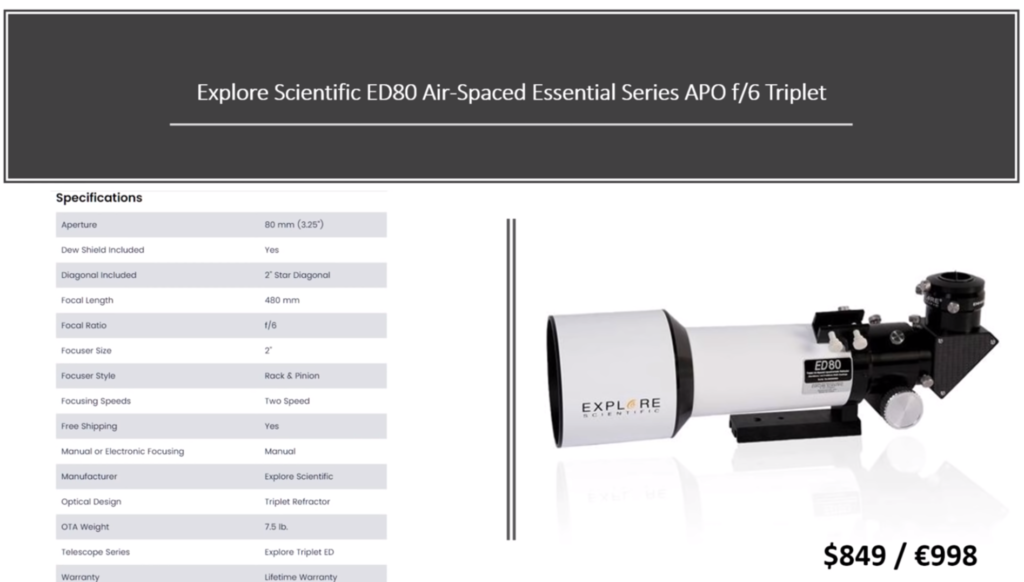
Check price and availability (USA/WW): Explore scientific 80mm f/6 triplet refractor
Check price and availability (EU/WW): Explore scientific 80mm f/6 triplet refractor
Explore Scientific is famous for producing high-quality telescopes at an affordable price. This air-spaced APO telescope has a generous 80mm aperture and a 480mm focal length (F/6), which is an ideal focal length used by many astrophotographers (including myself) to take good color-calibrated images of some of the famous deep-sky objects. Also, it is quite portable at 7.5 lbs (about 3.5 kg).
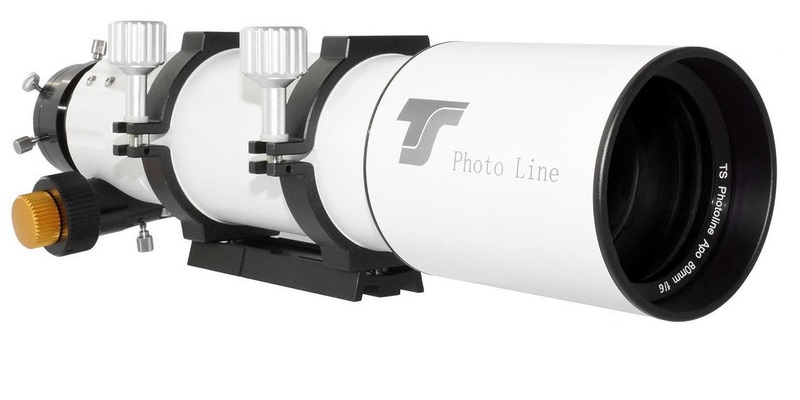
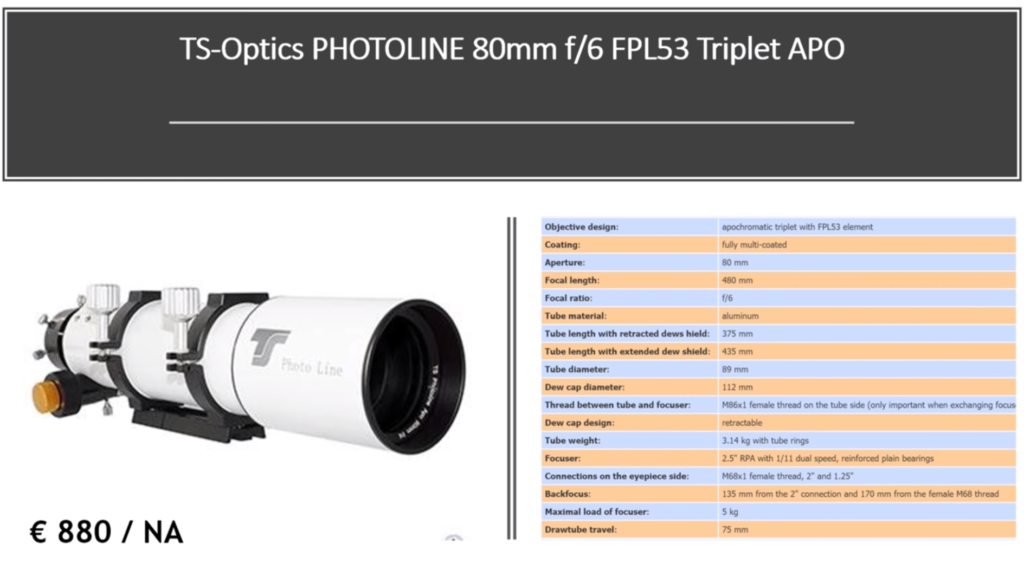
2. TS Photoline 80mm triplet f/6 refractor
Check price and availability (EU/WW): TS Photoline 80mm triplet f/6 refractor
Check price and availability (USA/WW): TS Photoline 80mm triplet f/6 refractor
Teleskop Service is famous in Europe for its affordable, high-quality refractors. Joseph Ritter von Fraunhofer would have been jealous at the aberration-free images this telescope is able to produce with glass that includes the famous, high-quality FPL-53 lens element. This APO refractor telescope offers a generous 80mm aperture and 480mm focal length, which is ideal for many of the famous deep-sky objects amateur astrophotographers want to capture.
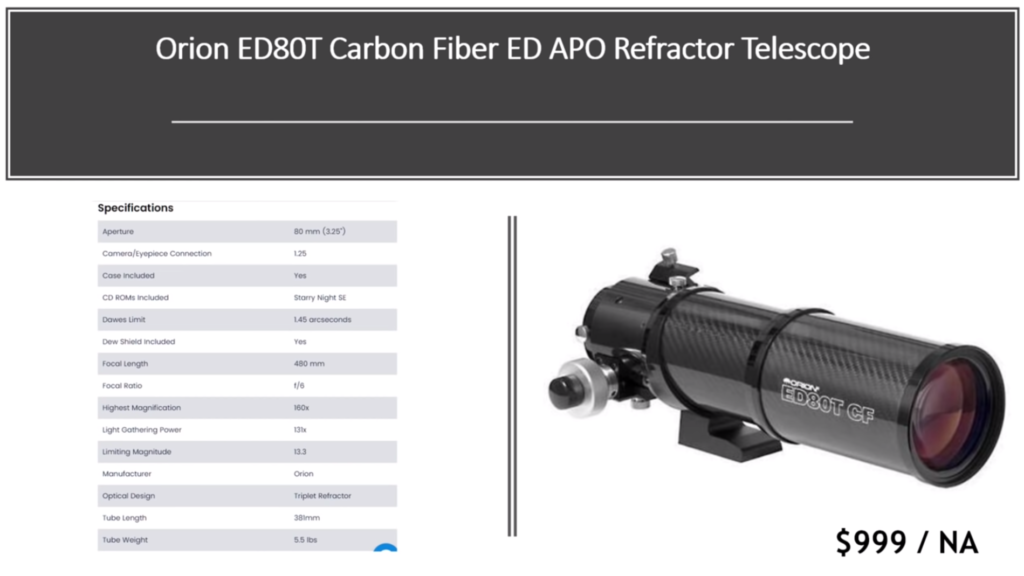
1. Orion 80mm (ED80T) Triplet f/6 refractor
Check price and availability (USA/WW): Orion 80mm (ED80T) Triplet f/6 refractor
Last but certainly not least, the Orion ED80T refractor telescope has been a popular telescope on the amateur astrophotography market for many years, and with good reason. The carbon fiber used means that this lightweight telescope at 5.5 lbs (2.5 kg) is easy to carry around, while offering a generous 80mm aperture and 480mm focal length. The telescope includes the low dispersion FPL-53 glass, producing razor-sharp and color aberration free images of the night sky.
Hey Wido…I have been watching your u-tube videos and reading your blogs- one of the best in astrophotography. I’m an amateur photographer; and venturing into astrophotography; Thanks to your info; I have finally narrow down the telescope; Leaning towards Celestron Edge HD 8 (although a little worry that it may be advance for me); or One of the telescope that are APO/EDT.(definitely one of ones you recommended). Going to purchases the Skywatcher mount EQ5-to go;
I’m going to need a guiding telescope with camera. Not sure what else I will need. I have a Fuji Xpro2;
do I need Barlow lens; Any feedback on any other piece of equipment I will immediately need will be greatly appreciated. Thanks. collins
Hi Collins, sorry for the late reply and thanks for the compliments. If you are new to astrophotography, I would recommend starting out with a smaller apo refractor. A shorter focal length means you will get a wider field of view. Although your instinct is probably telling you to zoom in as much as possible, there are actually very nice widefield targets in the night sky (pleiades, Andromeda, orion nebula and other targets) that are really worthwhile to photograph with a refractor (i personally started with a 80/480mm APO refractor). You will also save a bit of money as compared to buying an Edge HD. As for the mount, I would recommend either a Skywatcher HEQ5 or a Celestron AVX if you’re going for the refractor. If you decide on the Edge HD, you’ll probably be better of with a slightly heavier mount with a higher payload capacity (e.g. the SW EQ6R pro, or the Celestron CGEMII, or even the CGX). You’ll indeed need a guidescope, for the refractor a small mini guidescope like the orion 50mm will do. And if you are starting with a regular digital camera you’ll need a T2 adapter for your camera. And finally, maybe you want to consider a cheaper non-cooled astrophotography camera like the ZWO 120mc or the 224MC to put in your guidescope for guiding, and to do some moon and planetary astrophotography with such a camera. Barlow is great if you’re trying to zoom in on smaller objects (planets, particular spots on the moon) within our solar system. For deep sky a barlow is less appropriate as it will double your focal length and will add exposure time to your capturing process. Hope this feedback helps, good luck deciding and clear skies!
Thank you for a great article! When I first began my interest was visual astronomy (in the early 1990’s) I became interested in astrophotography approximately 10 years later. Early on, I made many errors; one of them being the purchase of a Meade ETX 60 in 2000. There were very few resources to find good info on equipment and techniques related to DSO photography. That scope was very inexpensive but suffered from many inherent issues due to build quality (the motor drive was very “sloppy” suffered from backlash, the optics were poor and created false color); attempting to take photographs of even planetary objects was frustrating, to say the least.
Over the years I have been lucky enough to find useful information and have made much better choices when buying astro-gear. One of the best purchases I ever made was a Bresser 152mm Mak-Newt astrograph with a Carbon Fiber tube. This scope design has since been adopted by Explore Scientific as the David H. Levy “Comet Hunter”. I made the decision after listening to many recommendations by colleagues of mine that are also in the Cosmology and Astrophysics community. If it werent for those knowledgable people sharing their insights, I probabably would have given up and remained a “Visual Astronomer”.
So to make “a long story short”, thank you for taking the time to create a website that encourages others to follow their interests in a sensible way; I’m sure there are many cases of people who may have gone on to acheive amazing things in the field but gave up due to frustration caused by lack of resources, bad advice, and spending their hard earned money on things that woud never benefit their interest! Keep up the great work.
Hi Gary,
Thank you so much for your positive feedback, highly appreciated!
And thanks for sharing your story as well, it sounds very familiar. I’m hoping that the information on my website helps people to make informed choices and enjoy the hobby.
Clear skies!
Hi Wido,
I just like say , how much I appreciate your YouTube channel .
I still return to many of your videos from time to time ,. the information is so clear and easy to understand , other astro channels have too much technical information that goes way over my head.
I spoke to you last year (in the comment section on YouTube ) , about backyardEOS Premium Edition ., you did a video on this , and I still use it today . so thank you for that . At the moment I’m using a A Newtonian Reflector. Which is too big for my NEQ3 mount .
I’m just about to buy my next telescope for deep sky astrophotography . I’m looking for your advice before I hit a hole in my credit card .
I love your pictures from the photoline 80mm .You speak very highly about it , and for the money it seem an excellent telescope.
I kind of have my mind set on this telescope , but before I buy , I have a question ,
My Question for you is this .
knowing what you know now, with your 7 years experience… Would you still buy the TS Photoline 80mm triplet f/6 refractor or would you buy something like the William Optics Gran Turismo 71 APO Refractor . both are in my price range .
Any advice or reply would be greatly appreciated .
If you have a code or link for buying either to help your channel please let me know .
I thank you for your time and help.
stephen .
Hi there, thank you so much for your kind words.
I can only speak for the TS 80/480mm APO, I still use it and are very satisfied with the images it produces. It has a great color corrected field of view. Do take into account that this is a triplet refractor, so if you’re using a large sensor camera, you’ll probably want to add the TSFLAT2 to your list and check for the correct back focus to avoid elongated stars towards the edge of your field of view. This being said the WO gran turismo is undoubtedly a good refractor as well. It is a 71/420, so you’ll be getting a wider field of view (more zoomed out) as compared to the TS APO 80/480. Good luck deciding and clear skies!
Wido – Astroforum
Hi wido
I’m looking for some help please , if you have the time .
I recently bought a photoline 80mm triplet telescope and a optics photoline reducer 0,79x .
I’m following in your footsteps .lol. I recently spoke to you about this .
Here’s my problem, if you can help me .
I need an extension / adapter between the reducer and the camera 2″ and the same for the eyepieces .
I know the reducer is a T2 tread., Because my canon can fit on it .
My problem is, I don’t know what extension to get …ie. the tread size ( male and female ) and tube length .
I’m lost as to which to buy and I don’t want to waste money on the wrong product. I was wondering which one you use ?.
I would be grateful for any help you can give me .
best regards
stephen mohan .
Hi Stephan,
I’m not using the .8 reducer. Perhaps its best to just ask the shop you’ve bought your reducer, they’ll know what extension you’ll need.
Clear skies,
Wido.
Hello Wido, I love your work and follow every video and blog of yours. I am extremely basic is astrophotography. Got an astro modified canon d60 and a ioptron skyguider pro. I would like to upgrade my lens system and needed your help.
I stay in Belgium, not that far away from you so in the European market.
I have my eyes on two scopes
TSApo60f6RED + field flattener or
TS sharpstar61 (field flattener included)
Difference in price is about 100+ euros but one in a doublet and the other a Triple. All apo 53 glass
Now my question is, would a be Triplet be an overkill for a canon d60 ? And a doublet in enough ?
The William optics zenith start61 is too expensive in the European market so was looking at the options above.
Looking forward you your opinion. If you happy to be in Gent, would be great to meet up.
Regards,
Aniruddha
Hi Anidruddha,
Thanks! Sorry for not replying sooner. A doublet is fine if you are starting astrophotography. You will have a slight misalignment of the green part of the light spectrum, but most light we are catching from space is either in the red or blue part of the light spectrum, so you’ll be fine. I’ve never been to Gent, but I’ve heard it is a very nice city!
Cheers, Wido.
Thanks for a great article..
What do you think about Celestron 8SE for astrophotography?
Hi Gal, thanks! The 8SE is good for visual planetary observations and can also be used for planetary imaging + some great close-ups of the moon.
For deep-sky astrophotography, it’s a bit problematic for two reasons. First, the 8SE comes with a Nexstar altitude-azimuth mount which basically means you cannot take long exposure pictures of deep-sky objects, unless you put that telescope on an equatorial mount (see blogs about beginner and advanced mounts elsewhere on my website). Second, the 8Se is a typical Schmidt-cassegrain design telescope, and those designs suffer from (off-axis) coma. In practice, this means that your stars will be elongated towards the edges of your field of view when taking pictures with a camera. There are options to solve both problems (e.g. you can buy an additional wedge with the Nexstar mount to track the stars more accurately, and you can buy a coma corrector to correct for the elongated stars), but if you want great pictures of deepsky objects I’d recommend an equatorial goto mount and a different telescope (e.g. a good quality ed or apo refractor to start your hobby). Hope this helps!