In this in-depth review, I share my real-world experience with the new Seestar S30 Pro smart telescope from ZWO, based on two cold winter nights of testing under light-polluted urban skies. I cover everything from unboxing and specifications to solar, lunar, and deep-sky imaging, and explore whether the S30 Pro is a worthwhile upgrade over the Seestar S30 and S50. With its improved quadruplet apochromatic optics, upgraded IMX585 Sony sensor, EQ mode support, mosaic imaging, and intuitive app features, I explain why the Seestar S30 Pro stands out as one of the most capable, portable, and affordable smart telescopes available today.
After the success of the Seestar S50 and S30, ZWO was kind enough to send me their brand-new Seestar S30 Pro. In this blog, I’ll share my real-life experiences across two cold winter nights and we’ll take a close look at the specifications of this new smart telescope to see whether it’s worth considering as an upgrade to the older models, or as a new purchase.
Unboxing / Specs
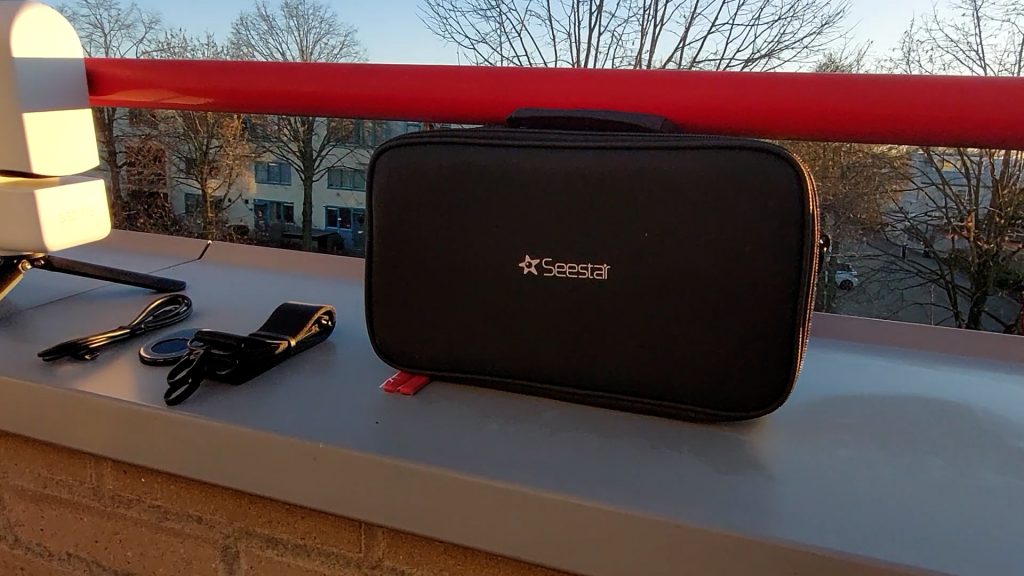
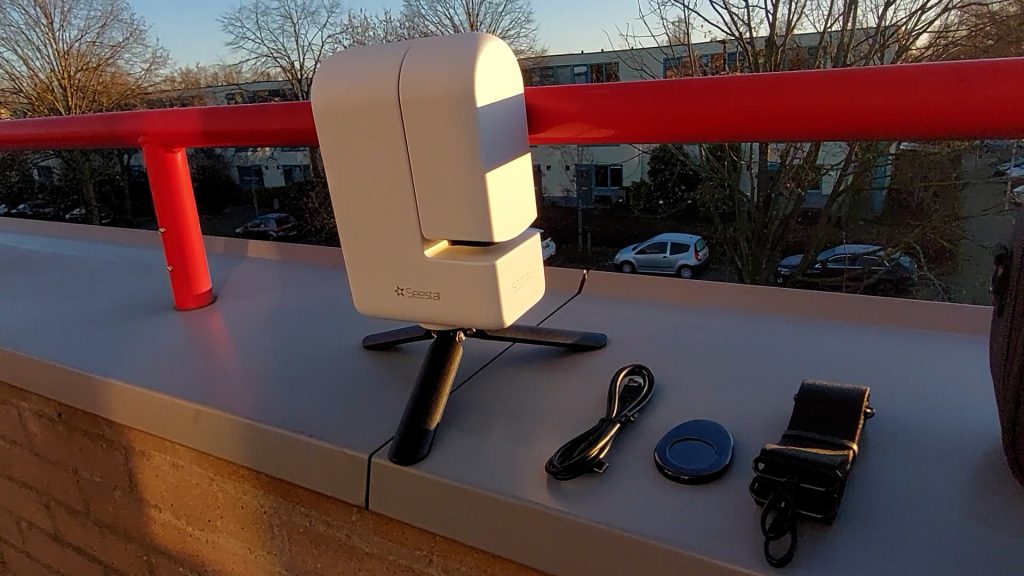
The S30 Pro comes in a sturdy carrying bag with a sholder strap and includes a small tripod, a USB-C cable, and a solar filter, so you can safely image the Sun. The outside is almost identical to the S30, but it’s the inside that counts so let us take a look at the technical specs.

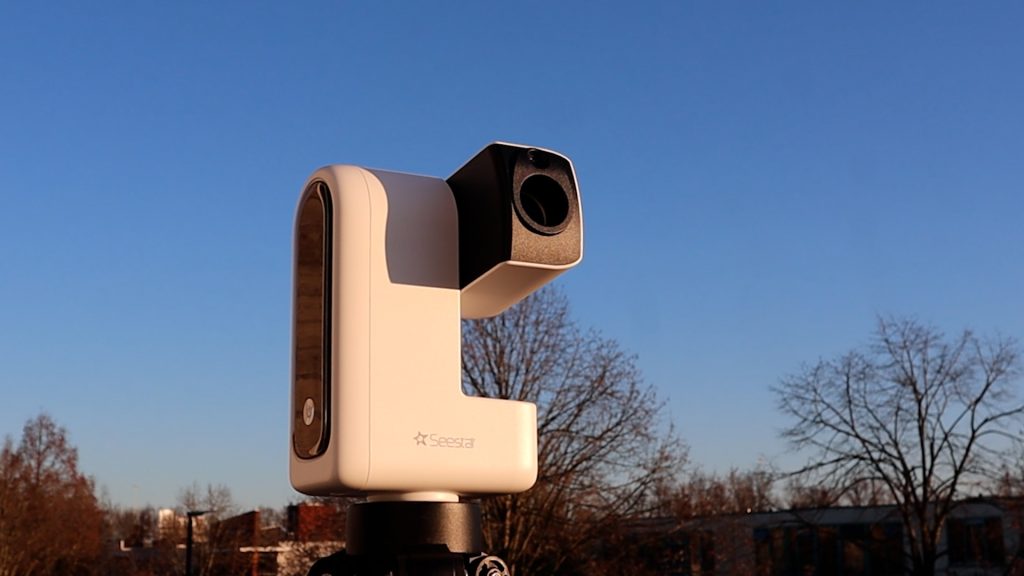
At its core is a 30-millimeter aperture, 160-millimeter focal length f/5.3 quadruplet apochromatic telescope, designed to deliver excellent color correction and round stars across the full field of view. This is an upgrade from the earlier triplet refractor designs on the S30 and S50. For imaging, The S30 Pro has the popular 8-megapixel Sony IMX585 color sensor, which is a clear upgrade over the 2 megapixel IMX462 and 662 sensors in the S50 and S30.
The S30 Pro delivers a field of view of 2.24 by 3.99 degrees in portrait mode, making it well suited for large nebulae and wide-field deep-sky objects. The resulting image scale is 3.74 arcseconds per pixel, which means you sacrifice some fine detail compared to larger aperture and longer focal length telescopes, but you’ll gain a wider view of the night sky.
In addition, the S30 Pro includes a higher quality wide-field IMX586 sensor, offering a large 63-degree field of view, which is great for widefield Milky Way and star trail photography, both of which are now offered as new options in the Seestar APP which you can download on any iOS or Android smart device to remotely connect to and control the telescope.
It weighs just 1.65 kilograms, with compact dimensions of 21 by 14 by 8 centimeters, making it a great and easy travel companion to dark skies. It features 128 gigabytes of internal storage which is a considerable upgrade from the 64GB storage on the previous models, and it supports Wi-Fi, Bluetooth, and NFC connectivity for easy pairing and file transfer. The 6000 milliamp-hour battery lasts about six hours and can be recharged via USB-C, even while imaging—so you can use the S30 Pro all night. And all of this costs around six hundred dollars. For the latest prices, check the links below.
The Seestar S30 Pro Smart Telescope is available at ZWO (vendor, worldwide), High Point Scientific (USA/WW), Agena Astro (USA/WW), and Astroshop (EU/WW)
Connecting and setting up the Seestar S30 Pro
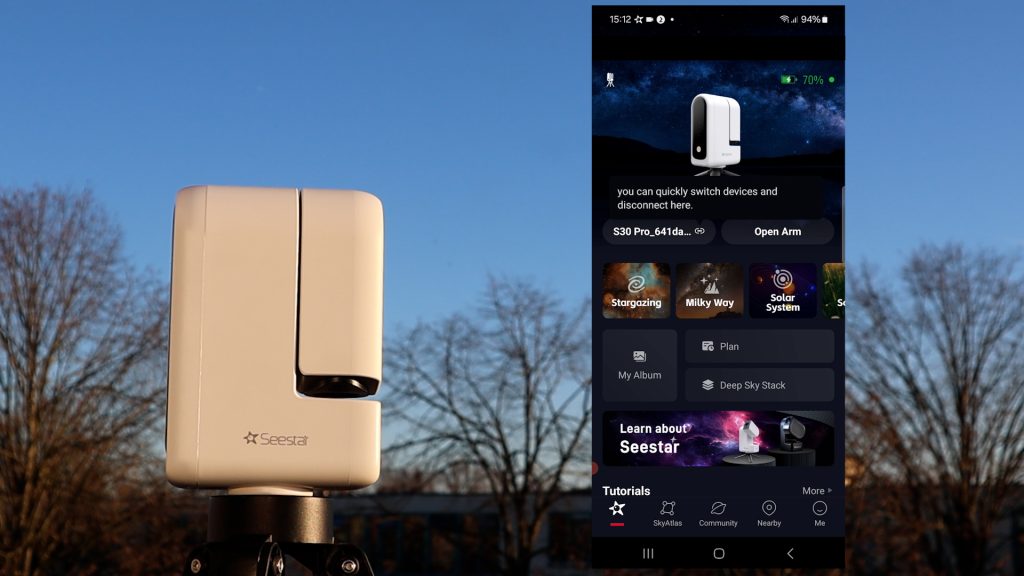
Pairing your smart device to the seestar is very straightforward. Just download or update the Seestar APP to the latest version, open the APP and follow the installation instructions. You can connect to the Seestar S30 Pro by powering it on and selecting the WiFi signal of the S30 Pro which is named S30 pro with some extra characters to identify your unique telescope. The default password is 12345678 which you can alter as soon as you’re connected to the telescope. Upon connecting to the telescope for the first time, the APP probably ask you to hit the small reset button at the bottom of the telescope to secure the connection, and I also got a firmware upgrade for the telescope upon first connection. By following the clear instructions on the seestar APP, I installed the firmware update and I was good to go within 5 minutes.
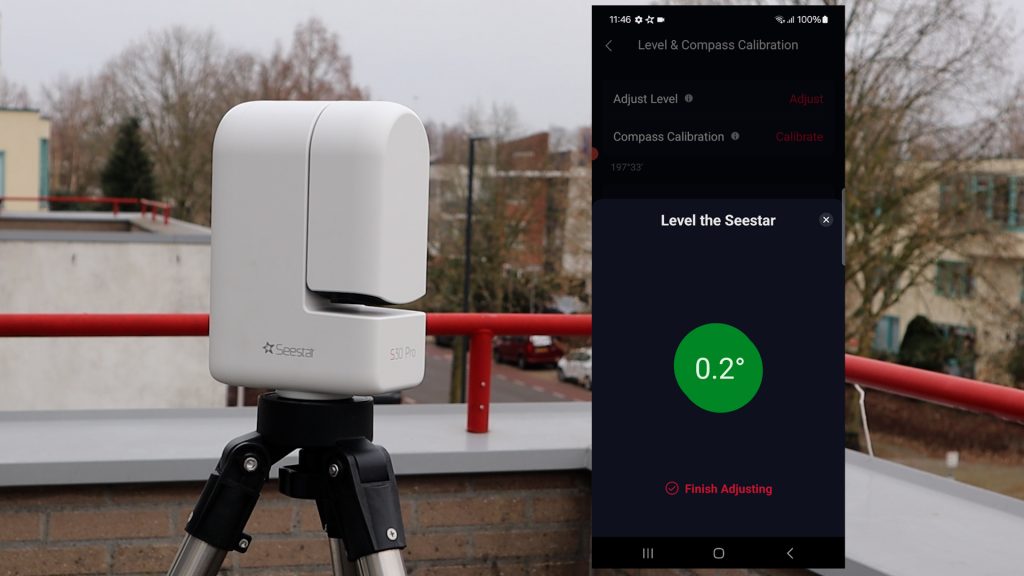
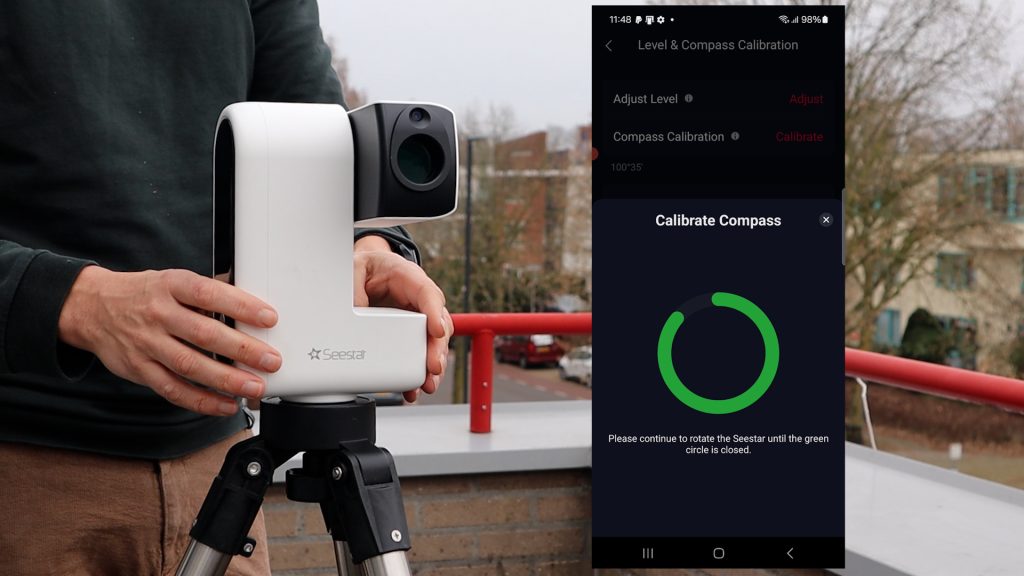
Before placing your Seestar smart telescope on a tripod, make sure the tripod is level. Then mount the Seestar, power it on, and open the Seestar app to connect to the s30 pro as discussed above. If you tap the Seestar image you can scroll down and tap Advanced Features and select level and compas calibration. Here you can tap on Adjust Level and you’ll see two circles—when they overlap, your Seestar is level. If not, adjust the tripod legs. You can also calibrate the compass of your seestar by tapping compass calibration and slowly rotating the Seestar 360 degrees. One important thing to note is that the Seestar uses a 3/8ths -16 thread, so it won’t fit a standard 1/4th 20 photo tripod. I’ve used an iOptron tripod during my tests as a taller, sturdy option to mount the S30 Pro.
My iOptron Tripod is available at Agena Astro (USA/WW) High Point Scientific (USA/WW), and Astroshop (EU/WW).
Solar Imaging
Always use the solar filter to protect the telescope imaging sensor and never look directly into the sun yourself as you might go blind. Installing the solar filter is very easy, just put the solar filter in front of the telescope lens and you’re good to go.
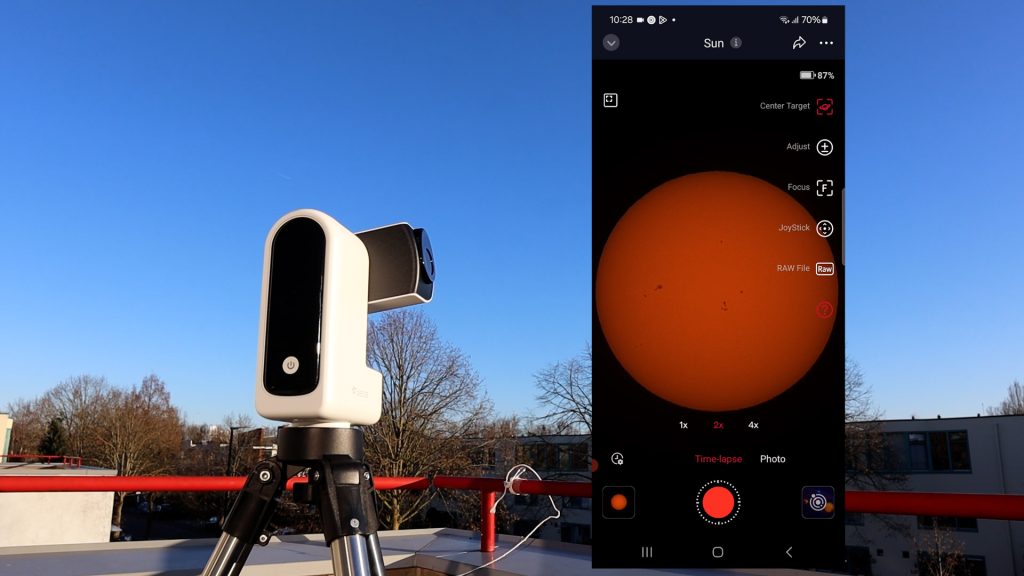
Finding the Sun turned out to be very straightforward. I opened the Solar System section in the Seestar app and selected the Sun. The app immediately told me to place the solar filter in front of the telescope, which I did first. After that, I simply tapped GoTo, and the telescope started moving on its own to find the Sun.
I also tried slewing manually using the joystick in Solar System mode on the right side of the screen. This was actually very easy. I started with the wide-field view and used the fast joystick controls to move the telescope until the Sun showed up in the telescope view.
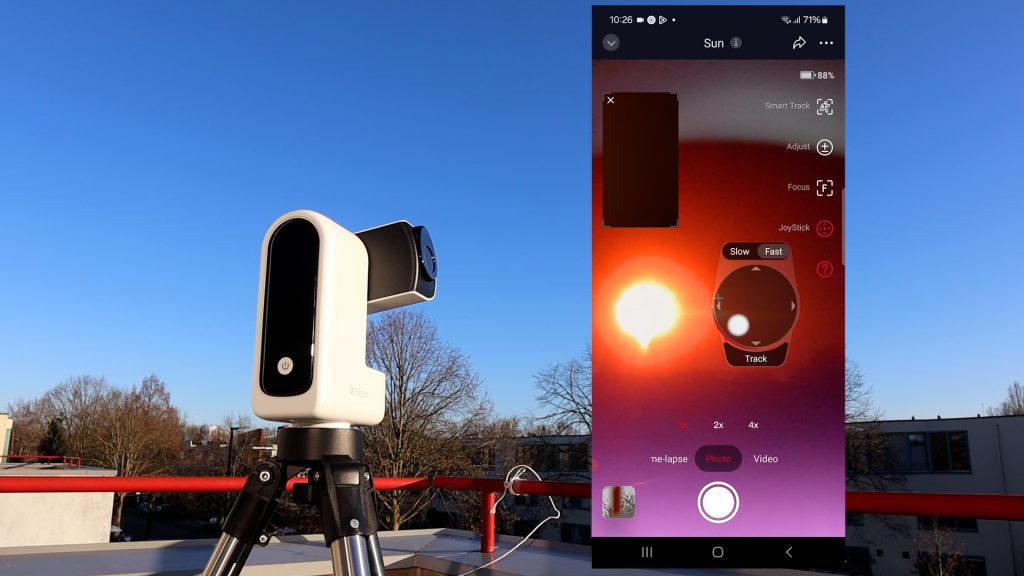
In telescope view, I tapped Slow to carefully center the Sun in the field of view. From there, I enabled automatic tracking by pressing Track in the joystick menu and i pressed enable target correction in the top-right corner of the Seestar app. At that point, the telescope automatically centered the Sun and started tracking it for me.
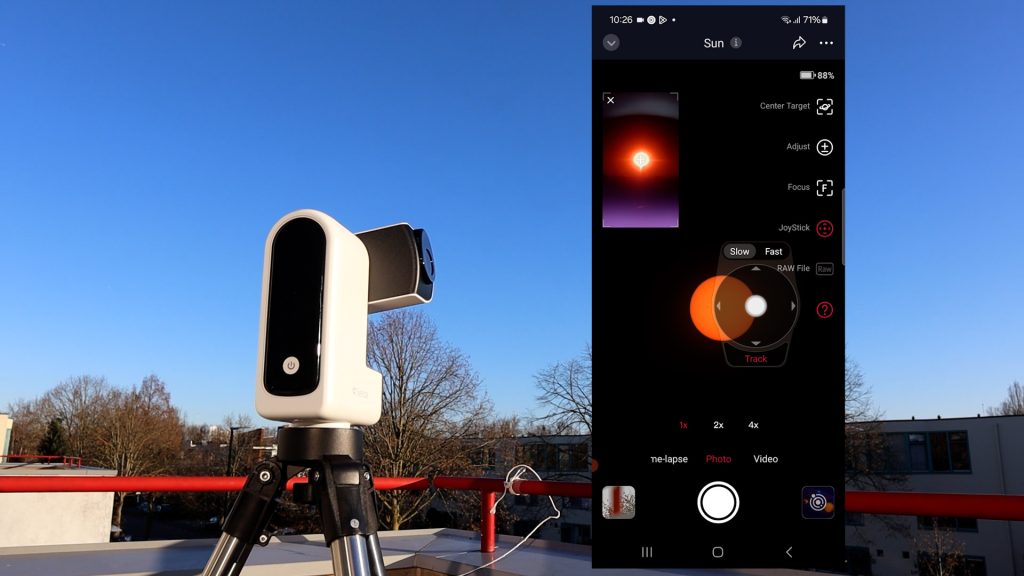
At the bottom of the screen I checked out the zoom functions by clicking 1x, 2x or 4x. you can also use two fingers to zoom in and out by pinching the screen. I noticed that i needed to re enable the target correction button after using the 2x and 4x zoom options to keep the Sun in the center of the screen. After zooming in, I tapped the focus icon and enabled autofocus, and the S30 Pro automatically focused on some of the sunspots that were visible that day. Alternatively, you can use the up and down arrows to adjust the focus manually. You can also manually adjust the exposure and gain settings, which is really nice.
Below the zoom controls, I had three options to capture the Sun: timelapse, photo, and video. I started with timelapse. By default, timelapse captures one image per second and turns that into an MP4 playing at 30 frames per second. I tracked the Sun for about two minutes, which resulted in a four-second clip.
In timelapse mode you can adjust the capture interval and set a recording limit to your liking. Timelapse would be especially useful for long events like solar or lunar eclipses. That said, tracking isn’t perfect— especially with strong winds like I had that day—so some video stabilization in post-processing would definitely be useful.
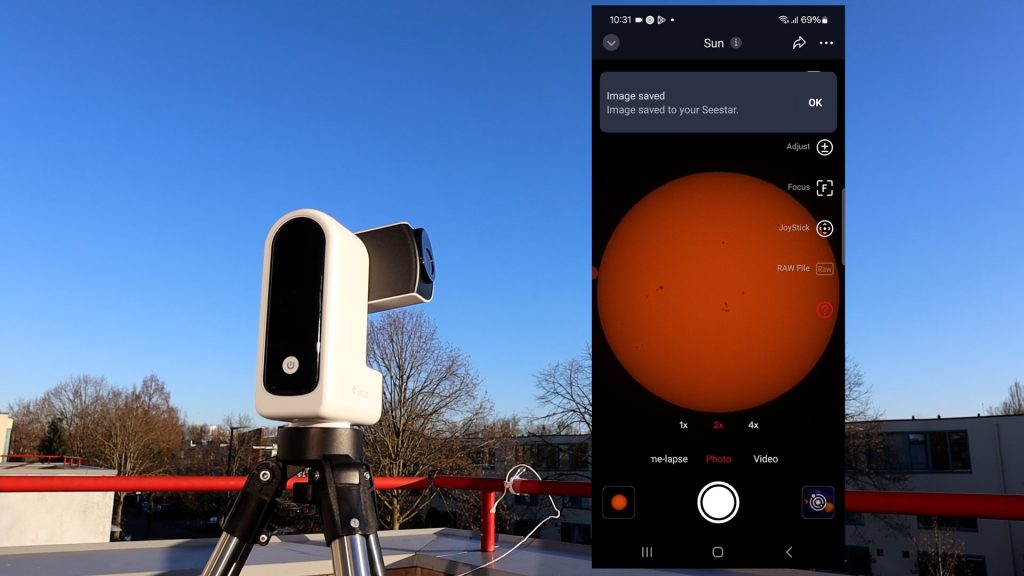
I switched to Photo which is straightforward. Just tap the shutter button and the Seestar will take a photo of the Sun in jpeg format and save it directly on your smart device. Very useful if you want to share it right away with others.
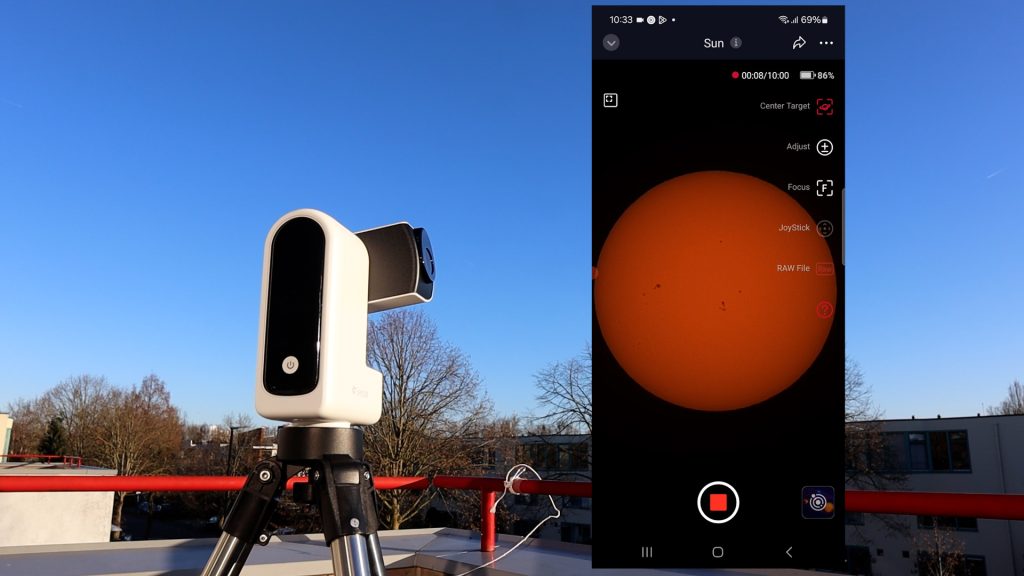
In video mode, I had two options. When I simply pressed the record button, the Seestar S30 Pro started capturing the Sun in MP4 format to the internal memory card, in a 1080×1920 portrait video. The file was only about 40 megabytes. After that, I tapped RAW and pressed record again. This allows you to capture Solar System objects in 16 bit AVI RAW format for up to 10 minutes. Recording the Sun for about one and a half minutes resulted in a 3.5-gigabyte AVI video file, playing at roughly 19 frames per second. The recording was again in 1080 x 1920 portrait mode.
These AVI RAW files are useful if you want to download the video and perform more advanced processing in software like AutoStakkert, RegiStax, WaveSharp, or AstroSurface. Let me show you. Below are three photos, one snapshot using the photo option and one stacked image after stacking and sharpening about 85% of the RAW frames in AutoStakkert and Photoshop, and one adjusted color image in Photoshop.
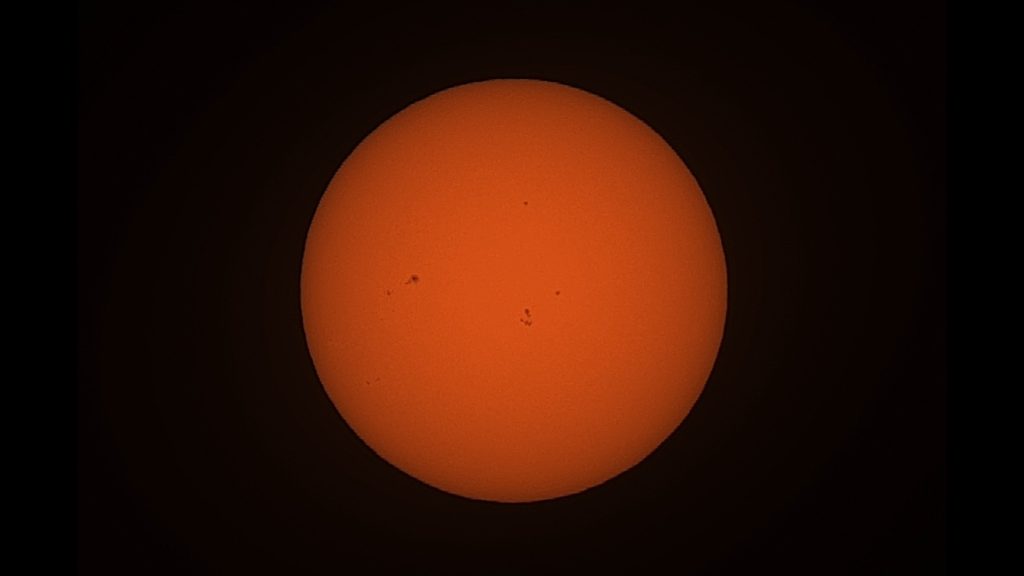

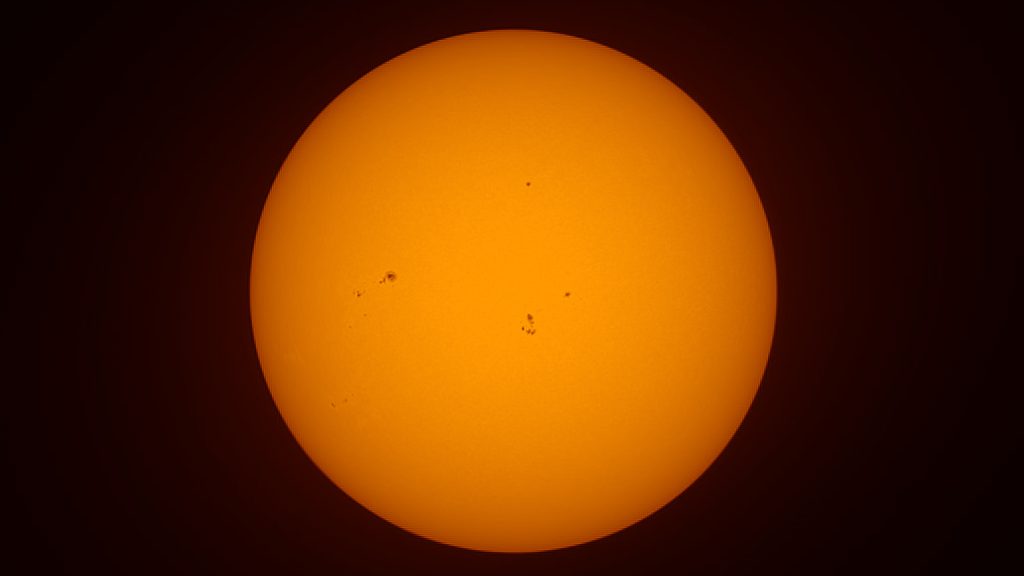
By default, the Sun is white, but the Seestar app applies an orange color tint, which I actually like—especially since I’m Dutch, and orange is our national color. That said, I personally prefer the Sun with a more yellowish tone, so I adjusted it in Photoshop.
All in all, the Sun is very easy to observe and capture with the S30 Pro, and it delivers some surprisingly decent videos and photos—especially given the tiny form factor of the telescope.
Lunar Imaging
I had two clear and cold nights to test the telescope, which I placed on my rooftop. I’m imaging from an urban, light-polluted sky, around Bortle 7. The winds were also quite cold and strong on both nights, around Beaufort 4.
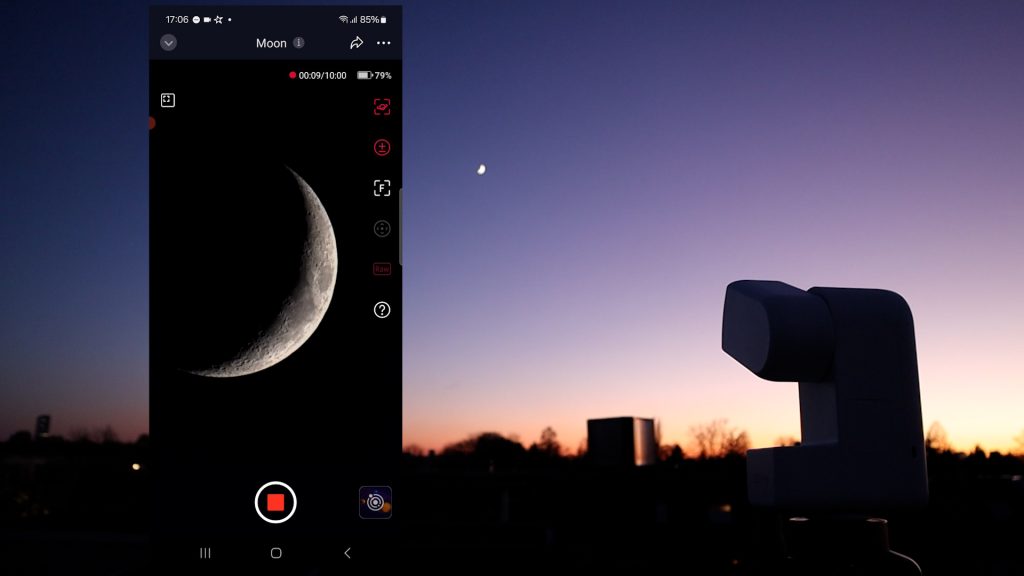
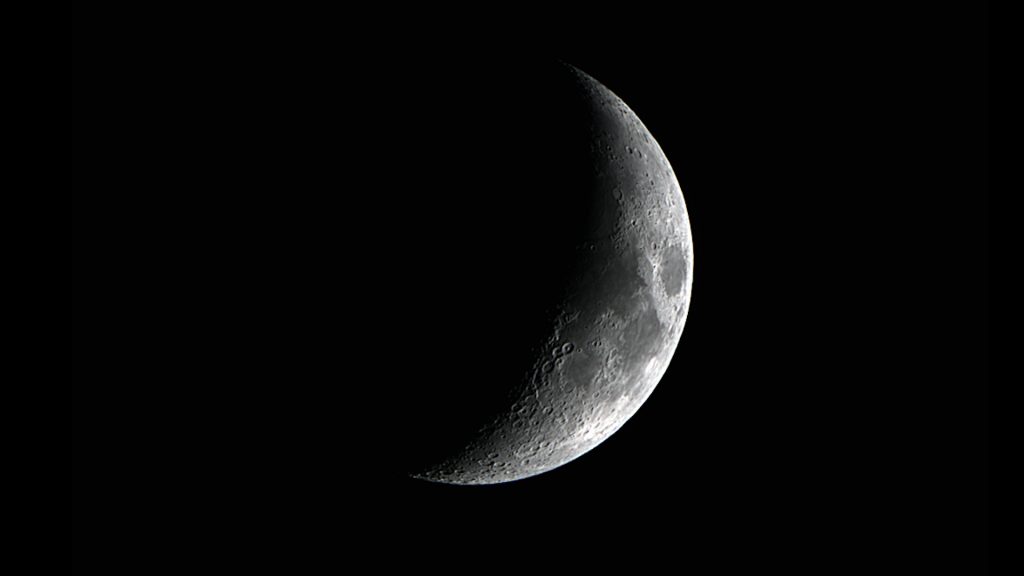
I spotted the crescent Moon at twilight, which was a great opportunity to fire up the Seestar app and capture the moon. I selected the moon in Solar System mode and I slewed the telescope to the Moon using the joystick feature, similar to how I pointed the telescope at the Sun earlier. I first used the wide view to locate the Moon in the evening sky, then switched to the tele view, where I enabled tracking and centered the Moon in the frame.I also used the autofocus feature to focus on the moon. Note that the features to view and capture the moon are exactly similar to the features to capture the Sun as already discussed above.
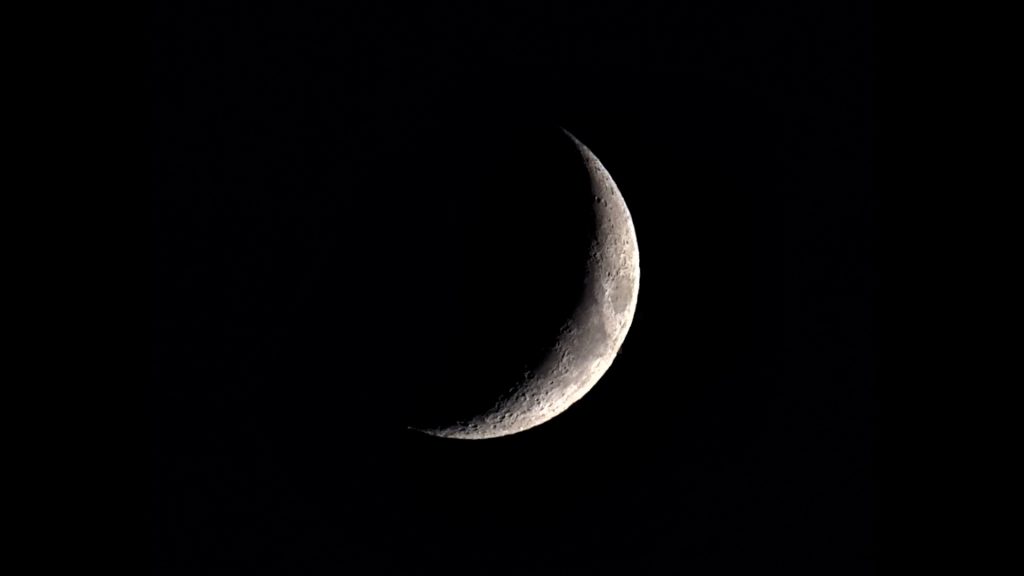
I noticed that the crescent Moon was a bit bright, so I played around with lowering the exposure and gain settings until I was satisfied and could clearly see the craters on the Moon. I snapped a jpeg photo of the Moon in Photo mode, which was immediately available on my smartphone.
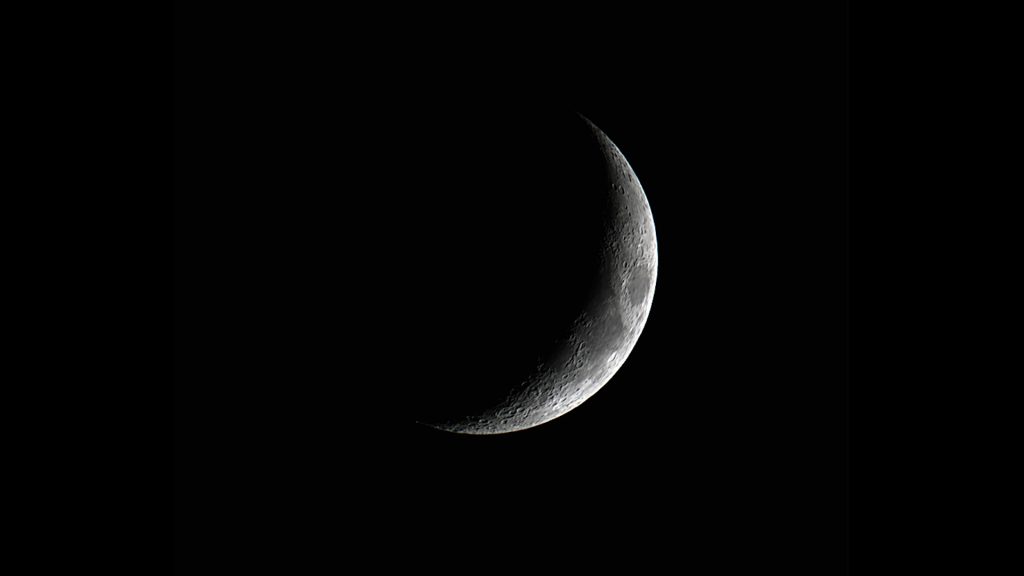
I also captured the Moon in Video mode by recording two 90-second videos in MP4 and AVI RAWformat. In addition, I captured a RAW AVI video of the Moon, which I processed in AutoStakkert and Photoshop after transferring the file to my computer using a USB-C cable. The MP4 video file was about 50 MB, while the AVI file was roughly 3.5 GB—similar to capturing the Sun, with both videos recording at 20 fps. Here’s an unprocessed photo and a stacked and processed photo of the moon from the AVI RAW video I took that night, as well as processed image of the Moon I took during my second imaging night. Not bad at all for a tiny, form-factor telescope like the S30 Pro.
EQ Mode and Remote Control
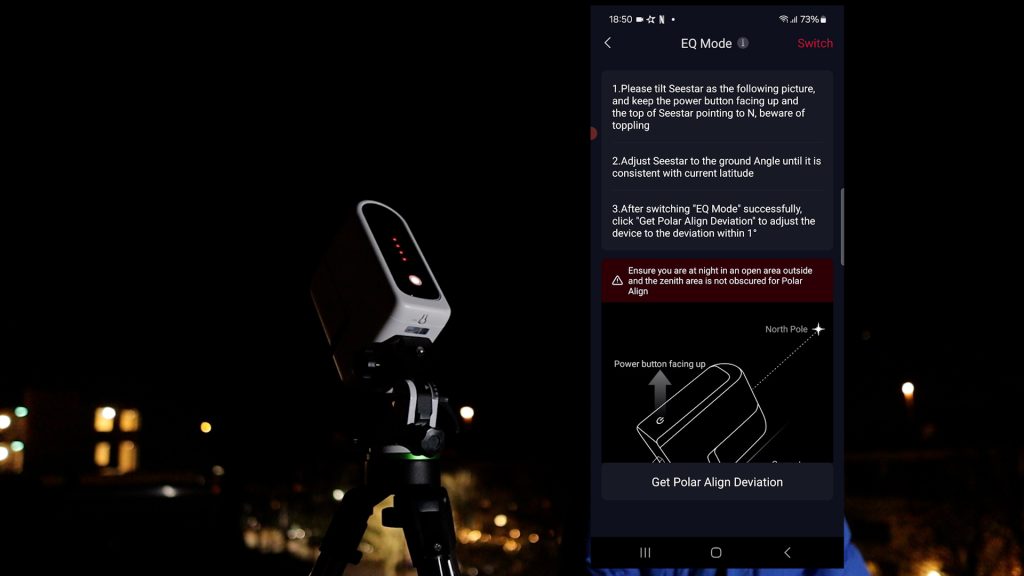
As night fell, I wanted to capture some well-known deep-sky objects. To do that properly, I switched the S30 Pro into EQ mode by placing an extra wedge between the telescope and the tripod. Note that a wedge isn’t included with the telescope, I used my Skywatcher EQ wedge.
By using the wedge, the telescope aligns with Earth’scelestial pole, allowing it to better track the stars as they move across the sky caused by the Earth’s rotation. This makes it possible to use much longer exposures—up to 60 seconds—so the camera can collect more light and produce cleaner, better images of deep sky objects. Without the wedge, exposure times on the S30 pro are limited to about 10 seconds per image.
I placed the wedge on the tripod and mounted the S30 Pro on top, with the telescope’s power button facing upward and the telescope pointed toward the north celestial pole with my wedge angle at 52 degrees, which matches my latitude. My red nose is proof of how cold it was that night, with a very cold wind coming from the northeast.
After positioning the telescope, I opened the Advanced Features menu, tapped on Mount Mode, switched to EQ mode using the toggle in the top-right corner, and then tapped Get Deviation. The S30 Pro takes about a minute to determine its position, and the app clearly shows how to adjust the telescope up or down, and left or right, by using the bolts on the wedge. Normally, it’s recommended to repeat the polar alignment procedure, but it was so cold that I decided the first alignment was good enough. I quickly left my freezing rooftop and went back inside to my warm and cozy house.

The SkyWatcher EQ Wedge is available at Agena Astro (USA/WW), High Point (USA/WW), and Astroshop (EU/WW).
The Wi-Fi connection works reliably up to about 10 meters, but you can also connect Seestar telescopes to your home Wi-Fi network using Station Mode to control the Seestar S30 Pro anywhere inside your home, so I did that and could control the Seestar throughout my home network, which is a great feature, especially during cold nights like this one.
Deep Sky Objects
– native FOV, without light pollution filter
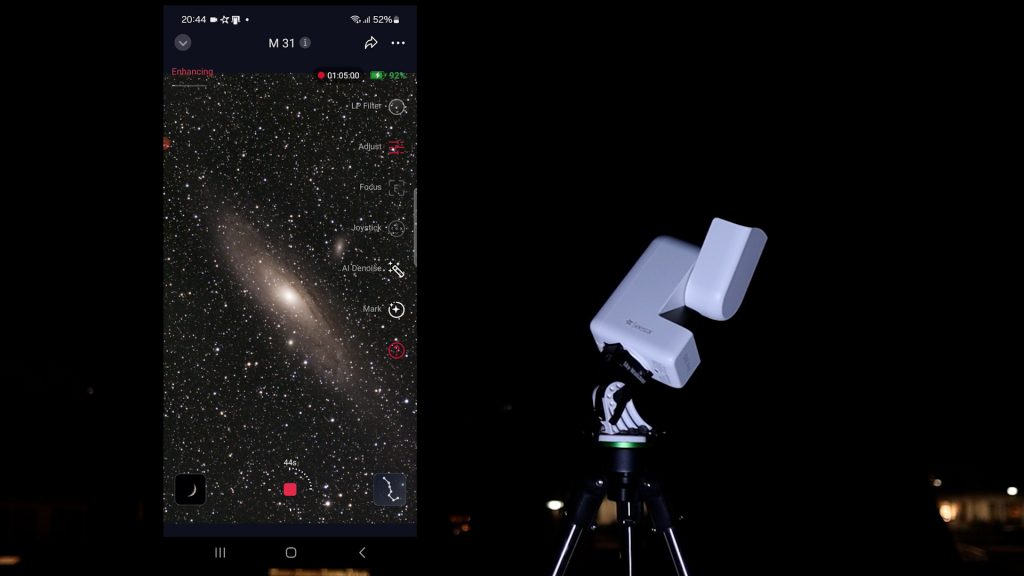
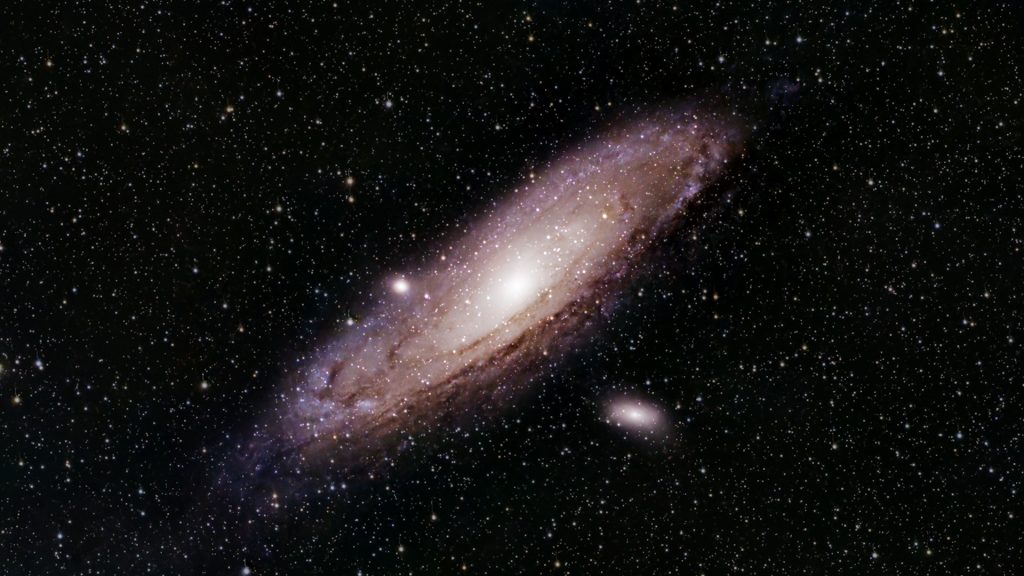
Back inside, I switched to Stargazing Mode and selected M31, the andromeda galaxy which is our closest neighboring spiral galaxy, located about 2.5 million light-years away. Coincidentally, it was almost directly overhead near the zenith that night, which meant less light pollution and atmospheric disturbance to worry about.
The Seestar S30 began taking 10-second photos of M31. For those who are new to astrophotography, stacking is a process in which each photo is combined with the previous ones to increase the so-called signal-to-noise ratio. In practice, this means that each stacked photo adds more light from the faint object you’re trying to capture, which increases the visibility and detail in the final image.
Because I put the telescope in EQ mode, I stopped the automatic 10s capture, tapped on the three dots in the top-right corner, and adjusted the exposure time to the maximum of 60 seconds. Note that you can also enable Save each frame, which stores every individual photo. This is great if you want to download and stack the images yourself using your own software—for example, to stack only the best frames without satellite or airplane trails. You can also switch to fullscreen mode, which hides the menu so you can enjoy watching the object being captured without distractions.
The menu for deep-sky imaging—or Stargazing, as ZWO calls it—is very easy to use. If you tap on Adjust, you can perform some basic editing, such as dynamic background extraction and adjusting the brightness, contrast, and saturation levels of your stacked image.
There’s also an AI denoise option to reduce noise in the image, and you can rotate and download the edited result once you’re satisfied. So far, I’ve mostly used expensive software on my PC to process deep-sky objects, such as PixInsight and Photoshop, so it’s great to see that some of these basic—and even more advanced—editing features are now also available in the Seestar app.
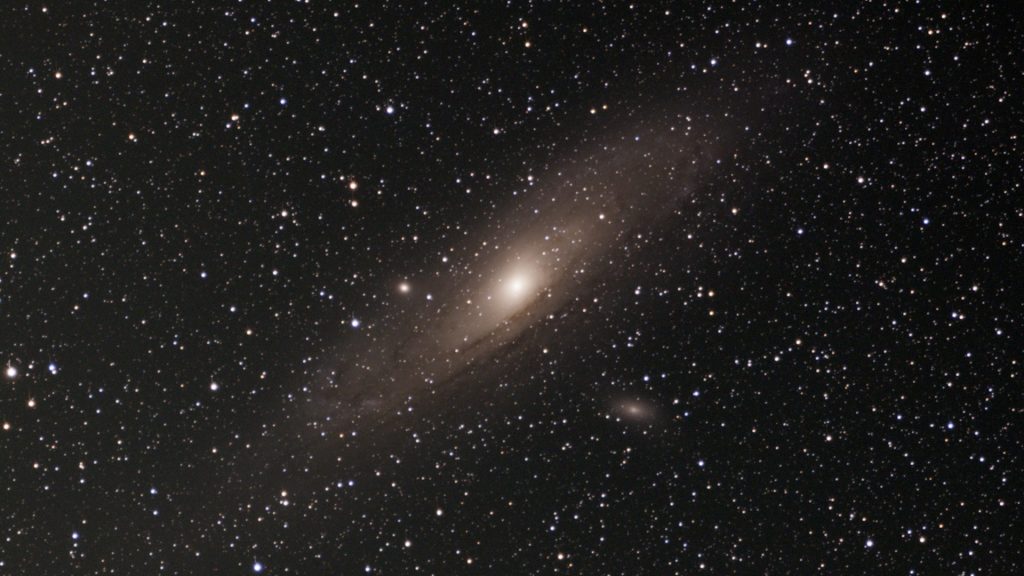
I should note that M31 fits comfortably within the native field of view of the Seestar S30 Pro, thanks to its wide coverage. With the Seestar S30 or S50, capturing the full galaxy would require a mosaic, which I’ll come back to later. I imaged the Andromeda Galaxy for roughly one hour. Despite the strong winds that night, the stacking process worked reliably: about 80% of the individual frames were accepted, with roughly one in five rejected, likely due to wind gusts causing slight star trailing during the 60-second exposures.
Here is the unedited stacked image straight out of the Seestar S30 Pro, and my processed version after downloading the data and processing it in PixInsight.
Over the course of two nights, I captured several objects, spending roughly one to one and a half hours on each. The images below were all taken using the native field of view of the Seestar S30 Pro, without the light pollution filter enabled.
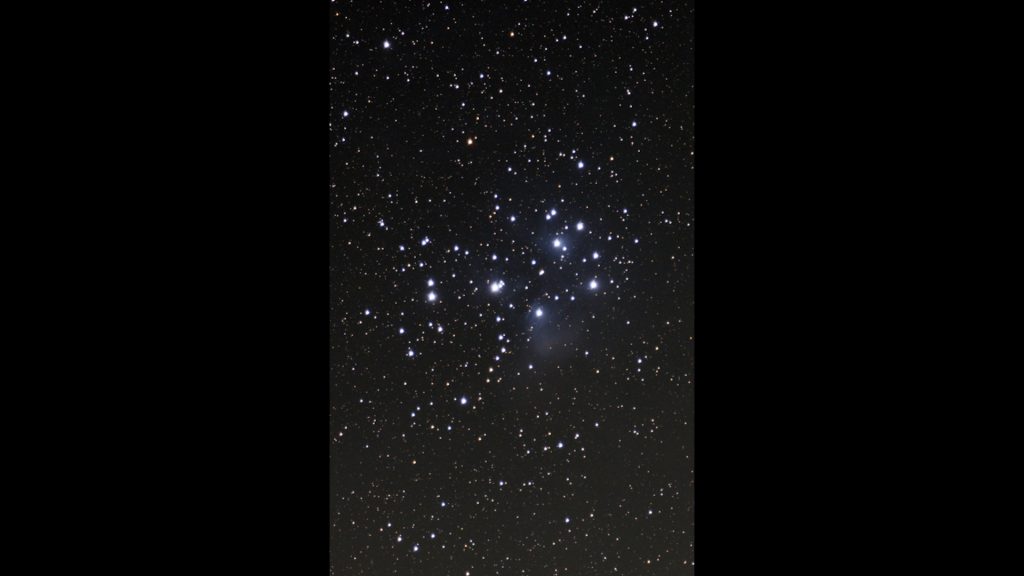
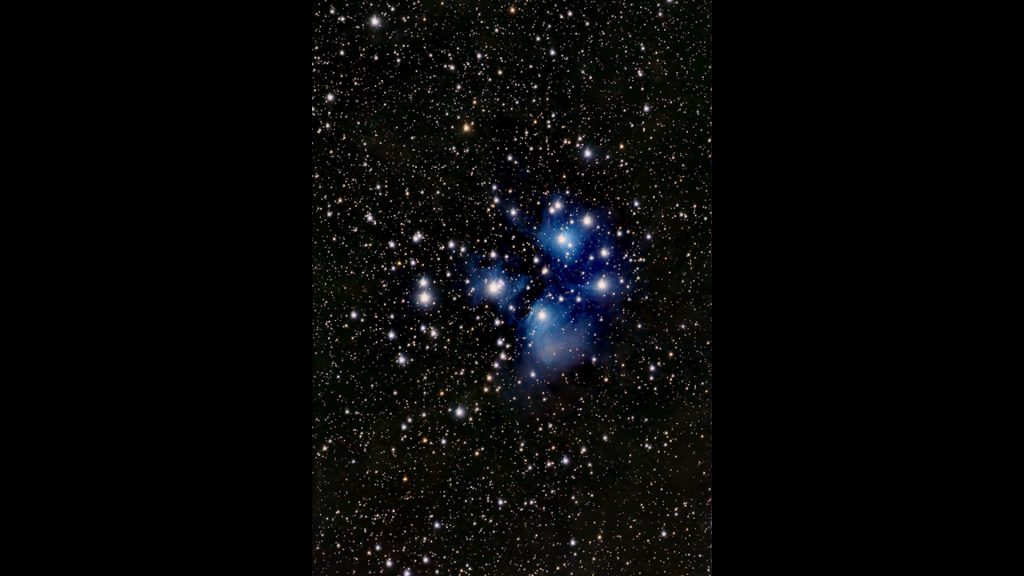
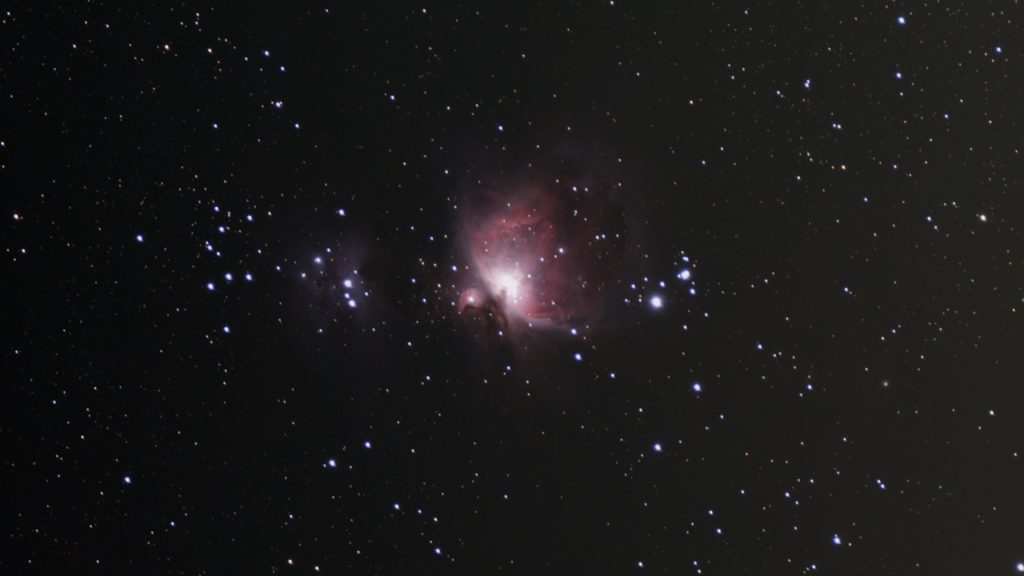
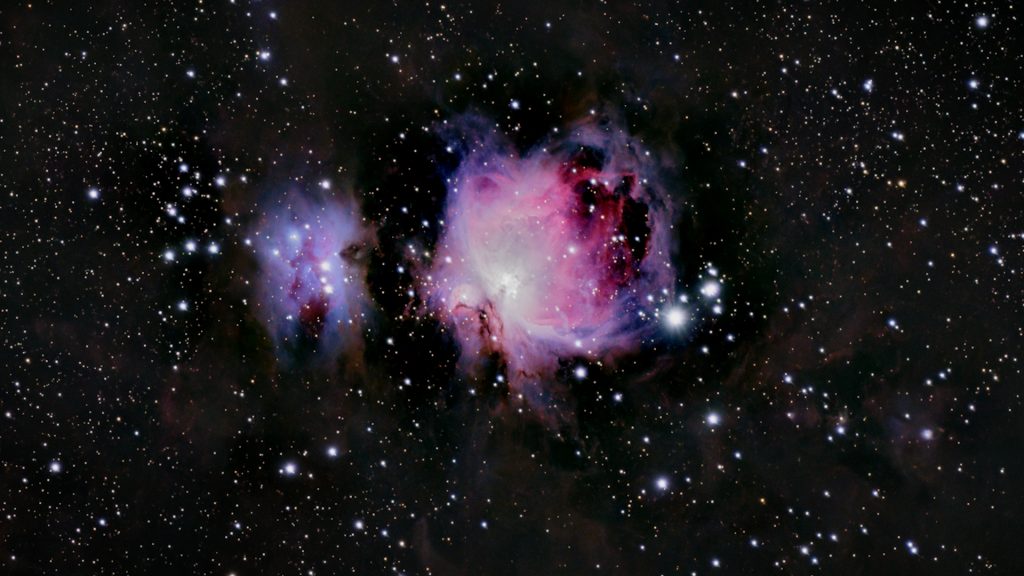
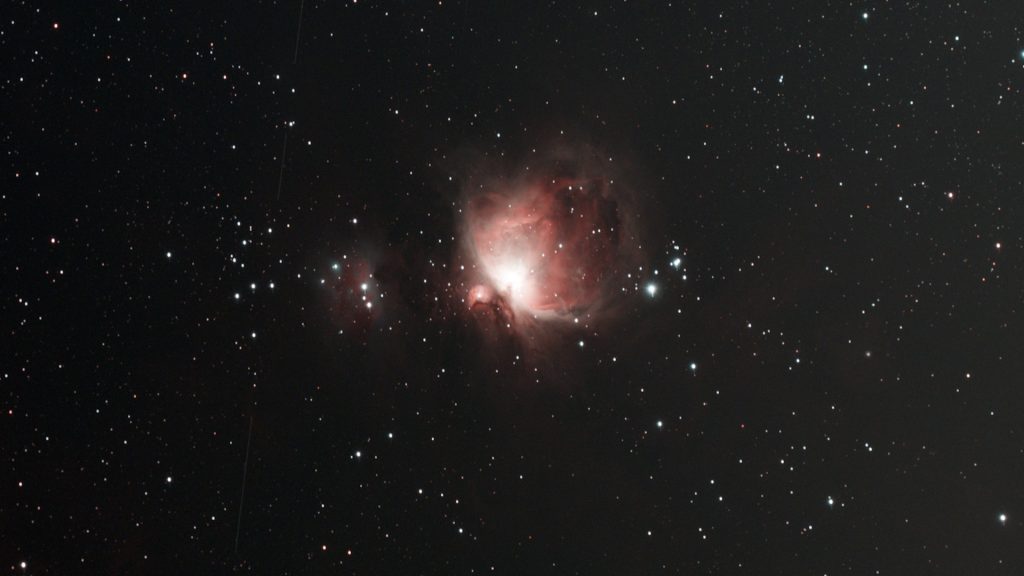
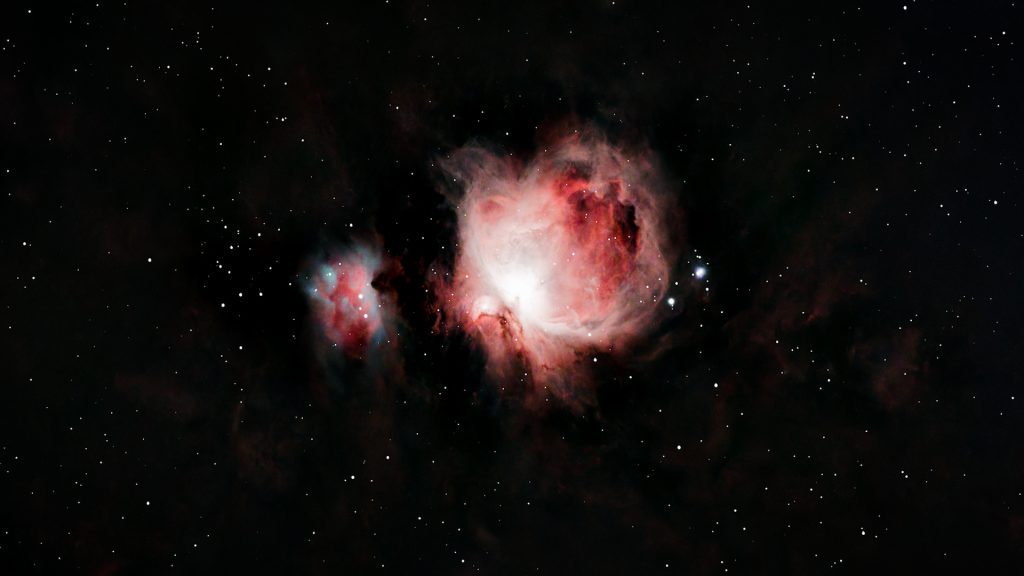
After Andromeda, I switched to M45, the Pleiades, and captured it for about one hour again. Above are the unedited stacked photo straight out of the S30 Pro in portrait mode, and the processed image using PixInsight. I then moved on to capture M42, the Orion Nebula, for about one hour, again without using the light pollution filter and just using the native field of view of the Seestar S30 Pro. Next to the Orion Nebula, you can also see the Running Man Nebula, which comfortably fits within the native field of view of the S30 Pro. Here are the unprocessed and stacked and processed images.
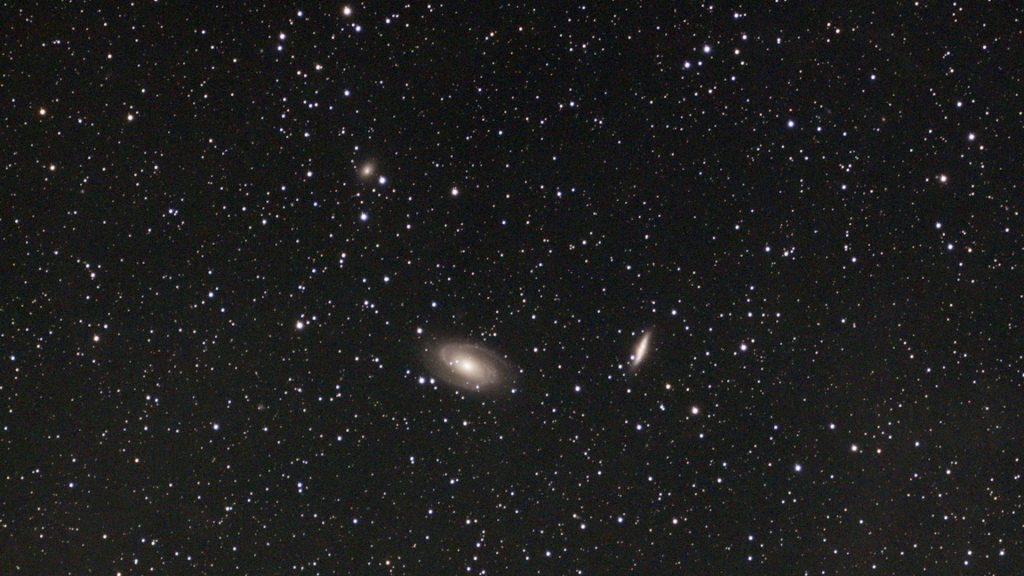
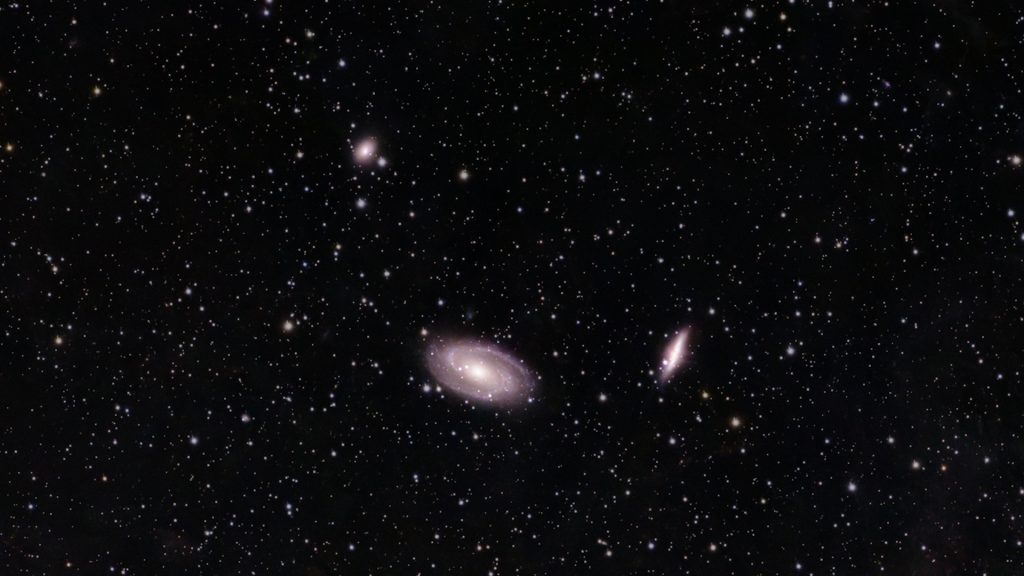
The S30 Pro does pretty well on larger galaxies and nebulae—but what about smaller deep-sky objects, such as distant galaxies? I decided to capture Bode’s Galaxies, M81 and M82, which are located about 12 million light-years away. The S30 Pro had no trouble capturing them, as you can see, but they do appear a bit small in the field of view. On the upside, this wide field of view also revealed three galaxies in a single frame: Messier 81, Messier 82, and NGC 3077—also known as the Garland Galaxy—which was pretty awesome to see.
– native FOV, with light pollution filter
Next, I captured several objects using the native field of view of the Seestar S30 Pro, this time with the light pollution filter enabled. Each stacked image represents roughly one hour of total exposure. Below is the Orion Nebula again, now captured with the light pollution filter, which can be toggled in the top-right corner of the capture screen..
Here’s the unprocessed stacked image straight out of the S30 Pro and my processed version. Notice that the stars appear smaller, as the light pollution filter blocks some of their light, while the nebula looks more detailed. This is because the light pollution filter captures Hα and O III emission lines in the red and blue parts of the spectrum while blocking most other wavelengths. This makes it especially effective for capturing emission nebulae, which emit strongly in these regions.
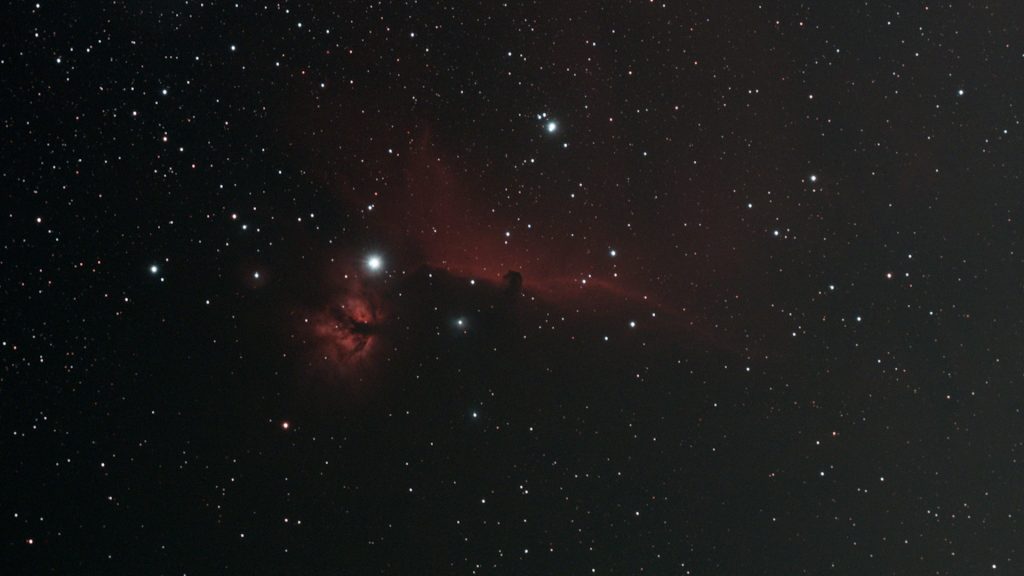
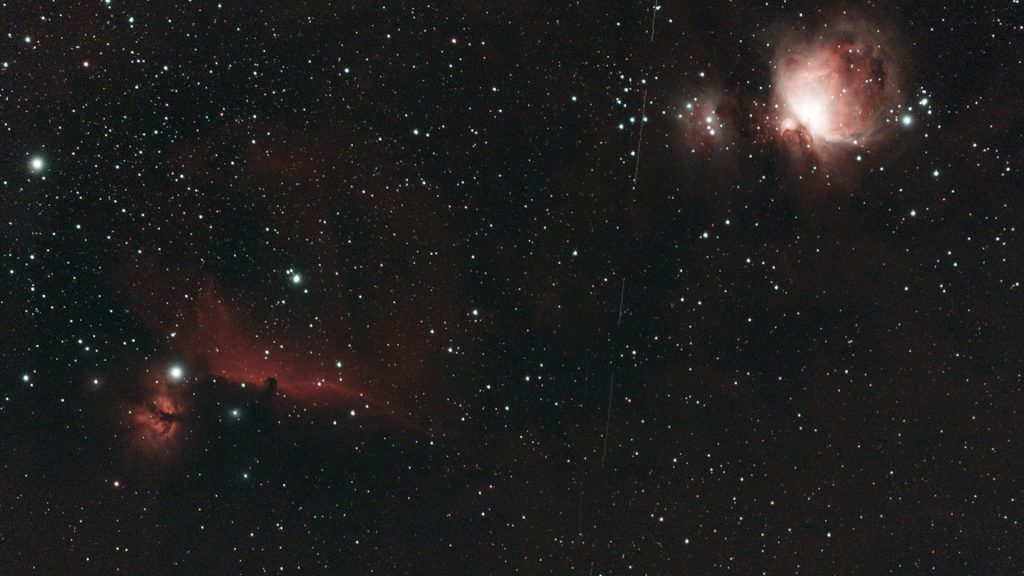
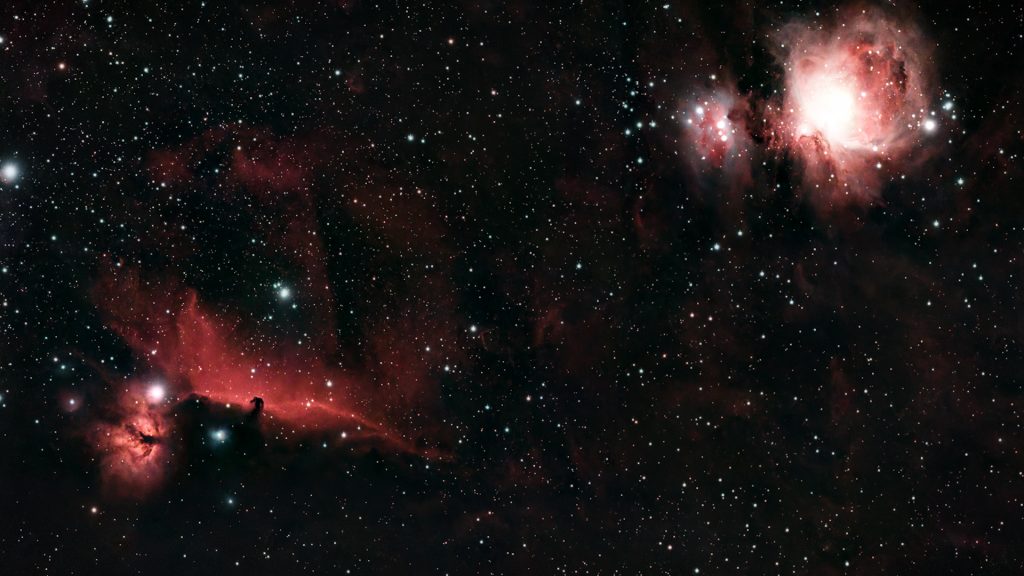
Near the Orion Nebula, you can find the Horsehead and Flame Nebulae, which I imaged next. The bright star in the frame is Alnitak, the leftmost star in Orion’s Belt. Here’s the unprocessed stacked image, and my processed version. Again, I’m really happy with the results, especially considering the relatively short total exposure time.
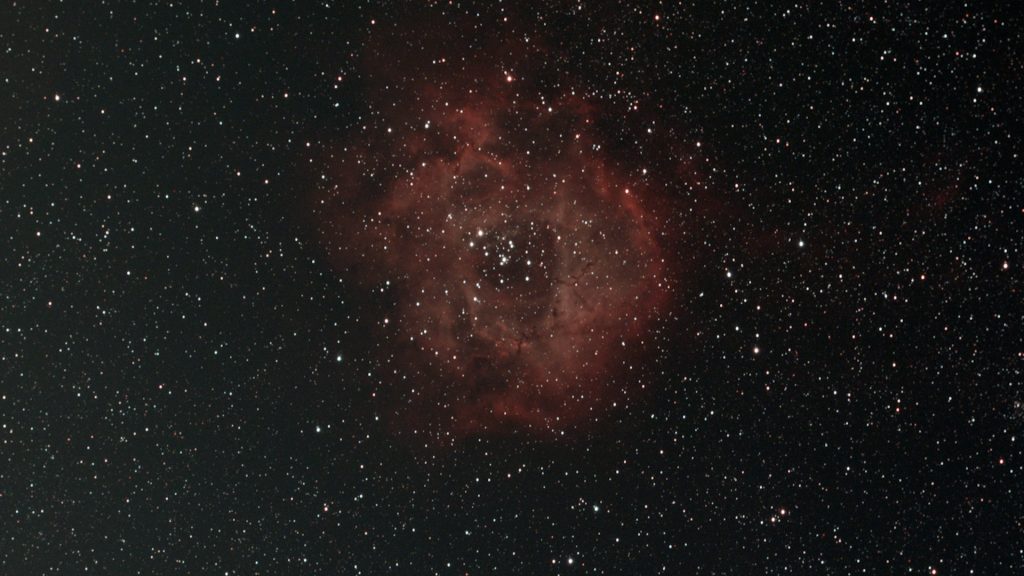
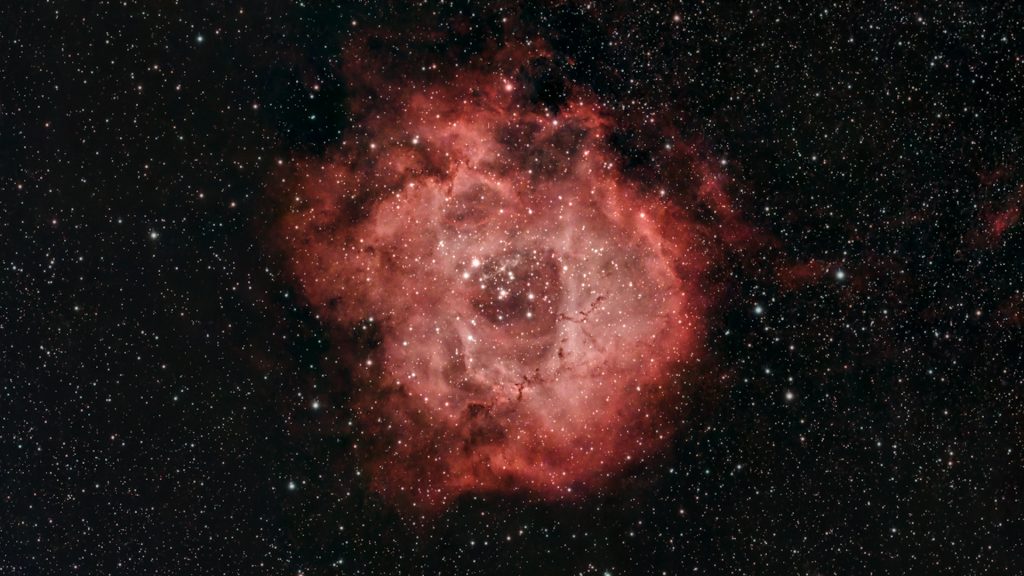
I also captured one of my other favorites, the Rosette Nebula, using the light pollution filter. The Rosette Nebula is a large emission nebula in the night sky—about three times the apparent size of the Moon—but it fit without any problem in the native field of view of the Seestar S30 Pro. Here’s the stacked image, and my processed version.
– DSO framing / mosaic feature tested
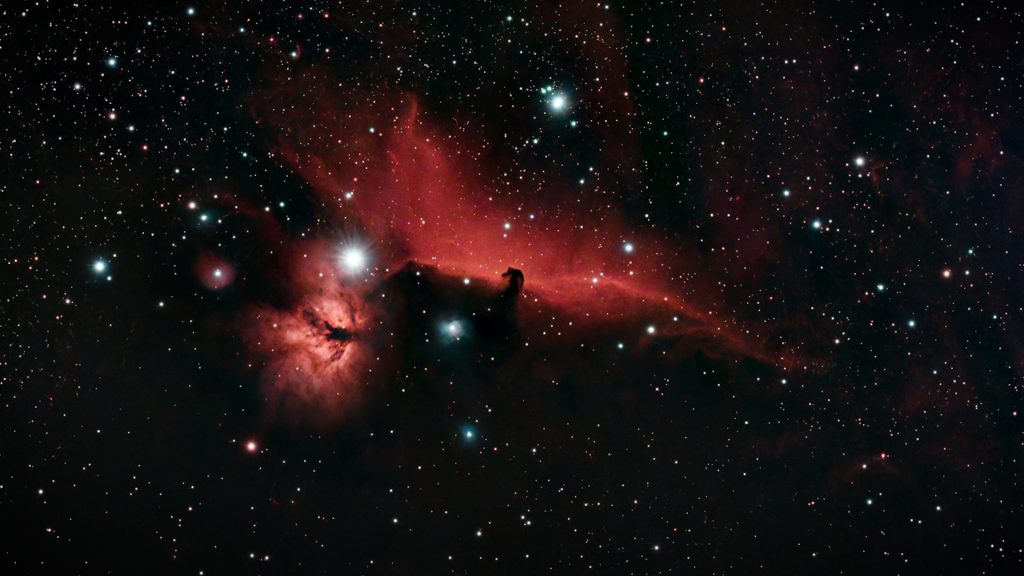
The Orion and Horsehead Nebulae are relatively close together, so I used mosaic mode to capture both in a single image. As it was getting late, I set this up using Plan Mode in the Seestar app, which allows you to schedule one or more objects and lets the telescope handle slewing and imaging automatically.
Although the Seestar S30 Pro already has a wide native field of view, mosaic mode can extend this further. In this case, I only needed to increase the field to about 1.5× to include both nebulae in the frame. Mosaic imaging does require more total exposure time, as multiple sections of the sky need to be captured and stitched together. While the app recommended around five hours, I limited the plan to about three hours due to clouds and mist.
Strong winds affected tracking that night, resulting in a usable total exposure of roughly one and a half hours. Below is the stacked mosaic image straight out of the Seestar S30 Pro and my processed version.
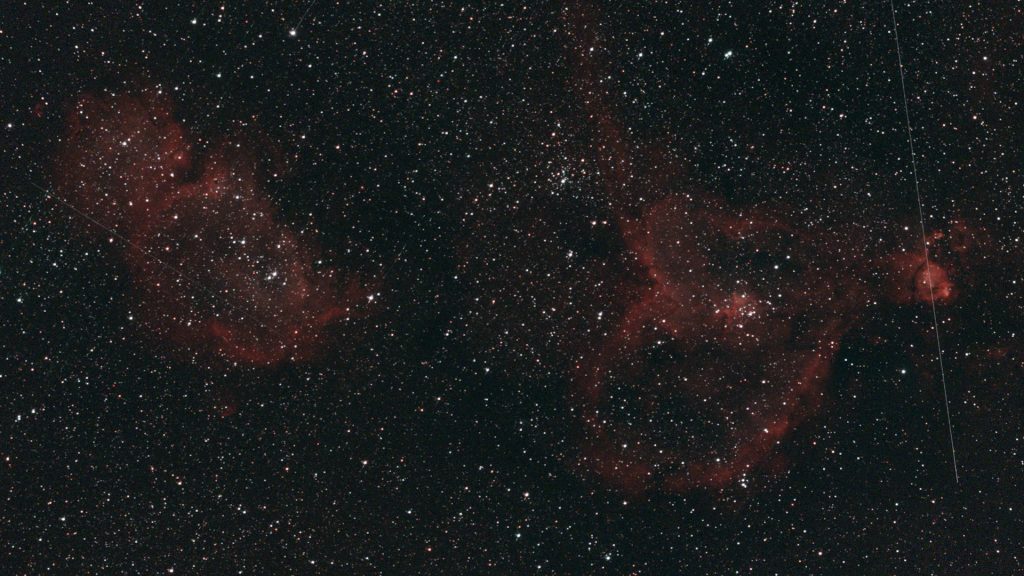
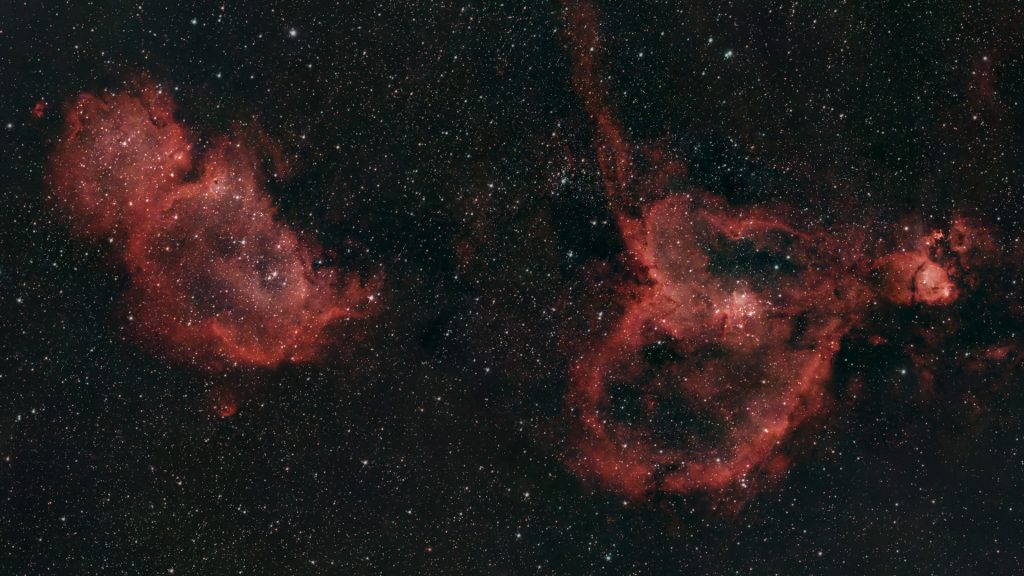
I also attempted a mosaic of the Heart and Soul Nebulae. Despite their large apparent size, both fit within a single framed mosaic using the same approach. The total capture time was again about one and a half hours. Below is the stacked image and my processed version.
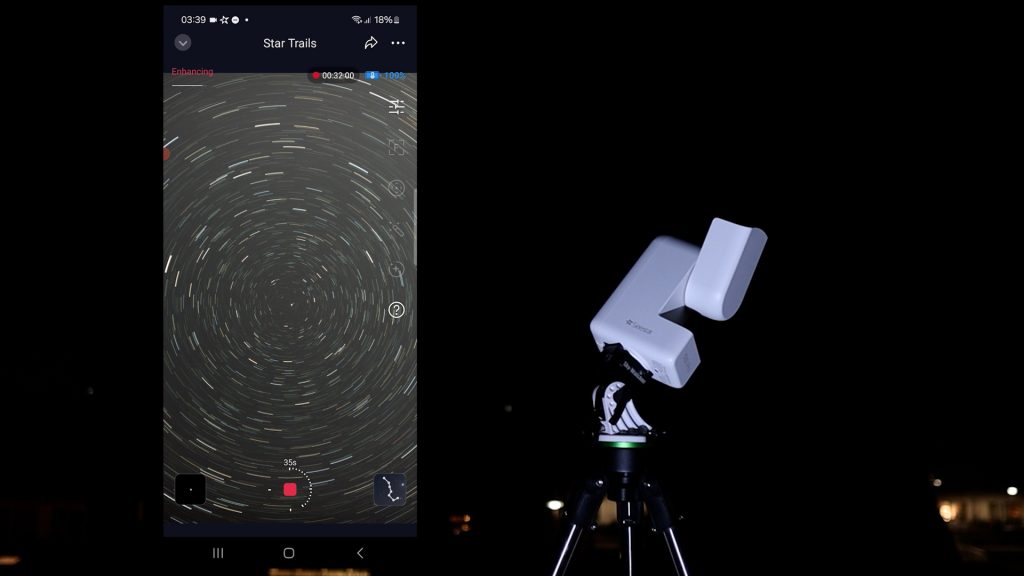
New Milky Way Function
You can now use a new Milky Way mode in the app, which allows you to capture images using the wide-field lens as well—and that’s awesome. In Milky Way mode, I selected the constellation Orion, and the S30 Pro started taking 60-second exposures with the wide-field lens. You can use AI denoise, along with brightness, contrast, and saturation adjustments, to edit the image. Even under my light-polluted urban sky, I could actually see the Orion and Horsehead Nebulae while editing the photo.
There’s also a star trail option in Milky Way mode, so I used that while pointing the telescope toward the North Celestial Pole, which resulted in this nice star-trail image.
Planetary imaging
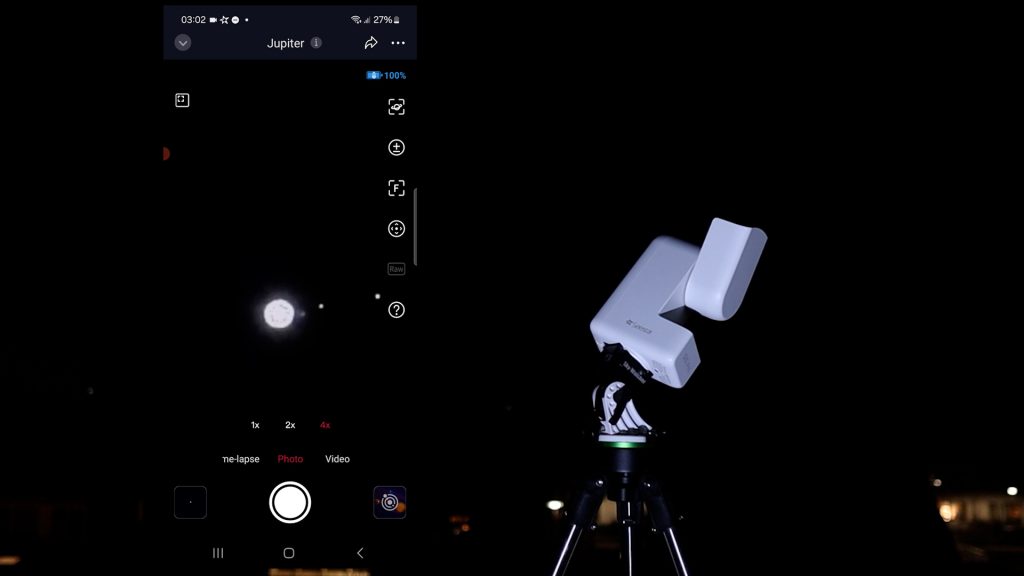
Finally, I do want to emphasize that this is a telescope designed for wide-field stargazing and astrophotography. As such, it’s not suited for capturing detailed images of the planets—you need a much larger telescope for that. Here’s Jupiter, the largest planet in the Solar System. Unfortunately, from Earth, it appears very small, only about 3% the apparent size of the Moon, so it looks like this. You can see the four Galilean moons around Jupiter, which is nice, but you can’t make out any surface details on the planet itself.
FINAL VERDICT
You may have noticed that I’ve been using phrases like very decent and quite good, especially given the total exposure time. So let me drop my European reservations and just say it: this smart telescope is pretty freaking awesome. You can take this smart telescope anywhere and set it up in about five minutes. It has a wide field of view and an excellent-quality telescope and camera for capturing wide-field images of the night sky. It offers in-app noise reduction and editing options, and the seestar app itself is very straightforward and easy to use.
You can even connect it to your home Wi-Fi network and stay inside while enjoying live images from the Seestar S30 Pro. All of this for around $600 makes this telescope one of the most budget-friendly, portable, and fun smart telescopes on the amateur astrophotography market today.
Clear skies!
@Wido Oerlemans.
The Seestar S30 Pro Smart Telescope is available at ZWO (vendor, worldwide), High Point Scientific (USA/WW), Agena Astro (USA/WW), and Astroshop (EU/WW)
One Reply to “Seestar S30 Pro Review & Tutorial”