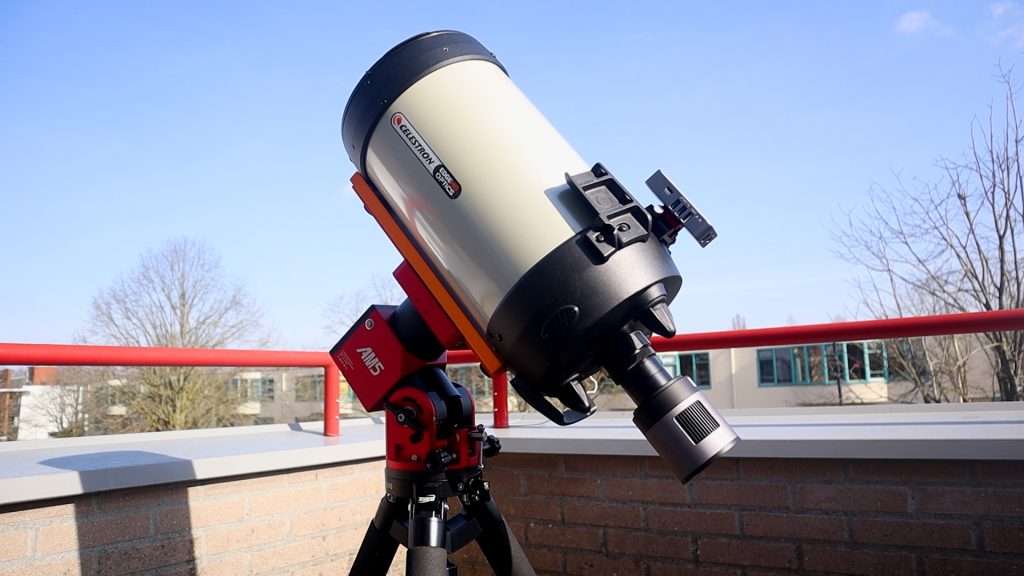
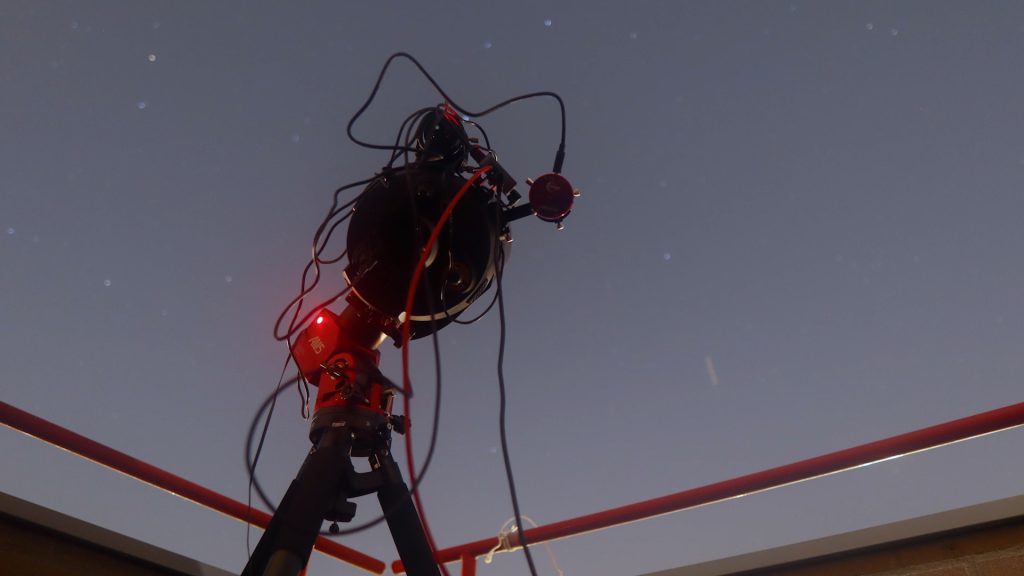
After weeks of snow and cold, cloudy weather, we finally have clear skies again here in the Netherlands! So I took out my Edge HD 8″ to test the new SC571CC camera and the SV241 Power Hub, which SVbony kindly sent me for an independent and unpaid review.
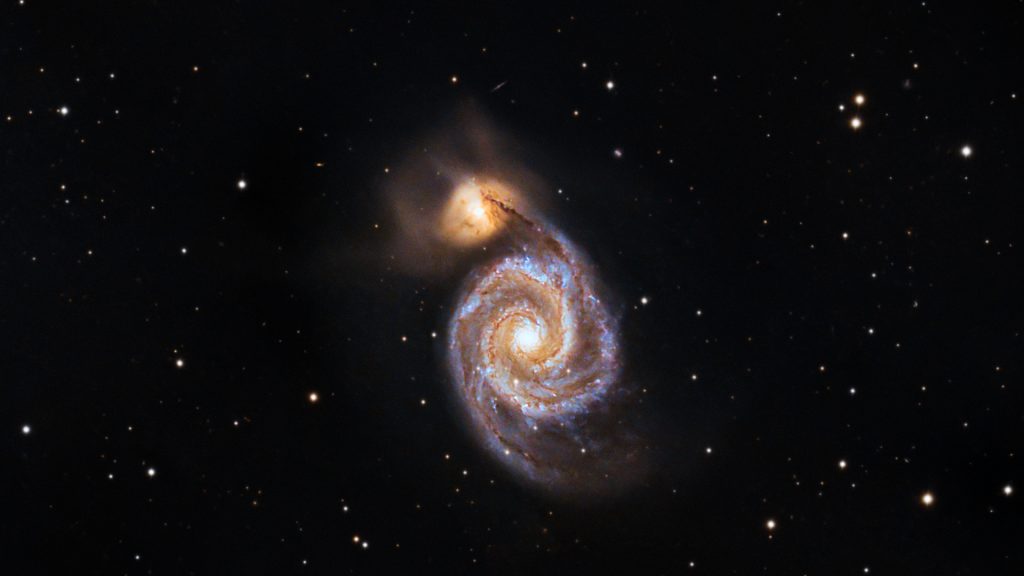
It’s nearly spring, so time for some galaxy hunting! At the time of testing, it was late February, with a half Moon lighting up the sky and Jupiter nearby. My plan was to attach the new SC571CC camera and SV241 Power Hub from SVbony to my Celestron Edge HD 8″ telescope and slew toward Ursa Major — the Big Dipper — to photograph one of the most majestic galaxies in the night sky: Messier 51, the Whirlpool Galaxy.
About 25 million light-years away, M51 is a face-on spiral galaxy, meaning we can clearly see its sweeping spiral arms in great detail. It’s interacting with its smaller companion galaxy, NGC 5195, and that gravitational dance is what shapes its dramatic structure.
M51 is home to roughly 100 billion stars, which is comparable to our own Milky Way. It’s an incredible sight to capture — even under a bright half Moon.
A Closer Look at the SVBONY SC571CC (IMX571) Camera & SV241 Power Hub
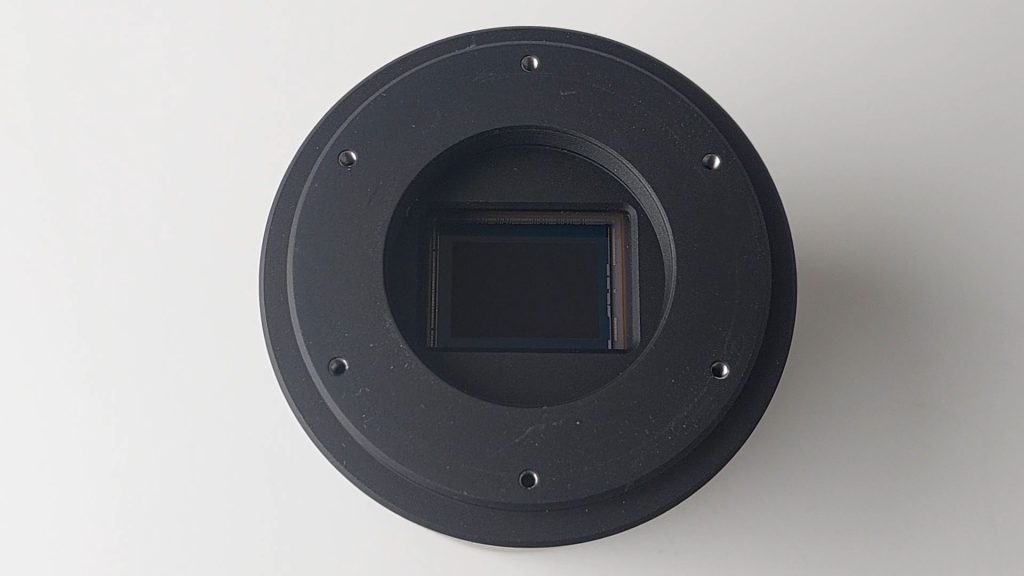
The SVBONY SC571CC features the well-known Sony IMX571 CMOS color sensor, delivering a generous 26-megapixel APS-C–sized field of view of the night sky. With 3.76-micron pixels and a 16-bit ADC, the camera offers excellent dynamic range and the ability to capture fine structural detail in galaxies, nebulae, and star clusters.
To ensure reliable performance during long imaging sessions, the SC571CC includes 512MB of internal DDR memory. This buffer helps stabilize data transfer and minimizes the risk of dropped frames when shooting extended exposures.
Cooling & Build Quality
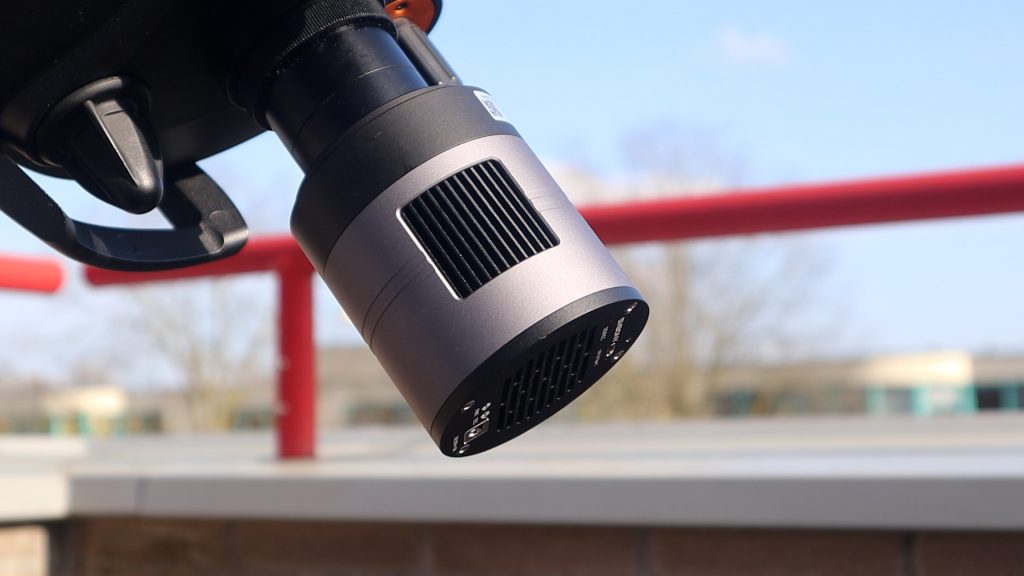
For deep-sky astrophotography, temperature regulation is essential. The SC571CC is equipped with a dual-stage TEC cooling system capable of lowering the sensor temperature by approximately 35 to 42 degrees Celsius below ambient. This significantly reduces thermal noise during long exposures, resulting in cleaner calibration and improved signal-to-noise ratios.
The camera also features anti-reflective coated protective glass to help reduce unwanted reflections. Weighing just 557 grams, it remains relatively lightweight — a welcome advantage for balance-sensitive setups.
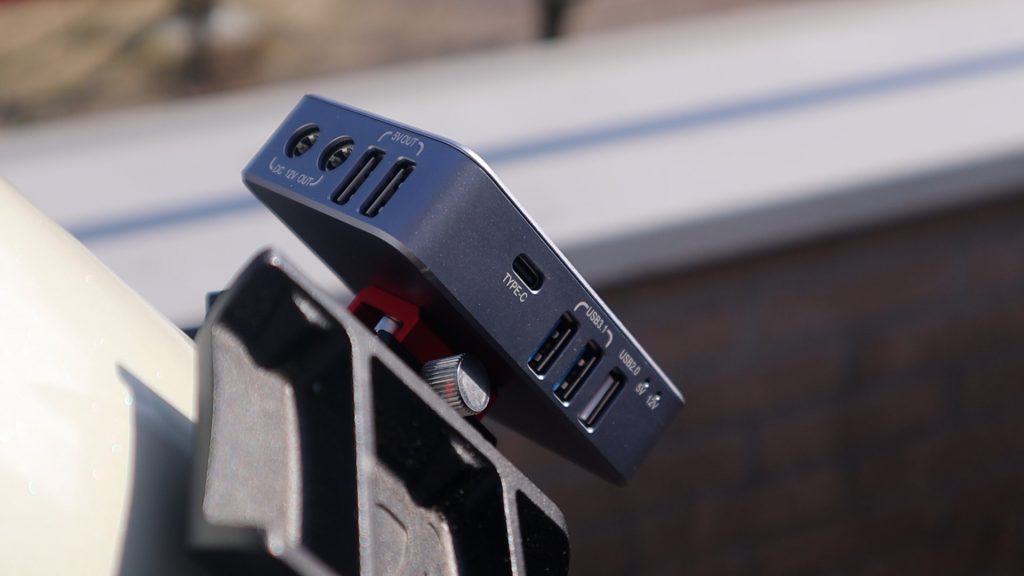
In terms of connectivity, the SC571 offers a USB-C output for fast and stable data transfer, along with a standard 12-volt input to power both the electronics and the cooling system.

Streamlined Power Management with the SV241 Power Hub
The SV241 Power Hub is designed to complement the SC571CC camera and simplify cable management. It provides six 12-volt DC outputs and 2 USB 2.0 outputs, allowing you to power accessories such as dew heaters, electronic focusers, and other imaging gear.
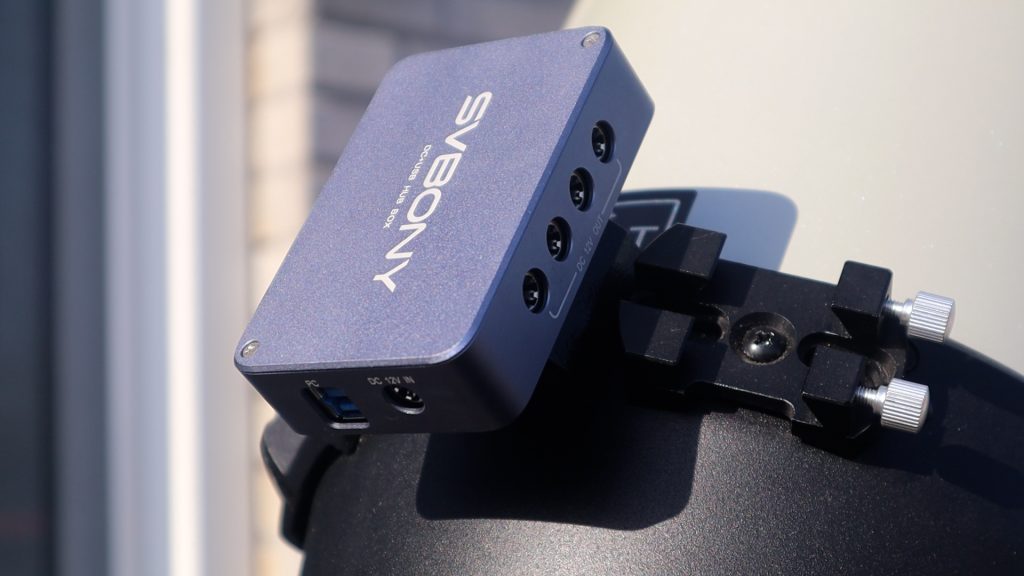
For data connectivity, the hub includes:
- Two USB 3.1 ports — ideal for high-speed imaging cameras
- One USB 2.0 port – ideal for your guidecam and/or mount
- An additional USB Type-C output
- A USB-B port for connecting the hub to your laptop or PC (via USB-B to USB-A cable)

The result is a much cleaner and more organized imaging setup, reducing cable clutter and potential connection issues during long nights under the stars.
During my test, I connected the SC571CC (main imaging camera), my guide scope, my AM5 mount, and some dew heaters to the power hub, and ran a single USB cable to my mini PC. Everything worked perfectly fine. Importantly, you simply need to power on the hub and it works. There is an additional app available to regulate the power output, but I didn’t use it since I have external power controls on my dew heaters. However, I initially ran into an issue powering on the hub, as I needed to purchase a 2.5mm to 2.1mm adapter plug in order to use my regular 12V power cables.
Important Note on Power Input
I contacted SVBONY directly to clarify the power input specification. They confirmed that the current Creator version of the SV241 Power Hub still uses a 2.5mm power input. However, future production runs are expected to switch to a 2.1mm input. At the time of writing, both the official website and the product manual still list the input as 2.5mm. To avoid compatibility issues, I recommend contacting SVBONY directly for the most up-to-date information before purchasing.
SVBONY 9th Anniversary Sale
If you’re reading this between March and April 10th, 2026, SVBONY is celebrating its 9th Anniversary. During this promotional period, many products will be available at significant discounts — up to 50% off. Here are my affiliate links to the camera with my personal discount code to receive an additional $100 off your purchase:
Exclusive discount code: WIDO571CC (Save $100)
Capture Experience in the Field
I had about four hours of clear skies before the clouds rolled back in, so I had to move quickly.
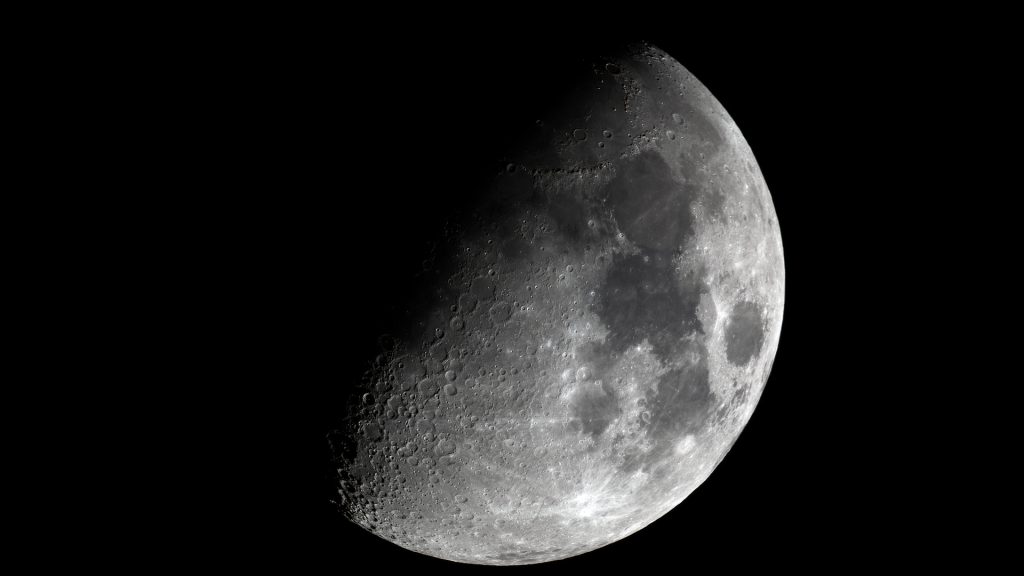
I fired up sharpcap and started with the Moon. It was sitting beautifully in the sky and framed perfectly at the native 2030mm focal length of my Edge HD 8″. I captured 200 frames and stacked them for a detailed lunar image. The sharpness and contrast looked very promising right away.
After that, I properly polar aligned my mount and slewed the telescope to M51, the Whirlpool Galaxy. I spent about three hours imaging with the SC571 color camera cooled to -15°C, paired with my Edge HD 8” at native focal length — no reducer and no filters.
My ZWO AM5 mount was well polar aligned and guiding between 0.4 and 0.6 arcseconds RMS. I shot 300-second exposures under Bortle 7 skies, even with a half Moon present.
Inspecting a single 5-minute sub (16-bit FITS, gain 100, high gain mode, 2×2 binning), the stars looked good. There’s a tiny bit of elongation, but at 2000mm focal length and 5-minute exposures, that’s completely acceptable. The brightest star shows a slight pinch — a small reminder that I should fine-tune collimation on the Edge HD — but nothing concerning.And importantly: zero amp glow.
The power hub also performed flawlessly. I connected the camera, guide scope, AM5 mount, and dew heaters, ran one USB cable to my mini PC, powered it on — and everything just worked. Clean setup, no issues.
Final Images
The stacked and processed Moon image turned out beautifully detailed. Craters are sharp, especially along the terminator where the half Moon creates dramatic shadows.
For M51, even a single 5-minute exposure already showed solid structure. Under an unlinked stretch, the stars remain nicely shaped and tracking performance held up well at this long focal length. The data looked clean, cooling performed well, and no amp glow. I ended up stacking and processing 36×5-minute exposures in pixinsight and photoshop. Here are my first light images taken with the SC571CC:
Overall Thoughts
This wasn’t a perfect night. Half Moon. Bortle 7 skies. Only four hours before the clouds came back. And honestly… that’s real life astrophotography from the Netherlands. And that’s exactly why I’m impressed. Even under those conditions, the SC571CC delivered clean, detailed data. No amp glow. Solid cooling. Usable 5-minute subs at 2000mm focal length — which is not forgiving at all. That’s pushing things. And it held up.
The SV241 power hub just quietly did its job. And honestly, that’s what you want from something managing all your cables and power in the dark at 2 a.m. What I like most is this: even on a rushed night with mediocre skies, I came away with images I’m genuinely happy with. And that says a lot.
I’m looking forward to giving this setup another proper dark-sky run! Clear skies!