By Wido Oerlemans — June 23, 2025
As amateur astrophotographers, we spend countless nights capturing small patches of the night sky. Whether we’re using a modest APO refractor, a Newtonian reflector, or a Schmidt-Cassegrain telescope paired with a camera, we know how much effort it takes: aligning the mount, locating deep-sky objects, dialing in precise focus, guiding accurately, stacking long exposures—and of course, hoping the skies stay clear.
Now compare that to the Vera C. Rubin Observatory, which captures the entire visible night sky—over 18,000 square degrees—every 3 to 4 nights, automatically, using 15-second exposures! The first images were released today. This isn’t just another observatory—it’s the most powerful, automated deep-sky imaging system ever built! Think of it as the ultimate smart telescope, and it’s only just beginning its mission.
Imaging the Entire Sky in Just Days!
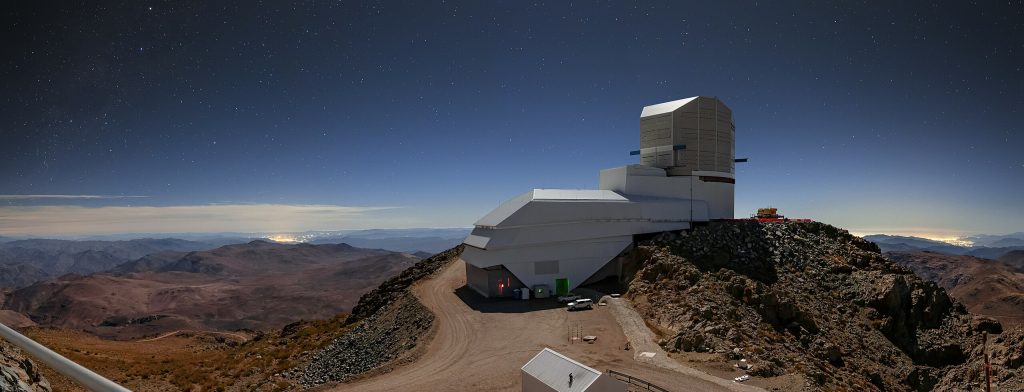
The Vera Rubin Observatory is located 2,700 meters above sea level on Cerro Pachón in Chile. It’s designed to capture the entire visible southern sky—about 18,000 square degrees—every few nights, continuously, for ten years.
For comparison: while we as amateurs might spend hours imaging a single nebula covering a couple of degrees in the night sky, Rubin captures 10 square degrees at once in 15-second exposures, repeating this every 30 seconds. It will image the full sky roughly every 3 to 4 nights, meaning that in under two weeks, every visible patch of sky above Chile is revisited multiple times. Let’s have some fun and compare Rubin to our our average mid-range amateur astrophotography setups to image deep sky objects 🙂
Rubin vs. Amateur Backyard Setups
| Spec | Vera Rubin Observatory | Amateur Setup (APS‑C sensor) |
|---|---|---|
| Aperture | 8.4 m | 50–300 mm (refractor/SCT) |
| Focal Length | ~10,300 mm | 250 mm – 2500 mm |
| F‑ratio | f/1.23 | f/2 – f/10 |
| Sensor Format | CCD (~64 cm plane) | CMOS APS‑C (23.5×15.7 mm) |
| Resolution | 3200 Mega Pixels | ~26 Mega Pixels |
| Pixel Size | 10 µm | ~3.76 µm |
| Field of View | 9.6 deg² | ~0.5°² – 3°² |
| Image Scale | 0.20"/pixel | ~ 0.5 – 3"/pixel |
| Exposure Time | 2×15 s per field | 10–600 s per image |
| Data per Night | ~60 TB | 10–50 GB typical |
World-Class Sky Conditions
Cerro Pachón offers exceptional seeing. The median astronomical seeing is around 0.67 arcseconds, with the best nights dipping below 0.5 arcseconds. For comparison, most of us deal with seeing between 1″ and 2″ in typical backyard conditions.
This means Rubin can achieve image sharpness that is only limited by the atmosphere, not by its optics. In professional terms, this is called seeing-limited performance: the telescope is operating so precisely that any blurring comes purely from atmospheric turbulence, not from flaws in the system.
Rubin’s image scale of 0.2 arcseconds per pixel might seem excessive given atmospheric seeing, but it’s intentional. It allows for precise measurements of galaxy shapes, star positions, and brightness changes. This approach is known as Nyquist oversampling: you capture more detail than the atmosphere allows so you can recover better results.
Not Adaptive Optics, but very smart…
Unlike some telescopes, Rubin does not use adaptive optics to correct atmospheric turbulence in real time. Instead, it uses a high-precision active optics system that continuously adjusts its mirror surfaces and alignments:
- Hexapods and actuators reshape the mirrors to correct for flexure and temperature changes
- Wavefront sensors in the camera monitor and feed back alignment errors
A Smart Telescope for Science at Scale
Rubin functions like the ultimate smart telescope! It handles:
- Scheduling: A real-time scheduler decides which sky patch to image based on weather and survey needs
- Rapid Imaging: Two 15-second exposures per field, then a fast slew to the next
- Automatic Calibration: Every frame is bias, dark, and flat corrected
- Plate Solving and Alignment: Instant astrometric matching for stacking
- Image Stacking: Nightly and long-term stacks are built from hundreds of exposures
- Difference Imaging: New images are compared to previous ones to detect any change
- Real-Time Alerts: Any supernova, asteroid, or variable star gets automatically flagged and shared within 60 seconds by a sophisticated image differencing algorithm.
In other words, Rubin is the ultimate smart telescope dream for professional astronomers! But whereas budget amateur smart telescope captures a very small portion of the sky, Rubin is doing it automatically, for the whole sky, every night!
Rubin’s Filter System: Beyond RGB
Unlike our RGB filters or one-shot color cameras, Rubin uses a six-filter system: u, g, r, i, z, y. These filters are part of the Sloan Digital Sky Survey (SDSS) system and span wavelengths from ultraviolet to near-infrared:
| Filter | Wavelength | Approx. Color | Use Case |
|---|---|---|---|
| u | 320–400 nm | Ultraviolet | Star formation, hot stars |
| g | 400–550 nm | Blue-green | Young stars, galaxies |
| r | 550–700 nm | Red | Older stars, red galaxies |
| i | 700–820 nm | Deep red/NIR | Dusty galaxies, faint stars |
| z | 820–920 nm | Near-IR | Distant galaxies |
| y | 950–1050 nm | Infrared | Cool red stars, early universe |
These filters are for scientific measurements, not visual aesthetics. Rubin’s color images are composites designed to highlight specific features across the spectrum—not to mimic what the human eye would see.
🔭 So How Does Rubin Detect UV and IR?
- Ultraviolet (“u” band): Rubin doesn’t go into the far-UV (below 300 nm) like space telescopes do. Instead, it operates in the near-UV, where atmospheric transparency is partial but sufficient. The telescope is optimized to get as much as possible from that range.
- Near-Infrared (“i”, “z”, “y” bands): These are just at the edge of what Earth’s atmosphere allows. Rubin operates in the most transparent parts of the near-IR window. The telescope is also located at 2,700 meters elevation, where there’s less water vapor, helping boost IR sensitivity.
Mission Goals: Mapping the Dynamic Universe
Rubin’s 10-year mission is part of the Legacy Survey of Space and Time (LSST), and its primary goal is to map the dynamic night sky in unprecedented detail. It aims to:
- Detect and catalog billions of galaxies to help us understand dark energy and the accelerating expansion of the universe
- Measure the shapes and distribution of galaxies to study the effects of dark matter
- Track millions of asteroids, comets, and near-Earth objects
- Observe supernovae and other transient phenomena in real time
- Create the most complete 3D map of the universe ever made
In short, Rubin is designed not just to take pictures, but to uncover the underlying structure and evolution of the cosmos.
The First Images: A Glimpse of What’s to Come
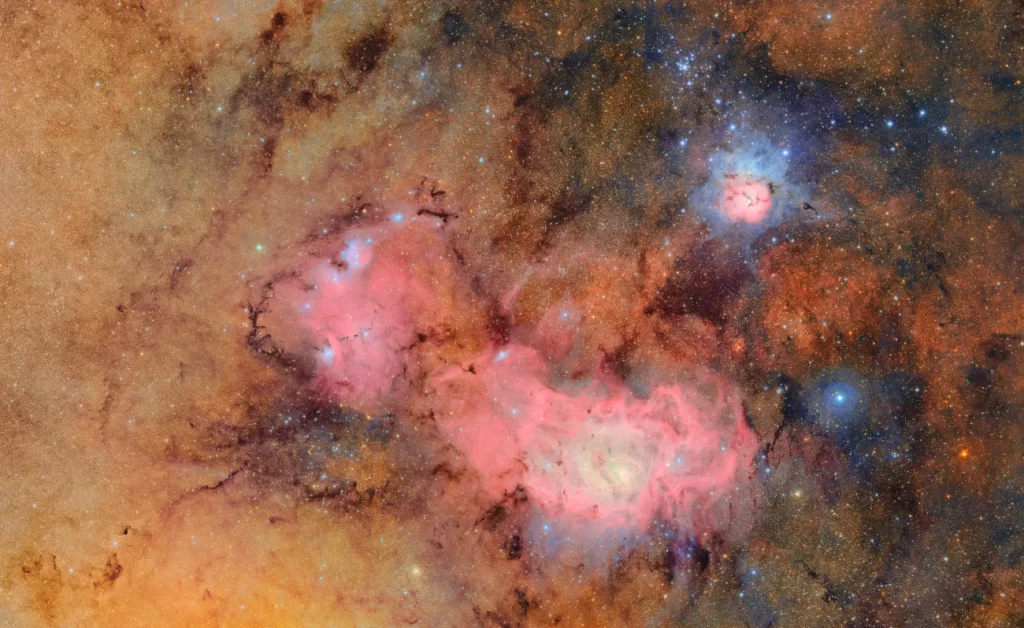
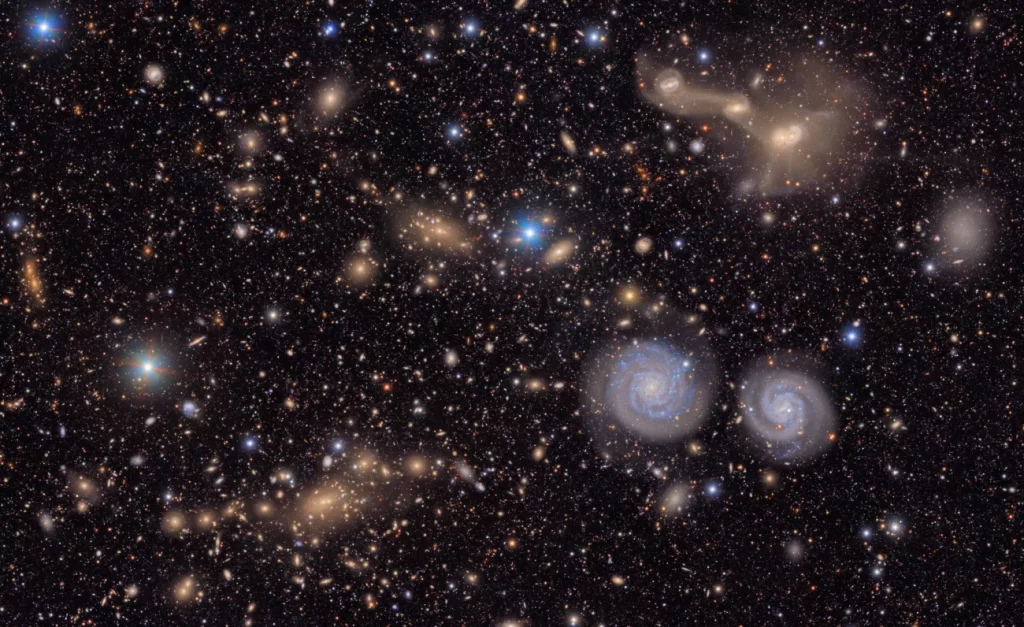
The first official images released today include a stunning composite of the Trifid and Lagoon Nebulae, revealing colorful star-forming regions in the Milky Way with incredible detail. Another image captures a wide-field view of the Virgo Galaxy Cluster, showcasing thousands of galaxies in various stages of interaction —just a taste of what Rubin will achieve night after night. These early images demonstrate the telescope’s sharpness, wide field, and scientific power during its commissioning phase.
In Sum
The Vera Rubin Observatory is changing the way we observe the night sky. For those of us capturing light from our backyards, Rubin is the grand-scale, automated version of what we do as astrophotographers: image, align, stack, and calibrate images of the night sky.
Its first images are beautiful. But more importantly, they signal the start of a project that will track the evolving sky in real time for a decade—uncovering millions of new objects and phenomena. It’s the ultimate example of what astrophotography can become when paired with massive engineering and a scientific mission. And we’re here for it!
How does Nyquist oversampling improve the precision of galaxy shape, star position, and brightness measurements?
I saw your r
smart telescope review of Vespera 11 and seestar. I have both a Stellina and a Vespera Pro. where can I find a comprehensive tutorial or can I ask you specific questions about their operation??
ps your reviews are great as is everything I have found from you