The Vespera Pro is the latest and most advanced smart telescope from Vaonis, designed for effortless exploration of the night sky. Featuring a 50/250mm f/5 quadruplet refractor with S-FPL52 ED glass, it delivers sharp, color-accurate, and flat-field images. Its Sony IMX 676 sensor, equipped with STARVIS 2 technology, ensures low noise and high sensitivity for capturing celestial objects with precision. Optional light pollution and dual-band filters enhance stargazing and deep-sky imaging, even in urban environments, while a solar filter allows for daytime observation of sunspots. Housed in a premium casing with the sleek, recognizable Vespera design, it’s both functional and visually appealing. The accompanying app offers powerful features like covalENS, multi-night imaging, and planning tools, allowing users to capture and create stunning mosaics of the night sky. While it has its drawbacks such as the high €/$ 2799 price tag, and restricted exposure times due to alt-az tracking—it stands out as a top-tier choice for those seeking high-quality equipment. The Vespera Pro is great for anyone who wants to experience advanced night sky views without diving into the complexities of traditional astrophotography.
Introduction
Vaonis was among the first to innovate in the smart telescope market, beginning with the launch of the Vaonis Stellina. Building on its success, the company introduced the Vespera series, designed to be more portable and budget-friendly. This lineup includes the original Vespera, Vespera II, and now the Vespera Pro—the most advanced model yet.
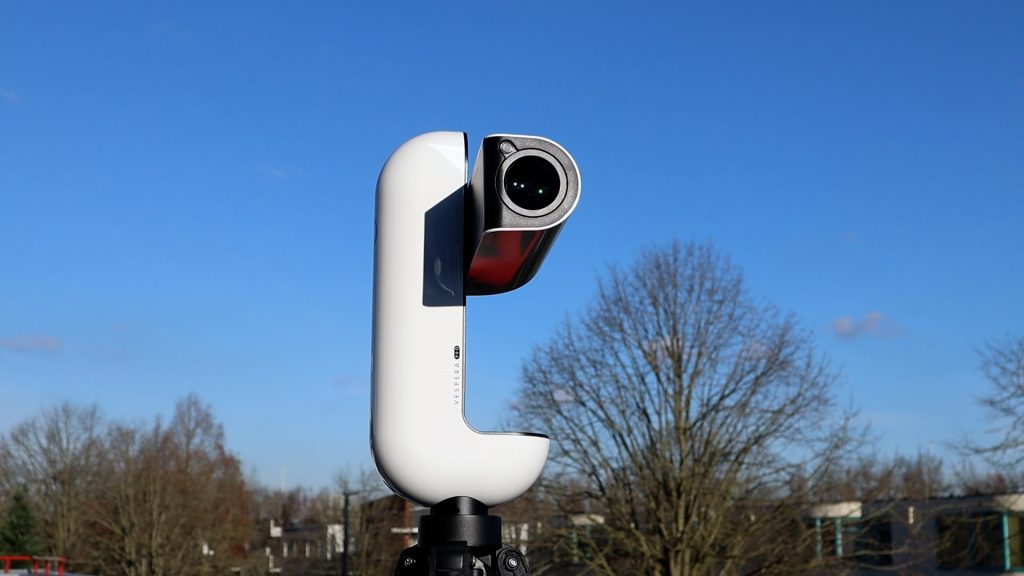
With its upgraded camera sensor, improved image scale, and expanded storage capacity, the Vespera Pro offers notable enhancements over the more affordable Vespera II.
In this review, we’ll take a closer look at the technical specifications of the Vespera Pro and see how it compares to the Vespera II. Then, we’ll put it to the test—capturing images of the Sun, Moon, and deep-sky objects—before sharing our final verdict on its performance.
Price and accessories
The Vaonis Vespera Pro comes with a premium price tag, starting at 2,790 euros or dollars. This is a significant step up from its more budget-friendly counterpart, the Vespera 2, which retails for around 1,590 euros or dollars—a model I reviewed about a year ago.
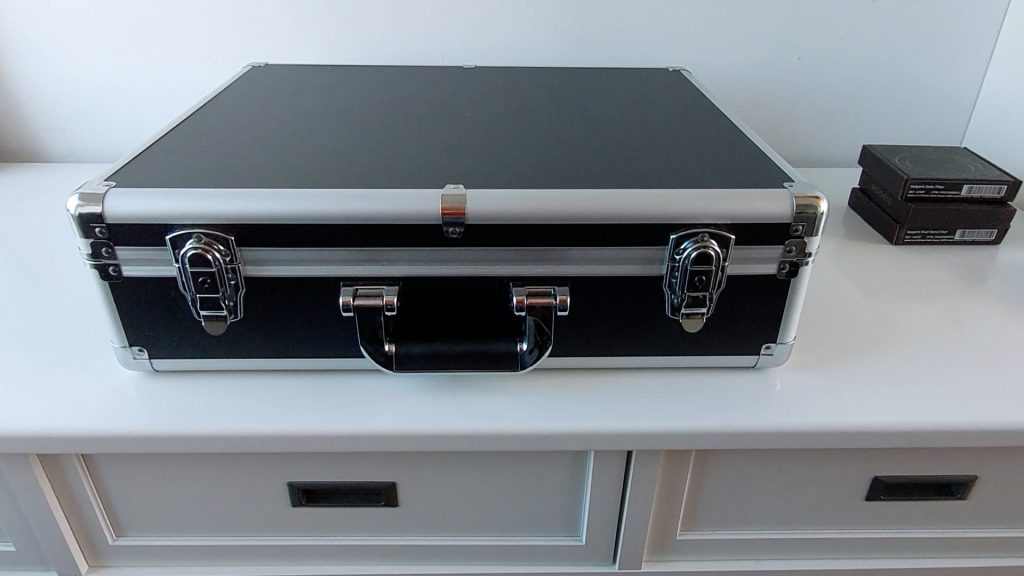
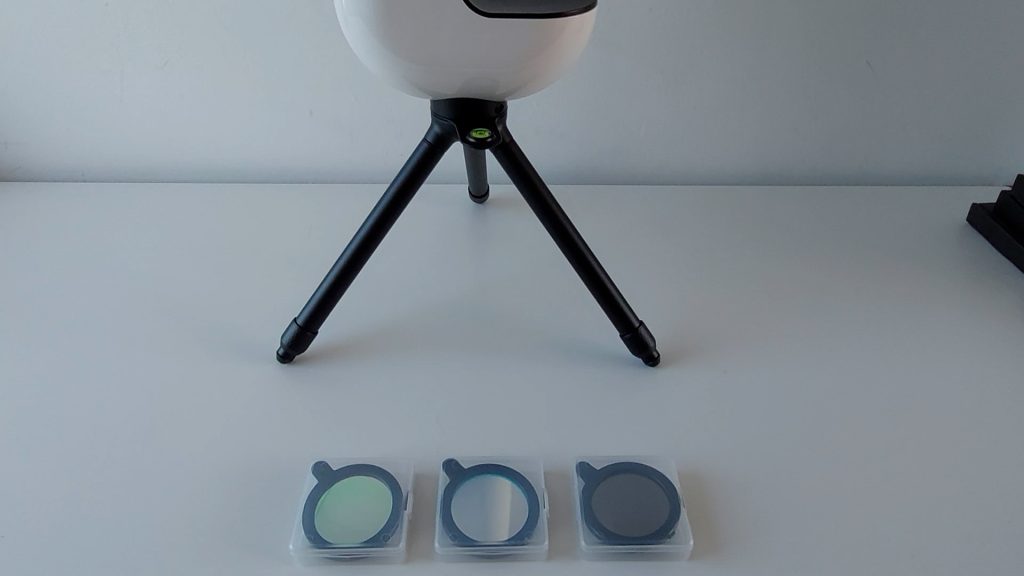
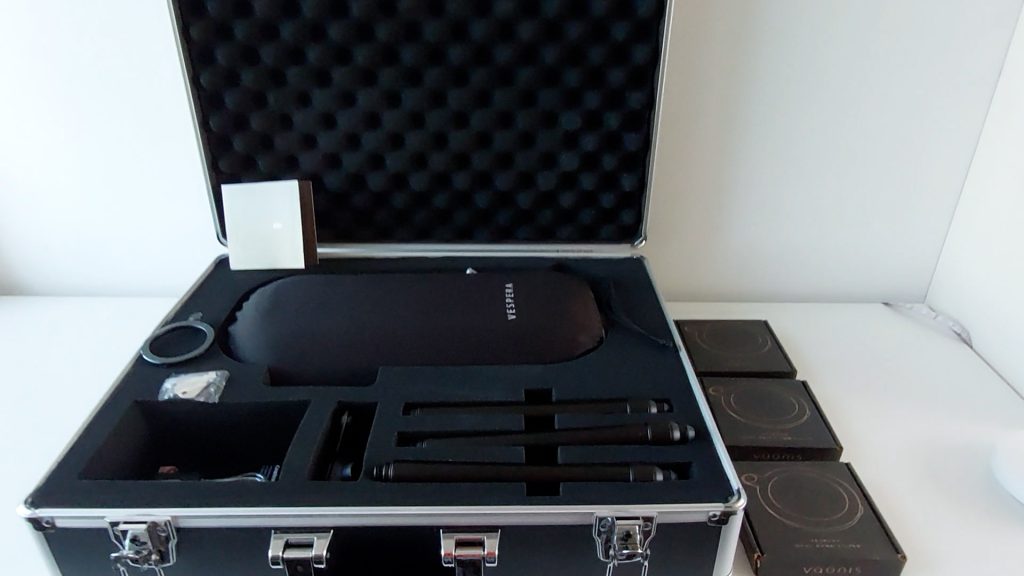
Included with the Vespera Pro is a high-quality hard-shell case with a lock for added security, along with a compact tripod for effortless setup. For those willing to invest even more, the Cosmic Bundle (priced at 3,349 euros) offers additional versatility with three specialized filters:
- A solar filter for safe observation of the Sun
- A light pollution filter to enhance image quality in urban environments
- A dual-band filter that isolates ionized hydrogen (H-alpha) and oxygen (OIII) emissions from nebulae, blocking unwanted light for superior contrast
These additions make the Vespera Pro a flexible and capable astrophotography tool, catering to a range of observational needs.
The Vaonis Vespera Pro is available at Vaonis (direct from vendor), High Point Scientific (USA/WW), Agena Astro (USA/WW), and Astroshop (EU/WW)
Vaonis Vespera Pro: Technical specifications
Let’s dive into the technical details of the Vaonis Vespera Pro, the latest addition to the Vespera lineup. Compared to its predecessor, the Vespera II, this model brings some significant upgrades—especially in image quality and performance.
Both Vespera models feature a 50mm f/5 quadruplet refractor telescope with S-FPL52 ED glass, ensuring sharp, color-accurate images. But here’s where the Pro stands out: it’s equipped with a new Sony IMX 676 sensor, delivering a 12.5 MP resolution (3536 × 3536 pixels). That’s a noticeable jump from the 8.3 MP Sony IMX 585 sensor found in the Vespera II.
Image Scale & Expanded Field of View
The Vespera Pro offers an improved image scale of 1.6 arcseconds per pixel, compared to 2.39 arcseconds per pixel on the Vespera II. That places it right in the ideal range for deep-sky imaging (1–2 arcseconds per pixel). It also maintains a square field of view of 1.6° × 1.6°—about three times the size of the full Moon. But here’s where it gets exciting: Vaonis’ CovalENS technology allows for mosaic imaging, expanding the field of view to 3.2° × 3.2°. That means you can capture up to 50-megapixel images of large deep-sky objects.
More Storage & Longer Battery Life
One of the most practical upgrades is storage. The Vespera Pro includes 225GB of internal storage, compared to just 25GB on the Vespera II. That means more saved images and less worry about running out of space. Battery life has also tripled—the Vespera Pro lasts up to 11 hours, compared to just 4 hours on the Vespera II.
Control & Connectivity
Both models are controlled via the Vaonis Singularity app, which connects the telescope to your smart device over WiFi. The app is available for both Android and iOS and provides an intuitive interface for selecting and capturing deep-sky objects. Both telescopes also feature a USB-C port for recharging.
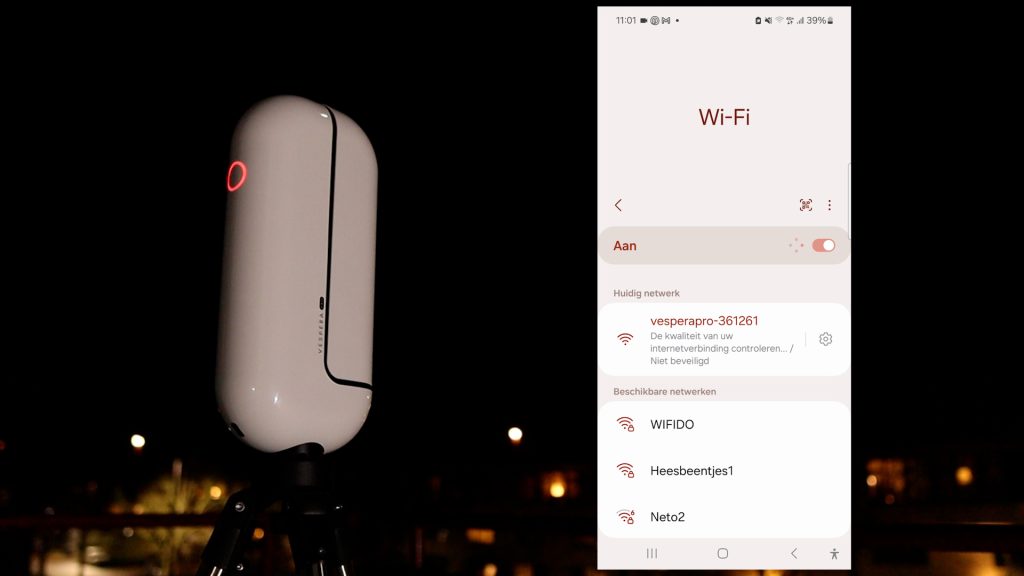
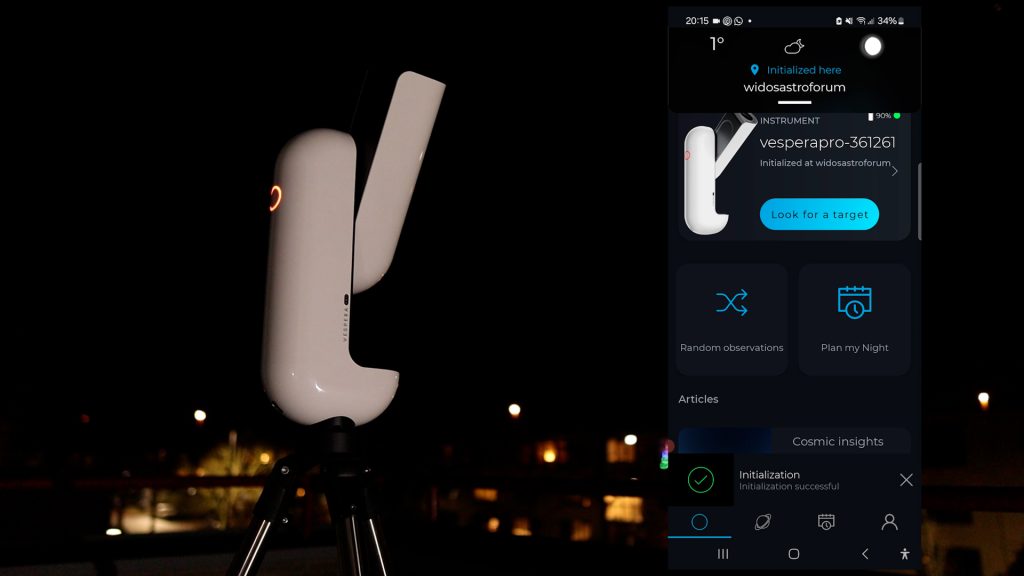
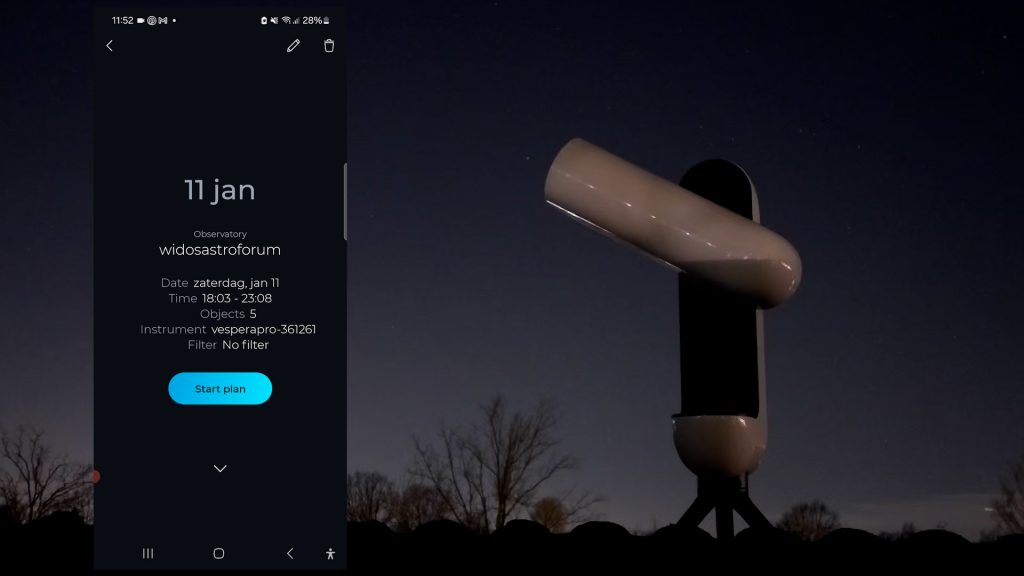
Connecting to the Vaonis Vespera Pro
Getting started with the Vaonis Vespera Pro is simple. To power it on, press the large white button—it will flash three times before blinking red. Next, open your WiFi settings on your phone or tablet and connect to the Vespera Pro’s WiFi signal. Once connected, launch the Singularity app, which will automatically detect the telescope.
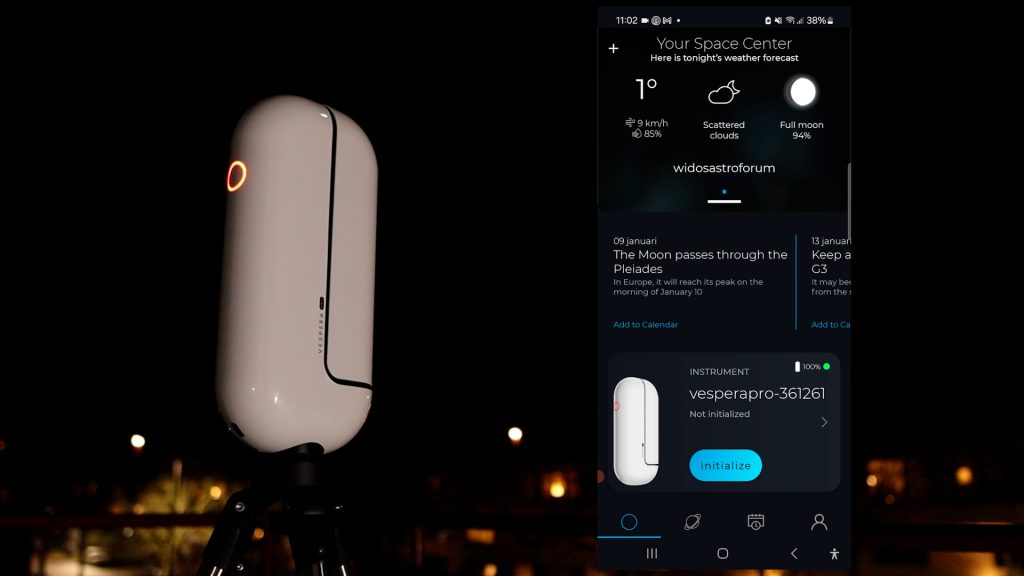
The Singularity app is designed for ease of use, making it accessible even for complete beginners. The main screen provides key features such as weather updates, astronomical events, educational articles, and a selection of objects available for live stargazing and imaging. In this review, we’ll explore each of these features—starting with solar imaging.
Solar Imaging with the Vaonis Vespera Pro: A Closer Look
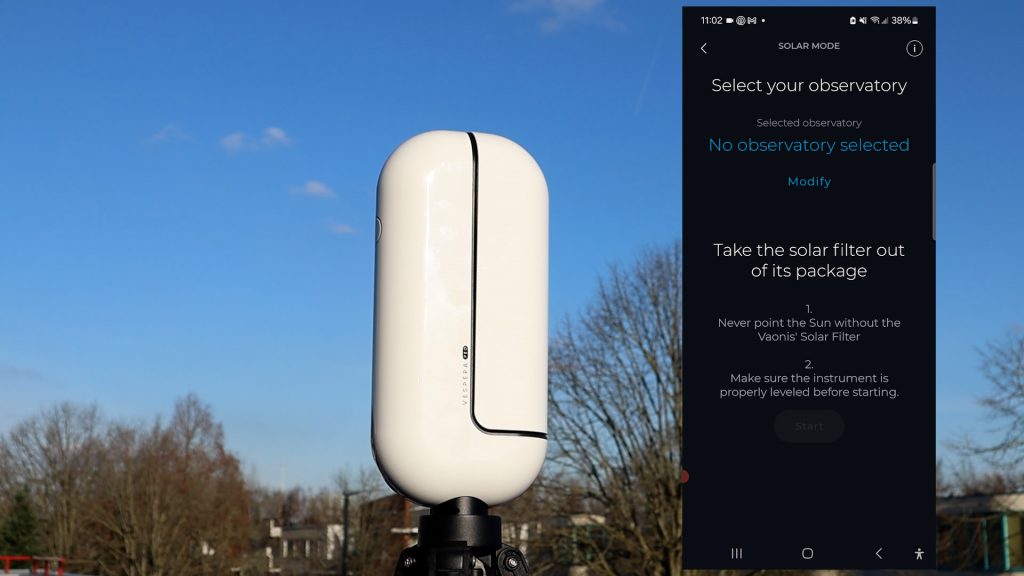
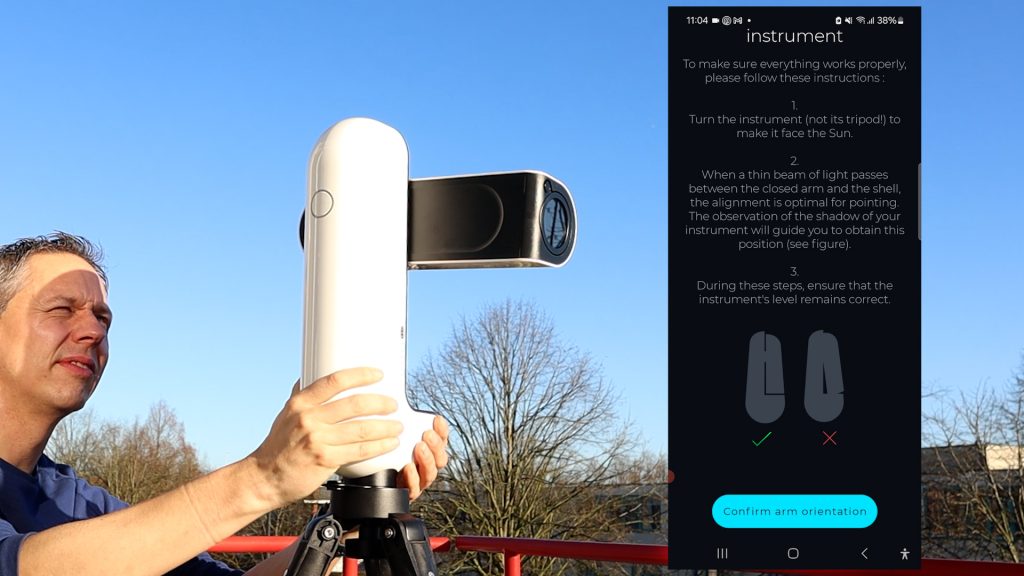
To begin solar imaging, tap the Solar Mode button in the Singularity app. The app will prompt you to attach the solar filter and ensure the tripod is level—double-check these steps before proceeding. The telescope will then automatically adjust its arm by 45 degrees, preparing for solar observation.
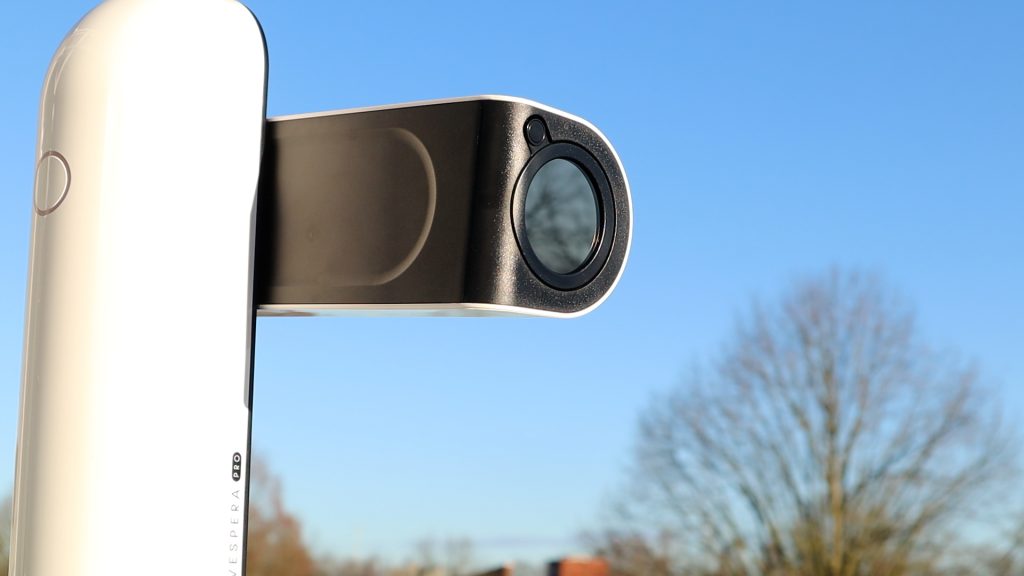
Next, attach the solar filter to the front of the lens using the click system—a quick and secure process. The Vespera Pro will recognize the installed filter, confirming the setup is correct.
Now, it’s time to align the telescope with the Sun. The Singularity app will guide you, but always remember to keep the tripod level and never look directly at the Sun. For safety, position yourself behind the telescope in the shade while making adjustments.
Once properly aligned, tap “Confirm Arm Position”, and the Vespera Pro will take over—automatically locating and focusing on the Sun. This process takes a couple of minutes, during which the app displays real-time solar information.
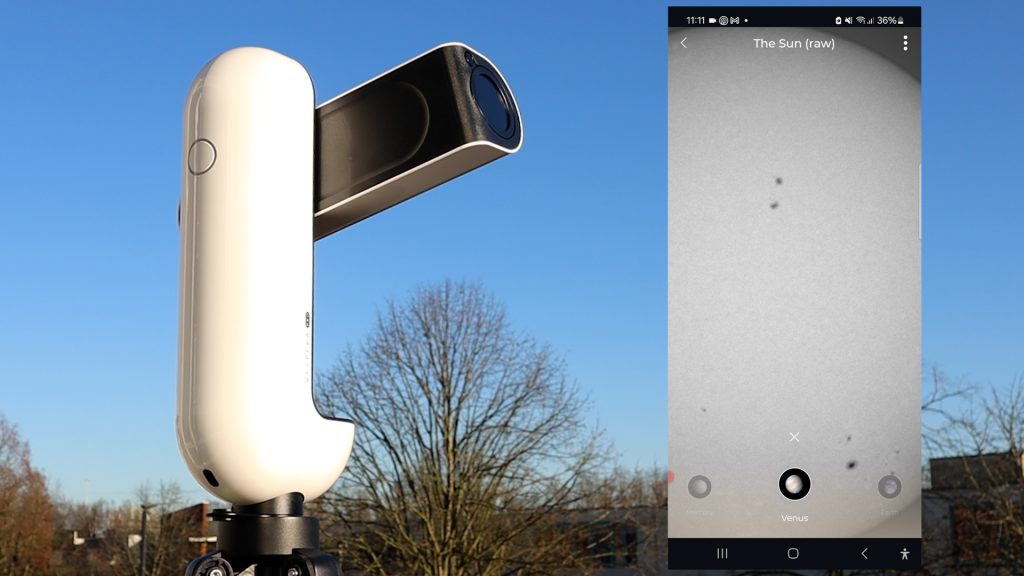
When everything is set, the Singularity logo will turn blue, signaling that the Vespera Pro is ready to deliver a live view of the Sun directly to your smart device. Now, you’re ready to explore our closest star in stunning detail!
The live image of the Sun appeared sharp and well-focused in the Singularity app, and I was lucky enough to capture some sunspots that day—a nice bonus for my session.
Exploring Solar Mode Features
The Solar Mode in the Singularity app includes a few interesting tools. One of them is Solar System Mode, which allows you to compare the apparent size of the Sun as seen from different planets. The farther a planet is from the Sun, the smaller it appears. Selecting Venus or Mercury, the closest planets, resulted in a noticeably larger Sun compared to Earth’s perspective. Interestingly, these planetary views are displayed in grayscale, whereas switching back to the main live view restores the color image. You can also zoom in on the Sun directly by pinching the screen on your smartphone.

Sharing and Connectivity
Next, I tested the share button, which lets you post a live photo of the Sun directly to social media. While the feature worked smoothly, there is one downside—when connected to the Vespera’s WiFi, you lose internet access. It would be great if Vaonis introduced an option to link the Vespera’s WiFi to a home network, as some other smart telescopes do. This would allow for continuous internet connectivity while operating the telescope and extend its WiFi range beyond the current 10-meter limit.
That said, even if you disconnect from the telescope, it continues tracking the Sun, Moon, or any object you started imaging. You can walk away, return later, reconnect, and pick up where you left off—an excellent feature for longer observation sessions.
Additional Features and Image Quality
The information button in the app provides additional info about the Sun, while the menu button in the top right allows you to refocus the telescope and save images. One limitation I noticed is that exporting images in TIFF format is greyed out, meaning all solar images are saved in lower-quality JPEGs by default.
For experienced solar imagers interested in stacking multiple images using software like AutoStakkert, there is a workaround. By navigating to the main screen of the app, selecting the Vespera image, and enabling “stacking images in JPEG”, every live frame will be saved in a separate folder for post-processing. However, one feature I found missing is the ability to capture high-quality video formats such as AVI or SER, or FITS files—which are useful for advanced solar imaging and processing. If Vaonis added these options, the Vespera Pro could become a viable alternative for serious solar astrophotographers who want a more convenient, all-in-one setup.
Final Thoughts on Solar Mode
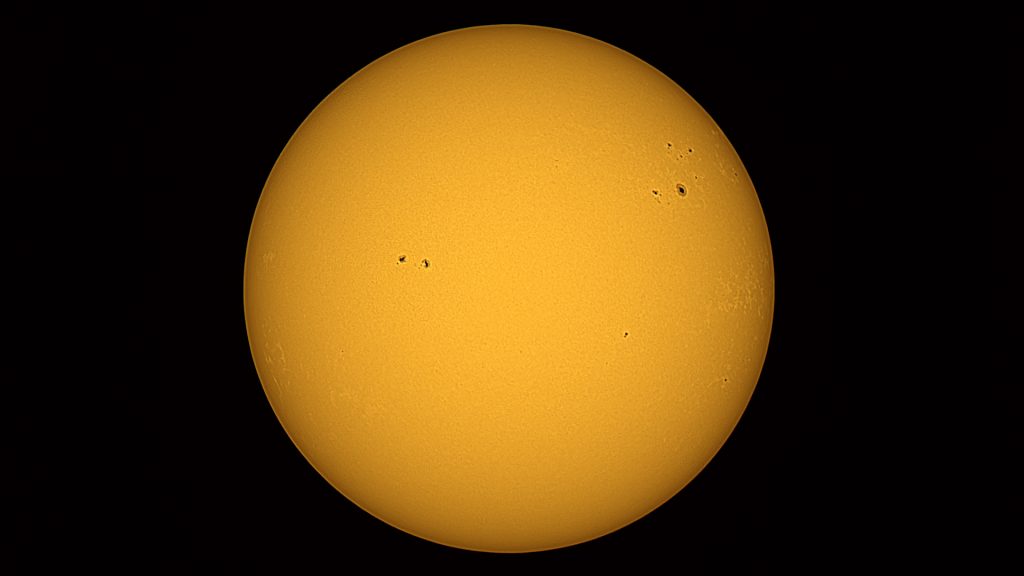
Overall, the Vespera Pro delivered an impressive, sharp live image of the Sun, making for an enjoyable solar observation experience. To end your session, simply tap the stop button, and the telescope will halt tracking and close the session. Here’s a processed image from the JPEG files I captured—the sunspots appear crisp and well-defined, showcasing the Vespera Pro’s capability as a user-friendly solar imaging tool.
Observing the Moon and Planets with the Vaonis Vespera Pro
Getting Started: Initialization Process
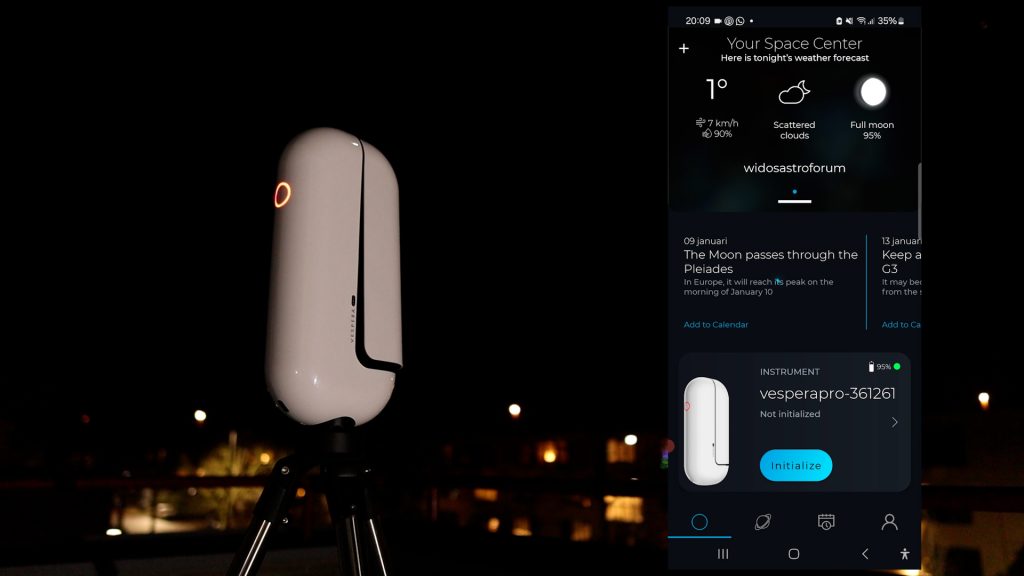
Before diving into nighttime stargazing, the Vespera Pro requires initialization. Thankfully, this is a quick and straightforward process. Simply tap “Initialize” next to the Vespera Pro image in the Singularity app, and the telescope will automatically orient itself, running a series of calibration and autofocus routines. In just a couple of minutes, it’s ready to go.
Exploring the Solar System
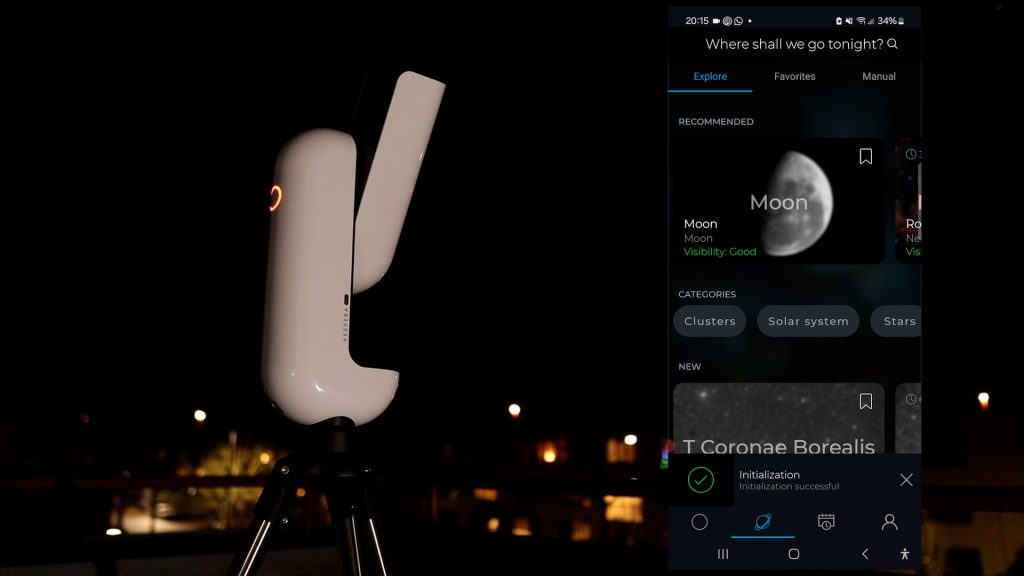
The Singularity app provides a variety of observing options. Tapping the planetary icon at the bottom of the screen opens categories like galaxies, nebulae, and the solar system. Selecting “Solar System” brings up a list of targets, including the Sun, the Moon, and the planets.
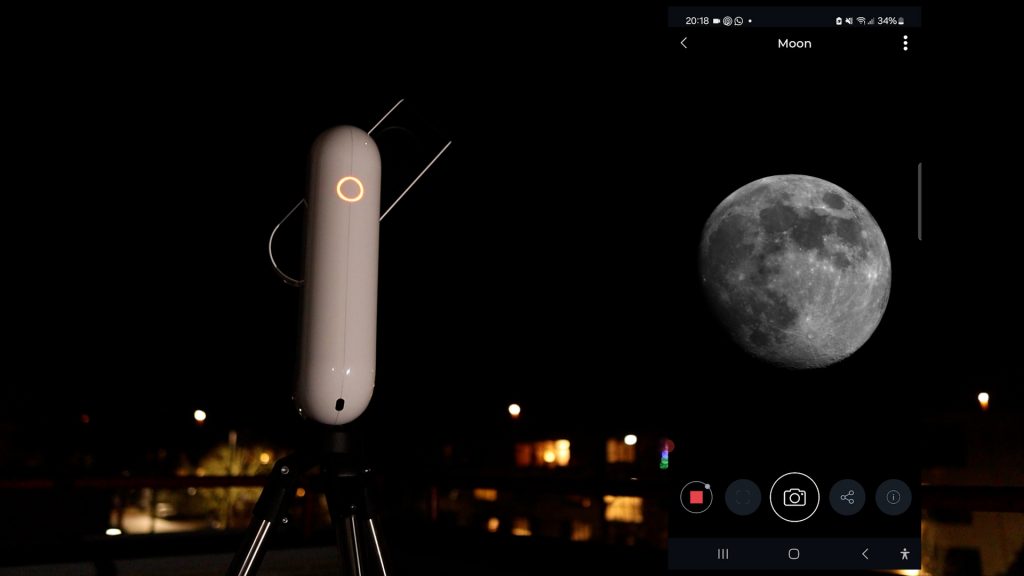
That evening, the Moon was highlighted as a recommended target, so I tapped “Moon” followed by “Observe”. The Vespera Pro slewed to the Moon, focused automatically, and displayed detailed information about the target. Within a minute or two, a live image of the nearly full Moon appeared on my screen—and it looked impressive.
Live Imaging and Photo Capture
The live view of the Moon allowed me to zoom in using pinch gestures on my smartphone. Capturing a photo was as simple as tapping the photo button, which instantly saved the image in the app. Dragging the live image across the screen, I could explore different areas of the Moon, and the clarity remained sharp and detailed.
Accessing the top-right menu revealed the same options available in solar mode, including refocusing and saving images. However, like in solar mode, TIFF export was unavailable, and video recording was not an option. It seems that for solar system imaging, the Vespera Pro only captures JPEG images.
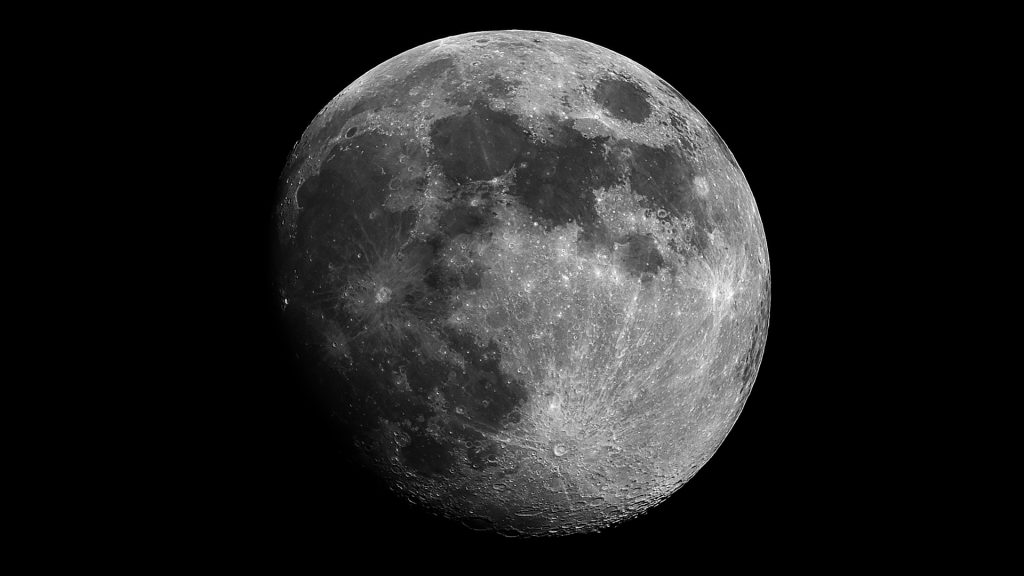
After a few minutes, I ended my Moon session. Here’s a processed, stacked image created by enabling the “Save live images” option in the image format menu and stacking the jpeg files. The final results were good, but I wished for higher-quality file formats for advanced processing as discussed above.
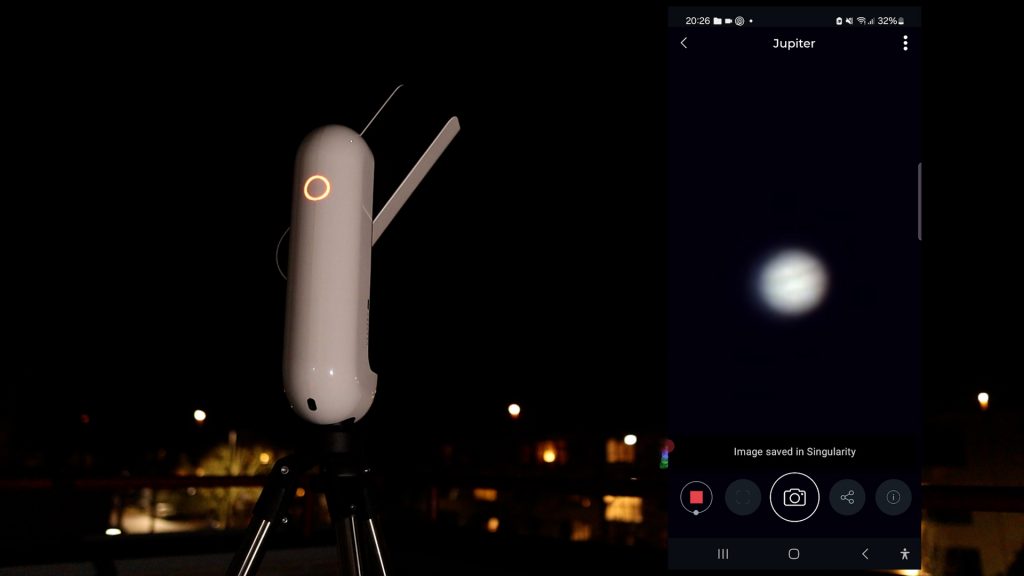
Jupiter: A Small but Recognizable View
Next, I selected Jupiter, which was also listed as a recommended target for the night. After tapping “Observe”, the app displayed a warning—Jupiter was close to the Moon, which could affect visibility and contrast. Ignoring the message, I proceeded, and the Vespera Pro slewed to Jupiter, displaying detailed information about the planet while preparing the live view. The entire process took about two minutes.
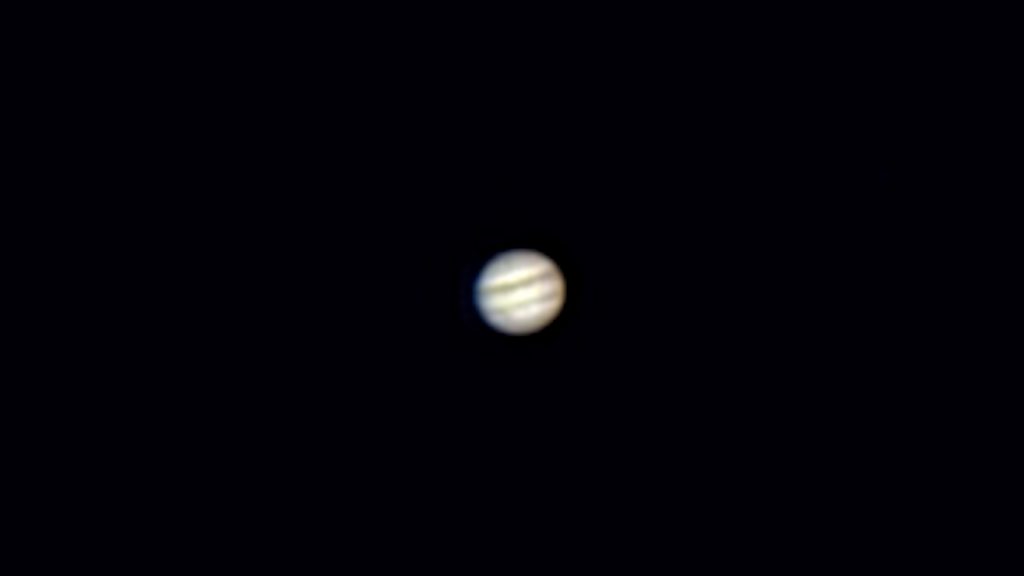
At 250mm focal length, Jupiter appeared as a small dot in the sky. However, pinching to zoom in, I could just barely make out two main cloud bands, which was a nice detail. That said, for planetary imaging, a telescope with a much longer focal length is typically required to capture detailed surface features.
One limitation of the Vespera Pro is that exposure and gain settings are fully automated, with no manual adjustment options. While this makes things easy for beginners, I missed the ability to increase exposure, which would have helped to better reveal Jupiter’s Galilean moons.
The Singularity app’s options for Jupiter were the same as for the Moon—refocusing and capturing JPEG images, but again, no video recording or high-quality FITS format for stacking and processing.
Here’s a single image. Yeah, not exactly something to write home about—but considering the Vespera Pro’s wide-field design, it wasn’t unexpected.
Capturing the Planets?
While the Vespera Pro is not optimized for planetary imaging, it provides very good views of the Sun and Moon. For those looking for detailed planetary imaging, a higher focal length telescope is recommended; check here for my recommendations. Now, let’s move on to what the Vespera Pro is actually designed for —capturing deep-sky objects.
Deep-Sky Imaging with the Vespera Pro
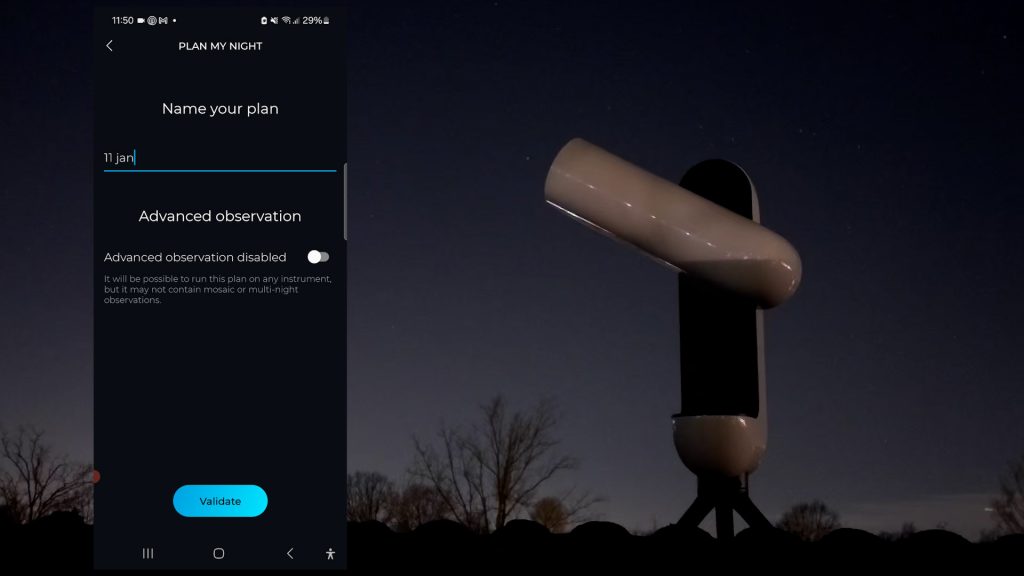
Before diving into the deep-sky objects I captured, let’s first explore how the Vespera Pro can fully automate an entire night of imaging using its planning feature.
Automating Your Astrophotography Sessions
To set up an automated imaging session, simply tap “Plan your night” or select the planning icon at the bottom of the app. Then, choose your location, date, and the time range for your session.
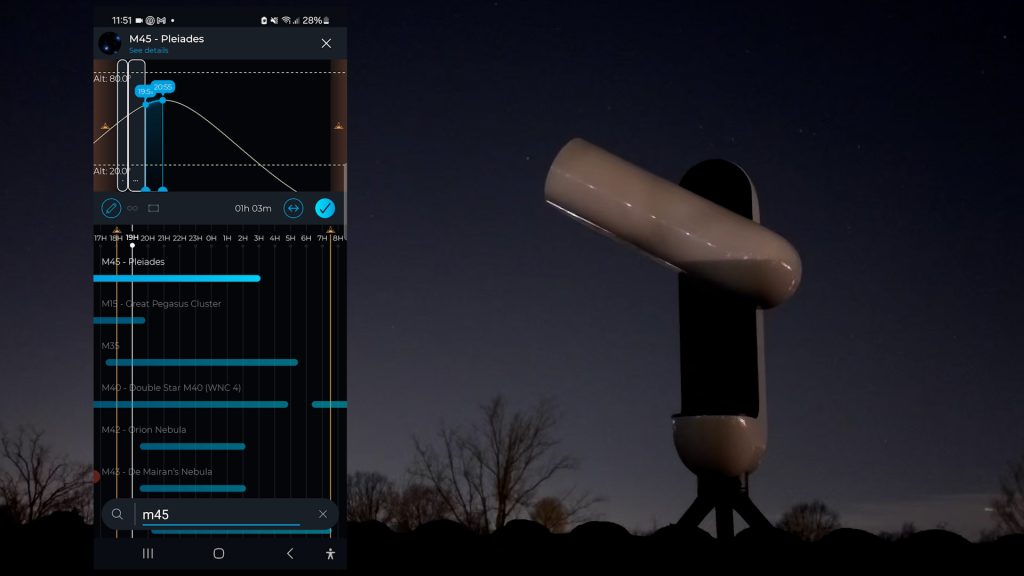
The Singularity app will suggest the best objects visible that night, but you can also search for a specific target by tapping the magnifying glass and entering its name. Once an object is selected, an arc appears, showing its position in the night sky over time. Ideally, you want to image when the target is at its highest point, as this minimizes atmospheric distortion and produces a sharper image.
The interface is incredibly intuitive—just tap the object, adjust the timeline to set your imaging duration, and add additional targets. The app will automatically schedule them one after another, ensuring seamless overnight imaging.
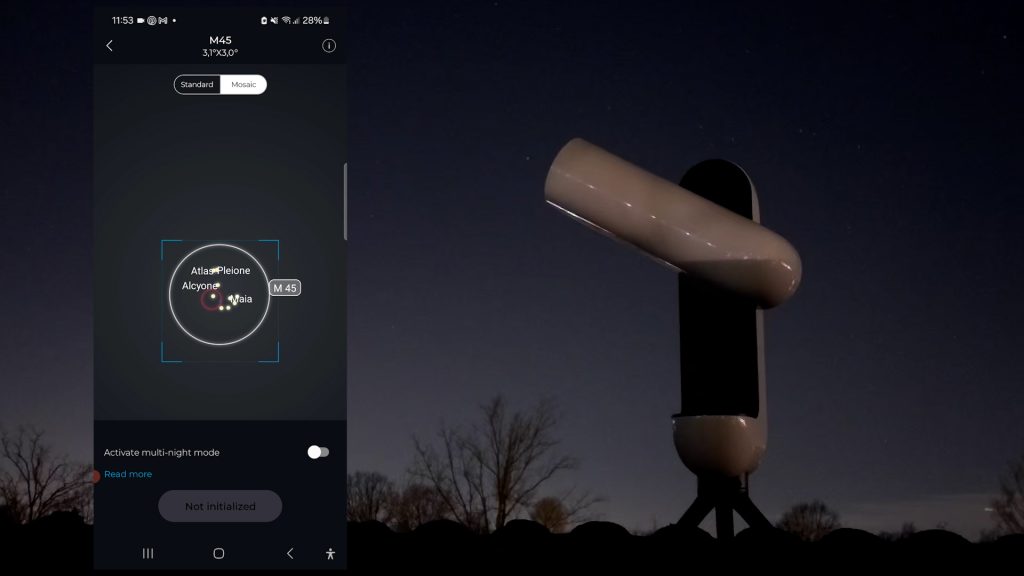
Expanding Your Field of View with CovalENS Mode
One of the standout features of the Vespera Pro is CovalENS mode, also known as mosaic mode.
To use it, select a deep-sky object and tap “Advance”. The app will then display a graphic representation of its size and shape, helping you frame your shot. With CovalENS, you can expand your field of view up to twice the width and height of the sensor, capturing larger nebulae and star fields that wouldn’t fit in a single frame. Just pinch, rotate, and drag the object on your screen until you’re happy with the composition.
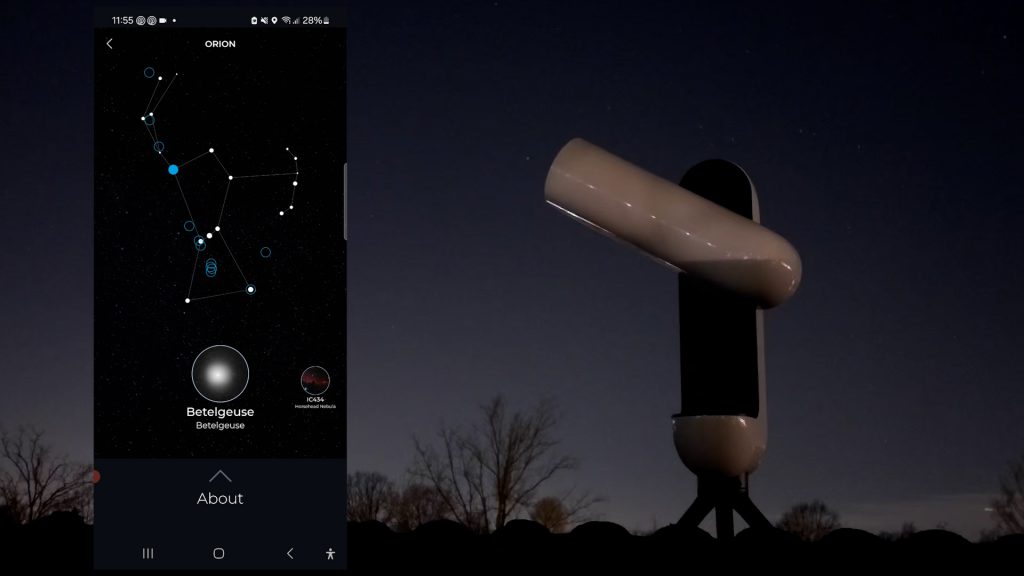
Exploring Constellations for New Deep-Sky Targets
Another fantastic feature is the ability to explore entire constellations. When selecting an object, you can tap on its constellation to reveal other deep-sky objects within that same region. This is a great way to discover new targets beyond the well-known nebulae and galaxies, expanding your astrophotography portfolio.
Capturing Deep-Sky Objects with the Vespera Pro
Capturing Deep-Sky Objects with the Vespera Pro
With the setup complete, let’s dive into the deep-sky objects I captured with the Vespera Pro!
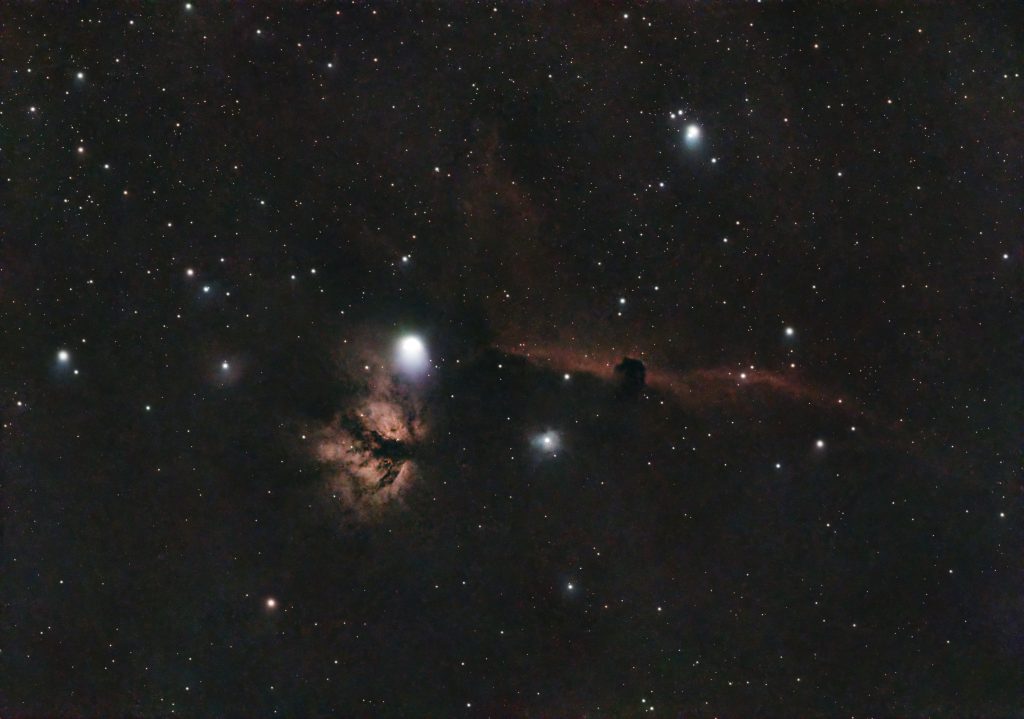
Orion Nebula (M42) – A Classic Winter Target
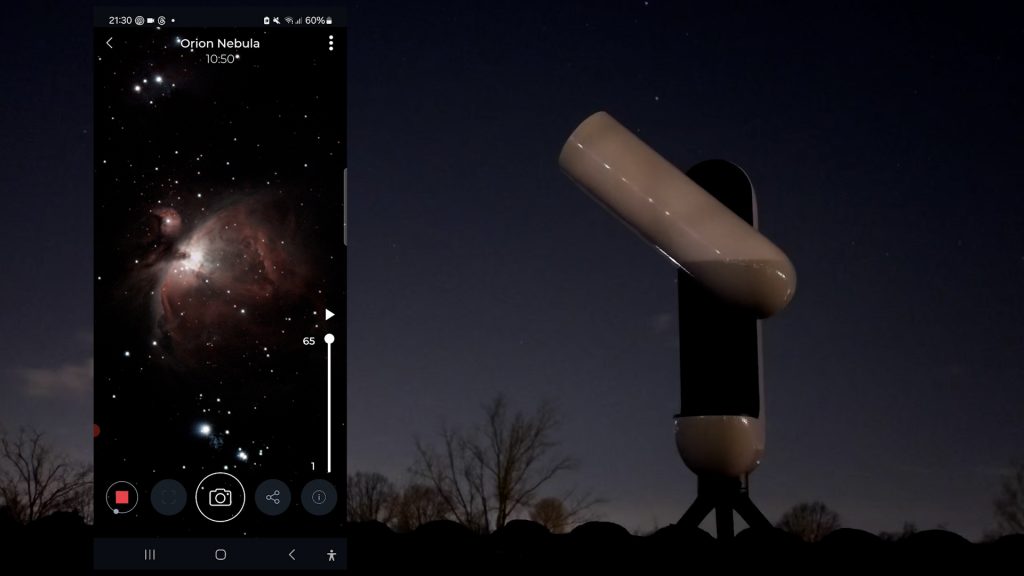
My first target was the Orion Nebula (Messier 42)—one of the brightest and most famous star-forming regions in the night sky. I selected M42 in the Singularity app, and the Vespera Pro automatically slewed to the target. After about two minutes, it began capturing and stacking 10-second exposures.
Since I’m imaging from an urban Bortle Class 8 sky, I used a light pollution filter to enhance the image. Conditions weren’t ideal—this month has been a mix of clear skies and passing clouds, making imaging a bit tricky.
Within 10 minutes (or about 60 stacked frames), the Orion Nebula was already looking impressive in the app. If the framing isn’t perfect, you can simply tap the reframing icon at the bottom of the app to adjust the object’s position. The top menu also provides options like re-focusing and saving images, but one of the most useful tools is Multi-Night mode.
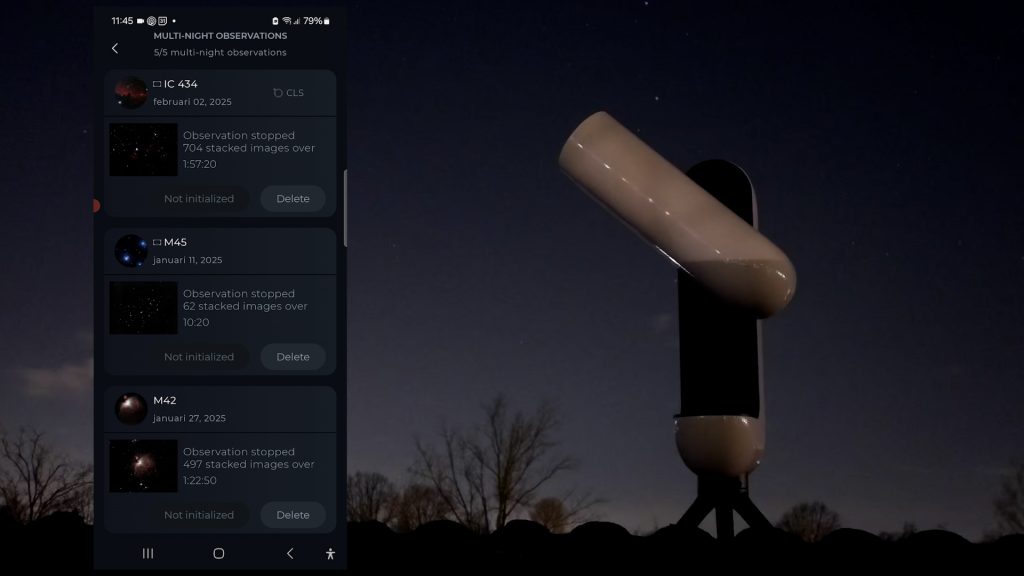
With Multi-Night mode, you can pause your session if clouds roll in and resume on another night. Just open the Multi-Night menu, select your object, and pick up where you left off.
Over several nights, I accumulated about 1.5 hours of total exposure time on Orion. After some processing with the 16-bit TIFF file saved in a linear format, this is my final result!
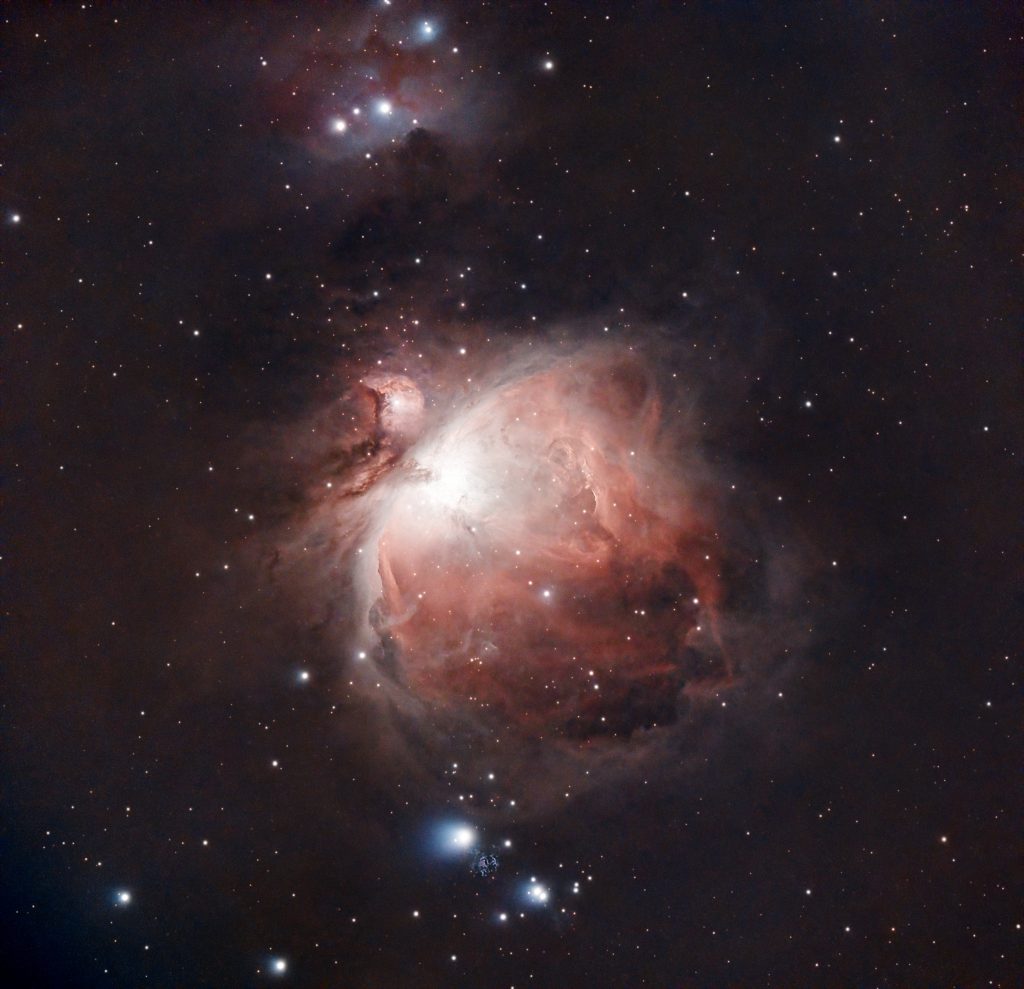
Considering the light pollution and unpredictable weather, I’m quite happy with how it turned out! Now, let’s check out some of the other deep-sky objects I captured.
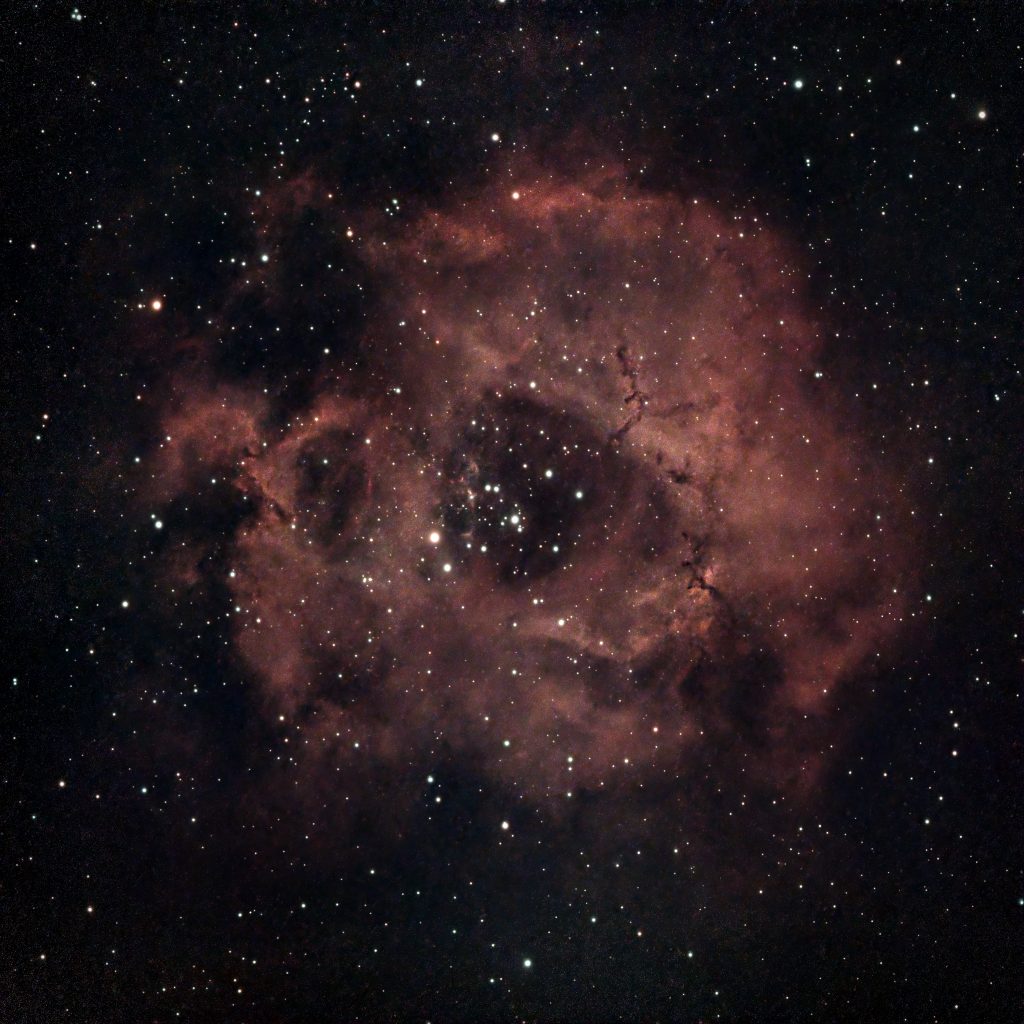
Rosette Nebula – A Showcase for the Dual-Band Filter
Next, I imaged the Rosette Nebula, this time using the dual-band filter. This emission nebula is dominated by ionized hydrogen gas, which emits light in the deep red part of the spectrum, along with doubly ionized oxygen (OIII). The dual-band filter helps isolate these specific wavelengths, improving contrast and enhancing details.
That night was extremely humid, and despite the built-in dew heater, the filter still fogged up a bit. However, I managed to capture one hour of 10-second exposures before conditions worsened.
Here’s my final processed image. Not bad for just an hour of imaging!
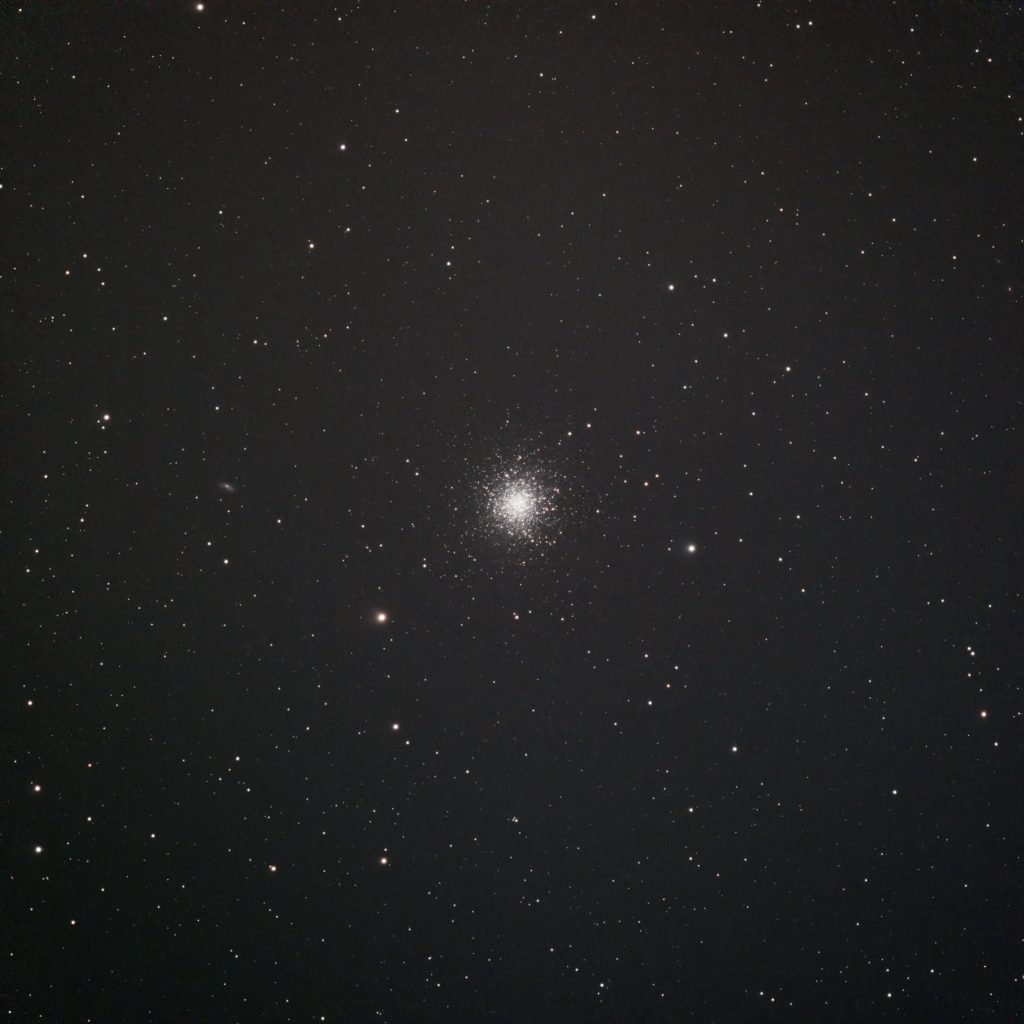
M13 – The Great Hercules Globular Cluster
For a change of pace, I turned my attention to Messier 13, one of the largest and brightest globular clusters in the northern sky. This dense sphere of ancient stars contains some of the oldest stars in the universe, making it a fascinating target.
For this one, I didn’t use any filters—just the Vespera Pro on its own. After 30 minutes, I had a solid stacked image, processed using APP.
Here’s my final image. A great result for a quick session!
Horsehead & Flame Nebulae – A Mosaic Mode Test
Finally, I captured the Horsehead Nebula and Flame Nebula, once again using the dual-band filter to enhance the ionized hydrogen regions. This time, I enabled mosaic mode to expand the field of view and fit both nebulae in the frame.
A cool feature in the Singularity app is how it visually tracks the mosaic progress, displaying a numbered rectangle for each section being captured. Since mosaics require imaging multiple sections and then integrating them, they take more time.
After about two hours, I wrapped up the session. While more exposure time would help refine the details, the Horsehead Nebula is still clearly visible—even with the Vespera’s 10-second exposure limit due to its alt-az tracking.
Here’s my final processed image.
Final Thoughts – Is the Vespera Pro Worth It?
Overall, I had a great experience capturing deep-sky objects with the Vespera Pro. But is it worth investing in? Let’s wrap up with my final thoughts!
Pros
The Vespera Pro features a quadruplet apochromatic refractor, delivering a flat field across the entire image, even with larger sensors like the Sony IMX676. With the Covalens mosaic mode, it can capture an impressive 3.2 by 3.2-degree field of view at 250mm focal length and a 1.6″ per pixel image scale. The result? Sharp, well-corrected astrophotographs that surpass many cheaper smart telescopes.
The Singularity app is incredibly user-friendly—ideal for beginners. No prior astrophotography experience? No problem! Just set it up, press the power button, connect to WiFi, select a target, and let the telescope do all the hard work.
The build quality is exceptional, with a sturdy and modern design, and it comes with a high-quality protective case. The internal battery lasts up to 11 hours, easily covering a full night of imaging. With 225GB of onboard storage, you can capture multiple deep-sky objects without worrying about running out of space.
Cons
The azimuth-altitude tracking system limits the exposure time to just 10 seconds, which can be restrictive for capturing fainter nebulae or galaxies. A dedicated equatorial tracking system would solve this, but it would introduce more complexity for beginners.
For more advanced astrophotographers, the lack of high-quality video formats like AVI or SER for solar, moon, and planetary imaging is a downside. Additionally, the absence of FITS or TIFF files for solar system objects means you’re limited in terms of stacking and advanced processing. However, FITS and linear TIFFs are available for deep-sky imaging.
At 250mm focal length, the Vespera Pro isn’t ideal for detailed planetary imaging. For that, you’d need a longer focal length and a larger aperture. There’s also no manual control over camera settings like exposure or gain, meaning you can’t adjust settings to capture details like Jupiter’s moons.
Finally, there’s the price. At $2,799 for the base model and $3,349 for the Vespera Pro with filters, it’s a significant investment. If you’re looking for a more budget-friendly option, the Vespera II at $1,590 offers a lower resolution, less storage, and shorter battery life. Alternatively, you could invest in a dedicated equatorial mount, telescope, and astro camera for more flexibility and higher-quality imaging—but this comes with a steeper learning curve.
Is the Vespera Pro Worth It?
If you’re after a high-quality, fully automated astrophotography experience with minimal effort, then yes, the Vespera Pro is worth it. However, if you’re looking for more customization and higher-end imaging capabilities, you may want to explore more traditional astrophotography setups instead. Moreover, if this high-end price range is beyond your budget, the more affordable Vaonis Vespera II or other smart telescopes could be a better fit for you. Let me know your thoughts in the comments, and I’ll do my best to answer any questions.
The Vaonis Vespera Pro is available at Vaonis (direct from vendor), High Point Scientific (USA/WW), Agena Astro (USA/WW), and Astroshop (EU/WW)
Clear skies!
Wido Oerlemans
You can vary the exposure time by using expert mode.
You can configure the instrument to view Jupiter with the 4 moons. Need to be in expert mode then create a manual target. Create an object name, select object type: star, select pointing type: direct, select exposure time: 1 sec, select gain: 1 dB, enter the current coordinates (RA/dec) for Jupiter, save and observe. It would be nice if there was an object type: planet, and the ability to select an exposure time less than 1 sec.
Typo in the con section: Vespera Pro (and Vespera II) are 250 mm focal length. The Vespera I (or classic) and Vespera Passengers were 200 mm focal length.
Hello,
I have purchased a Vespera Pro and so far it works great. I am however having a difficult time prosessing my dual band filter images of the Heart Nebula in Pixinsight. The Tiff image produced from my night of imaging look great. However the fits files do not look at all correct for what I would expect. The fits images have no color and no detail whatsoever. There are a few stars I can see but they are very faint. I am curious if you have run into anything similar with your Vespera Pro ? I used the scope to image the sun, moon and galaxies and all of those images look great. It appears to be just the dual band filter images that are the challenge. Even the JPG images from the Heart Nebula look correct. It’s just the fits image that are totally grey. Any and all advice would be appreciated.
Thank You
Ask Vaonis when they’ll introduce EQ mode functionality! 😊 Kidding aside, the short exposures aren’t very helpful for narrowband imaging.
You need to stack many images together to bring out color in narrowband photos. The grayish appearance of individual images is perfectly normal.
I’d recommend processing the automatically stacked TIFF file or stacking the (many) individual images first using software like DeepSkyStacker (which is free).
Good luck!
1. with the Pro, are you always operating at maximum pixels?? if not how do you increase to max?
2. in Mosaic mode, can you shrink the field when an object is small, like the sombrero galaxy? If so, will you gain resolution by just having the more concentrated image?? ie would the galaxy be larger without zooming? presuming that zooming typically decreases resolution??
3. if you want to capture an object in multi night, can you incorporate that into plan my night somehow??
1. I’m not exactly sure what you’re asking. The field of view is simply determined by the sensor size of the 585MC camera and the focal length of your telescope.
2. No, that’s just digital zoom. True resolution—meaning the level of detail in your final (stacked) image—depends on your telescope’s aperture, the quality of your optics, atmospheric conditions, and the quality and quantity of your stacked exposures.
3. Multi-night imaging allows you to gather data over several nights and stack it into one final image. I’m not certain if that can be integrated into a single imaging plan, but you can definitely save your subs from multiple nights and stack them later to create a detailed image of your target.
1. I would like to learn to process tiff images. Regardless of cost, which do you recommend that have adequate tutorials?
2. there are options in the Pro to choose Tiff, Jpeg and others. For either imaging or processing which would you choose or not choose?
Single deep-sky images are saved in FITS format. Stacked images are saved in 16-bit TIFF format. Both are very usable for further processing depending on if you want to process individual photos manually (fits) are you want to edit the stacked image (TIFF). You don’t want to use JPEG for post processing but if you don’t want to process and just share a quick image with others, JPEG is the way to go.
which apps for further processing are available for processing tiff files?
The Vespera Pro has 12.5 mp and Vaonis says with the Covalens feature can get up to 50mp. My pro does not show a choice for Covalens but does have a choice for”Advance” mode. Can I presume Advance and Covalens are the same?
1. Is the resolution ie megapixels in Advance mode always at the max or is it adjustable.
2. Can you set up a “plan my night” and have all selected objects be “Advanced” ? Advanced with adjusted resolution?
3. In plan my night mode, can you choose the mosaic feature for some objects?
4. If you are in Mosaic mode, and you shrink the size of the circle surrounding a small object like the Sombrero Galaxy you are effectively cutting out a large area of sky filled w stars and stacking images of only the smaller area defined by the mosaic. Are you then going to effectively get more resolution since you are reducing the area to be shot dramatically.
1 through 3: Yes, that’s correct! Advanced Mode expands the original field of view to its maximum using CovalENS, and you can indeed use Advanced Mode during planning.
As for point 4:Stacking more images does improve the signal of the object you want to capture, and if you’re working with the original field of view, your Vespera sticks to its native sensor size and captures the object directly. In contrast, when using CovalENS (Advanced Mode), you capture a wider area of the sky, which is great for larger compositions—but it spreads imaging time over a broader region, meaning the camera isn’t collecting as much data on any one part of the object at a time.