Are you considering to buy a Skywatcher EQ6-R PRO telescope mount? Then you have come to the right place :-). In this blog, I’ll share my first impressions of this telescope mount which arrived on my doorstep earlier this month. After using it for a couple of nights, I would say the main advantages are that it guides well (sub-arc accuracy with PHD2) and the dual saddle plate to mount the telescope is wonderful. Also, the EQ6-R pro can be connected to your laptop/PC via the direct USB connection on the mount, without the use of a hand controller. The main disadvantages – besides my ‘first fight’ – are the bubble level on the mount (misaligned), the weight of the mount (but that was to be expected) and the handle on the altitude knob on the back of the mount.
In this blog, I’ll write about the following topics:
- Unboxing and setting up the mount
- Connecting the mount via direct USB to EQMOD
- First fight
- First light: guiding results
Before I start to write down my thoughts I have to underscore that my experiences are currently based on my first week of using this telescope mount. I’ll write an in depth review after a couple of months when I have performed multiple imaging sessions. I really dislike so called ‘reviews’ that are based on only one or two nights of use. Also, if you are still undecided about choosing a mount that lies within the same price and capacity range of the Skywatcher EQ6-R pro, it may be useful to also read my blog on best advanced telescope mounts in 2020, where I compare six mounts that are similar in terms of price and capabilities.
Unboxing the Skywatcher EQ6-R PRO
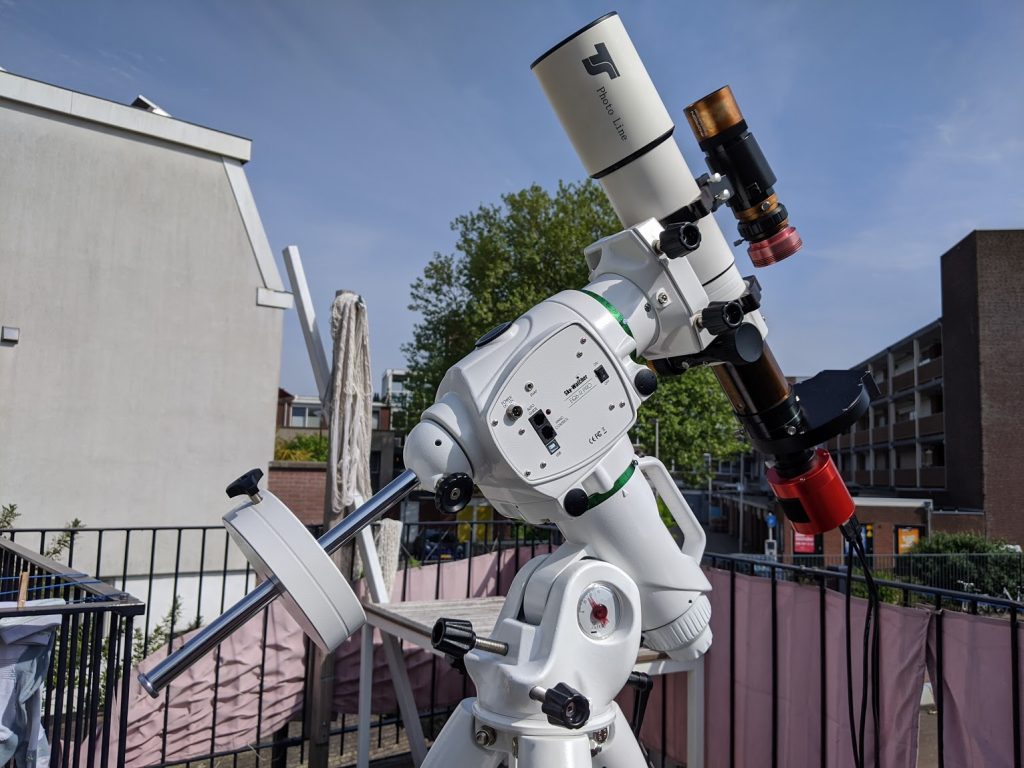
I was of course very excited when the skywatcher EQ6-R PRO arrived at my doorstep. The main reason I bought this equatorial telescope mount is that it ticked most of the boxes of what I would like to see in an ‘advanced’ telescope mount. First of all, the EQ6-R PRO has a generous advertised payload capacity of 20 kg (44 lbs) which leaves plenty of room for me to upgrade my telescope. I currently use a Teleskop Service 80mm APO photoline refractor telescope on a Celestron Advanced VX equatorial mount, but I’m thinking about buying a second, larger and heavier telescope. As my current AVX mount has a maximum payload capacity of 13.6 kg (30 lbs), I was looking for a mount that could carry a bit more weight around while still guiding with high (sub-arc) accuracy. The belt drive motors with PPEC capabilities on the EQ6-R PRO should be able to guide heavier setups. Also, the dual saddle plate which supports both losmandy and dovetail style telescopes and the direct USB connection on the mount which eliminates the use of a hand controller when connecting this mount to my mini PC were reasons for me to choose this mount.
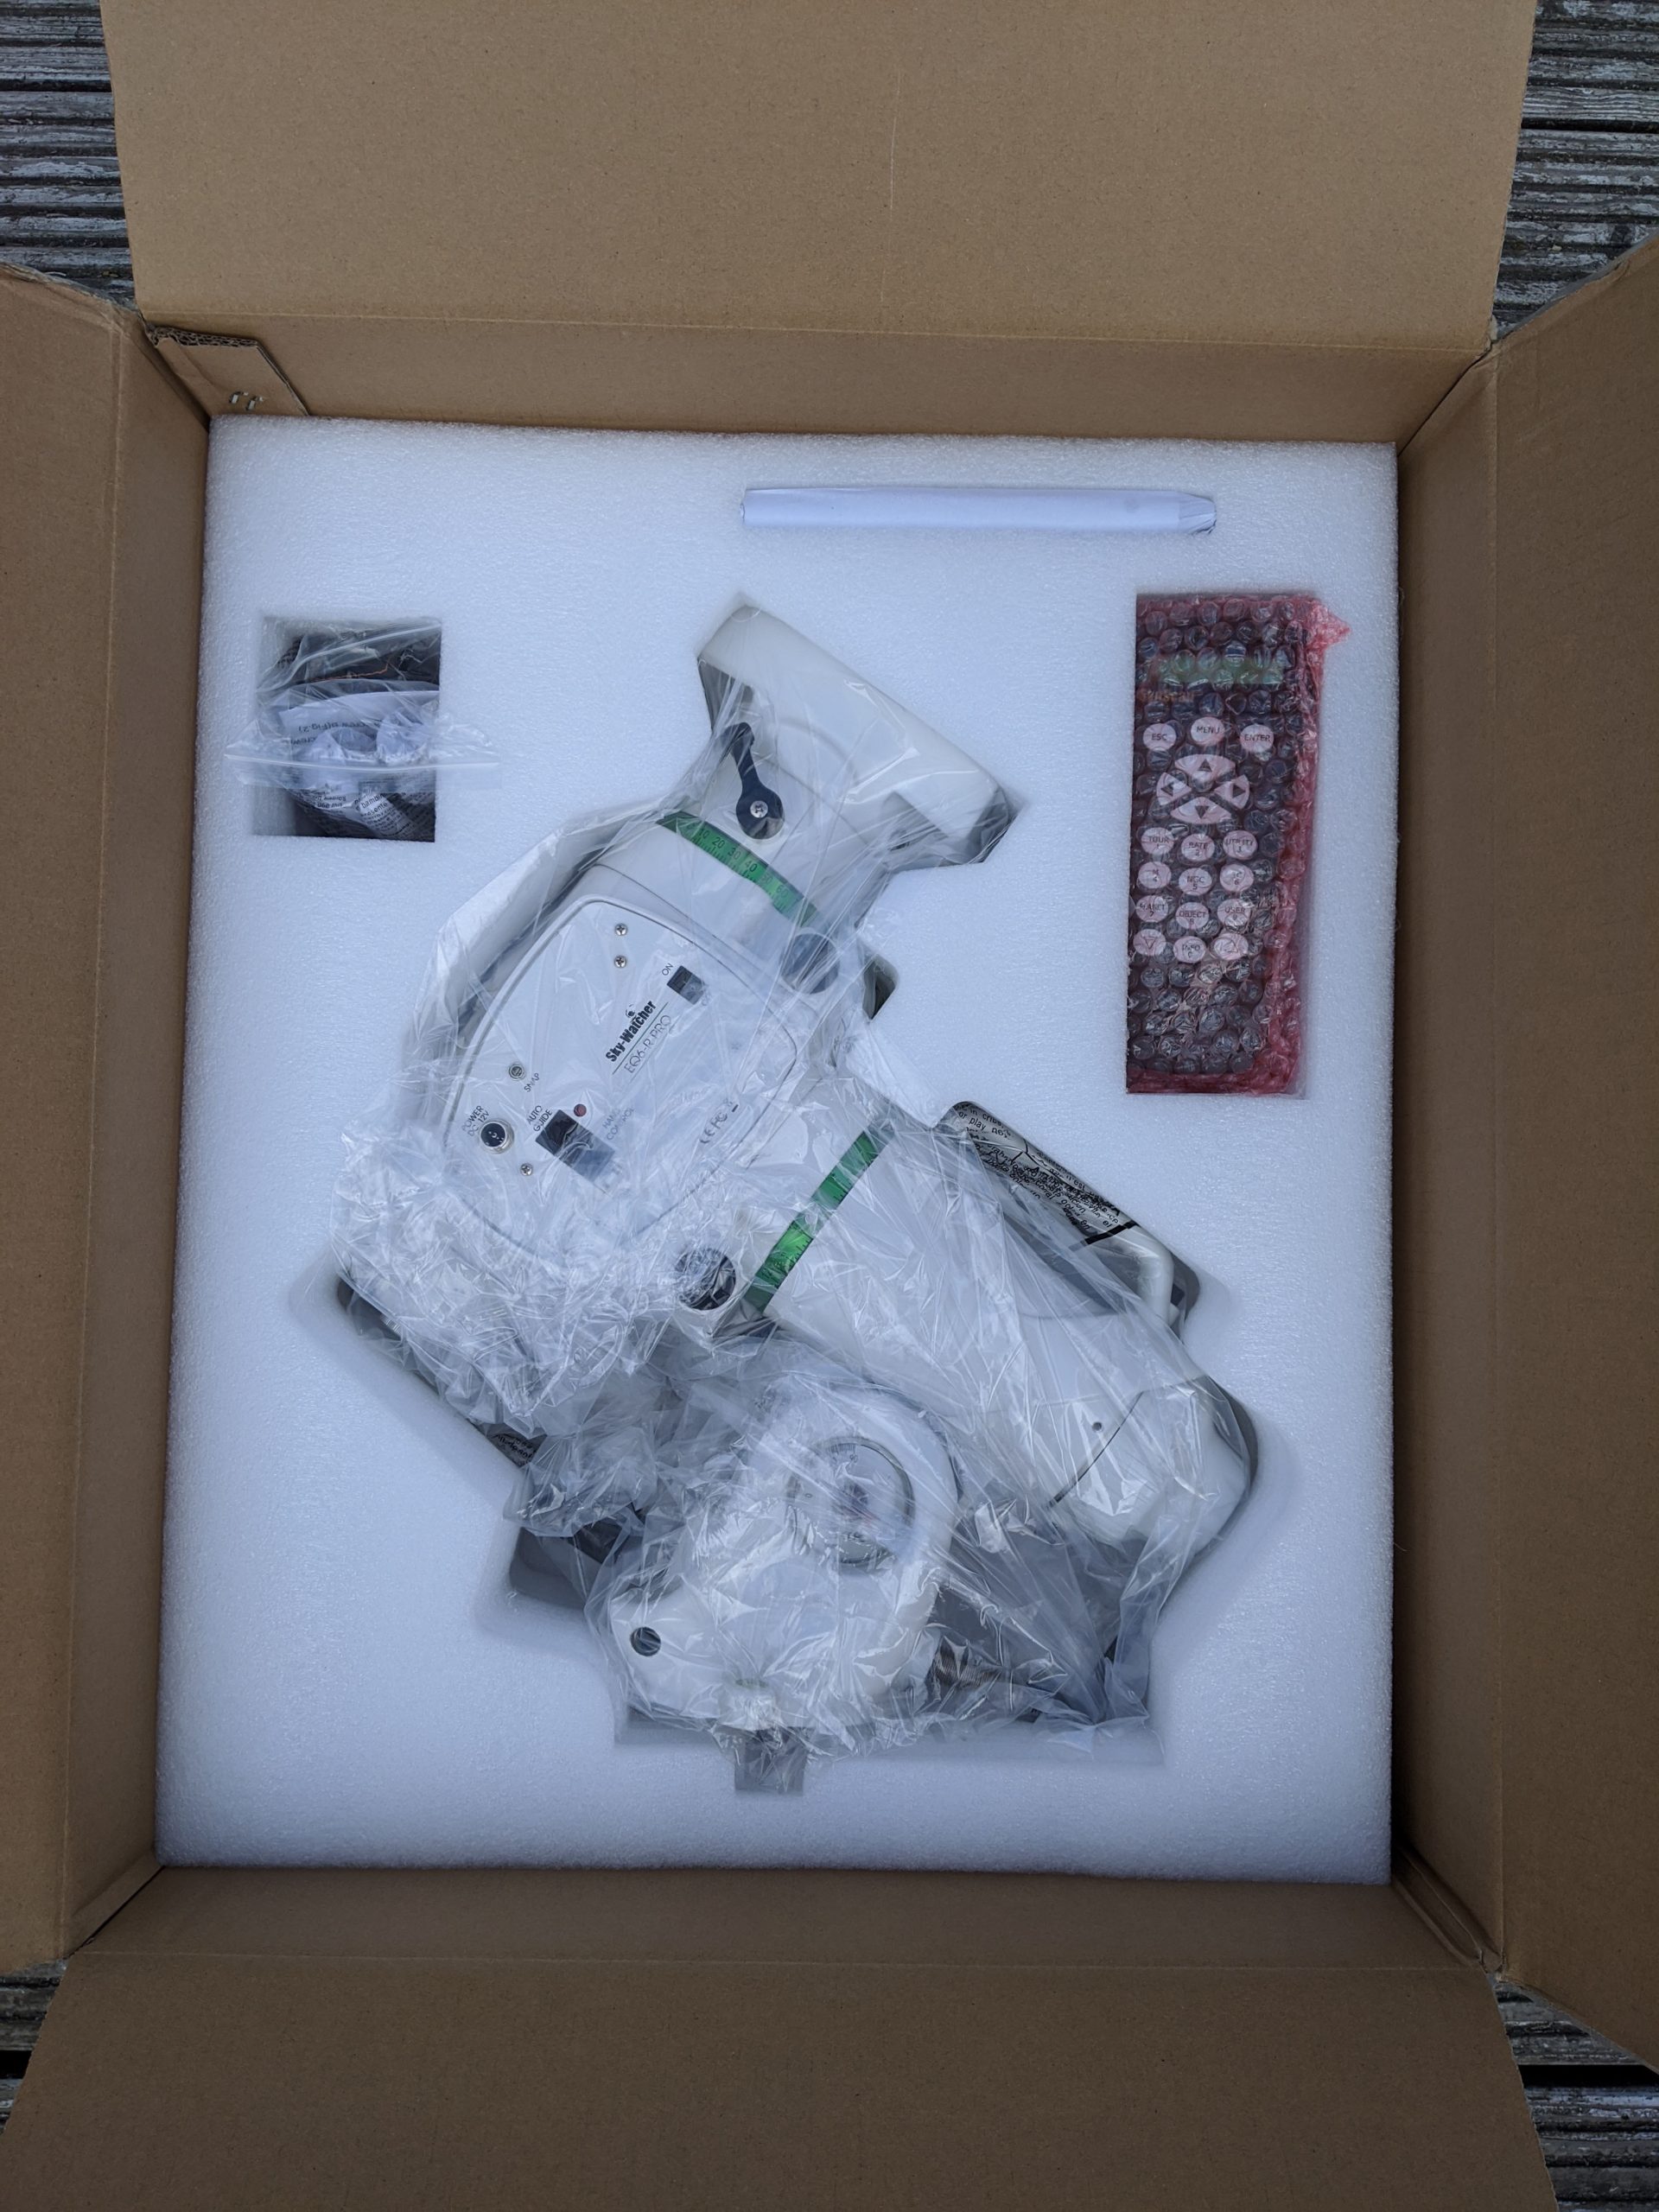
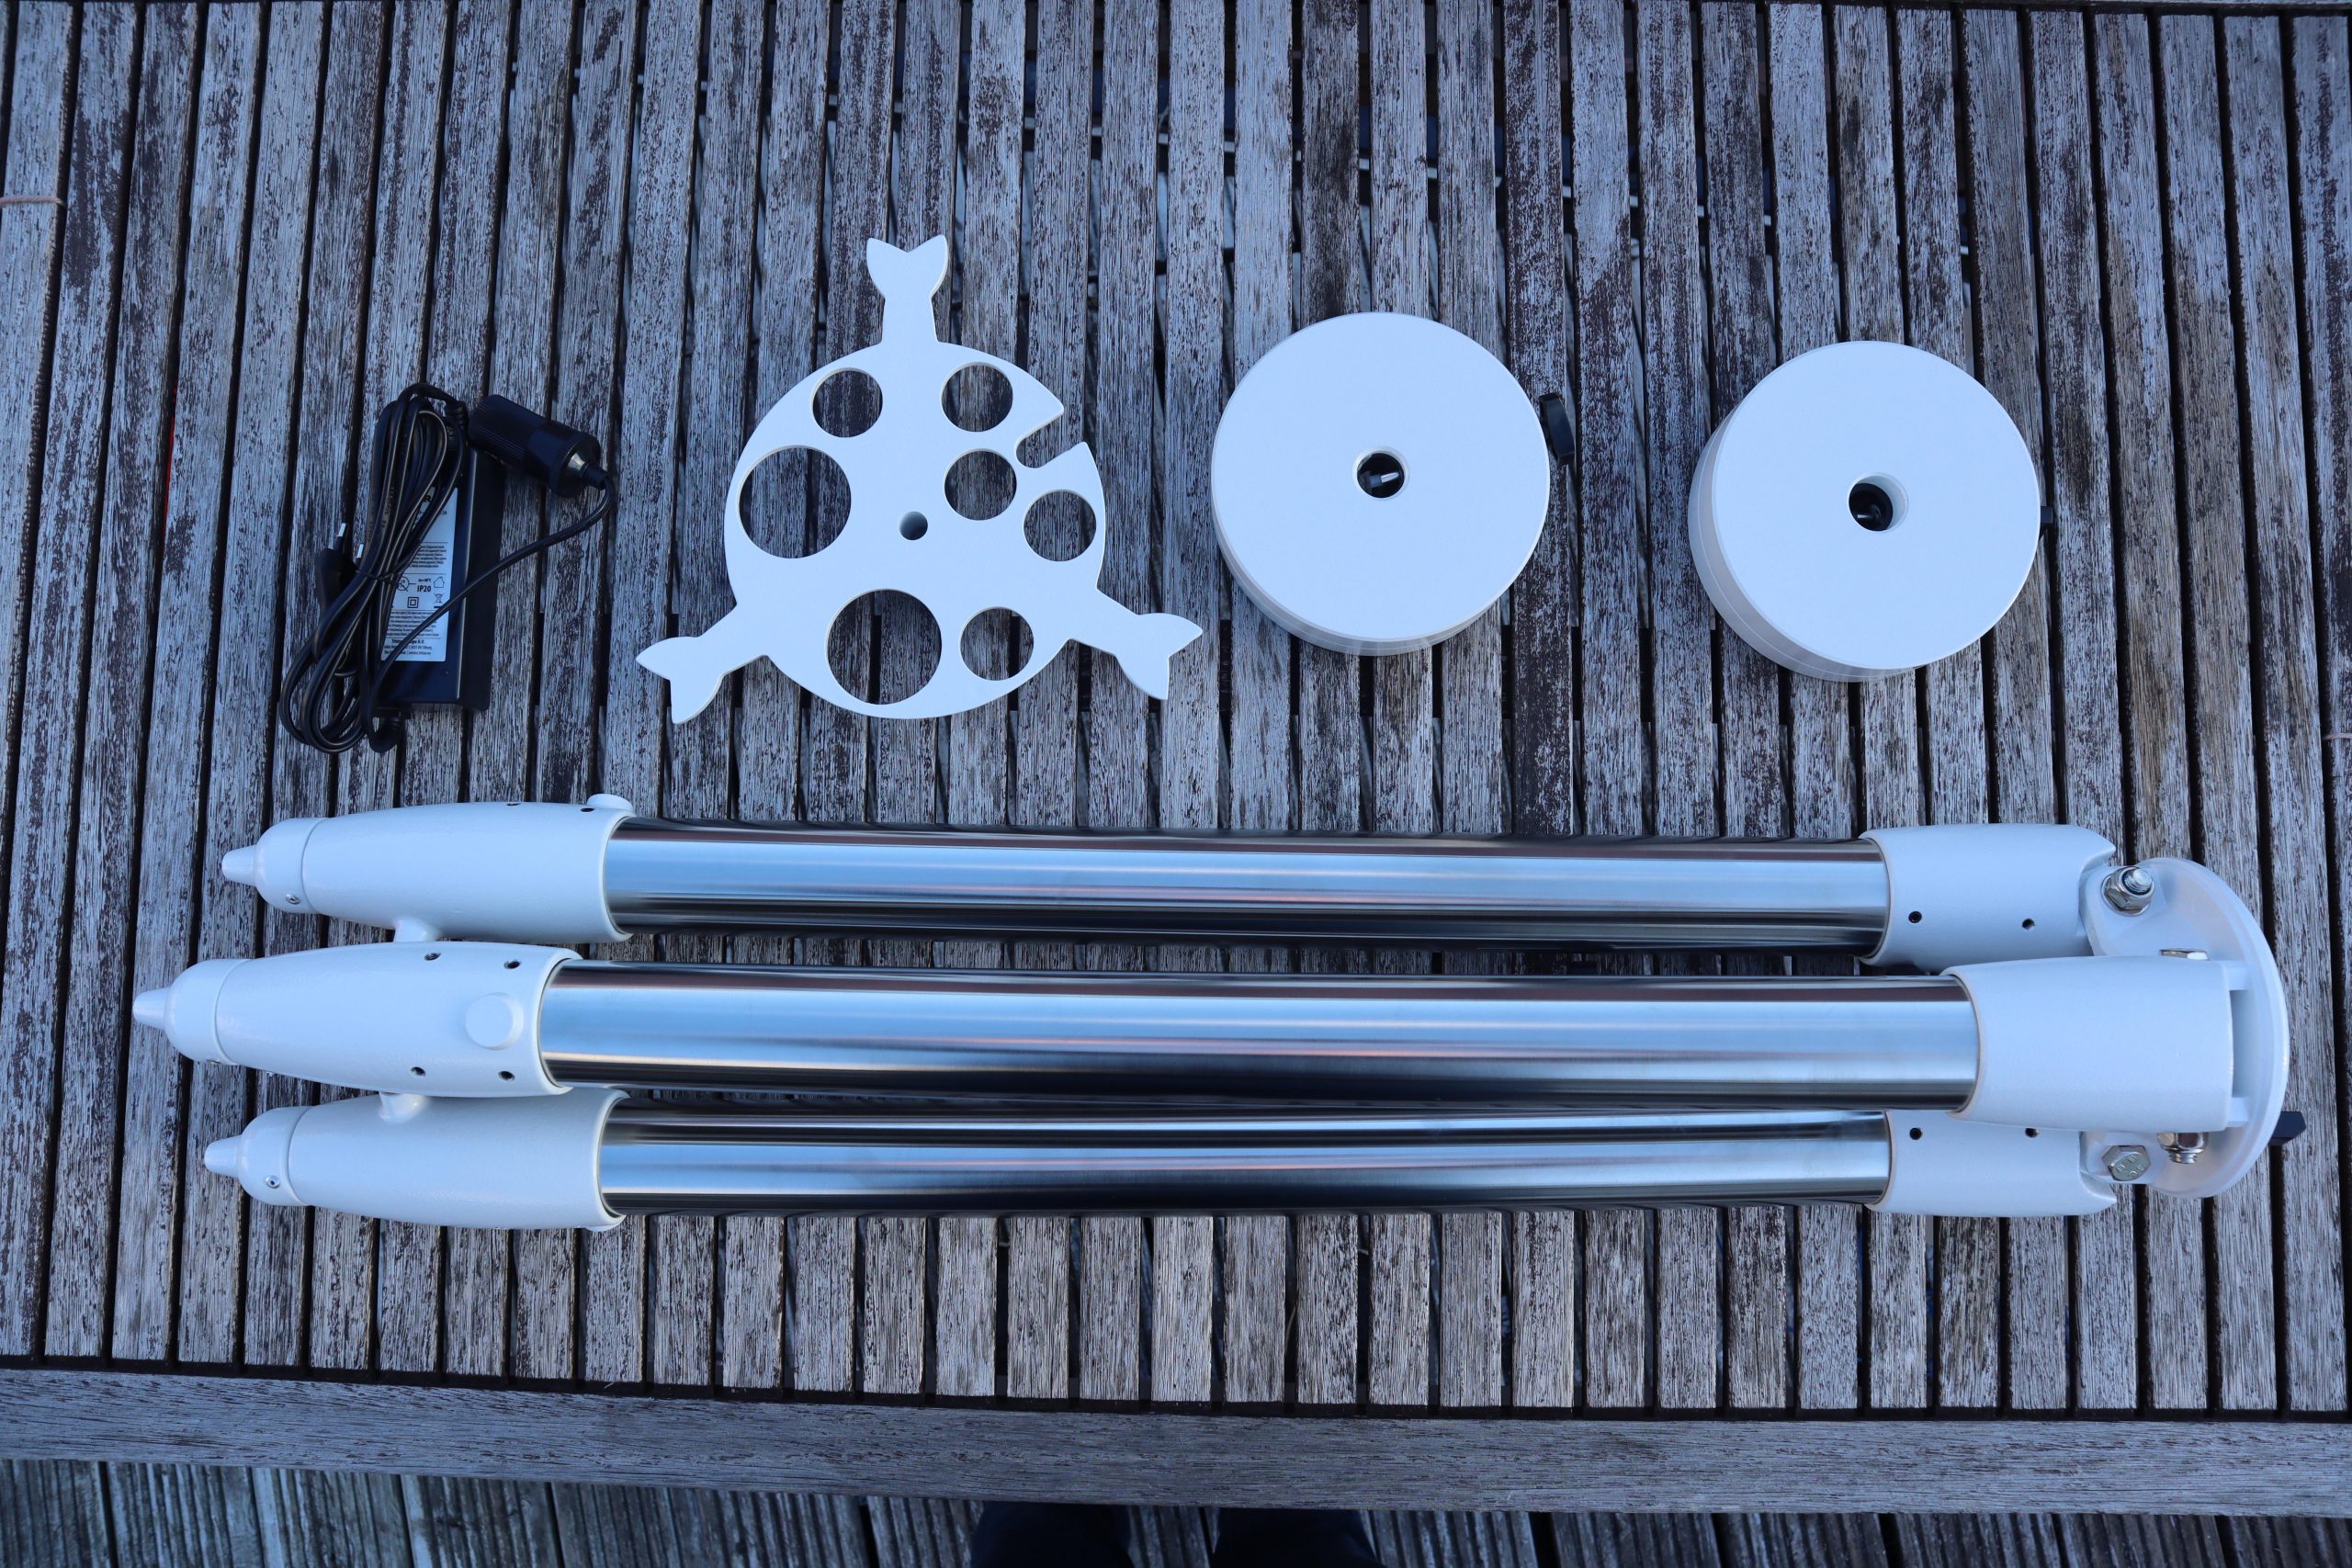
The EQ6-R pro arrived in two packages, one with the mount head and another one with the tripod. The extra accessories included the usual stuff, like the 2 x 5 kg counterweights with a counterweight extension rod, a synscan hand controller, an eyepiece holder, a pole finder (in the mount) and a power supply with car battery adapter.
Setting up the Skywatcher EQ6-R PRO
Setting up this equatorial mount is easy when you are already used to working with an equatorial mounts. If you do not have any experience with setting up an equatorial mount, I have two videos on how to setup and polar align an equatorial mount. Please bare with me as the video on setting up an equatorial mount was one of my first YouTube videos ever :-). It didn’t take me more than 15 minutes to setup the EQ6-R pro, including the time it took to mount my telescope, filter wheel and ZWO 1600MM pro camera.
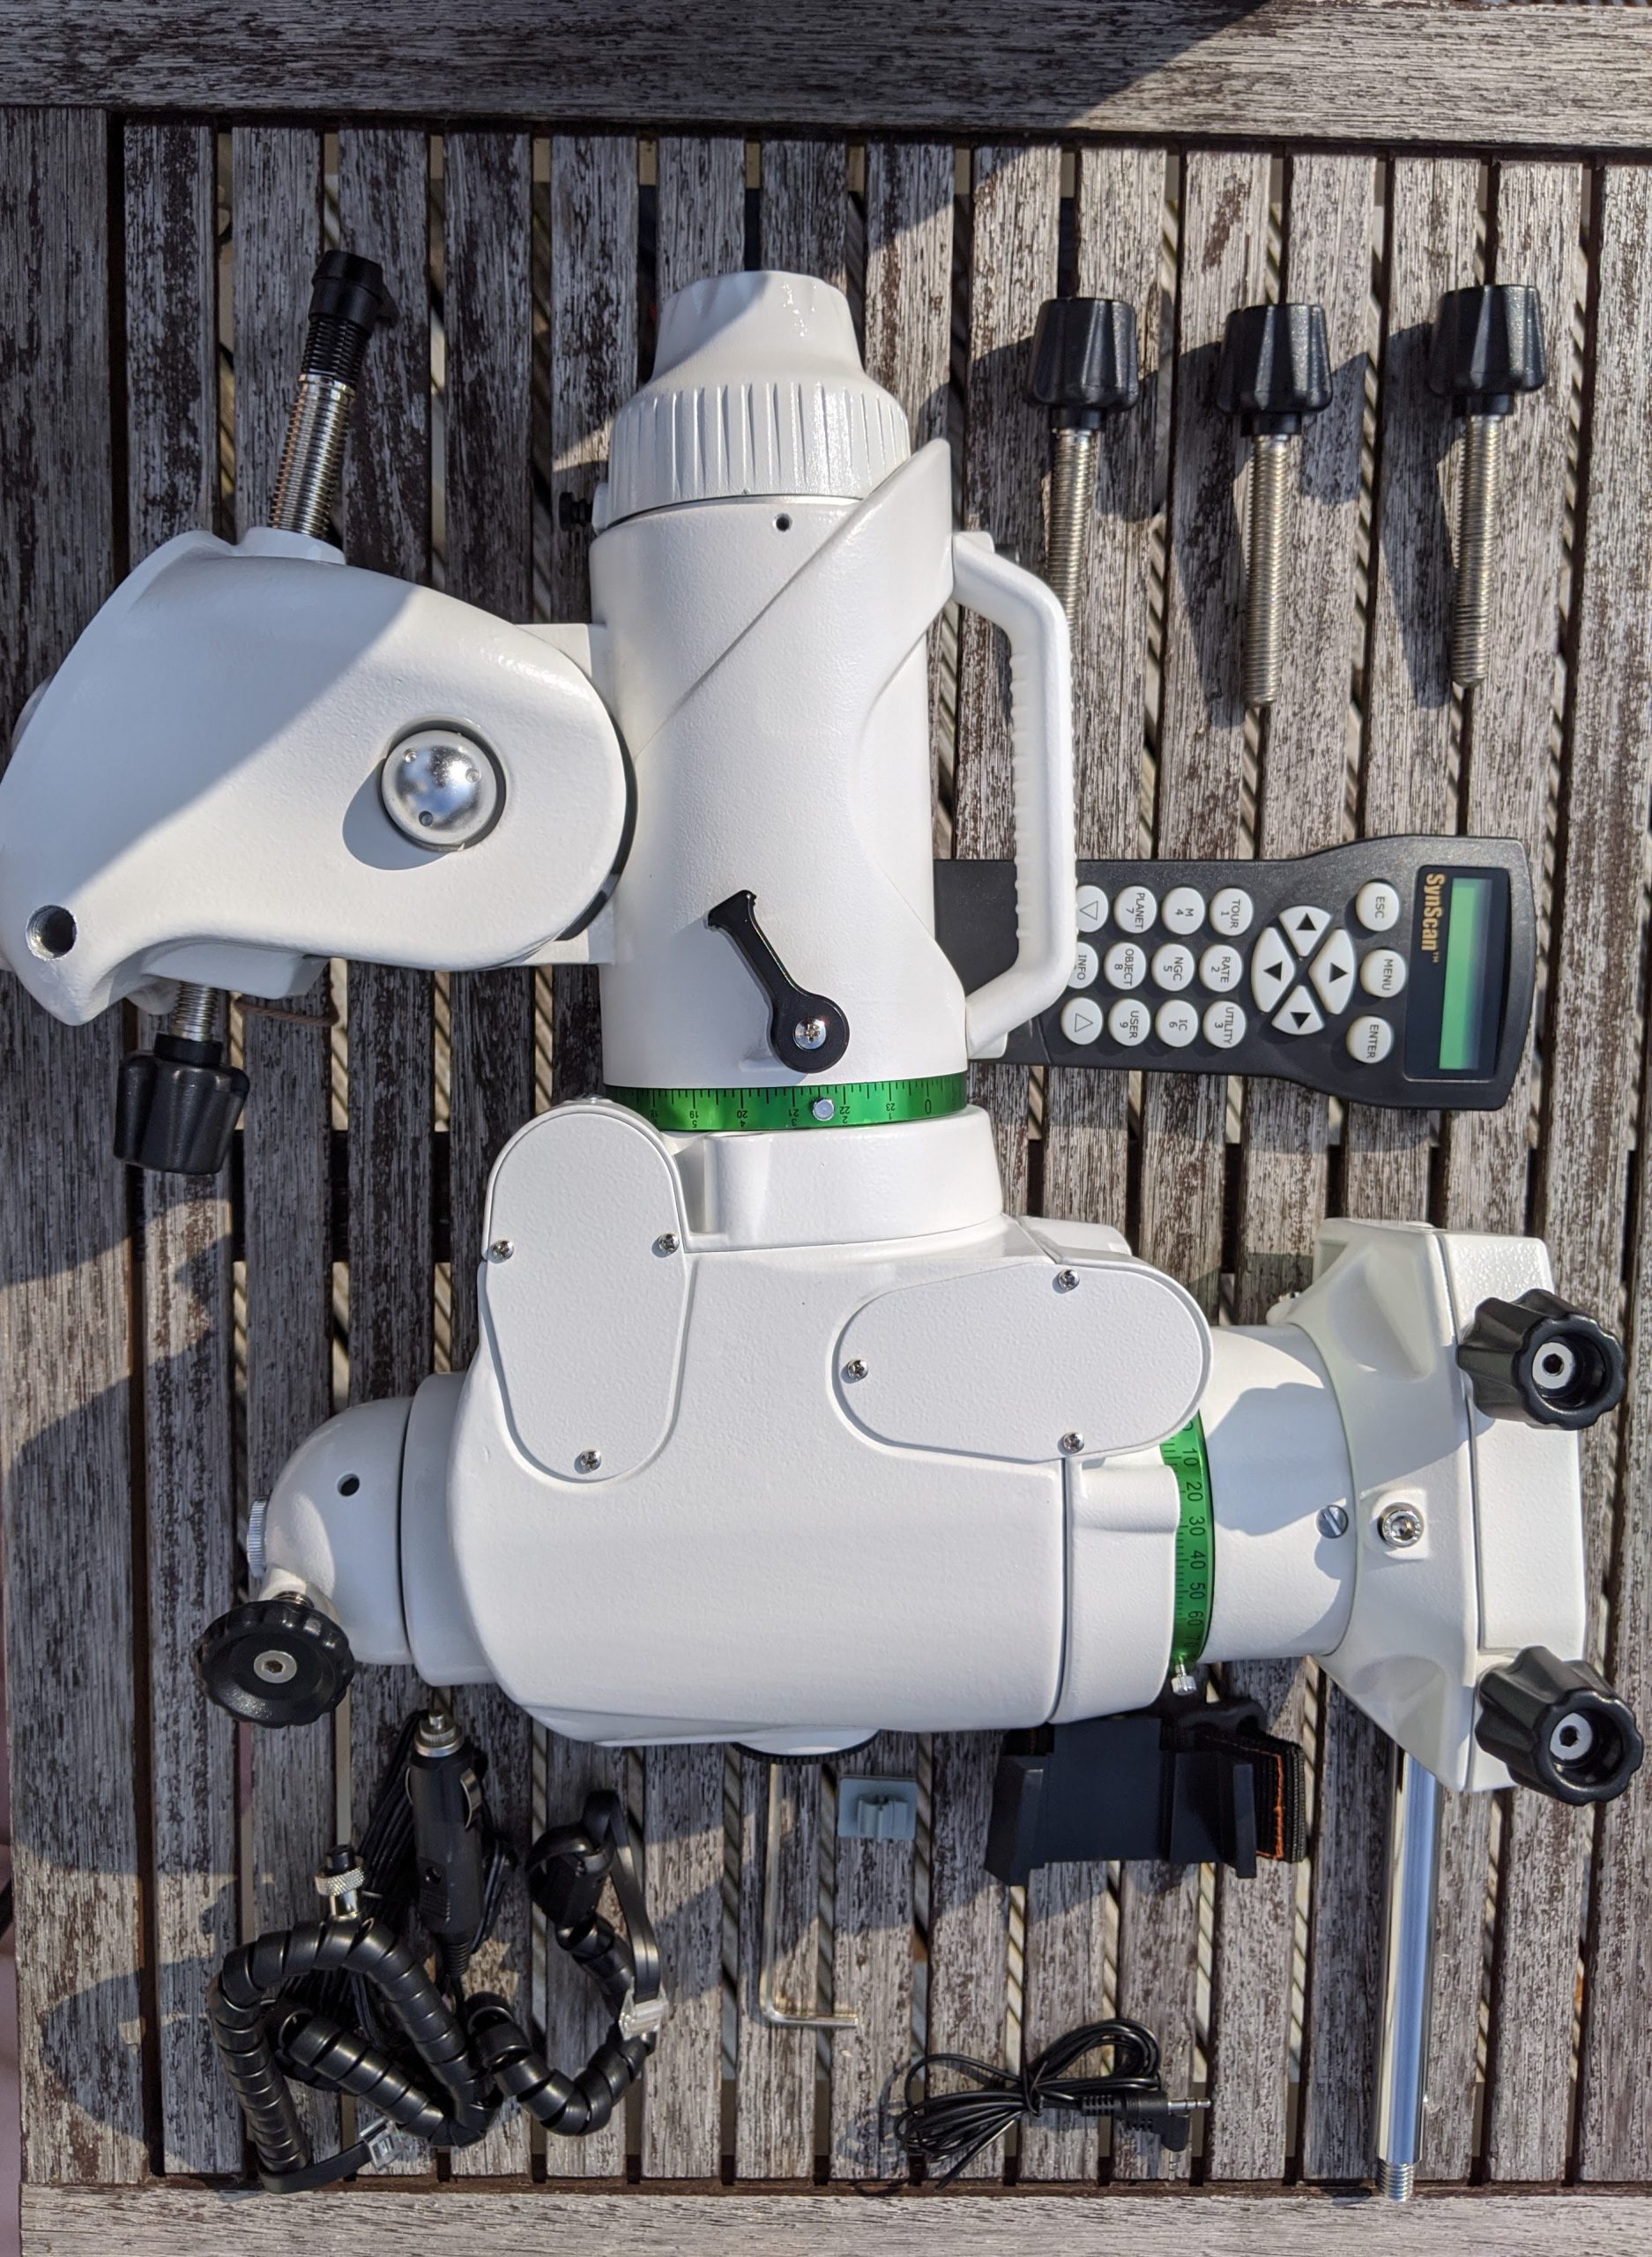
There were a few minor things that bothered me however. First of all, the bubble level that is included on the mount itself was misaligned. My regular leveler showed that the mount was exactly level whereas the bubble level indicated it was not. The second, minor issue was that threading the tripod to the mount head felt a bit stiff. Finally, the altitude knob on the back of the mount has a little handle. As I’m at 52 degrees latitude, the handle touches the rear tripod leg when I want to turn it which is somewhat annoying when I’m polar aligning my telescope. I will be replacing this handle with a regular knob. Finally, the EQ6-R PRO mount head is a lot heavier as compared to my Celestron AVX mount head. But this is all part of the game if you are looking for a mount that can carry high(er) payload capacities. Despite these minor issues, I would say that setting up the skywatcher EQ6-R pro is easy.
Connecting the Skywatcher EQ6-R pro via direct USB to your PC or Laptop (EQMOD)
One of the more exciting possibilities – at least in my opinion – is to connect the EQ6-R PRO directly to your (mini) PC or laptop via a USB-B to USB-A cable, without the need to use the hand controller. With a lot of beginner and advanced telescope mounts such as my Celestron AVX, you first have to connect the hand controller to the mount which, in turn, can be linked to a PC or laptop. The Skywatcher EQ6-R PRO can be directly controlled from the mount itself via one USB-B to USB-A cable, which is awesome. It allows you to directly connect your mount to some of the more popular software programs that are often used by astrophotographers and (amateur) astronomers such as PHD2, Sequence Generator Pro and Stellarium. Note that it does require some steps to get the direct USB-B to USB-A cable to ‘talk to’ your (mini) PC or laptop. I will make a separate video and blog in the future on how to setup your software, so keep an eye out for that if you are interested in this. Of course, when you do not intend to use the mount with a PC or Laptop, then this option isn’t relevant to you. And if – for some reason – you do want to connect your laptop or PC via the synscan hand controller to the EQ6-R PRO then this can be done as well. I just like simplicity of having one cable that connects my mount to my computer and I’m happy to get rid of one piece of hardware (the hand controller) in my astrophotography setup.
First fight with the EQ6-R pro
Unfortunately – as is often the case with new hardware – my first night didn’t go as planned. I spent the whole night up to 4 am to get the mount working. Although I was able to setup the direct USB connection with my mount and use my software (PHD2 guiding and Sequence Generator Pro), guiding seemed to be off quite a bit. This was odd, since I have ample experience in setting up and polar aligning equatorial mounts to the north celestial pole. I kept on looking for software issues and finally gave up in frustration. The next day I decided to take a step back and simply connected my hand controller to the mount. Oddly enough, the mount would turn from left to right when using the upper axis motor but not up or down when using my lower axis motor. I could hear the motor turn but the mount didn’t move at all. After consulting with the supplier, I decided to remove the Philips screws and the cap on the lower axis motor to take a closer look and find out what was happening. After I had removed the cap I could clearly see what was the issue. The belt drive that connected the motor to the worm had come loose and the ring that was supposed to keep to belt drive in place had come off. This might have happened during transportation, or it was simply a mistake made in the Syntha factory in China, who knows.
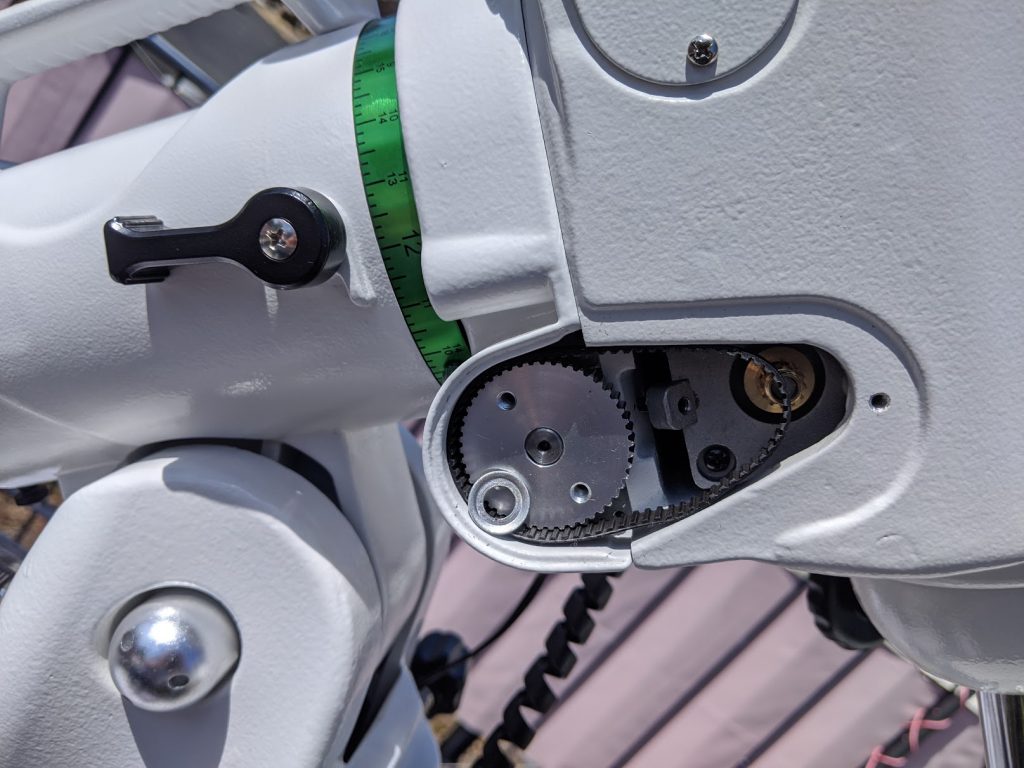
After consulting again with the supplier I decided to put the belt drive back on myself, and re-attach the ring in front of the motor to keep the belt in place. Unfortunately, that ring didn’t hold and the belt drive kept running off. I decided to put a small piece of flexible hard plastic in front of the ring before re-attaching the cap on the motor drive with the Philips screws. That did the trick as the mount could now be slewed to all directions using both the upper and lower axis motors. The supplier also informed me that this problem can be solved by slightly tapping on the hollow side of the ring with a hammer, and by using some lock tide to fix the ring into position. I have to decide if I’ll go back to the supplier or repair it myself. For now, the mount runs great with the small piece of hard plastic as a ‘secret ingredient’ that keeps the ring and the belt drive in place. I’m also assuming that I simply had some bad luck, as I’m not aware of any other users reporting this problem.
First light with the EQ6-R pro
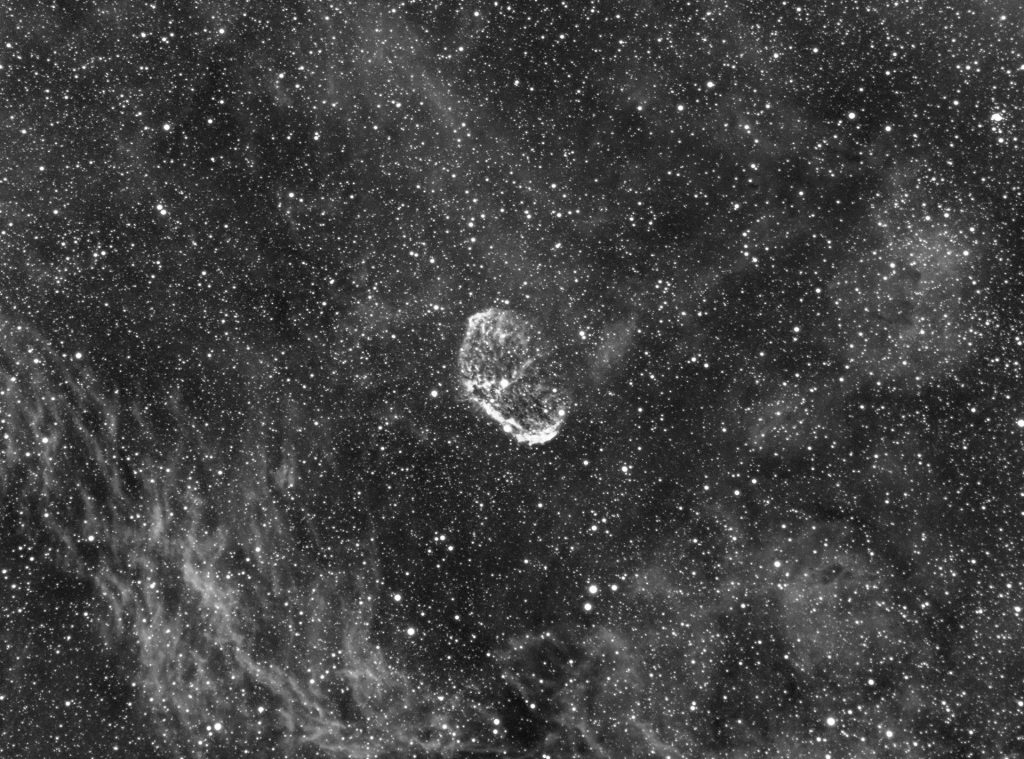
I have been using the EQ6-R PRO mount for a couple of nights to image the crescent nebula and the hydrogen rich region around the star Sadr in Cygnus. I would argue that the most important things a mount needs to do well is (a) to slew to the target of interest and (b) accurately guide – both of which the mount did fine. It is always difficult to give exact figures on guiding capabilities. It depends on the (weight of) the gear you use, the way you have balanced your telescope and gear on your mount, the accuracy of your polar alignment and – of course – weather and seeing conditions as well. Over the years, I have come to think that I can polar align and balance my mount quite well (but maybe I’m wrong :-)). Importantly, I have used the EQ6-R pro with light weight gear for my first sessions, being my TS 80mm APO F/6 refractor, my ZWO ASI 1600MM pro camera with my ZWO 8 position motorized filterwheel and my orion 50MM guidescope – as you can see in on of the pictures above. The weather was favorable and winds were 2-3 Beaufort max. Guiding across three nights averaged out at about .75 arc seconds of guiding error for RA and about .5 arc seconds of error for DEC. The guiding was also quite regular, I did not experience any odd outliers during my 10 minute guiding cycles. I have to say that I did use PHD2 guiding and I first used the guiding assistant procedure to fine tune the settings in PHD2 for the Skywatcher EQ6-R PRO.
Early conclusions
All in all, I’m pretty happy with my new mount. I did have some bad luck as explained above in the first fight section. That put aside, I think the skywatcher EQ6-R PRO meets most of the expectations I had before buying the mount. Again, these conclusions are just based on my first week with the mount. I’ll perform a proper review after a couple of months, after several imaging sessions. Most importantly, the mount has been guiding with sub-arc accuracy. As I’ve used relatively light gear, I hope the guiding will also be similar once I decide to switch to a heavier telescope. Moreover, I really appreciate the direct USB-B to USB-A cable connection on the mount. Also, the dual saddle plate to mount telescopes with both vixen and losmandy style connections is great. My old AVX mount has bolts that directly impact the dovetail of my telescope which damaged the paint of my dovetail. The EQ6-R pro has knobs in the dual saddle plate which do not impact the dovetail whatsoever. This being said, I did experience some minor issues. First, the bubble level cannot be trusted in my opinion. I would advice to use a regular leveler to level your mount. Second, the handle of the altitude know was somewhat annoying, as it keeps running into my rear leg when I’m polar aligning my scope. I’ll replace this knob for sure. Finally, the mount head is heavy. All Skywatcher EQ6-R PRO mounts have a handle which makes it somewhat easier to carry the head of the mount. It would be no issue for someone who is relatively fit, it is portable for a couple of meters. I would not recommend this mount to anyone who has some (low) back pain symptoms.
It is my hope that my first impressions help you to make up your mount about the Skywatcher EQ6-R pro. I know that choosing a mount can be hard. I have another blog on my website where I discuss other mounts that have similar capabilities and are in a similar price range which may help you.
Clear skies!
Hi there!
Beautifully pictures and good info on astrophotography here!
Personally I am quite experienced in other types of photography and are on the edge of investing in astro gear. Before doing so I’m looking for someone I can meet up with for a astro session to see if the astro shoots fit me. Are you up for taking a beginning enthusiastic on a beginners tour? I’m from Zeist by the way, so we’re basically neighbours.😀
Regards,
Florian
Hi Florian,
It’s quite boring to watch what I’m doing, which is basically taking pictures of one object during multiple nights :-). But I’m glad to answer any kind of questions you may have.