Smart telescopes are transforming the field of astronomy, making it more accessible and affordable than ever. Two notable models in the $500 price range are the Seestar S50 and the Dwarf 3, both equipped with cutting-edge features. While each telescope has been reviewed separately in earlier posts (check out the Seestar S50 review here and the Dwarf 3 review here), a direct comparison between the two has not been conducted—until now. This blog will provide a side-by-side evaluation of the Seestar S50 and Dwarf 3, assessing their performance in solar, lunar, and deep-sky astrophotography. Keep on reading for a thorough analysis of the strengths and weaknesses of each telescope to determine which one truly stands out.
What are Smart Telescopes?
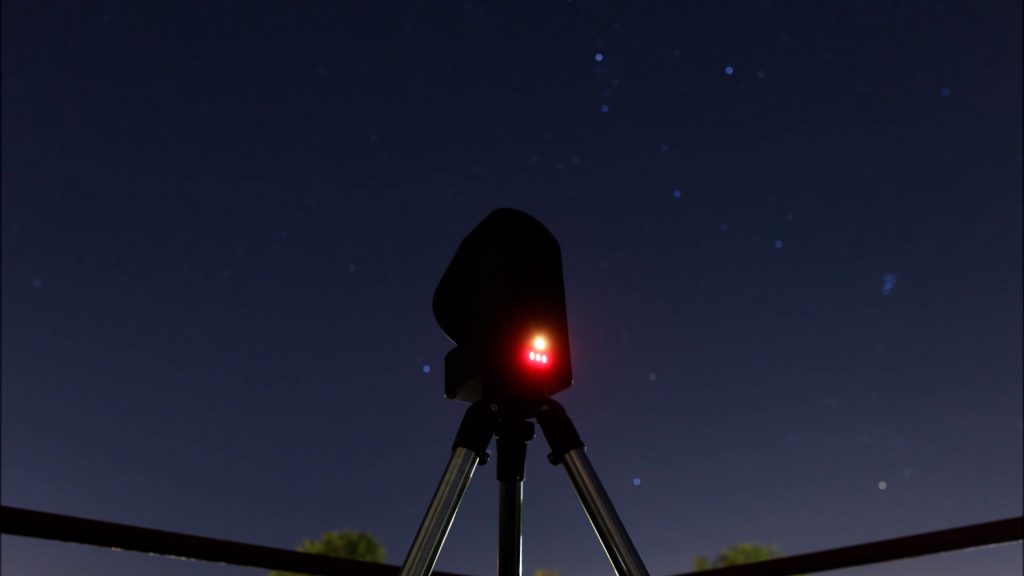
Dwarf 3 vs. Seestar S50 – key features
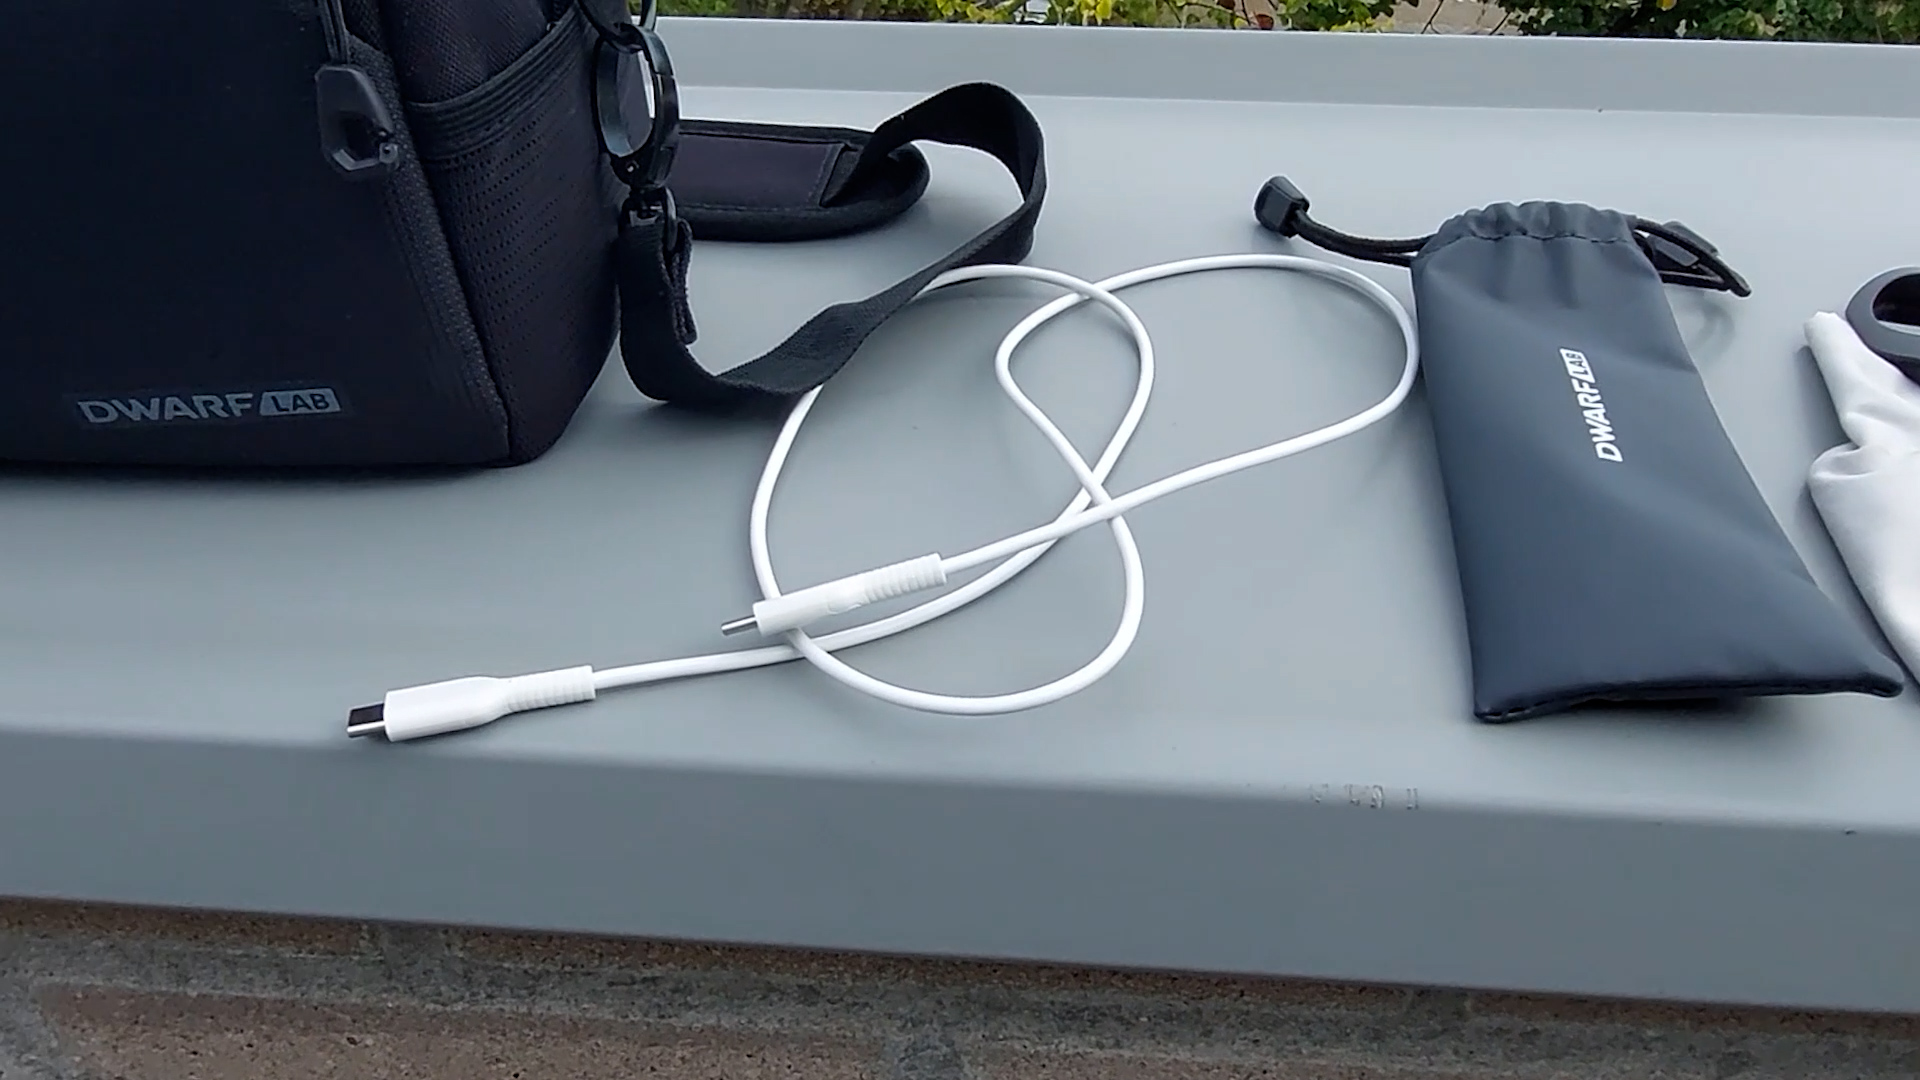
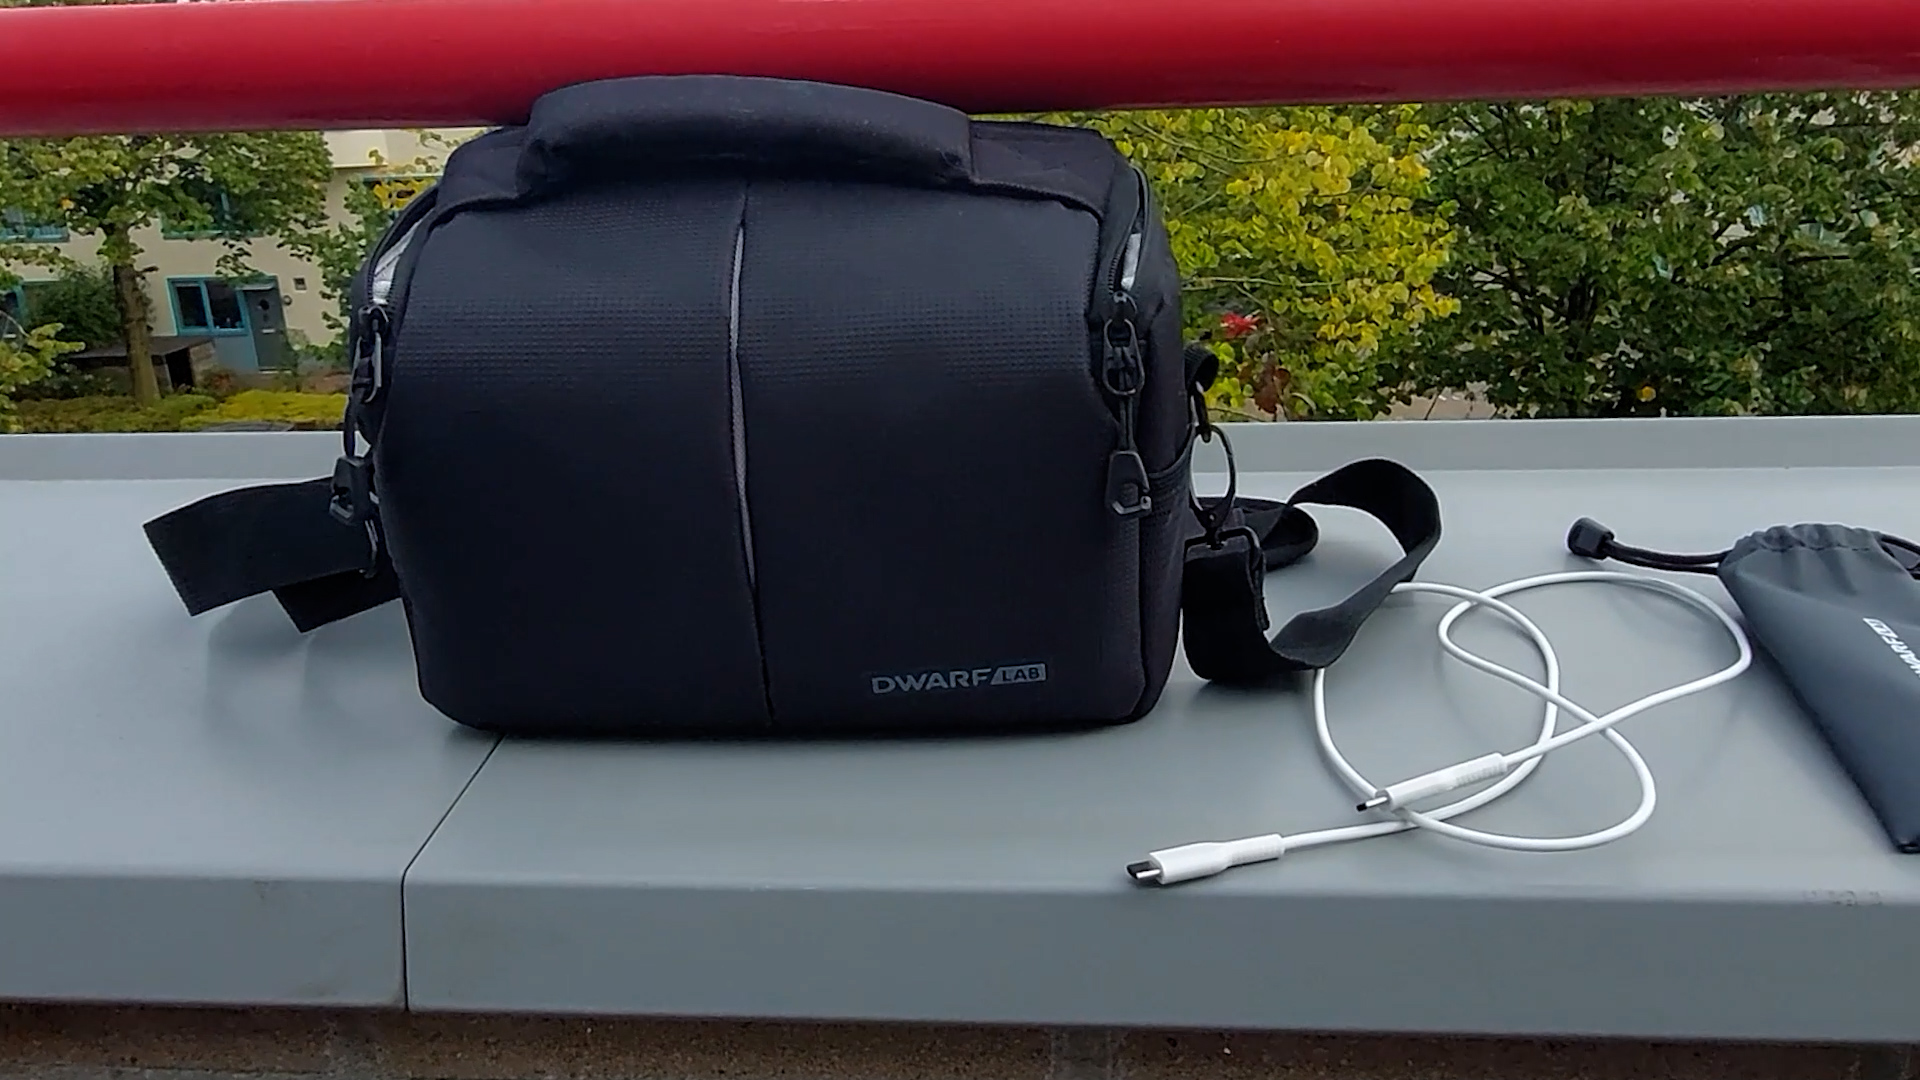
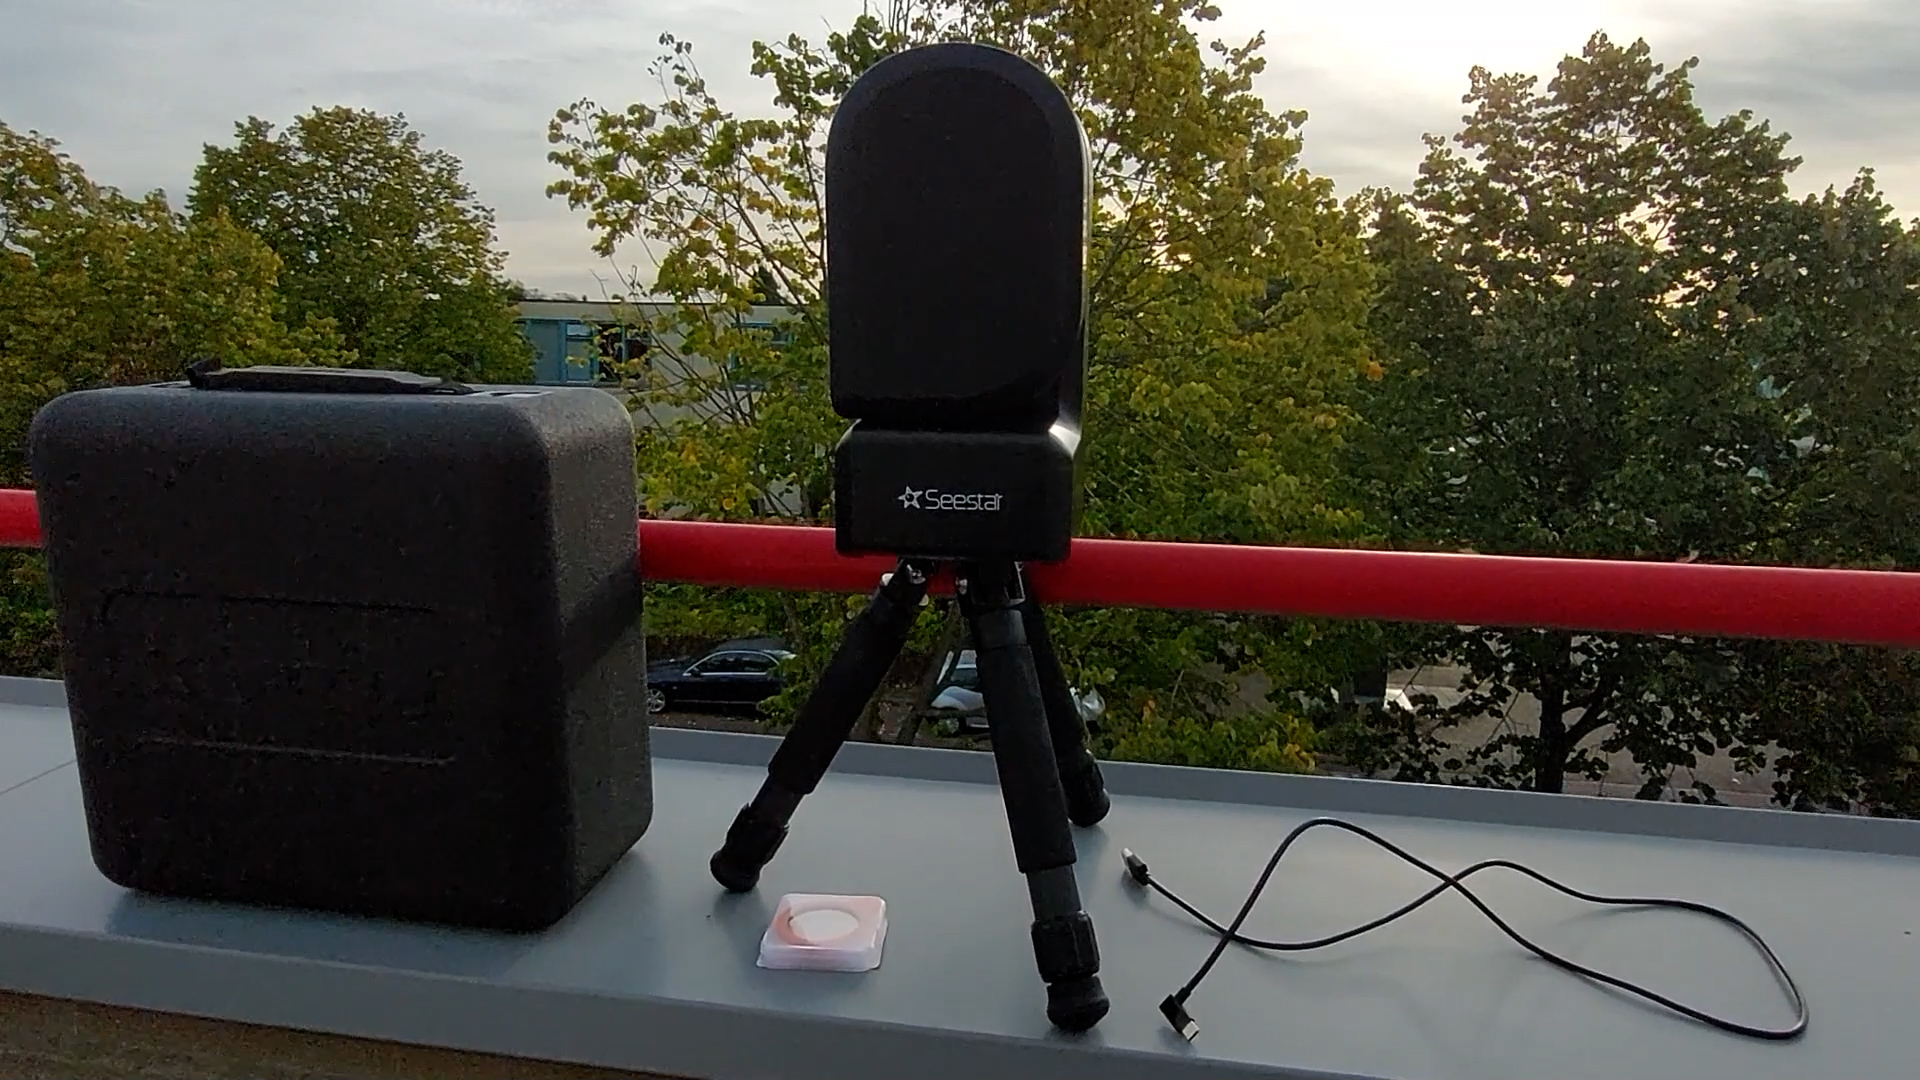
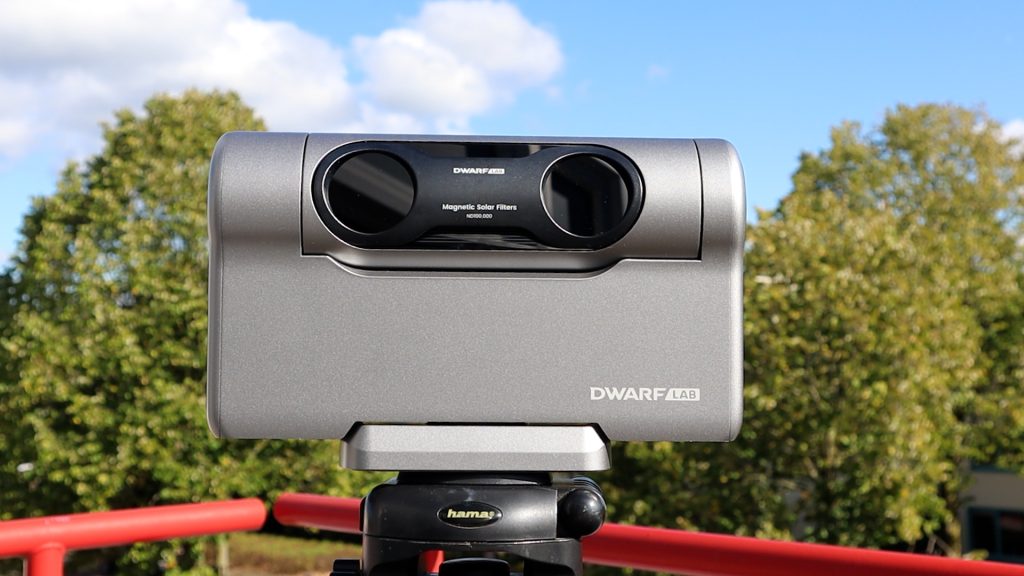
The Dwarf 3 Smart Telescope is currently priced at $499, not including taxes. In the box, you’ll find the telescope itself, magnetic solar glasses for safe solar imaging, a USB 3.0 charging cable, a cleaning cloth, and a travel bag for easy portability. However, it doesn’t come with a tripod. The good news is that the Dwarf 3 is compatible with any standard camera tripod that uses a 1/4 inch 20 screw, so you can easily attach it to one you already own. The ZWO Seestar S50 smart telescope is also available for $499. For that price, you’ll get the Seestar S50, a solar filter, a sturdy tripod, a carrying case, and a USB-C charging cable.


The Dwarf 3 Smart Telescope is available at Dwarflab (WW), High Point Scientific (USA/WW), and Astroshop (EU/WW)
The Seestar S50 Smart Telescope is available at ZWO, Agena Astro (USA/WW), High Point Scientific (USA/WW), and Astroshop (EU/WW).
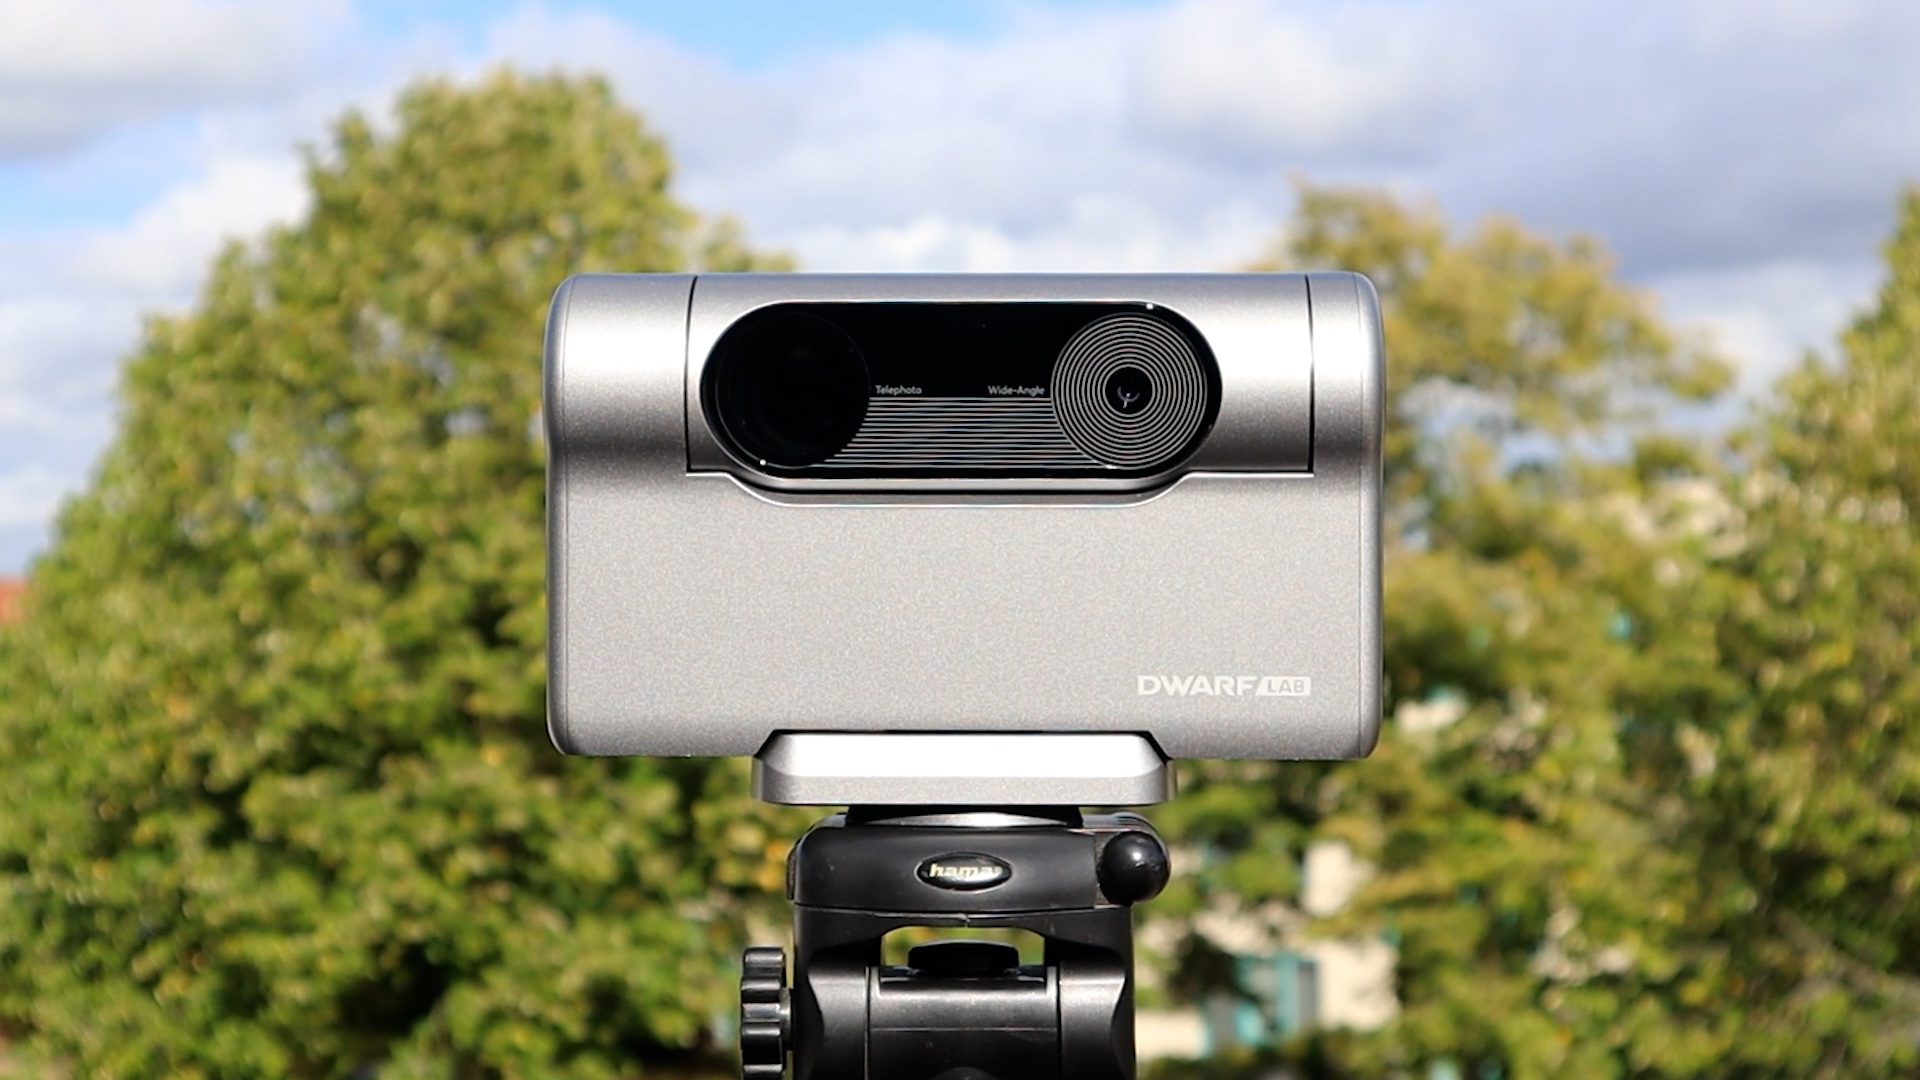
Let’s compare the optics. The Dwarf 3 features a 3.4mm widefield lens and a 35mm telephoto lens with extra-low dispersion glass to reduce diffraction spikes and chromatic aberration for sharp images. The telephoto lens has a 150mm focal length and the Dwarf 3 has an 8.3-megapixel Sony IMX678 sensor, that is optimized for low light conditions with STARVIS 2 technology. The Dwarf 3 offers a 2.93 x 1.65-degree field of view—about six times the width of the Moon—making it great for capturing large objects like the Andromeda Galaxy. With an image scale of 2.75 arcseconds per pixel, it’s slightly above the ideal 1-2 arcsecond range for deep-sky imaging, but still close enough so it should deliver solid results.
The Seestar S50 features a larger 50mm aperture and a 250mm focal length triplet refractor design, providing improved light-gathering and greater magnification compared to the Dwarf 3. However, it uses an older 2-megapixel Sony IMX462 camera sensor with earlier STARVIS technology for low-light imaging, while the Dwarf 3 boasts an 8-megapixel sensor with STARVIS 2 technology. The Seestar S50 has a narrower field of view of 0.7 x 1.3 degrees, which can fit one full Moon within its view. It does have a slight advantage in image scale at 2.39 arcseconds per pixel, giving it an edge in clarity for deep-sky objects.
The Seestar S50 features a larger 50mm aperture and a 250mm focal length triplet refractor design, providing slightly better light-gathering and greater magnification capabilities as compared to the Dwarf 3. However, the S50 uses an older 2-megapixel Sony IMX462 camera sensor with earlier STARVIS technology for low-light imaging, while the Dwarf 3 boasts an 8-megapixel sensor with newer STARVIS 2 technology.
The Seestar S50 has a narrower, portrait field of view of 0.7 x 1.3 degrees, which fits the width of one full Moon within its view. It does have a slightly better image scale at 2.39 arcseconds per pixel, which should give the S50 a slight edge in clarity for deep-sky objects.
Solar filters!
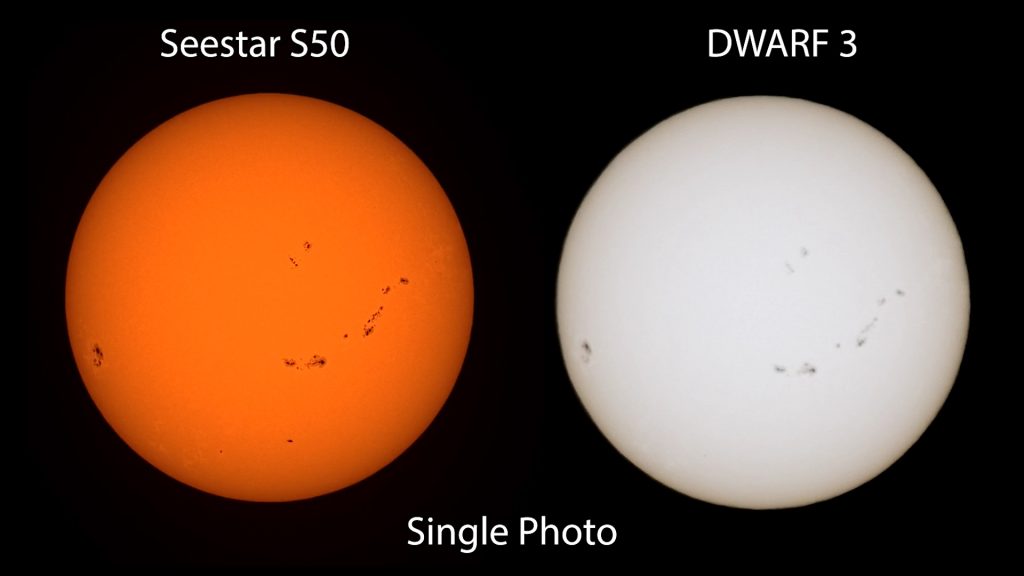
Let’s compare the Dwarf 3 and the Seestar S50 on their solar imaging capabilities first. One important thing to remember: never look directly at the Sun, and always use a solar filter when imaging the sun with these telescopes. Now, both telescopes come with solar filters right out of the box. The Dwarf 3 includes magnetic solar glasses, while the Seestar S50 has its own solar filter. Installing the filters is slightly different for each model. With the Dwarf 3, it’s super easy—just attach the magnetic solar glasses to both lenses, and you’re all set. The Seestar S50’s filter requires a bit more effort; you’ll need to press it onto the front of the lens, which can feel a little stiff.

Solar imaging: Seestar S50 vs. Dwarf 3
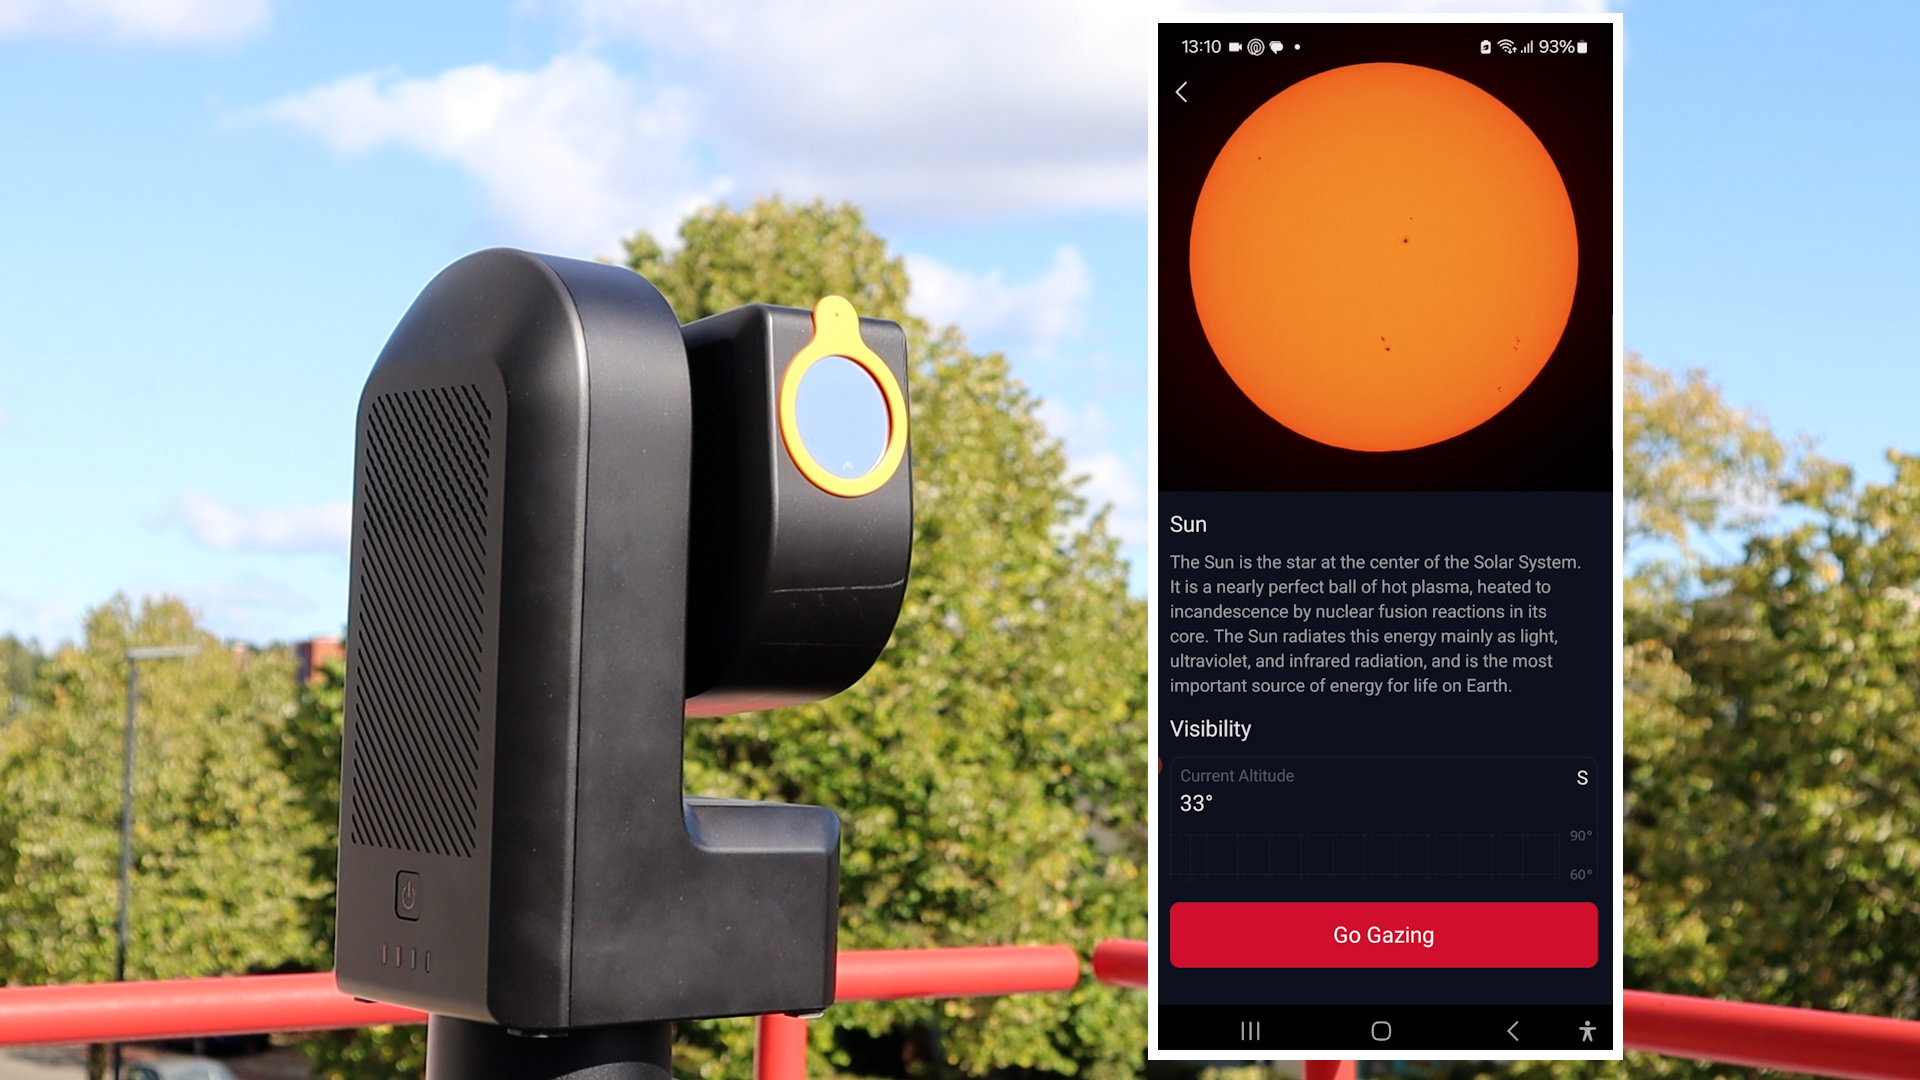
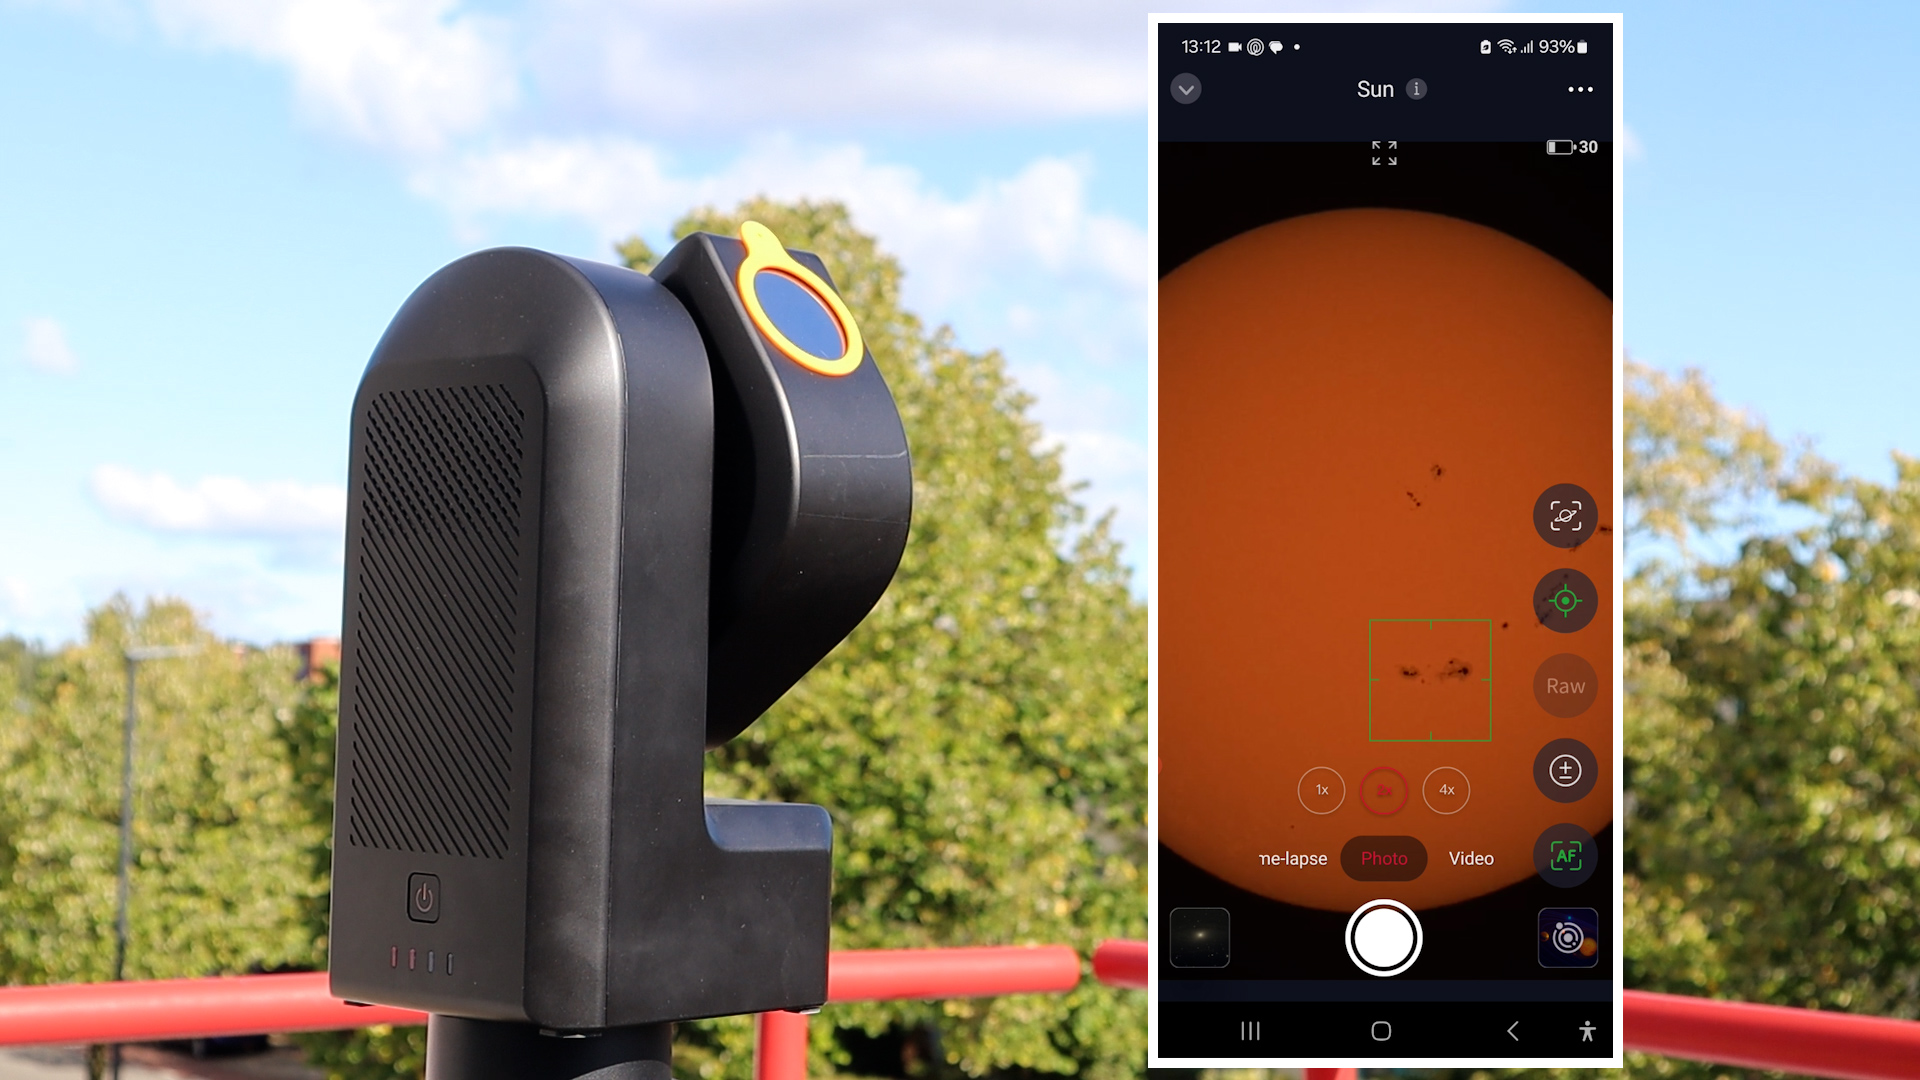
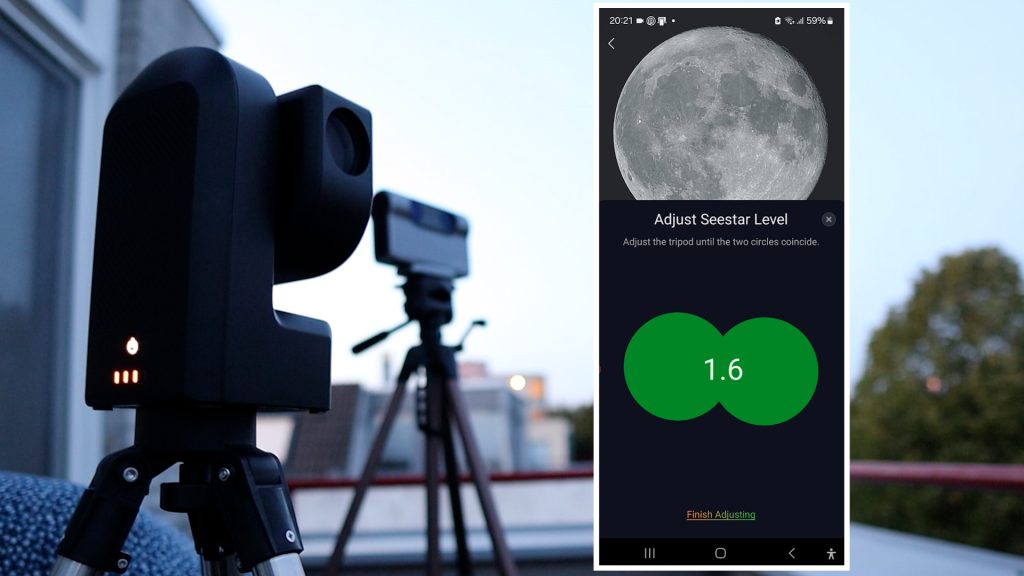
To kick off a solar imaging session with the Seestar S50, it’s essential to level the telescope tripod and point it roughly at the Sun. The Seestar app, required for controlling the device, is available for both Android and iOS, though not for Windows. Detailed instructions on app installation and connecting to the Seestar S50 can be found in my Seestar S50 review.
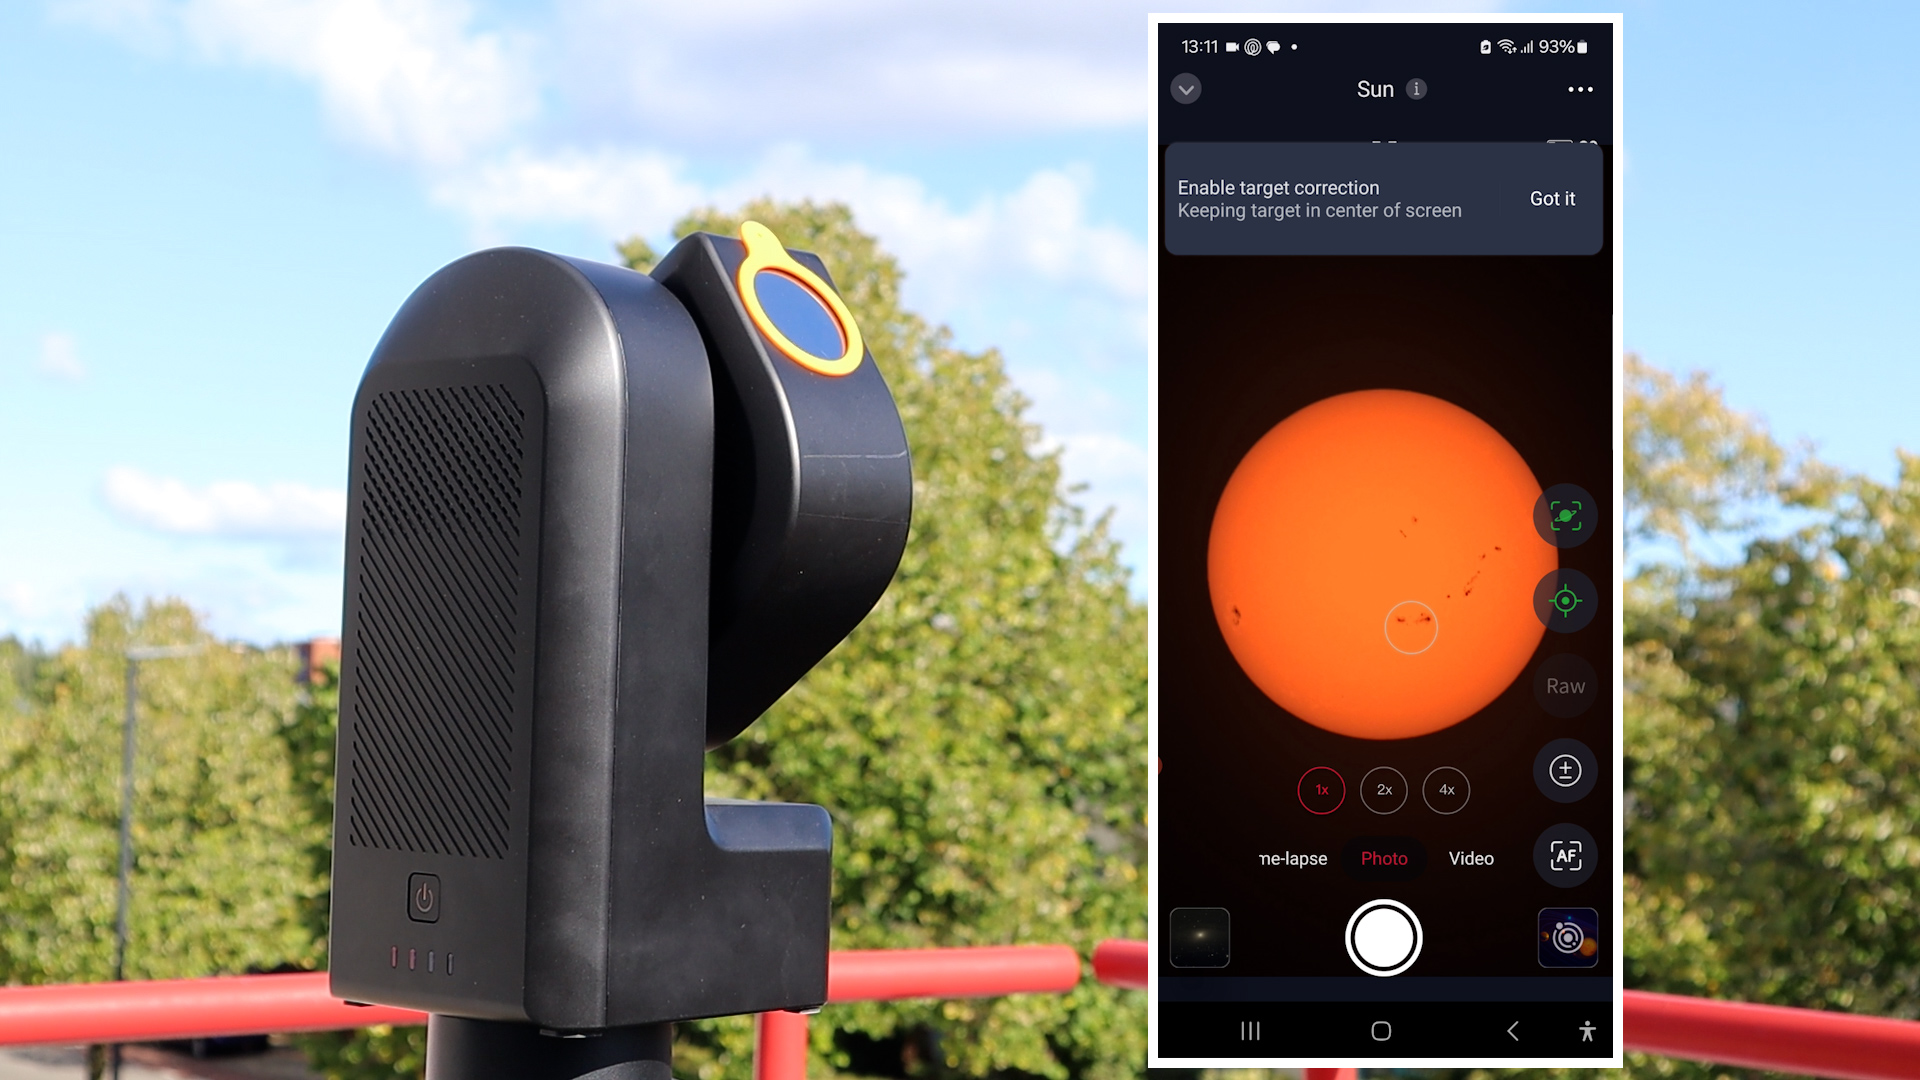
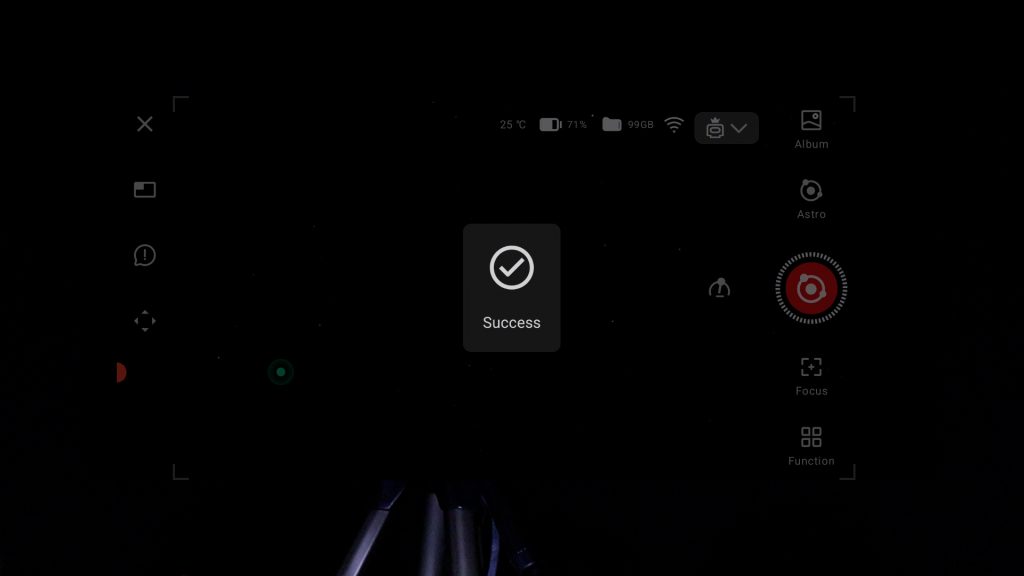
Once connected via WiFi, the solar system tab within the app allows users to select the Sun and begin the session by tapping “Go Gazing.” The app provides a prompt to install the solar filter before starting. After confirming the filter is in place, the Seestar S50 quickly locates the Sun, typically in under a minute. With the solar maximum approaching in 2024, sunspots were clearly visible during the session.
Once the Sun is located, tapping the target correction button enables tracking, ensuring the Sun stays centered on the screen. Zoom options (2x and 4x) allow for close-up views of sunspot regions, and the autofocus feature delivers sharp focus on these areas. The view can also be adjusted by swiping the screen.
The Seestar app offers both photo and video capture capabilities. The photos are saved in jpeg format. Videos are recorded in two formats: MP4, showcasing the sunspot regions, and a high-quality 16-bit AVI format when selecting the RAW option selected. This format is ideal for advanced astrophotographers who plan to stack and process the video frames using software like AutoStakkert, RegiStax, Wavesharp, or AstroSurface.
Before starting a solar session with the Dwarf 3, it needs to be leveled and roughly aligned with the Sun, similar to the Seestar. After leveling, the device can be powered on and connected via WiFi using the Dwarflab app, available on both Android and iOS. For a more detailed guide on how to install the Dwarflab APP and connect to the telescope, check out my Dwarf 3 review here.
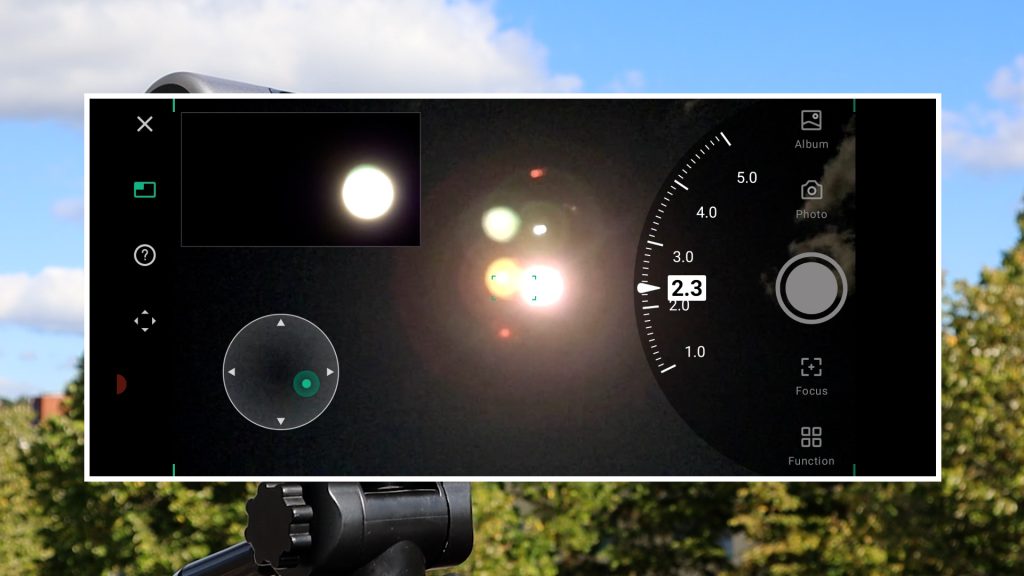
Once connected, the control panel appears after tapping the photo icon on the main screen. Joystick-like controls on the bottom left can be used to center the Sun in the telephoto lens, indicated by the green rectangle in the wide-lens view. The slew speed can be adjusted via a dial on the right side of the screen. After centering the Sun in the telephoto view, switching from the wide view to telephoto mode is as simple as tapping the telephoto view in the top left, a particularly handy feature.
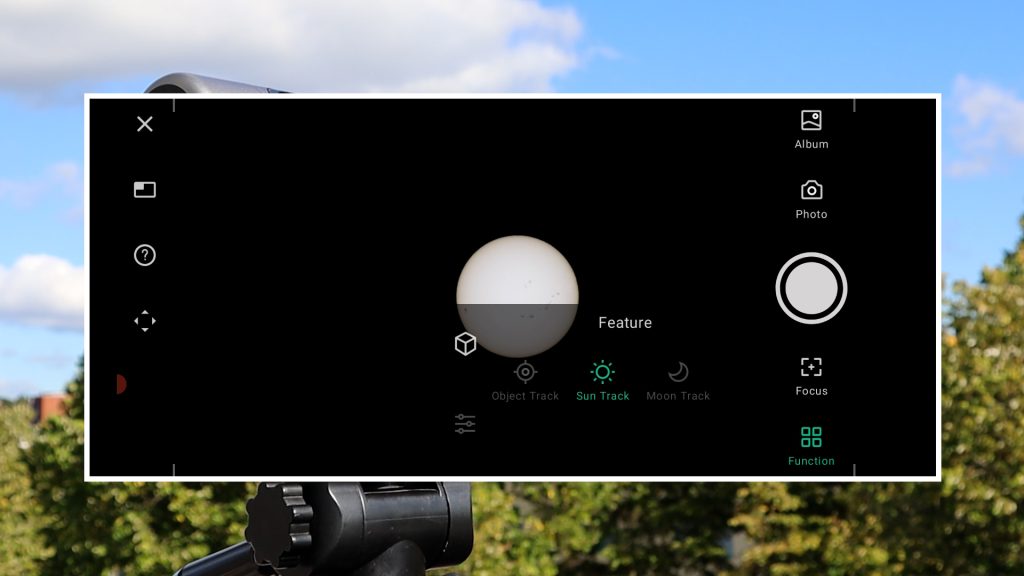
Autofocus is used to fine-tune the Sun’s focus, and a pinch gesture on the screen enables zooming in for a closer look at sunspot regions. Sun tracking mode is activated through the function tab on the bottom right. In order to start tracking the Sun, you’ll need to confirm the tripod is level, solar filters are in place, and the Sun is centered. Once confirmed by clicking done, the Dwarf 3 begins automatic tracking.
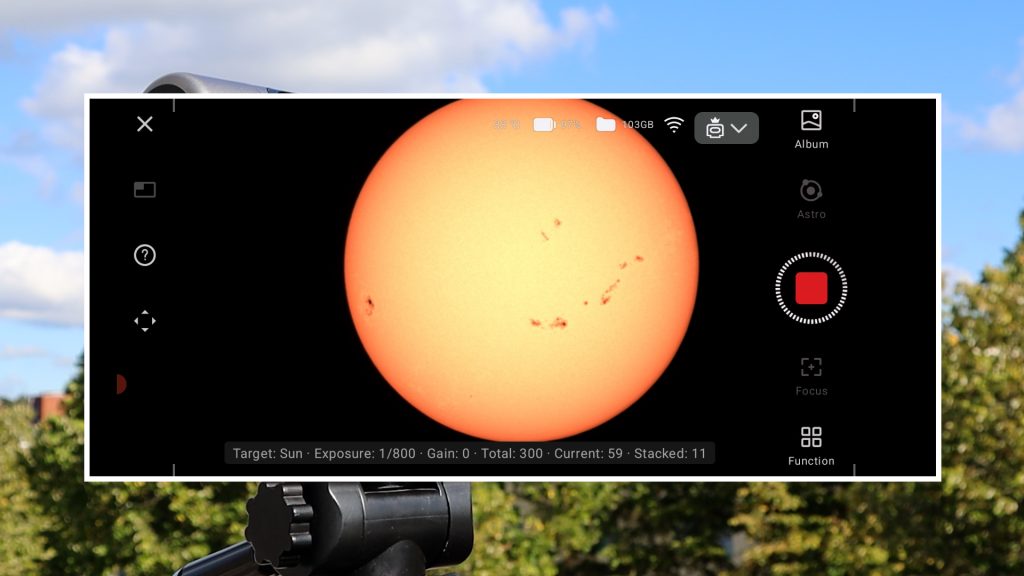
To optimize focus on the sunspots, zooming in and reactivating autofocus after Sun track is initiated is recommended. Then, switching to photo or video mode allows for capturing a photo in jpeg or a video of the Sun in MP4 format. For more advanced solar imaging, astro mode offers the ability to capture and live-stack images. Under the function tab, the exposure for the telephoto lens is automatically set at 1/800th of a second with zero gain, using the daytime VIS filter to capture the Sun. In the astro mode settings menu, you can select the number of images you want to take in either FITS or TIFF format, opt for live-stacking or showing single images during your capture, selecting 4K or a lower resolution 2K, and (de)select AI enhancement which helps with noise reduction. After choosing your options and pressing record in astro-mode, the Dwarf 3 proceeds to capture and live-stack the images on-screen. Once the images are captured, the session concludes.
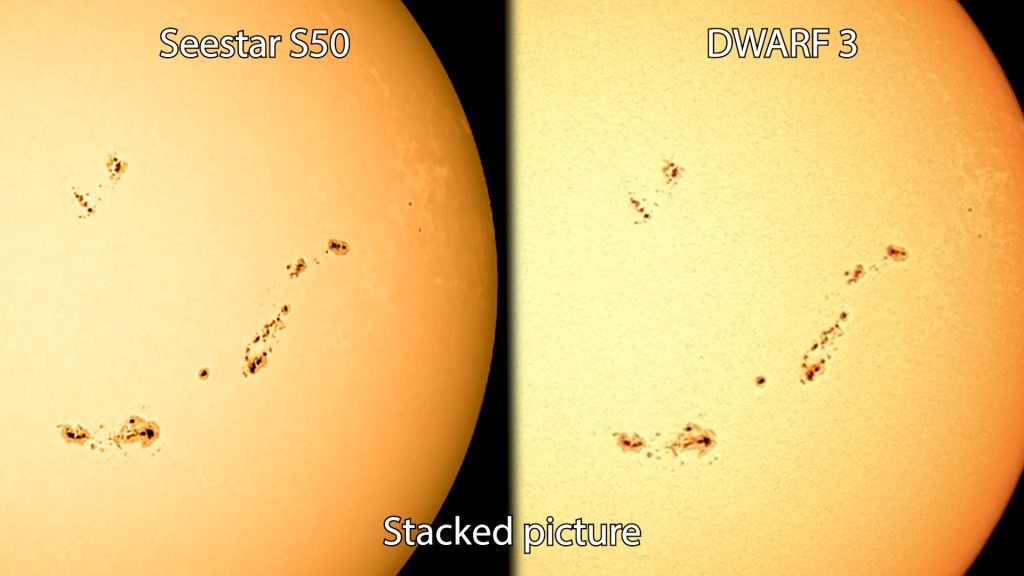
When comparing the stacked and processed results (using autostakkert and wavesharp) of both telescopes, the Seestar S50 appears to offer slightly better clarity when zoomed in on sunspots, though the difference is minimal. For smart telescopes priced at $500, the resulting image quality for both telescopes is impressive. The final choice between the two may come down to personal preference.
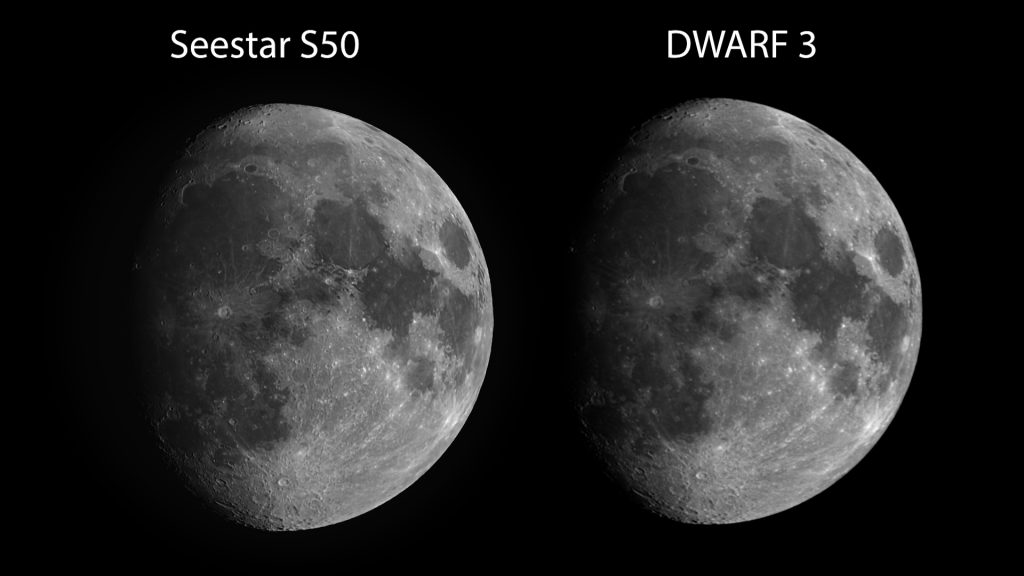
Lunar Imaging: DWARF 3 vs Seestar S50
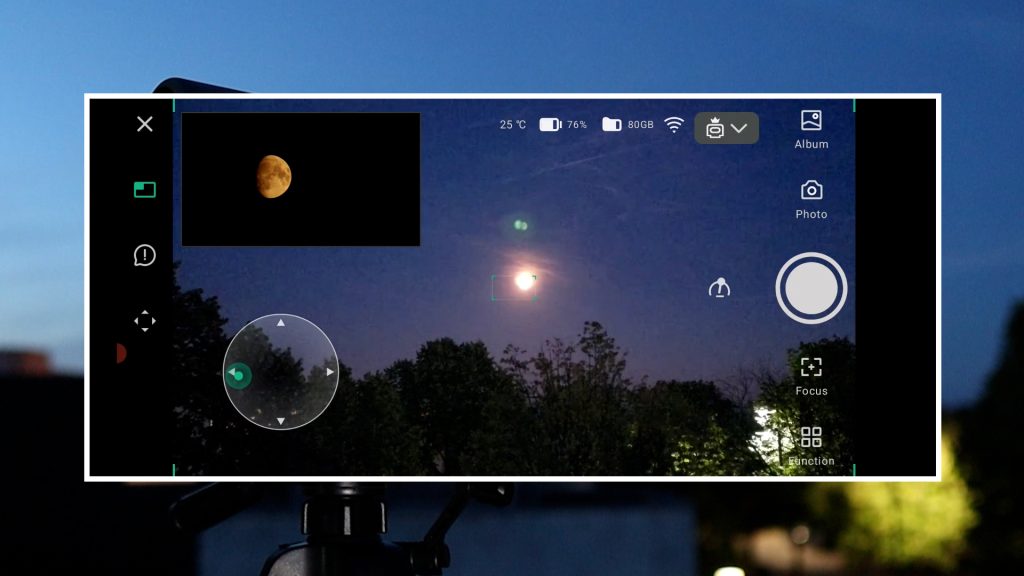
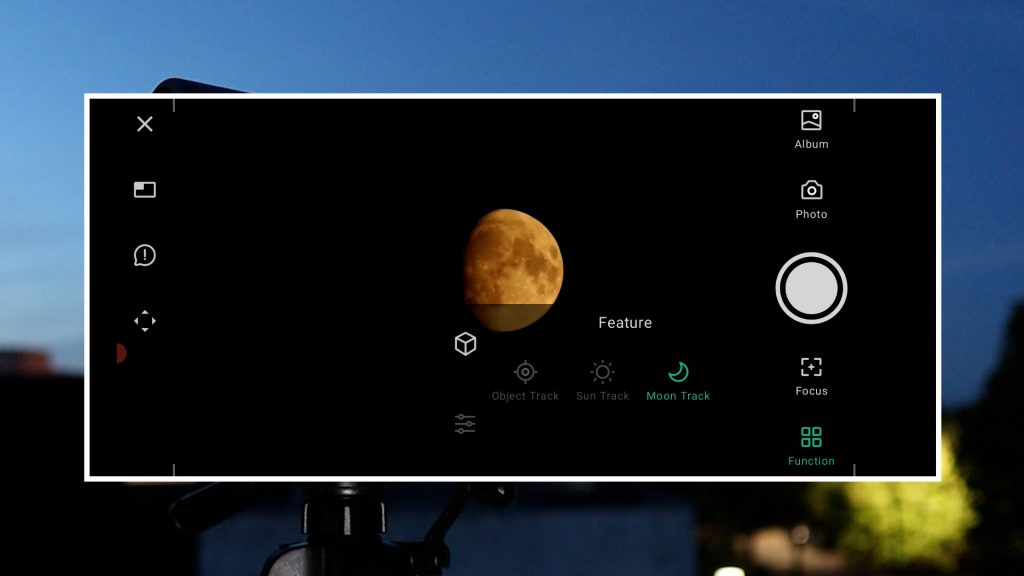
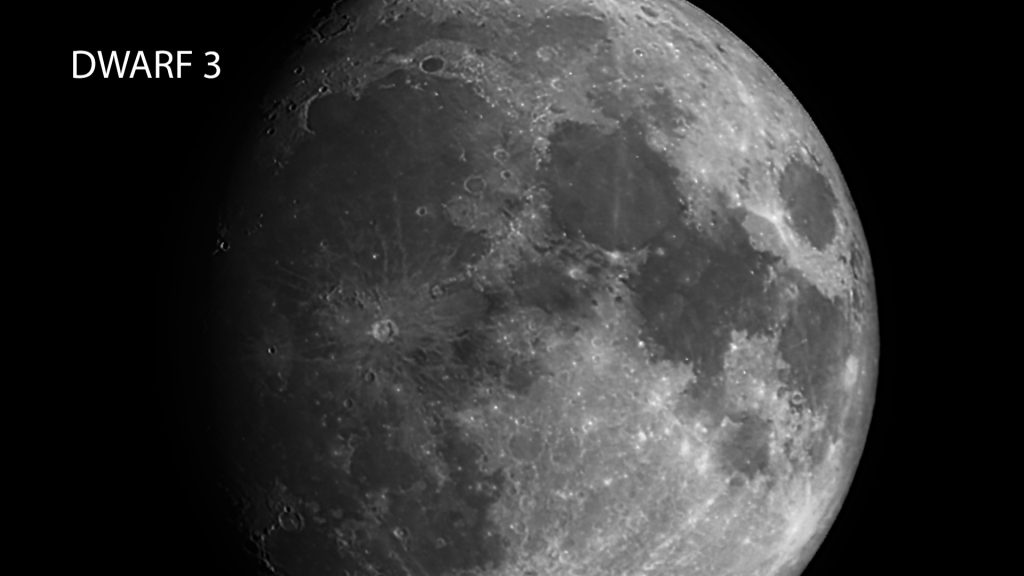
As night settled in, both the Dwarf 3 Smart Telescope and the Seestar S50 were set up to target the waxing moon as it rose. Imaging the moon using both telescopes is very similar to imaging the Sun. The Dwarf 3 the telescope was connected to my smartphone via WiFi. Using the app’s virtual joystick and speed controls, the moon was centered the moon in the telephoto view, after first using the wide-angle lens to align it. Once centered, autofocus was employed to lock in the focus.
The “Moon Track Mode” was selected from the “Functions” menu, prompting a check to ensure the tripod was level and the moon was properly centered. With these steps already complete, tracking began smoothly. Further fine-tuning of the sharpness was done by zooming in and using the autofocus alongside manual adjustments.
Astro Mode was then activated for the moon capture. With the VIS filter engaged, the shutter speed was set to 1/125th of a second at 0 gain. The default exposure and gain settings were maintained, while the system captured approximately 220 FITS images. Features such as live stacking and AI Enhance were enabled to get the best overall result.
Just as with solar mode, the Dwarf 3 performed live stacking in real-time, an engaging process to observe. After 220 images, the session was complete. The resulting image was automatically stacked, and a small amount of post-processing, including desaturation and sharpening, was applied to achieve the final result—which produced a crisp image of the moon.
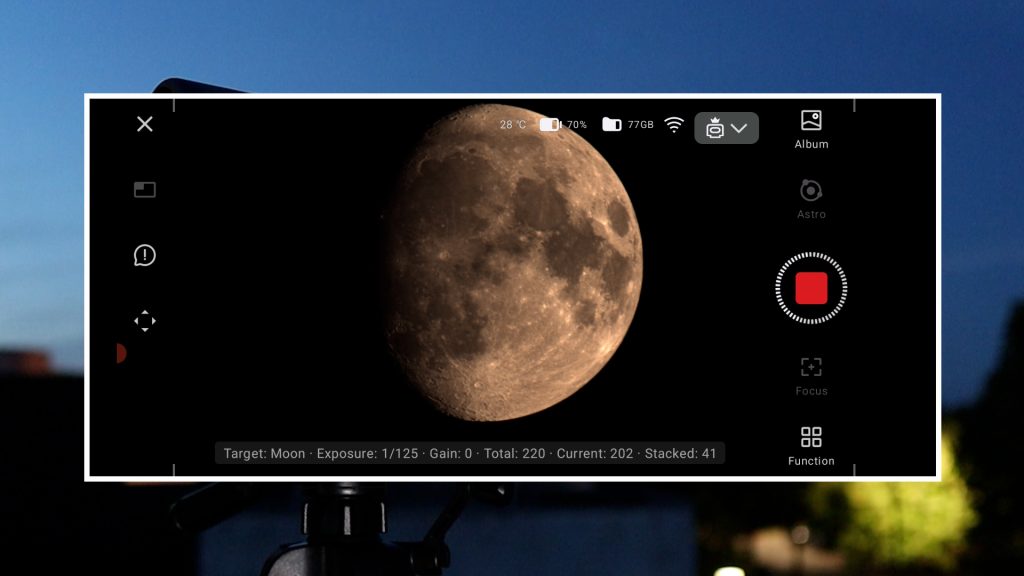
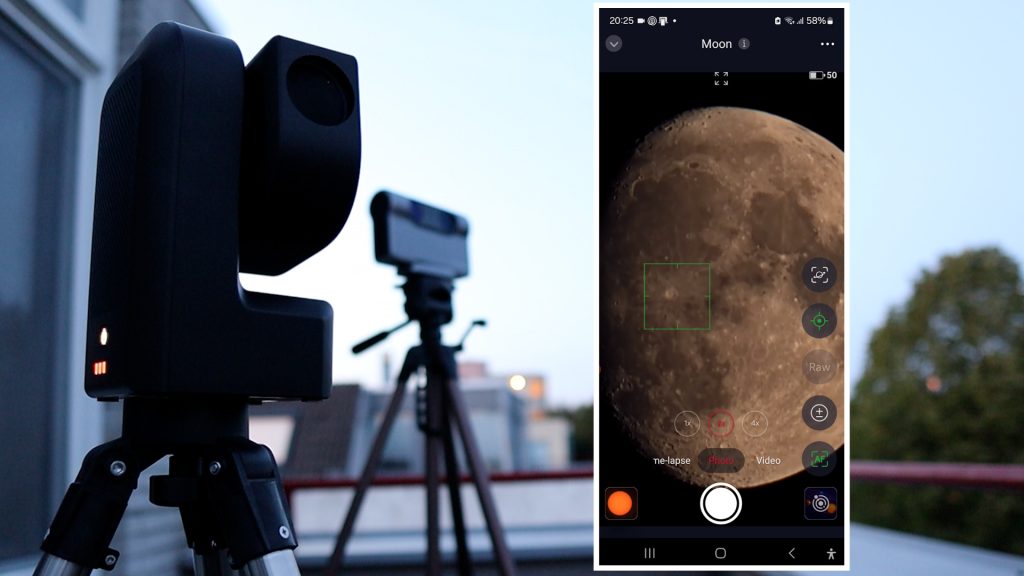
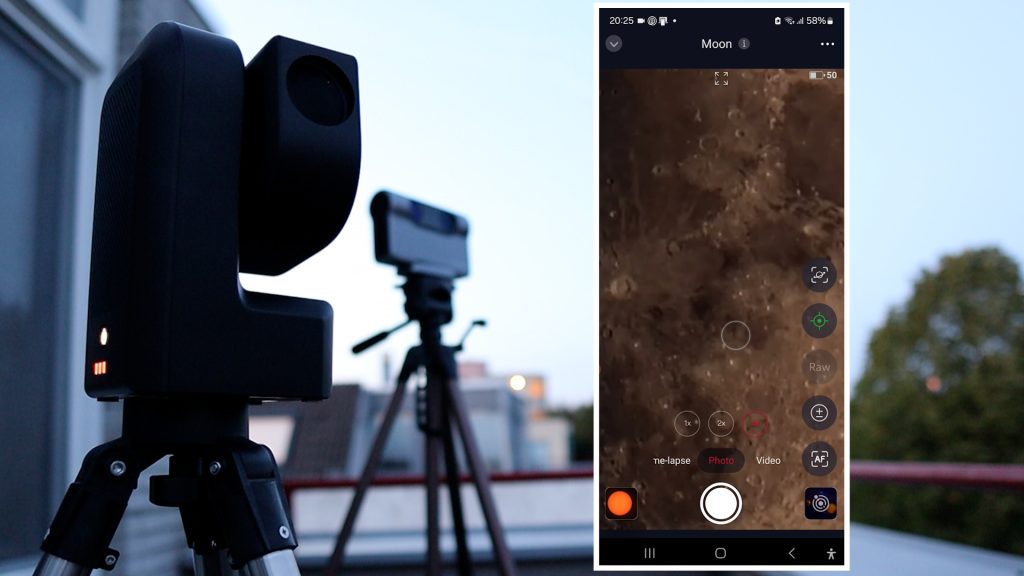
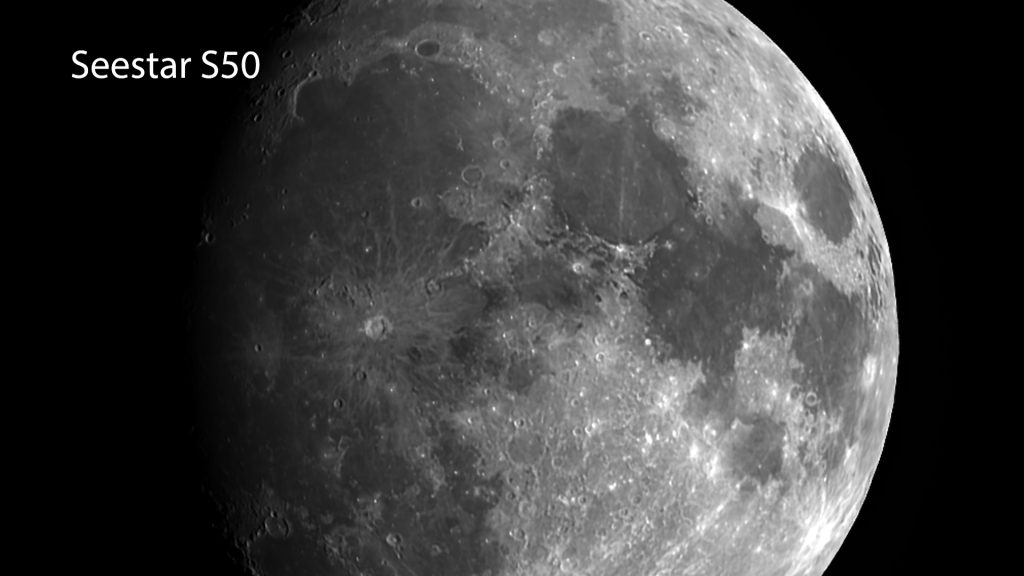
The Seestar S50 was then employed to image the moon, using the dedicated Seestar app. After selecting the moon from the Solar System mode and tapping “Go Gazing,” the app guides the user through leveling the tripod with real-time visual aids, if needed. Once leveled, tap Go Gazing” and the Seestar automatically slews to the moon’s position.
With the moon in view, the tracking feature was activated, and autofocus was used to ensure clarity. Focusing on Copernicus Crater, the Seestar adjusted perfectly, and further zooming into the moon at 4x magnification confirmed that the details were sharp. A photo of the moon, and a 2-minute RAW video were captured. The video frames were stacked and sharpened using Autostakkert and wavesharp, producing an enhanced image.
When comparing the final results (using autostakkert and wavesharp) from both the Dwarf 3 and the Seestar S50, the Seestar provided slightly clearer images, likely due to its larger aperture. However, the difference was subtle and primarily noticeable when zooming into the lunar craters. Both telescopes performed exceptionally well, and the final images from each, especially after processing, revealed a wealth of detail on the lunar surface.
Several deep-sky objects were captured using both the DWARF 3 and Seestar S50 as part of a comparative analysis. This part of the blog highlights the steps involved in deep-sky imaging with both telescopes, followed by a direct comparison of the results.
Dwarf 3 – Polar Alignment and Calibration
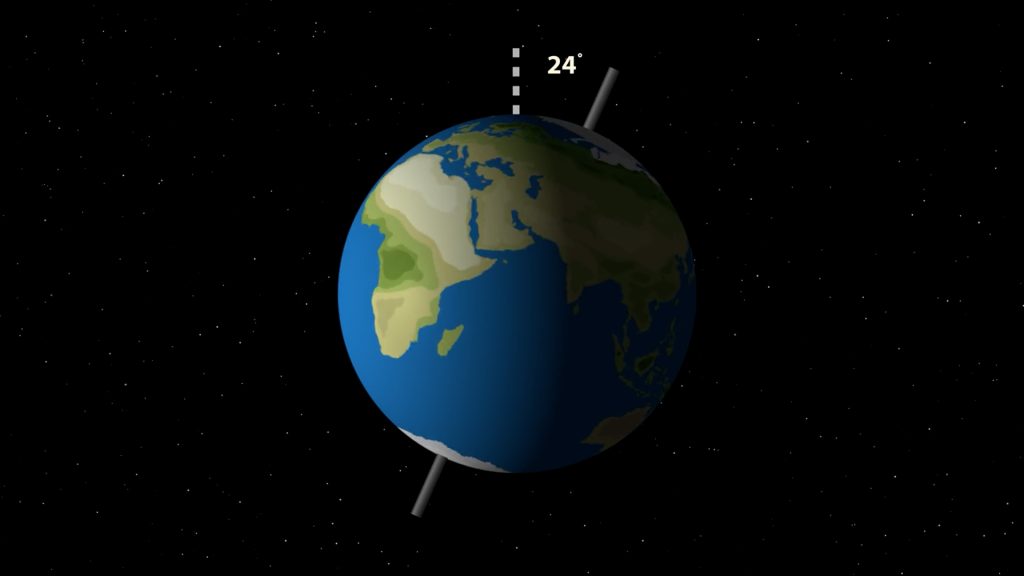
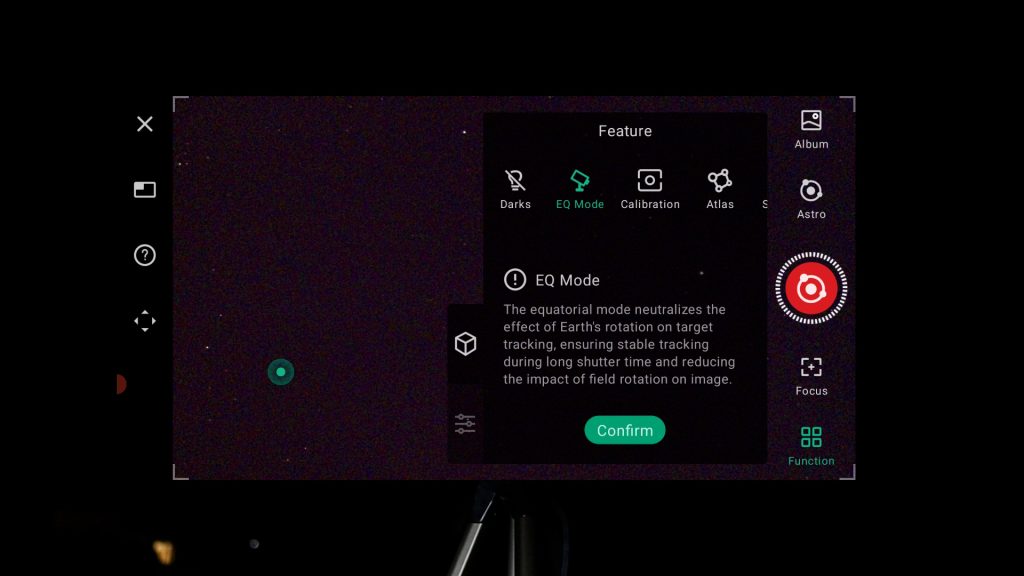
Starting with the DWARF 3, one of its standout features is the EQ mode, which enables polar alignment. Polar alignment is essential in astrophotography as it aligns the telescope with Earth’s rotational axis, allowing it to track celestial objects smoothly as they move across the sky. This prevents field rotation and star trails, ensuring sharper, long-exposure images.
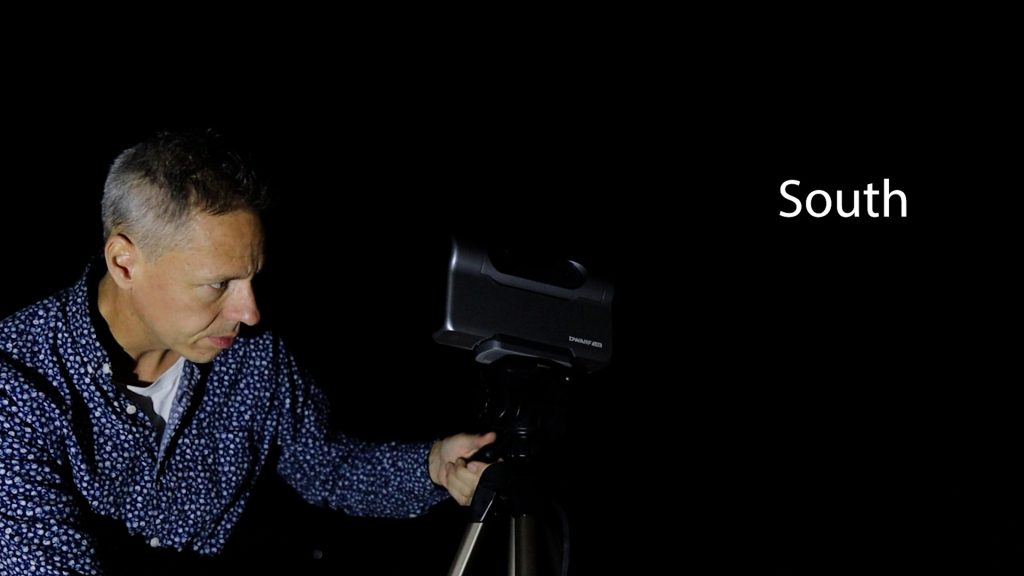
The polar alignment process for the DWARF 3 is slightly unconventional and requires a bit of time to master. Unlike typical alignment procedures, where telescopes are pointed toward Polaris in the north, the DWARF 3 must be aimed south, with its lenses angled forward. The tripod’s tilt must be adjusted to match the latitude of the location—in my case, 52 degrees for the Netherlands. Using the DWARFLab app, focusing on the stars is achieved by setting the shutter speed to around 1 second and the gain to 100. After that, the EQ mode in the app’s function settings guides the user through fine-tuning the tilt and horizontal position until the alignment is within 2 degrees of accuracy.
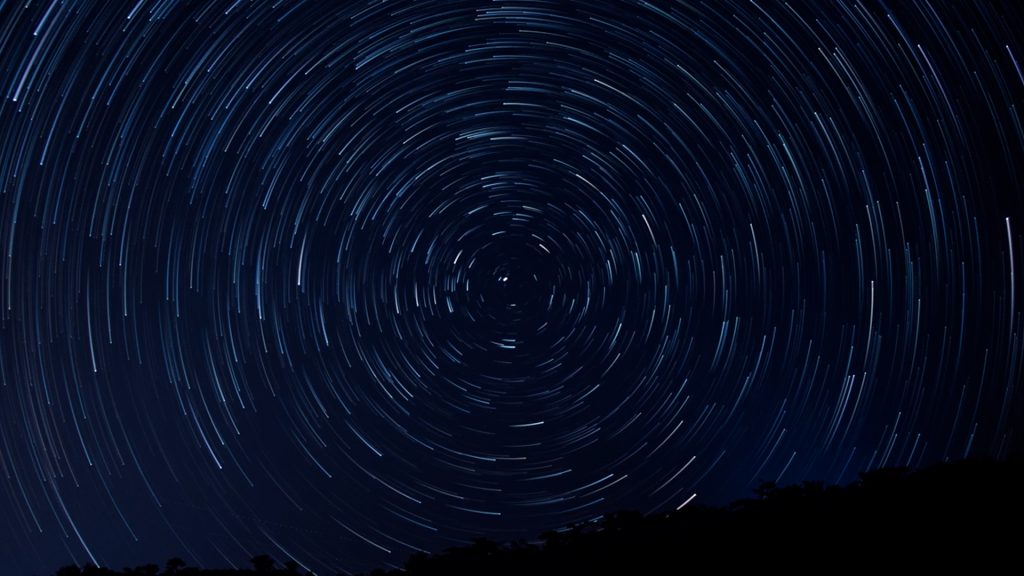
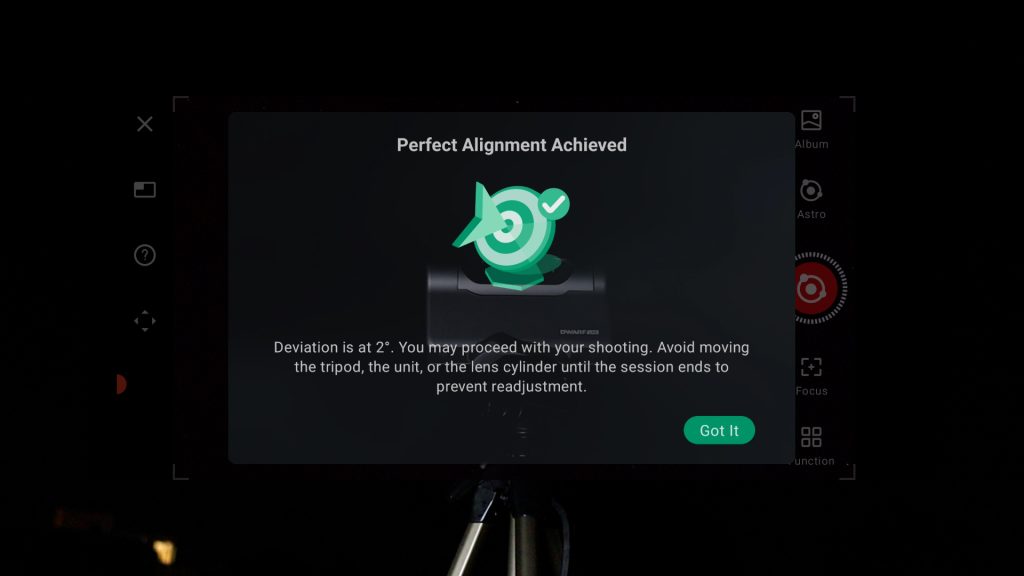
Once aligned, the DWARF 3 allows for tracking deep-sky objects with exposure times of up to 60 seconds, resulting in brighter and less noisy images thanks to an improved signal-to-noise ratios. For those who prefer to skip the alignment step, the exposure time will be limited to around 15 seconds. Going beyond 15 seconds may introduce star trails and when the telescope is not aligned, field rotation will occur when capturing and live stacking an object, affecting the overall image quality.
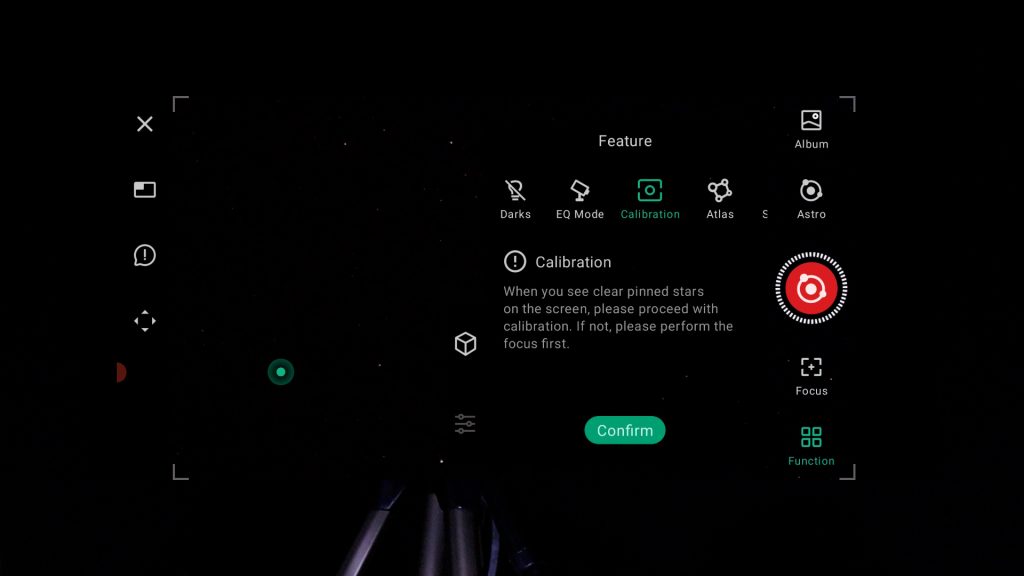
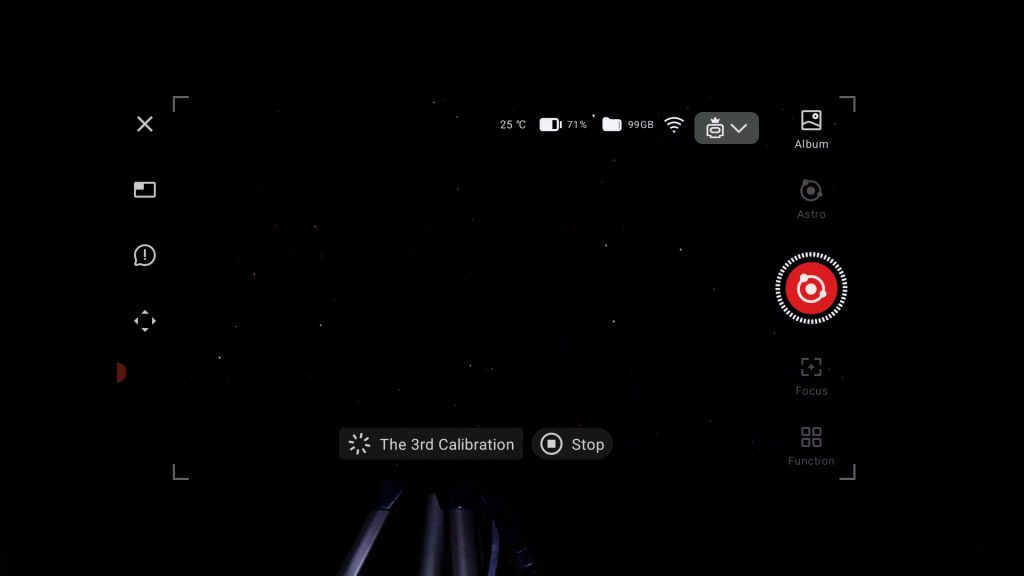
After polar alignment, calibration is the next critical step. This allows the DWARF 3 to accurately determine its position in the night sky. By entering “Astro Mode” and selecting “Calibration” under the function settings, this process starts and is automatic, provided the telescope is focused on stars with a shutter speed of 1 to 2 seconds and a gain of around 100. Once calibration is initiated, the DWARF 3 completes several steps to finalize the setup, ensuring precise tracking for the imaging session.
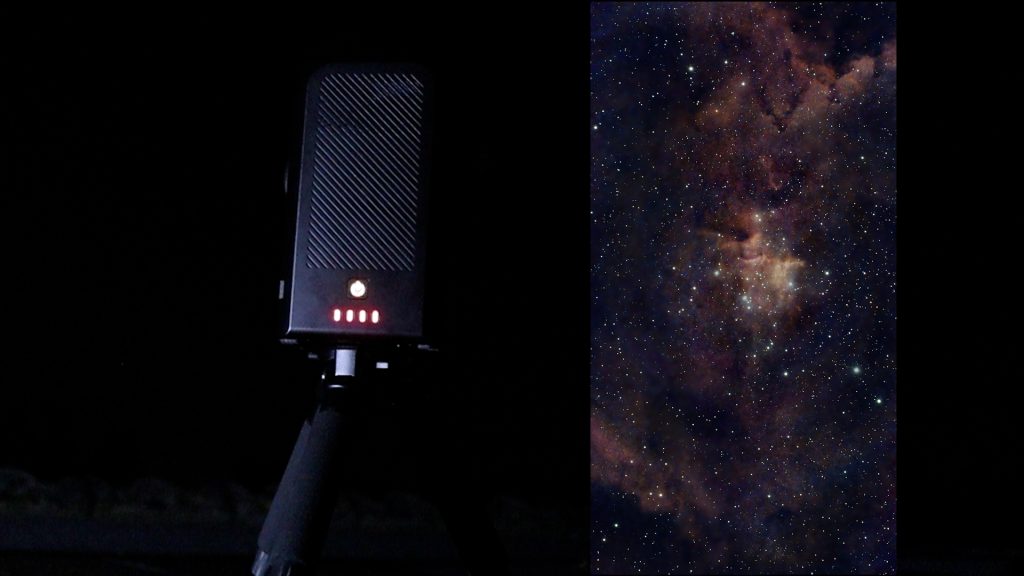
Dwarf 3 vs the Seestar S50: Andromeda Galaxy
After completing polar alignment and calibration, the virtual sky atlas under the “Function” presents a virtual sky identical to your location and time. By tapping on any object in the atlas or by searching for an object in its database, the Dwarf 3 will present more information about that object, with the option to slew to the object by tapping on the photo icon. After searching for the galaxy in the database and clicking on the photo icon, the telescope immediately moved to the galaxy and positioned it perfectly in its field of view.
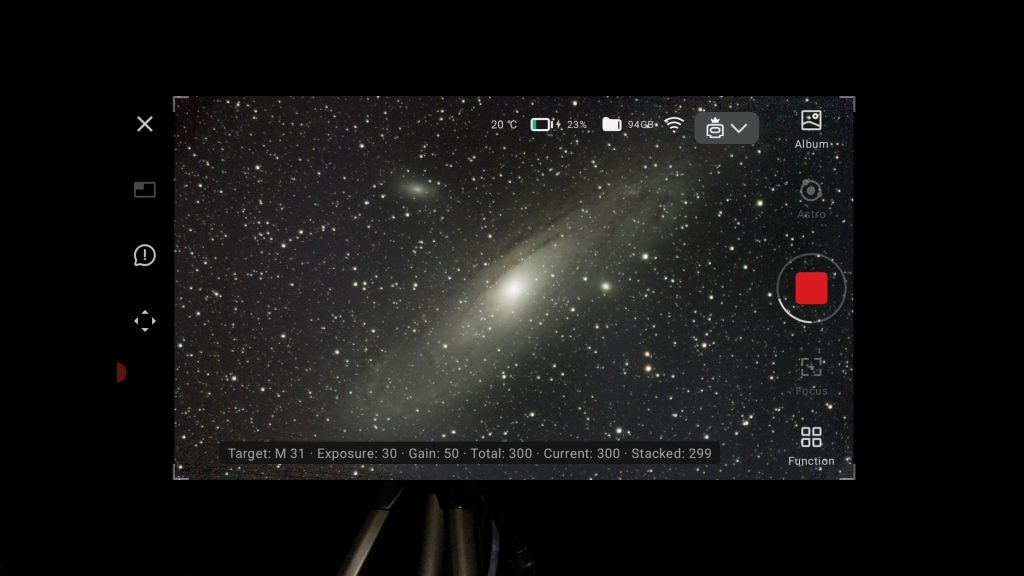
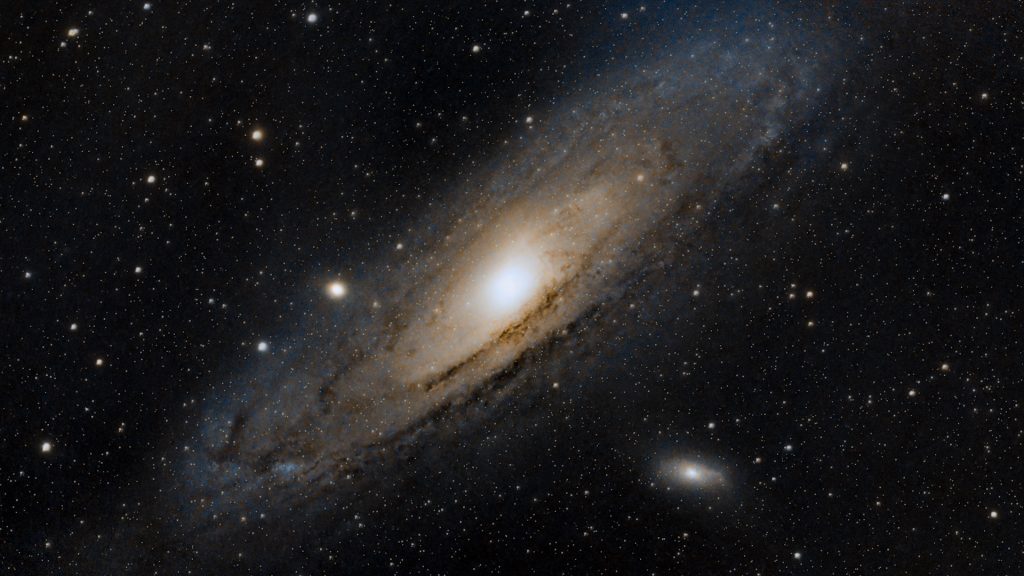
The Andromeda galaxy was captured using 30 second exposures, with a gain setting of 50, and applying the Astro filter which allows for capturing near-infrared light. In total, 300 FITS images was captured with live stacking, 4K resolution, and AI enhancement enabled in the settings menu.
Upon hitting “Record” in astro mode, a warning appeared about missing dark frames, offering the option to take them on the spot. Dark frames, captured with the same camera settings but with the lens covered, help eliminate sensor noise and hot pixels in astrophotography, producing cleaner final images. However, eager to capture the Andromeda Galaxy, the decision was made to skip this step, relying instead on the lower gain setting and the STARVIS 2 technology of the Sony IMX678 sensor to manage noise levels in the light frames.
The DWARF 3 then began capturing 30-second exposures, displaying a live stack of the images, a particularly useful feature. At one point, a satellite streaked across the frame, but as additional images were stacked, the streak gradually disappeared. It’s important to note that the DWARF 3 saves each individual FITS file, allowing for manual stacking later if desired. This enables rejection of unwanted frames or the use of more advanced stacking algorithms. After capturing and stacking the 300 images, the session was concluded.
The Seestar S50 doesn’t have a dedicated polar alignment procedure like EQ mode, so its default exposure time for capturing deep-sky objects is 10 seconds. As a consequence, field rotation will occur when capturing deep-sky objects as the telescope is not aligned with the celestial pole. However, you can try to extend exposures to a maximum of 30 seconds in the advanced features settings. You also have the option to save each individual photo or just the stacked image in those settings. One advantage of not needing to polar align is that you can set up the Seestar S50 anywhere with a clear view of the night sky, as long as your tripod is level, and you’re good to go.
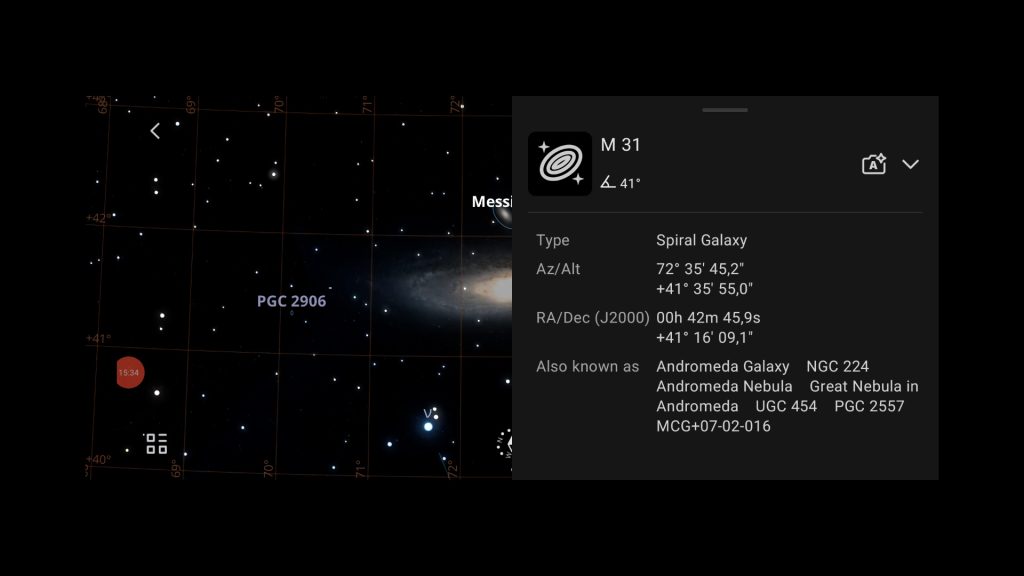
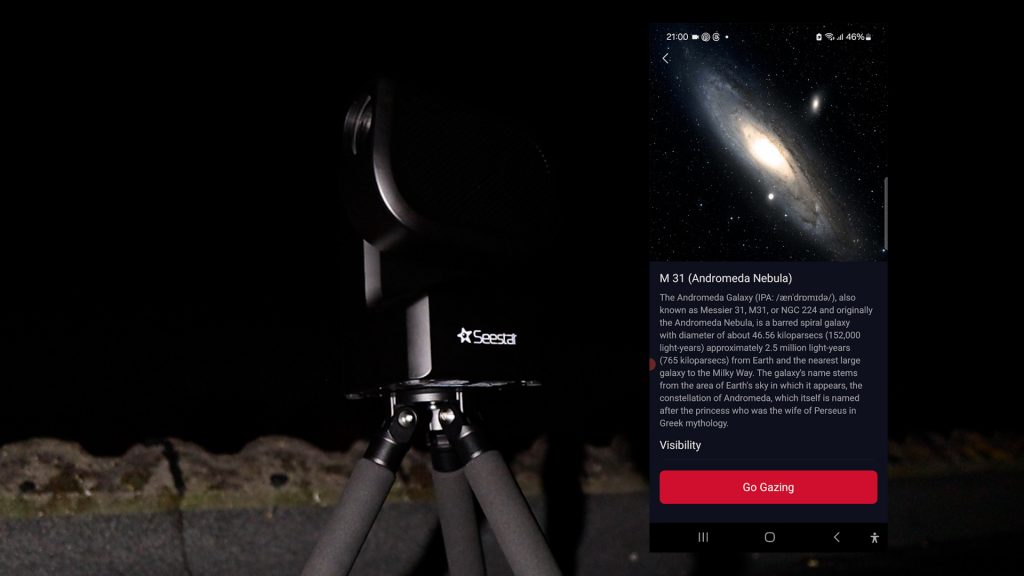
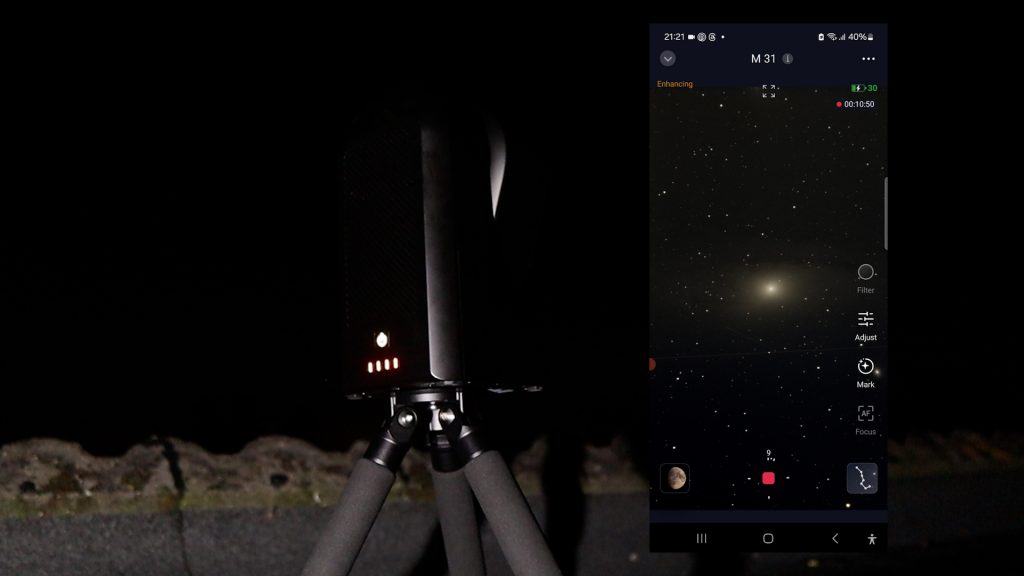
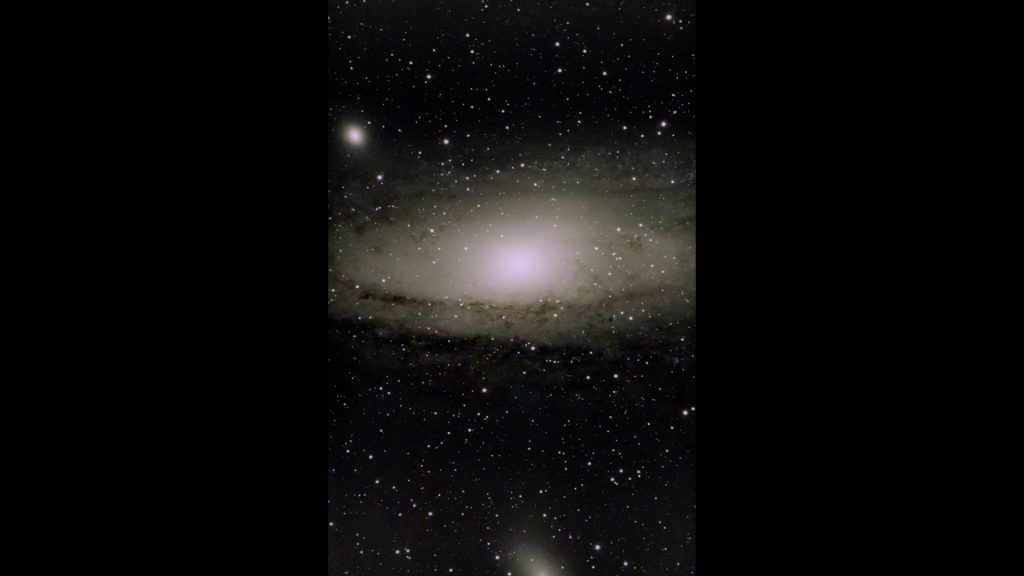
The Seestar app offers a dedicated “Stargazing” section, featuring categories such as galaxies, nebulae, and star clusters, alongside a highly useful virtual sky atlas. Among the suggested targets under the “Current Best” category was the Andromeda Galaxy. Upon locating M31 in the galaxy database and selecting it, additional details about its position in the night sky were provided, leading to the “Go Gazing” option. Once initiated, the Seestar S50 seamlessly handled the entire process, performing horizontal calibration and initialization procedures, which took approximately two minutes, before starting to capture and stack 10-second exposures. After about two hours of data collection, field rotation at the image edges became noticeable, prompting the decision to stop the live stacking session.

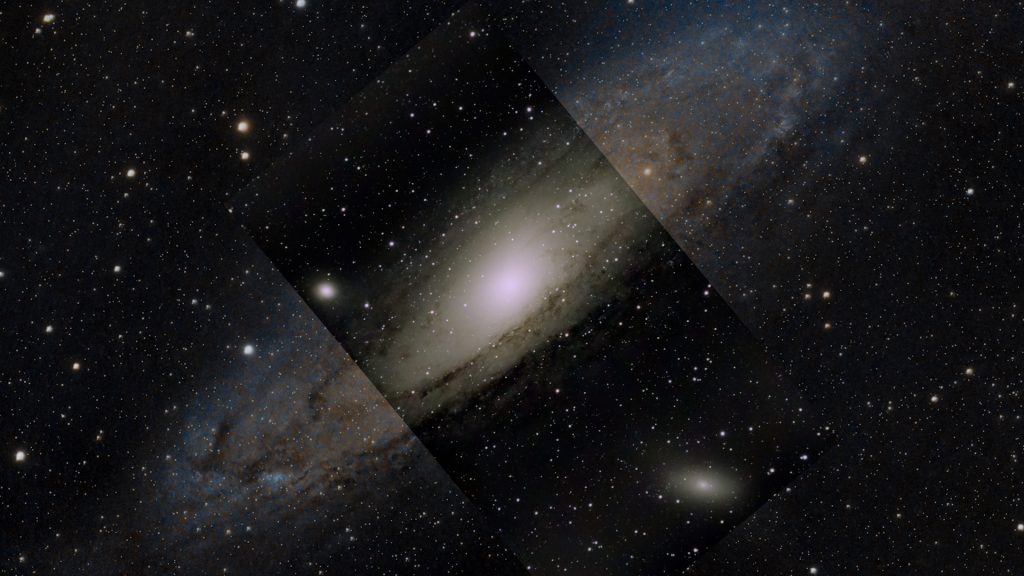
The stacked and processed final image (using PixInsight) from the Seestar S50 highlighted a limitation: its field of view is too narrow to capture the entire Andromeda Galaxy, whereas the Dwarf 3 can capture the entire galaxy because of its larger camera sensor and its wider field of view. A comparison with the final picture from the DWARF 3 telescope makes this difference clear (see overlay picture). Despite these constraints, both telescopes demonstrate impressive performance, especially considering the affordability of smart telescopes like these.
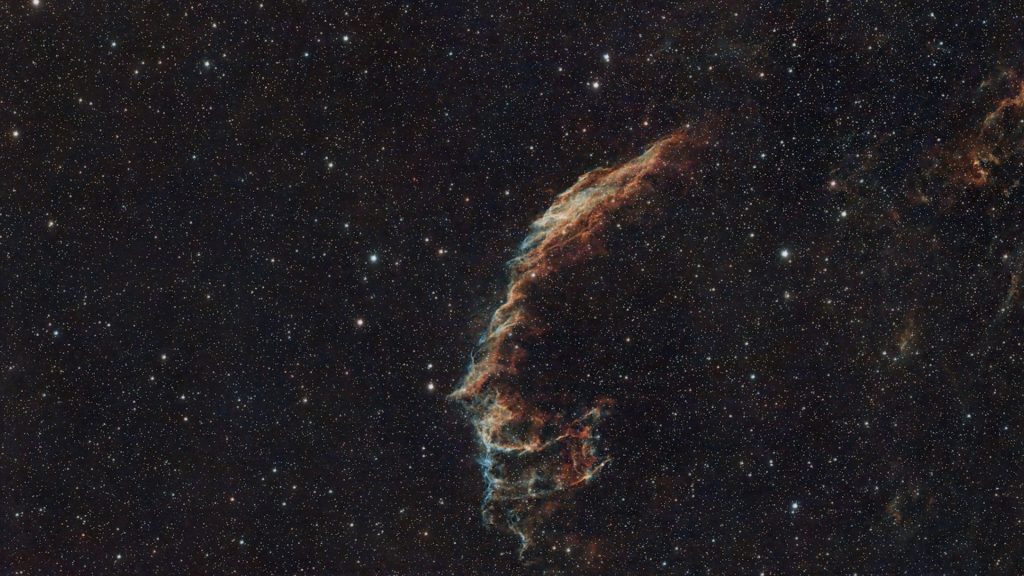
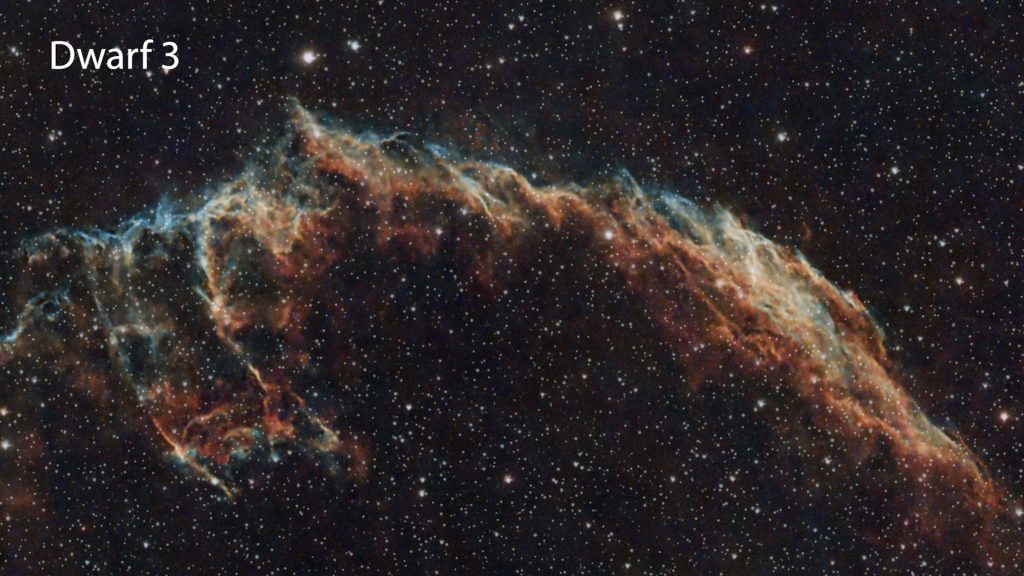
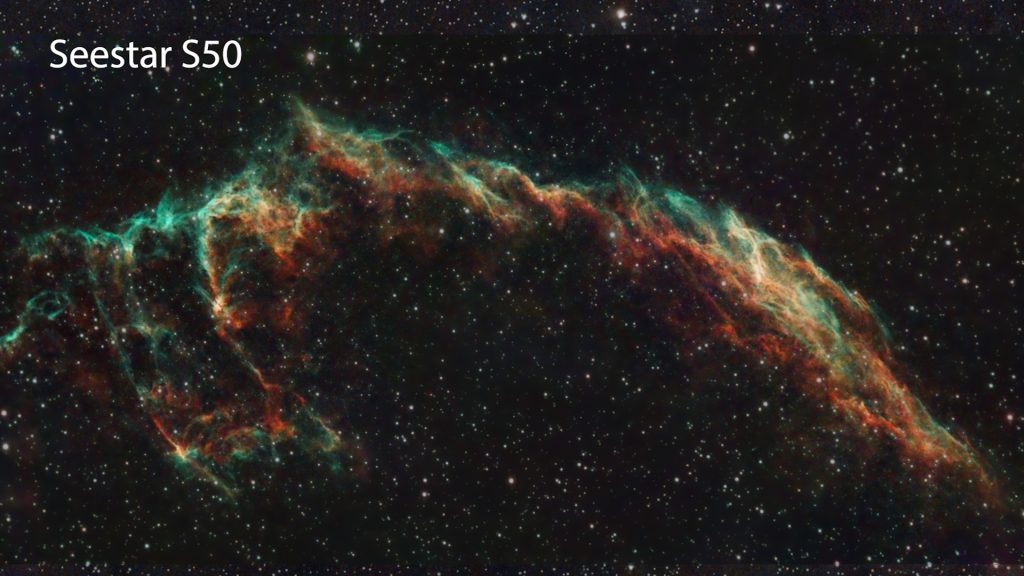
Dwarf 3 vs Seestar S50: Eastern Veil Nebula
The Eastern Veil Nebula, nestled in the constellation Cygnus, presents a fascinating target for astrophotography. Using the DWARF 3, centering the entire nebula in the field of view posed a slight challenge due to the fixed landscape orientation of the camera sensor. This emission nebula is rich in ionized hydrogen and oxygen gases, making it ideal for capturing with the Dwarf 3’s internal duo-band filter, which specifically isolates these wavelengths while effectively blocking out light pollution from any urban sky. With the telescope polar-aligned, 60-second exposures at a gain of 100 were employed to capture the nebula, resulting in a total exposure time of 3 hours and 45 minutes over 225 photos.
The Eastern Veil Nebula was also captured using the Seestar S50. Given that this nebula is much smaller than the Andromeda Galaxy, the portrait orientation of the Seestar’s sensor allowed for a perfect fit within the field of view. Like with the DWARF 3, the internal duo-band filter of the Seestar S50 was utilized to isolate the desired wavelengths while minimizing light pollution—an essential factor for astrophotography in light-polluted areas. The Seestar S50 took 10-second exposures, and the session was finalized after about an hour and a half due to field rotation.
Let’s compare the two images of both telescopes. Aside from minor color differences attributed to stacking and processing (PixInsight), the two images show a striking similarity. The DWARF 3 offers a larger field of view than the Seestar S50, providing a more expansive view of the night sky.. When zooming in on the eastern veil nebula, the Dwarf 3 also appears to exhibit more faint nebulosity, likely due to the longer 60-second exposures and greater total exposure time. However, the Seestar S50 image, while slightly darker, seems a tiny bit sharper, possibly owing to its shorter 10-second exposures that mitigate atmospheric seeing and tracking issues, or its larger aperture compared to the DWARF 3.
It’s important to clarify a common misconception: some might assume the Seestar’s 2-megapixel camera sensor yields lower resolution images compared to the DWARF 3’s 8-megapixel sensor. However, this comparison illustrates that camera resolution primarily influences the field of view in astrophotography, not the level of detail in the images, which is dependent on telescope aperture, image scale, atmospheric conditions, and the quality of the optics.
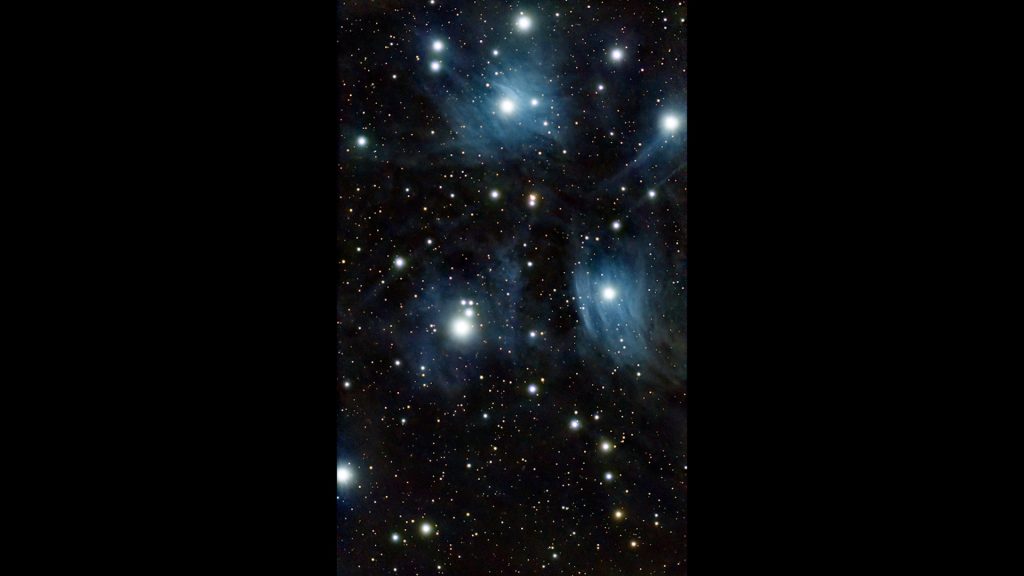
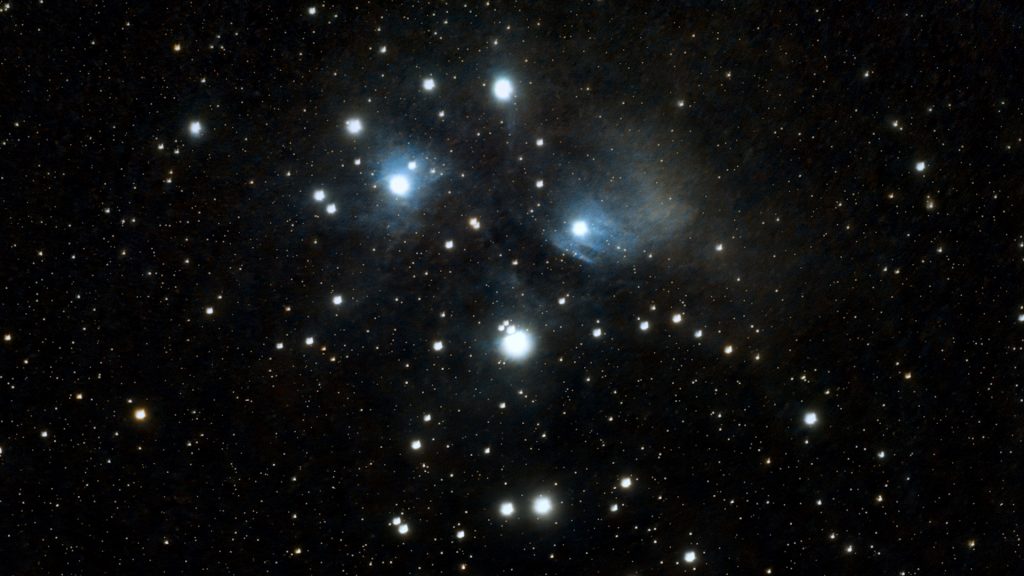
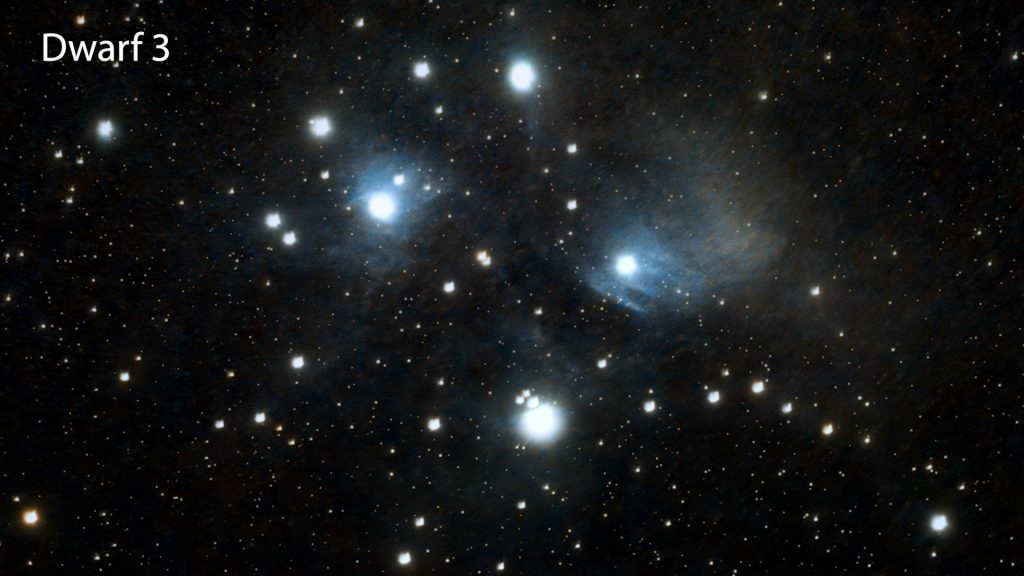
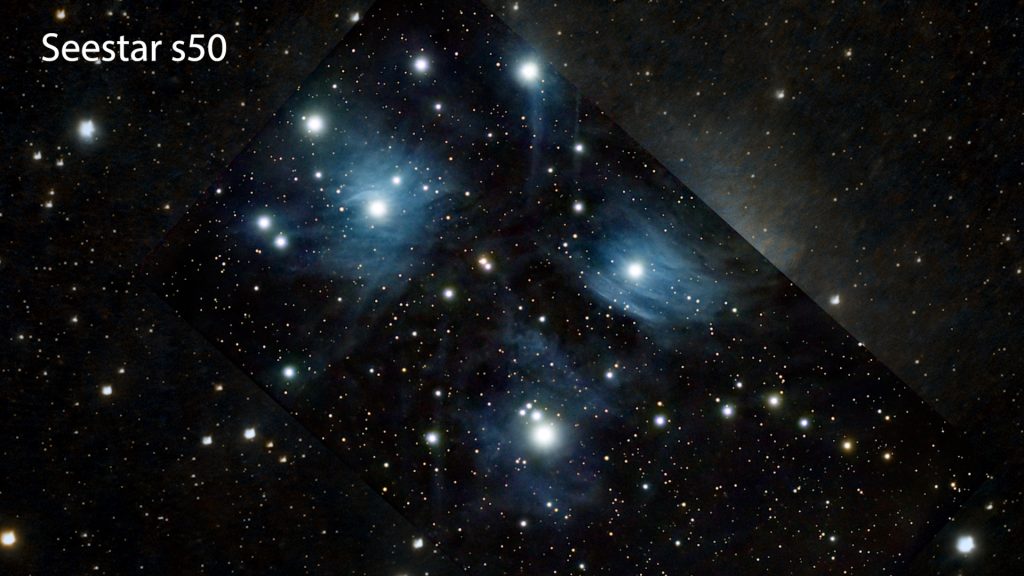
Dwarf 3 vs. Seestar S50: The Pleiades (M45)
M45, the renowned Pleiades cluster, was also captured using both smart telescopes. For the Dwarf 3, 30-second exposures were taken with a gain setting of 60, utilizing the internal astro filter. This process yielded a total of 250 FITS images, resulting in just over two hours of exposure time. The autostacked image produced by the Dwarf 3 showcases the results, with color enhancement performed in Photoshop Lightroom.
In parallel, M45 was captured with the Seestar S50, employing its default 10-second exposure setting. After an hour and 50 minutes, the session was wrapped up, resulting in an automatically stacked image from the Seestar S50, along with a version that underwent basic processing in Photoshop Lightroom.
A comparison of the two stacked and processed images reveals that the Seestar S50’s smaller camera sensor captured only a portion of the star cluster. However, the shorter 10-second exposures mitigated the overwhelming brightness of the stars, allowing for greater visibility of nebulosity detail compared to the Dwarf 3’s 30-second exposure stack. While 10-second exposures could also have been employed with the Dwarf 3, it’s essential to highlight the advantages of shorter exposures. They can reduce potential tracking issues and prevent oversaturation, which is especially beneficial in bright, urban environments. Stacking shorter exposures enhances dynamic range, capturing faint details without blowing out the brighter stars. This technique often results in sharper and more detailed images, particularly for bright deep-sky objects. Note that it is also possible to reduce the Dwarf 3 to taking 10 second exposures!
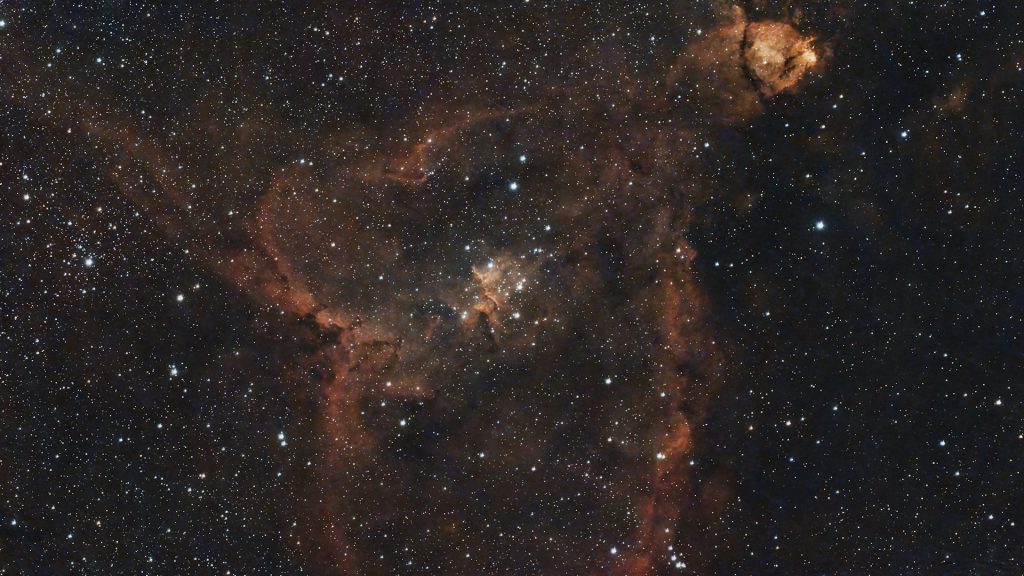
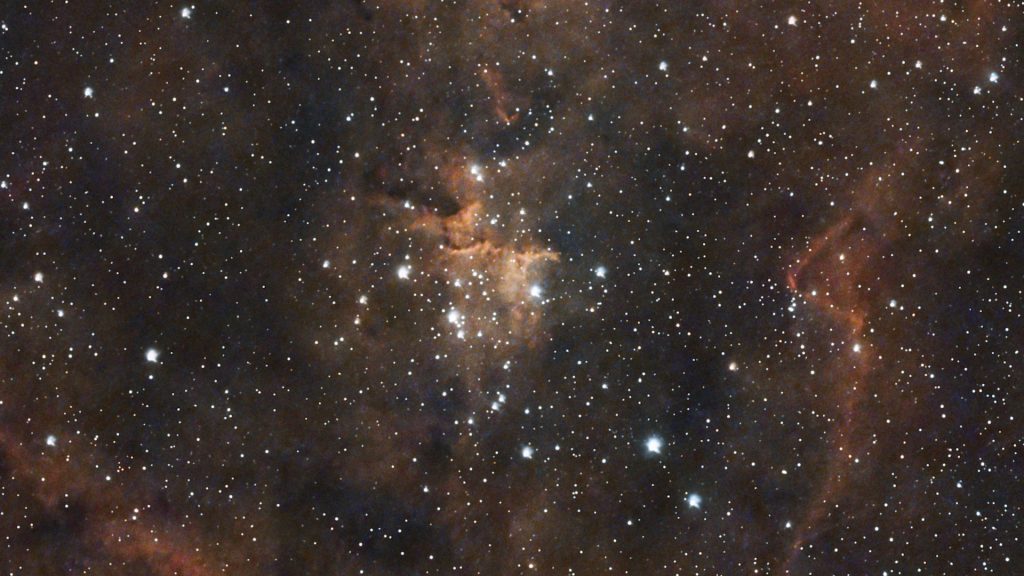
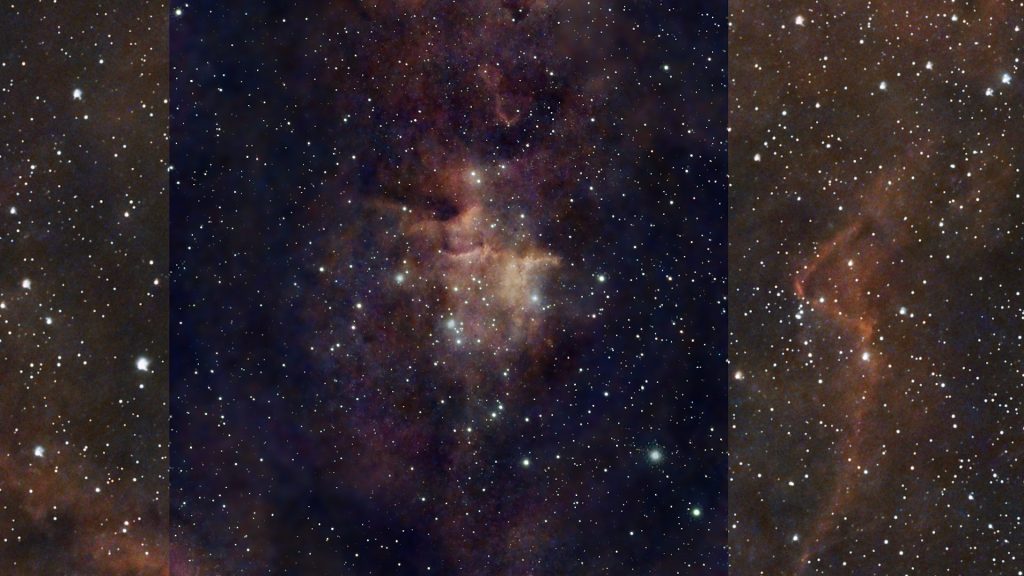
Dwarf 3 vs. Seestar S50: The Heart Nebula
Next, the Heart Nebula was examined, a vast structure spanning approximately 2.5 degrees across the night sky. The Dwarf 3’s landscape sensor proved nearly ideal for capturing this nebula in a single frame. Utilizing the internal duo-band filter and ensuring polar alignment, 60-second exposures at a gain of 100 were taken. A total of 250 FITS photos were captured with live-stacking enabled. The Heart Nebula was also imaged with the Seestar S50, maintaining the default 10-second exposure settings. After about 90 minutes, the session concluded due to noticeable field rotation in the corners of the stacked image.
The results show the stacked and processed images (using PixInsight). It’s clear that the Seestar S50 could only captured the core of the Heart Nebula, known as Melotte 15, due to its limited cmaera sensor size. When comparing the two images for comparison, the advantages of the Dwarf 3’s wide field of view become apparent, especially for large objects like the Heart Nebula. This being said, the Seestar’s shorter 10-second exposures resulted in slightly tighter stars and a sharper image of Melotte 15 (the heart of the heart nebula) compared to the Dwarf 3’s 60-second exposures. Nonetheless, the Dwarf 3’s wider field of view and its ability to capture more faint nebulosity is commendable, thanks to its longer exposure times and expansive field of view.
Dwarf 3 and Seestar S50: Additional features
Let’s highlight some additional features of each telescope. Both the Dwarf 3 and Seestar S50 can seamlessly connect to a home WiFi network, enabling control from the comfort of your living room while the telescopes perform imaging outdoors. The Dwarf 3 features an STA mode in its connection settings for network connectivity, while the Seestar S50 offers a station mode in its WiFi settings.
In terms of battery life, the Seestar S50 is equipped with a 6,000mAh battery, whereas the Dwarf 3 has a larger 10,000mAh battery. Both telescopes can operate for extended periods and can be recharged via USB-C, even during use. The Dwarf 3 includes a daytime VIS filter, a nighttime ASTRO filter for near-infrared light, and a Duo-Band filter for emission nebulae. Meanwhile, the Seestar S50 is also equipped with a duo-band filter. For storage, the Dwarf 3 offers 128GB, while the Seestar S50 provides 64GB, offering ample space for videos and FITS files. However, it’s worth noting that neither telescope is designed to capture detailed surface images of planets; a larger telescope would be necessary for that purpose.
As for daytime functionality, the Dwarf 3 is marketed as a device for nature and wildlife photography, enabling users to capture stunning photos, track moving objects, and create time-lapse videos or panoramas, as demonstrated in an earlier review. The Seestar S50 also includes a daytime scenery mode that allows for the capture of beautiful daytime images, videos, and time-lapses. Both telescopes are compact and lightweight, with the Seestar S50 weighing 2.5 kg and the Dwarf 3 at just 1.3 kg, making them incredibly convenient for weekend getaways or holiday trips.

Dwarf 3 vs. Seestar S50: Final verdict
Launched in April 2023, ZWO’s Seestar S50 stands out as one of the most budget-friendly smart telescopes available. Its app provides full automation, making it an ideal choice for beginners looking to effortlessly capture images of the sun, moon, and deep-sky objects without delving into the complexities of astrophotography. For more experienced astrophotographers, the advanced storage options, which include AVI RAW and FITS files, offer flexibility during post-processing. The 50mm triplet design produces sharp images; however, the 2MP sensor does limit its field of view for larger targets. While ZWO is currently testing a mosaic mode, it’s important to note that capturing mosaics will double the exposure time, similar to the functionality reviewed in the Vespera 2. Just as this review was being finalized, ZWO teased the release of a new S30 smart telescope, raising anticipation for future innovations.
On the other hand, the Dwarf 3 from Dwarflab has seen significant enhancements compared to earlier versions of their DWARF telescopes, including improvements in optics, camera sensor, and app functionality. This telescope is highly versatile for both daytime and nighttime use. The new EQ mode enables tracking of objects for up to 60 seconds, allowing for longer exposures and reduced noise, which helps reveal finer details in images.
With its wide field of view and the latest IMX678 sensor featuring Starvis 2 technology, the Dwarf 3 excels at capturing larger celestial objects in a single frame. Although the app has undergone major updates, there may be a learning curve to fully navigate its features. However, with some practice, it becomes second nature. Both telescopes deliver exceptional value based on individual needs, and we’re excited to follow their ongoing evolution!
The Dwarf 3 Smart Telescope is available at Dwarflab (WW), High Point Scientific (USA/WW), and Astroshop (EU/WW)
The Seestar S50 Smart Telescope is available at ZWO, Agena Astro (USA/WW), High Point Scientific (USA/WW), and Astroshop (EU/WW).
Thank you for in in-depth reviews, just wish had found these before buying an 8 inch DOB. Rarely use it due to the weight, disabled Vet and thought it could be handled lol. Have a photo background and was looking at astrophotography till realizing what that included.
My wife has told me to buy what I want for birthday which is soon. Still undecided on which one, your review answered a lot of my questions.
Hope Christmas is wonderful for you and family.
David
So you came to the same conclusion that I did. Between the Dwarf III and Seestar S50, which is better? YES!
It seems the right answer is……. I don’t know!!!!!
I think I’m leaning towards the Dwarf 3
Has anyone bought and used either smart telescope? If so, what did you buy and do you like it?