Are you looking for a reasonably affordable telescope for planetary imaging? I had the same question and decided to do some research. I’ve compared five planetary telescopes from $500 to $1250 on a number of criteria. The outcome is that the Classical Cassegrain 203/2436mm (F/12) ticked most of the criteria I was looking for. It has a decent 8″ aperture, a long focal length of 2436mm, it doesn’t have a corrector plate that would attract dew and require a longer cooldown time, and it comes with a 1/10th fine focuser. A decent second was the SkyWatcher Skymax Pro 180mm. This telescope has the longest focal length in this price range as a Maksutov telescope which gives you a high magnification needed for planetary imaging, it has a small secondary mirror, and users report that the telescope requires almost no maintenance. The Celestron XLT C8 Schmidt Cassegrain finished third. A big advantage of the C8 is that it is the shortest (425mm) and lightest (5,8 kg) telescope in this overview, with a decent aperture (203mm) and focal length (2036mm).
In this blog, I’ll first explain some must-haves and nice-to-haves that I would deem important for a planetary telescope. Next, I’ll compare five telescopes to each of the criteria I’ve mentioned in the first part.
PART 1: WHAT IS A GOOD TELESCOPE FOR PLANETARY IMAGING?
Based on my own research, I came to the conclusion that five criteria are especially important for a good planetary telescope. Also, I considered a number of nice-to-haves that I would personally prefer to see in a planetary scope. It is important to state at this point that I’m an amateur astrophotographer myself, performing my astrophotography in Utrecht, The Netherlands. My priorities may be different than yours so I would always encourage you to do your own research. Also, if you have any thoughts or experiences with the telescopes that I’m going to mention, I highly encourage you to leave a message in the comments section so that others who read this blog can benefit from your experience as well. I’ll first start with the five must-haves, after which I’ll mention five nice-to-haves.
Five important criteria (must-haves) to look for in a planetary telescope
Focal length at least 2000mm (high magnification)
The most important thing is that a planetary telescope has a sufficient focal length. Even at the best of times, when the outer planets are ‘in opposition’ (i.e. the closest distance from earth) or the inner planets are at their closest western or eastern elongation (i.e. again, the closest distance from earth), the planets – with the exception of Jupiter – will not be larger than 30 arcseconds in angular size. If you are unfamiliar with angular size, picture this. The moon has an angular size of about 30 arc minutes. Similar to how you calculate time, you can derive that 2×30 arcs seconds = one arc minute, and 30 arc minutes = the size of the moon (give or take an arc minute). This means that the planets, even at the best of times, are 60 times smaller as compared to the moon.
So if you want to see some details on the surfaces of those planets, like the cloud bands on Jupiter and the red spot, or the Cassini division in the rings of Saturn, you would need a telescope that is able to magnify the planets to the point that those features are visible. As a rule of thumb, you could say that a good planetary telescope requires at least a focal length of about 2000mm in order to magnify the planets to such a point where these surface details are visible. Focal length refers to the effective distance from the lens or mirror to the focal point, where an eyepiece or camera would go. In refractors and Newtonian telescopes, the focal length is the actual distance from the lens or mirror to the focal point.
Aperture at least 200mm (8 inches; high resolution)
At one point in our lives, we all tried to image an object that was far away with our phones. We started zooming in on that object, only to find out that our final picture looked blurry. The main reason for that is that the small, wide lens in your phone lacks the aperture that is necessary to collect enough light at that distance to show details of the object you were trying to image. Aperture refers to the diameter of the “light-collecting” region. With reflectors, it is based on the size of your mirror at the base of a telescope, and with refractors, we are talking about the size of the lens in front of a telescope. The bigger the mirror or lens is, the more light it can collect, leading to a higher resolution. As a conservative rule-of-thumb, people have argued that the aperture of a telescope should be at least 1/10th of the focal length. So if we are looking at a telescope with a focal length of at least 2000mm, the aperture of that same telescope should be at least 2000mm/10 = 200mm (8 inches) in order for the telescope to deliver a high-resolution image. If the focal length is high but the aperture low, the end result is a picture that suffers from “empty magnification”; the size of the planet is big enough, but the details of the planet surface are not visible (blurry) due to the low aperture (= low resolution).
Limited obstruction of the secondary mirror
When looking into telescopes with the focal length and aperture mentioned above, you’ll soon come to the conclusion that most telescopes are of either Maksutov or Cassegrain design. In order to produce the long focal length needed without ending up with a telescope that is two-meter in length (i.e. 2000mm), telescope inventors came up with a brilliant design in which secondary mirrors that are placed in front of a reflector telescope. Light first falls onto the primary mirror that sits at the base of your telescope, gets reflected and falls on a secondary mirror that sits in front of your telescope, and then is redirected back to a focal point at the back of your telescope where you can put your eyepiece or camera.
There are many variations to this design, but the basic idea is that the use of a secondary mirror considerably reduces the length of the telescope. This is of course nice as such telescopes are more portable and storable in-house for us amateur astronomers. The biggest disadvantage to such a design is that the secondary mirrors will block some of the light that would otherwise fall onto the primary mirror. The collection of less light results in a lower resolution image, as discussed above. So one important requirement to check is the percentage of light that is being blocked by the secondary mirror of any planetary telescope. You want that percentage to be as low as possible.
Avoid tube turbulence (cooldown time)
At high magnifications, vibrations of your telescope will be devastating for a high-quality image. Next to physical vibrations caused by wind or by touching your telescope, vibrations can also be present as a consequence of discrepancies in temperature inside the tube of your telescope as compared to the ambient temperature outside of your tube. If the tube is warmer than the air – the usual scenario – it warms up the air causing natural movement of warmer air upward, and colder air downward – creating tube currents. This results in a constant steady flow of air inside telescope tubes – the more out of thermal balance with the air, the more so – creating areas of varying air densities within the tube. A particular problem is that some telescopes require a long “cooldown time”. When you are moving your telescope from inside your house to your backyard (or elsewhere outside), the telescope needs time to cool down to reach the ambient temperature. You want a telescope that is able to reach an ambient temperature as soon as possible, as this results in a better resolution image of a planet.
Fine focuser
A final important aspect to look for is wether your planetary telescope has the ability to fine focus. When you are at high magnifications, you would want a precise focuser to fine-tune your focus on the planet in question. Some telescopes, however, only come with a course focuser that is positioned on the tube. Whereas this is not a major issue, it could lead to frustration when you don’t have the ability to fine focus.
Nice-to-haves on a planetary telescope
This particular list is probably a bit personal, but I’ll mention them as well.
- No Dew magnet; some telescopes attract a lot of dew, and I’m in a moisty sea climate in the Netherlands. So for me, that is an issue. Of course, dew caps and dew heaters can be used, but I would prefer a telescope that is less susceptible to dew.
- Portable/storable; I don’t have a lot of space to store astronomy equipment, so I prefer telescopes that are limited in size. Also, I prefer not to break my back every time I have to set up my planetary telescope, so weight is an important factor as well.
- Maintenance; I’m always looking for telescopes that require little or no maintenance.
Affordable telescope
One thing I have not mentioned so far is the price. There are lots of telescopes on the amateur astronomy market today, ranging from hundreds to tens of thousands of dollars. It is not my intention to create an exhaustive list of telescopes within each price range. I simply looked at telescopes that were available at the price range mentioned and compared them to the criteria and nice-to-haves mentioned above. Please note that higher focal length and higher aperture telescopes than the telescopes considered in this article are available on the astrophotography market which all produce an even better image of the planets. However, apart from those telescopes being even more expensive, such telescopes are also considerable in size and weight and need high-quality mounts to support such telescopes. So for financial as well as practical reasons, I decided to stick to the $500 yo $1250 price range (which is already a lot of money for most people).
Part 2: Comparison of Five telescopes for planetary imaging between $500 and $1250
In this part, I’ll discuss five telescopes between $500 and $1250 dollars on the criteria mentioned in the first part of this blog. Before we start, I have to mention that I did not include refractor (lens-based) telescopes in this overview. The main reasons are that although refractors are excellent telescopes, prices are high when taking into account a decent focal length (2000 mm) and aperture ( 8″). If you do want a high-quality lens-based telescope for planetary imaging – and the price is less of an issue – I would actually recommend the SkyWatcher Evostar APO 150/1200mm at a price of about $2000, which could be used together with a 2x Barlow to get to the magnification needed to image planets. This refractor would also be suited for deep-sky astrophotography, particularly on the smaller, brighter nebulae, galaxies and star clusters our universe has to offer.
Comparison tables
Below I will first present tables of the five telescopes I’ve selected, taking into account the criteria mentioned in the first part of this blog. After this, I’ll discuss the pros and cons of each of the telescopes in detail, with links to reliable online shops where these telescopes are available. Prices are indicative and based on a query in July 2020. For most accurate prices, see links to each of the telescopes below.
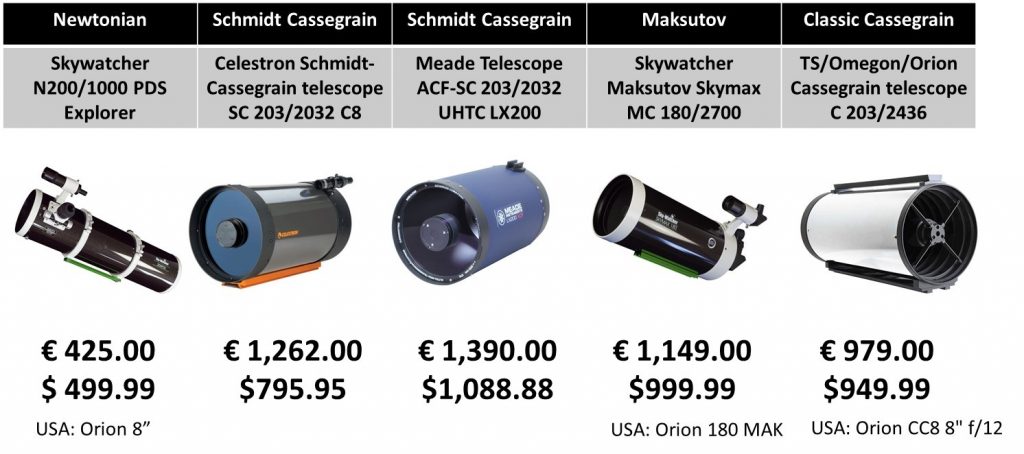
The SkyWatcher PDS explorer (rebranded in the USA as an Orion 8″ Newt) is the only Newtonian telescope I’ve included in this overview. Although – as we will see – this telescope is not perfectly suited for deep-sky astrophotography, it does provide the aperture needed at a price that is about twice as cheap as compared to the other telescopes in this overview. Next, I’ve included the Celestron C8 XLT and the Meade LX200 as two popular Schmidt Cassegrain telescopes on the astrophotography market. The only Maksutov telescope in this overview is the SkyWatcher SkyMax Pro – rebranded in the USA as the Orion 180 MAK. Finally, I’ve also included a Classical Cassegrain 203/2436mm telescope which is available under various brand names like Teleskop Service, Omegon, and Orion.
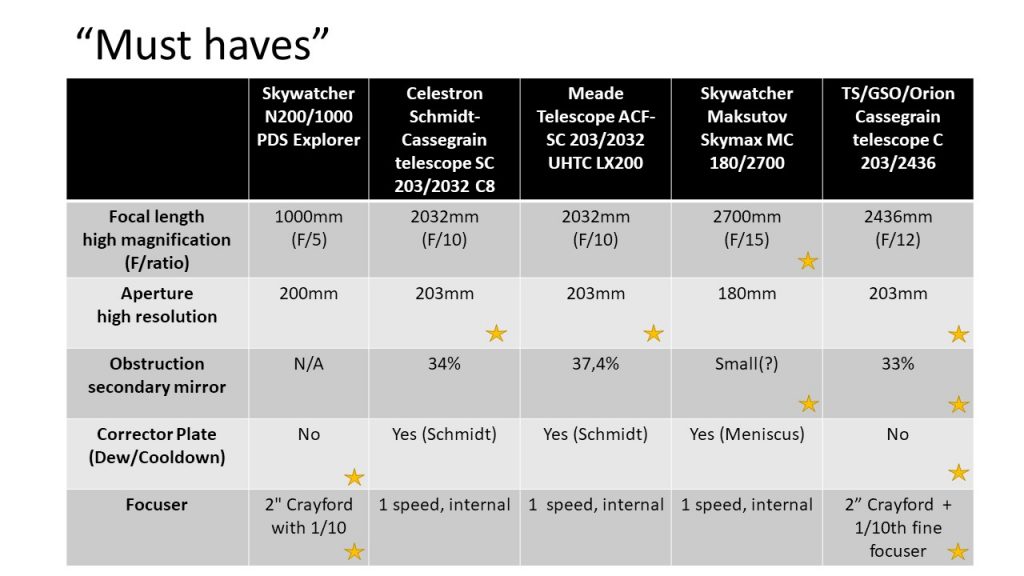
When looking at the must-haves, it is clear that the Skymax Pro 180mm wins in the category of focal length. With its 2700mm, it is the telescope that provides the highest levels of magnification. Surprisingly, the classical Cassegrain comes in second at 2436mm, followed by both the Celestron C8 and the Meade LX200 which both have 2032 of focal length. The Newtonian SkyWatcher PDS Explorer loses in this category as it has a focal length of just 1000mm. However, a 2x Barlow or higher magnification lenses could be used with this Newtonian to get it to the 2000mm and higher range needed for decent planetary imaging. Next, when looking at the aperture, all Cassegrain type reflectors offer the same 203mm (8″) aperture as well as the SkyWatcher PDS Explorer (200mm). The Maksutov Skymax Pro loses in this category, offering 180mm (7″). Regarding the obstruction of the secondary mirror, both the Skymax pro and the classical Cassegrain offer the lowest obstruction. For the Skymax pro, I could not exactly find the size of the secondary mirror but Maksutov designs are famous for their small size, whereas the classical Cassegrain blocks about 33% of light. The loser in this category is the Meade LX200 with a secondary mirror that blocks 37,4%. When looking at potential cooldown time and dew, both the SkyWatcher PDS Explorer and the classical Cassegrain don’t have any corrector plate so that cooldown time to ambient temperatures is quicker as compared to the Schmidt Cassegrain (C8, LX200) and Maksutov (Skymax 180) telescopes who do have a corrector plate. Also, the absence of a corrector plate is beneficial in terms of dew that corrector plates tend to attract. A potential con is that the open tube may also lead to higher variations in temperature within the tube, causing potential tube turbulence. Looking at focusers, both the Skywatcher PDS explorer and the classical Cassegrain contain Crayford focusers with a fine focus option that operates at 1/10th the speed of a normal focuser. The Celestron C8 XLT, the Meade LX200, and the Skymax pro have course, internal focusers on the tube without the option to fine focus.
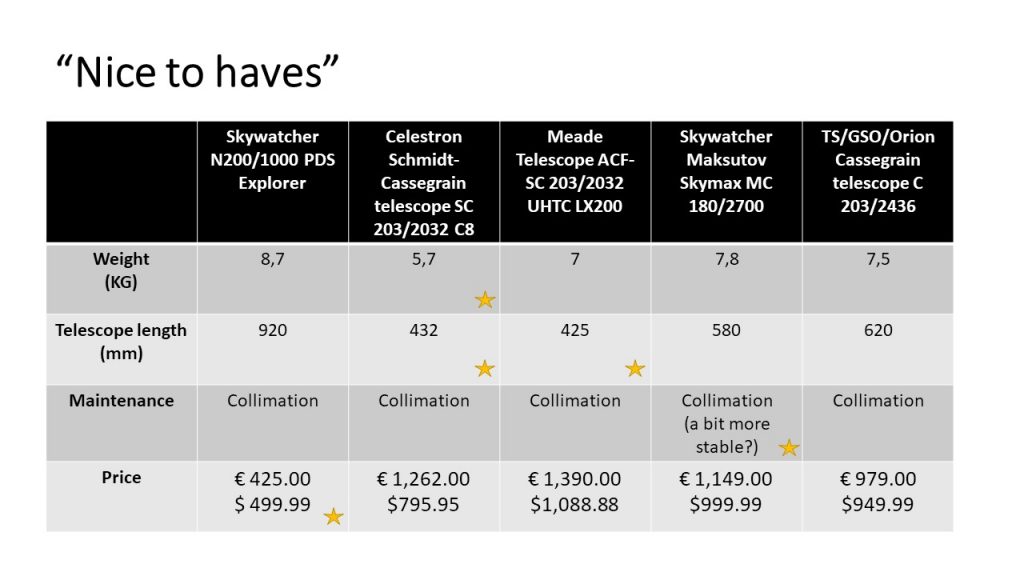
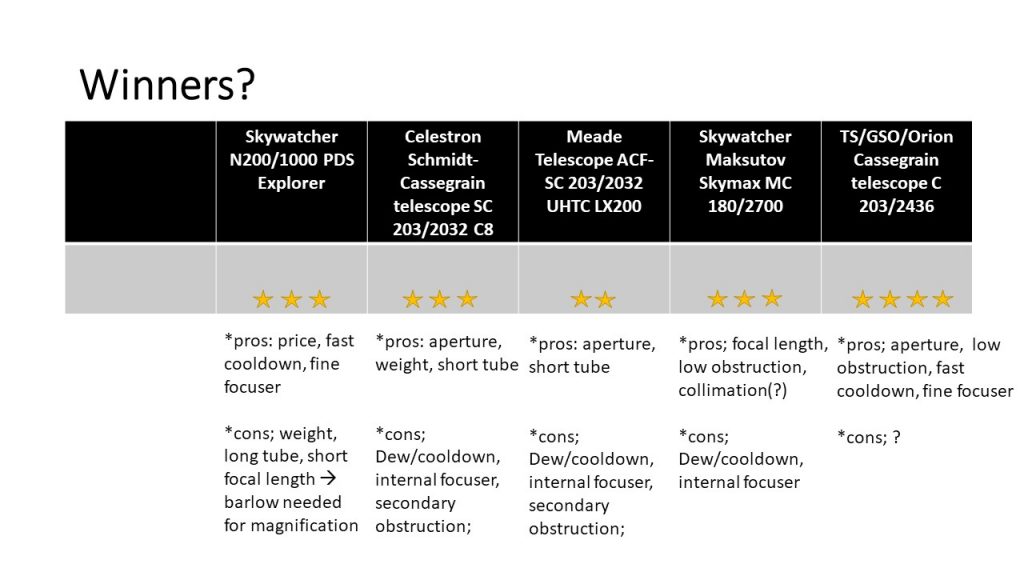
In terms of nice-to-haves, the Schmidt Cassegrain telescopes win in terms of weight and telescope length. The Celestron C8 is the lightest telescope at 5,7 kg, followed by by the LX200 weighing 7 kg’s. Moreover, both telescopes are very compact with a telescope length of 432mm for the Celestron C8 and 425mm for the LX200. A clear loser in these categories is the Newtonian SkyWatcher PDS explorer. Due to its design, the telescope weighs about 8,7 kg’s and is the biggest telescope in terms of telescope length with 920mm. When looking at maintenance, the users of the Maksutov Skymax Pro have reported that little to no maintenance is required, with collimation being only necessary ones every few years. Finally, when we look at the price, the Newtonian Skywatcher PDS Explorer is of course a clear winner, costing about half the price of its competitors in this overview. I should also note that there is a huge price difference between the Schmidt Cassegrain telescopes available in Europe and the USA. In Europe, VAT prices drive the cost of the Celestron C8 and the LX200 to 1262 and 1390 euros at the time of writing, whereas in the USA the Celestron C8 is already available for $795 and the Meade LX200 for $1088. In the table below, I’ve reiterated the main pros and cons for each of the five telescopes.
Conclusion
So, which of the telescopes wins the title of the best planetary telescope in the price range from $500 to $1250 dollars? Well, that would depend on your personal preferences, but my personal top three is as follows.
3. Celestron C8 XLT

The Celestron C8 XLT is perhaps the best all-round telescope that is available for planetary imaging within this price range. The telescope has a decent 8″ aperture which provides good resolution to capture the red spot on Jupiter, the Cassini division in the rings of Saturn, and even some features on the tiny planet of Mars. Moreover, the short and lightweight tube makes this telescope very compact, providing you with the opportunity to store the telescope inhouse and setting up the telescope without breaking your back. The C8 does not include a fine focus option but includes an internal, coarse focuser positioned at the back of the tube. So you may want to buy an additional focuser with fine focus capabilities. Also, the telescope does need some cooldown time, dew shields, and/or dew heaters around the Schmidt corrector plate. You might also want to consider buying a focal reducer for this F/10 telescope, which would turn the telescope into an F/6.3 to engage in some deep-sky astrophotography. Please do note that prices vary significantly depending on your location on this good earth. In the USA prices are cheaper as compared to Europe and elsewhere, due to high VAT rates.
2. Maksutov Skymax Pro 180mm (Orion 180mm MAK)
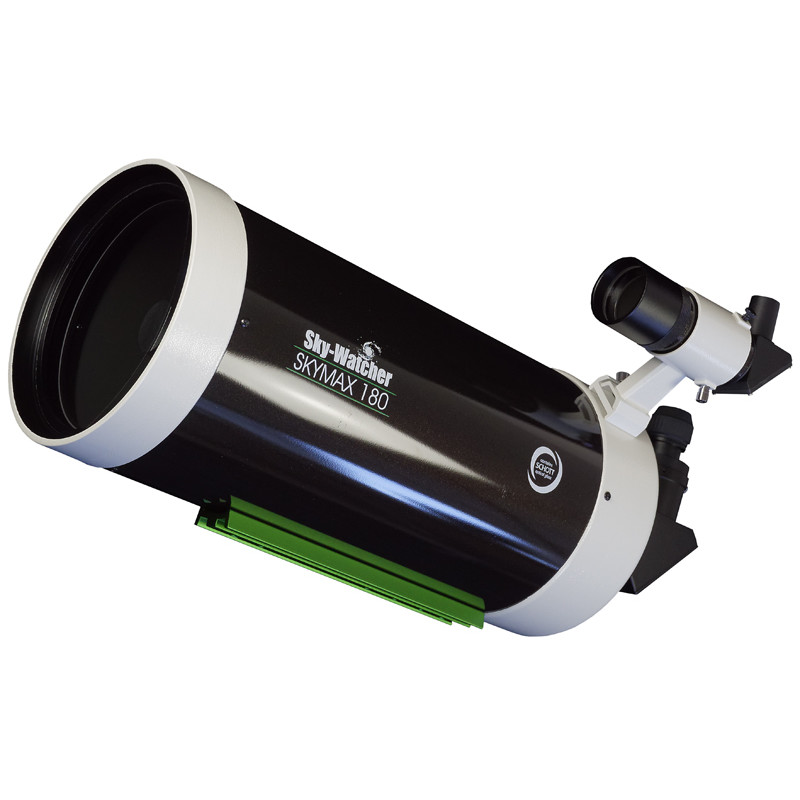
The SkyWatcher SkyMax Pro 180mm (in the USA: Orion 180mm) Maksutov telescope is a top contender in this price range. This telescope provides the longest focal length which will give you high levels of magnification. The red spot on Jupiter, the Cassini division on Saturn, and surface details of Mars are within your grasp. Also, this MAK is a genuine ‘moon killer’. Due to the thick meniscus corrector plate, it does take some time for this telescope to cool down, with reports stating that you would need up to 90 minutes before the telescope is ‘at equilibrium’. Also, the corrector plate will attract dew in moisty climates so be sure to order a dew cap or some dew heaters with this scope. Also, the telescope, unfortunately, does not include a fine focus option, but only a coarse focuser on the tube – so you might want to buy an additional fine focuser. Luckily, the telescope does come with a Schmidt Cassegrain thread so you can buy all SC focusers that are available if you would decide to do so.
1. Classical Cassegrain 203/2436mm F/12 – Teleskop Service/Omegon/Orion
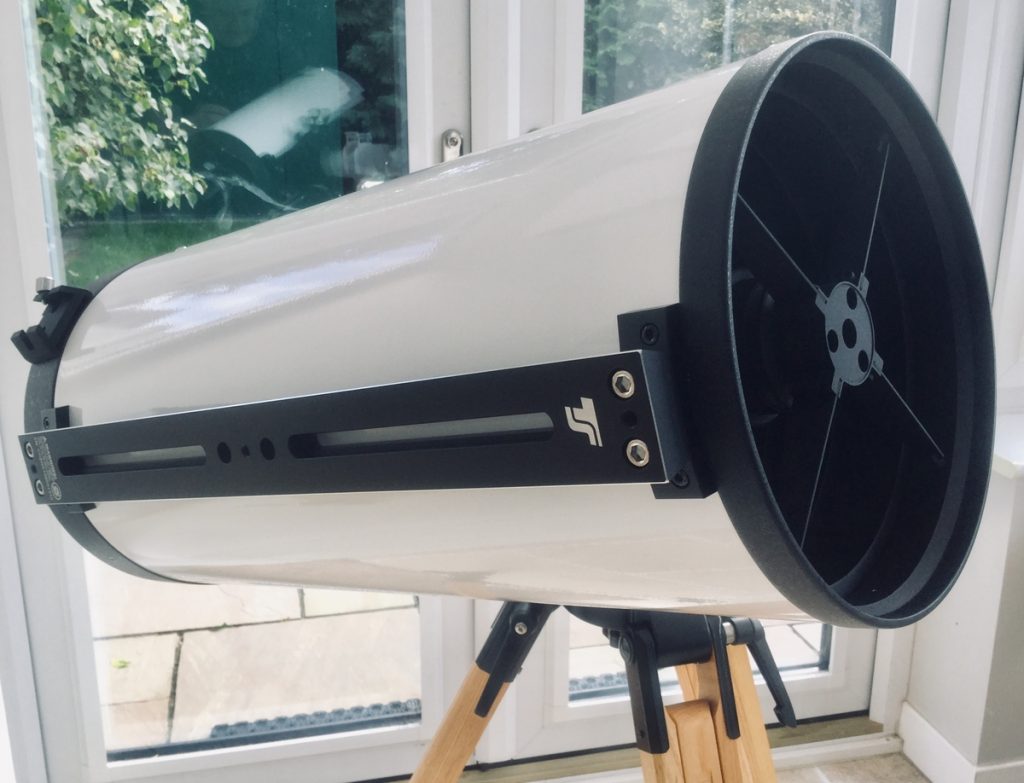
The Classical Cassegrain is my personal favorite in this overview on planetary telescopes within this price range for several reasons. It provides the second largest focal length after the MAK 180mm. With 2436mm of focal length, you will get awesome images of our moon and planets. It will be no problem for this telescope to capture the red spot on Jupiter, the Cassini division on Saturn, or the surface details of Mars. Additionally, the decent 8″ aperture is accompanied by an open tube without a corrector plate. This is advantageous in the sense that open tubes require less cooldown time. Also, dew is less of an issue for telescopes without corrector plates, and the fine focuser operating at 1/10th speed will give you the much-needed control to fine-tune your focus on the planets or the moon. Importantly, while not being the best telescope in all of the categories considered, it also doesn’t perform worst in any of the categories considered. Finally, the price is favorable when comparing it to the other telescopes (with the exception of the Newtonian reflector) – especially in Europe where prices for the Schmidt Cassegrain telescopes tend to be higher due to VAT. In my view, the CC F/12 is the winner in this overview and consequently, I’ve ordered one and I’m eagerly awaiting its arrival.
Clear skies!
If you have any thoughts or experiences using the telescopes discussed, do not hesitate to put your thoughts in the comment section below.
Links to all scopes discussed:
USA*:
- CELESTRON C8-A XLT (OPT): https://bit.ly/2CCmMe9
- MEADE 8″ LX200-ACF F/10 (OPT): https://bit.ly/38UGP3K
- MEADE 8″ LX200-ACF F/10 (AMAZON): https://amzn.to/3foItwZ
- ORION 180MM MAKSUTOV 180mm (OPT): https://bit.ly/308jojv
- ORION 180MM MAKSUTOV 180mm (Amazon):https://amzn.to/2B3v0fe
- ORION CLASSICAL CASSEGRAIN 203/2436 (Amazon): https://amzn.to/3fu09Hn
- ORION 8″ NEWTONIAN F/5+EQ MOUNT (OPT): https://bit.ly/2Cw33Nw
EU*:
- CELESTRON C8-A XLT (Astroshop): https://bit.ly/2B3wru8
- MEADE 8″ LX200-ACF F/10 (Astroshop): https://bit.ly/2Op68S6
- SKY-WATCHER SKYMAX PRO 180MM MAKSUTOV (Astroshop): https://bit.ly/2Zth1Zy
- TS OPTICS CLASSIC CASSEGRAIN 203/2436 (Astroshop) https://bit.ly/3evFBgx
- OMEGON CLASSIC CASSEGRAIN 203/2436 (Astroshop): https://bit.ly/2DEogoR
- SKYWATCHER N 200/1000 PDS Explorer: (Astroshop): https://bit.ly/2DIFth5
*Note that all of these shops also ship worldwide. But ordering within your own economic area is preferred due to absence of VAT costs.
True, I have a separate blog on ZWO cameras, you can find it here: https://astroforumspace.com/best-zwo-cameras-for-planetary-imaging-and-deep-sky-dso-astrophotography/
Hoi Wido,
Ik fotografeer al een hele poos en heb dan ook een redelijke collectie lenzen. Daarnaast heb ik ooit een Bresser Galaxia gekocht waar ik lekker doorheen kan koekeloeren. Desalniettemin als ik mijn camera hier aan koppel zijn de resultaten tot op heden altijd teleurstellend. Mijn 70-200 F4 lens presteert beter en scherper dan de galaxia combinatie. Waarom zou ik een 1000 euro uitgeven voor een 80mm lens F6 als ik voor de helft van het geld een 200 mm F4 kan kopen? Is dit überhaupt een reële vergelijking?
Hoi Pieter,
Die Bresser is als ik het goed heb een goedkope reflector. Je zult dus last hebben van coma (ovale sterren buiten je focus gebied) en diffractie in je sterren (je krijgt grote plustekentjes bij heldere sterren). Een apochromatische refractor is uitermate geschikt voor astrografie en zou een veel beter resultaat moeten geven dan een fotolens. Groetjes!
Good Afternoon Wido,
I wanted to pick your brain. I saw you video on filters. I live in North Carolina in what I call a Dark Class 5 Bortle. I shoot with Williams Optics GT102 Triplet APO Refractor with a Sky-Watcher Evoguide 50mm Helical Focuser. That guidescope has a ASI290mini. I’m mentioning ny equipment so you can get a overall perspective on my eventual question and situation. I just received my new camera ZWO ASI2600 COLOR. Since I jumped to color I also bought a ZWO FILTER DRAWER for my 2′ OPTOLONG DUAL BAND L-EXTREME. My filter is my real queztion. I want you thoughts on how my this filter will work with my color camera. Thank you
Hi Robert, wow, that’s a very interesting combination. To be completely honest, I haven’t tried the color camera x dual-band combination myself. But I do have some experience with narrowband imaging and I read the filter profile so I’ll give you my thoughts. First off, you’re in a dark class 5 environment which makes me wonder if you ever tried shooting without a filter and assess your light pollution situation. Under your conditions, it might be worthwhile to (also) consider broadband (i.e. normal) imaging. I think the l-extreme filter would work especially well for Ha and Oiii rich nebula. Assuming that you’re in the northern hemisphere, the nebulae in the constellation Cygnus (north America nebula, Pelican nebula, Cygnus loop, eastern/western veil nebula) would be extremely suited as they are H-alpha and Oiii rich nebulae. You could use the filter drawer+filter in combination with your asi2600 – that camera gives a wonderfully “wide” field of view which is awesome to catch the larger nebulae in just one picture – no need to create a mosaic. You will probably end up with one color stack, but you can process the RGB channels separately to create the image you want. Results would be a lot like the narrowband HOO images you’ll find on the internet. Hope this helps! Clear skies.
Hoi Pieter, goede vraag. De Galaxia is een eenvoudige reflector en zal dus van een aantal nadelen hebben, zoals ovale sterren aan de randen van je foto (door een fenomeen dat coma wordt genoemd) en de reflector produceert diffractie in de sterren (grote plustekentjes). Een apochromatische refractor zal die vertekeningen niet vertonen en geeft over het algemeen genomen en kwalitatief beter beeld dan een fotolens.
Hallo Wido,
Dank voor al je nuttige artikelen! Volg je regelmatig.
Heb een vraag over de classical cassegrain. Ik overweeg er een aan te schaffen voor voornamelijk visueel gebruik planeten. Eventueel nog fotografie. Nog geen deepsky fotografie. Ik zie de CC nergens meer terug in je artikelen. Was de OTA tegengevallen? Of komt het door deepskyfotografie waar deze niet zo voor geeigend is? Ben benieuwd naar je reactie.
Gr Paul
Dag Paul, ik kreeg die telescoop niet goed gecollimeerd met conventionele instrumenten. Je hebt een laser collimator nodig en een nogal ingewikkelde procedure. Nadat ik de telescoop 3 nachten lang had proberen te collimeren zonder goed resultaat heb ik hem teruggestuurd. Met refractors heb je geen collimator nodig en Newtonian + sct’s zijn veel eenvoudiger te collimeren. Het was een leermoment voor mij. Groetjes
Hallo Wido ,
Heb recent een soortgelijke ervaring met de 8″ classical cassegrain van TS gehad. Collimatie was ver te zoeken out of the box. Dacht dat ik hem zelf aardig goed had gecollimeerd dus dezelfde avond een sterretest gedaan. Wat ik zag maakte me nog steeds niet blij..in en uit focus; te slecht om op door te tunen. Dus heb het weer ingepakt en teruggestuurd. Dank voor je info anders had ik er waarschijnlijk “te” veel tijd in gestoken..
Groeten Paul
Hi,
Your video made me re-think my buying strategy, so thanks a lot!
Just a quick question: why I have opted for a TS instead of an OMEGON?
Thanks,
Rita
Hi Rita,
The post you’ve read is actually a couple of years old. you can find my latest blog about telescopes for planetary imaging here:
https://astroforumspace.com/best-telescopes-to-photograph-the-planets/
Best,
Wido.