If you’re lucky enough to own a ZWO AM5 mount, you’re probably aware that you can control that mount in four different ways with; (1) a hand controller, (2) your smartphone by using the ASI mount App; (3) your PC/Laptop using an ASCOM driver, and (4) the ASIAIR. In this tutorial v/blog, I’ll explain how to connect the mount using the first three options. I’m planning a separate v/blog on the ASIAIR and the AM5, so in this one, I’ll discuss the first three options. I have to say that I was rather impressed by the ASI Mount APP, so I will discuss that option in detail. Here’s my accompanying video:
Before getting into how to connect the AM5 mount, it is important to first set up and polar align the mount correctly in equatorial mode. If you’re unsure how to do that, you can check ZWO’s YouTube channel where you can find videos that show you how to set up the AM5. If you want me to make a separate video about it, please let me know in the comments below.
Controlling the ZWO AM5 with the hand controller

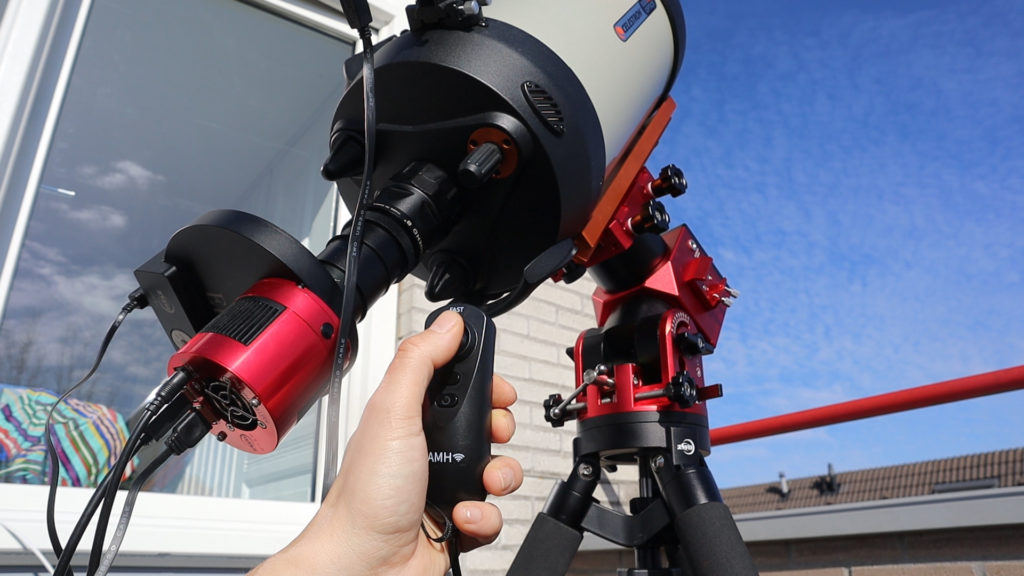
The first way to control your AM5 is with the joystick-like hand controller that comes with the mount. After you’ve set up and polar aligned the mount, simply put the plug of the hand controller in the HC port of the AM5. The controller has four basic functions. First, the directional joystick can be used to slew the telescope on the mount. Pressing the joystick up/down, and left/right will change the position of your telescope in the direction you push the joystick. You can press the joystick down to switch between high and low slew speeds. For example, it may be useful to first roughly align your mount with an object you want to observe using high speeds, and then precisely align your mount with that object using the slow speed option by first pressing down on the joystick, and then continuing slewing at slow speed. Below the joystick, you’ll find two additional buttons on the hand controller. The T button stands for tracking and can be used to switch the sidereal tracking of the mount on. When switching it on, your mount starts to automatically track the objects in the night sky so you don’t have to manually adjust the position of the mount once you’re aligned with the object of interest. The second button can be used to cancel the tracking and return the mount to its home position. A short press will cancel the tracking and goto functions, while a long press returns the telescope to its home position, pointed towards the celestial pole. Although most of you are probably looking to wirelessly control the mount, the option of the hand controller may still be useful to visually align the mount with solar system objects like the moon or one of the planets in the night sky, without the need to externally connect the mount over WiFi or USB to your smartphone or computer.
Controlling the ZWO AM5 with the ASI mount APP
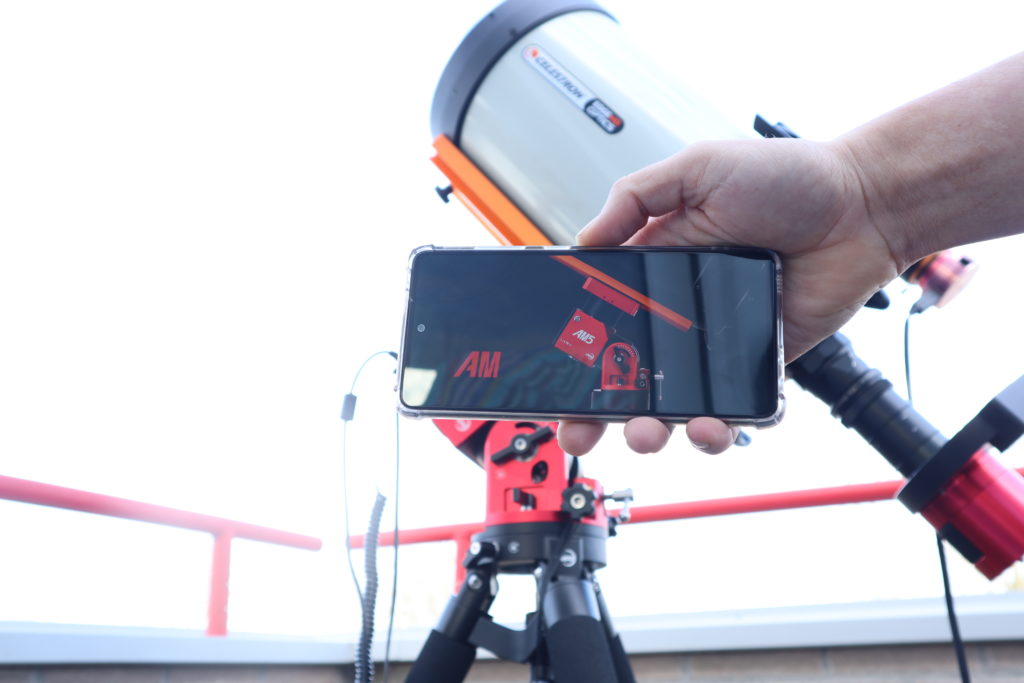
The second option to control the AM5 mount is by using the ASIMOUNT app. Download the ASIMOUNT APP to your smartphone or tablet. You can find it in the Play Store and App Store. I was a little surprised to see that the APP is over 500MB in size, but after having used it I understand why. The whole ASI Mount app features a full virtual planetarium much like the well-known Stellarium software, with the option to control your AM5 mount over WiFi. That’s pretty awesome if you ask me, so I’ll give you a detailed rundown of this APP. Importantly, if you want to use the APP with your AM5, you need to connect the hand controller to the HC port as mentioned above.
Opening the ASIMOUNT APP for the first time
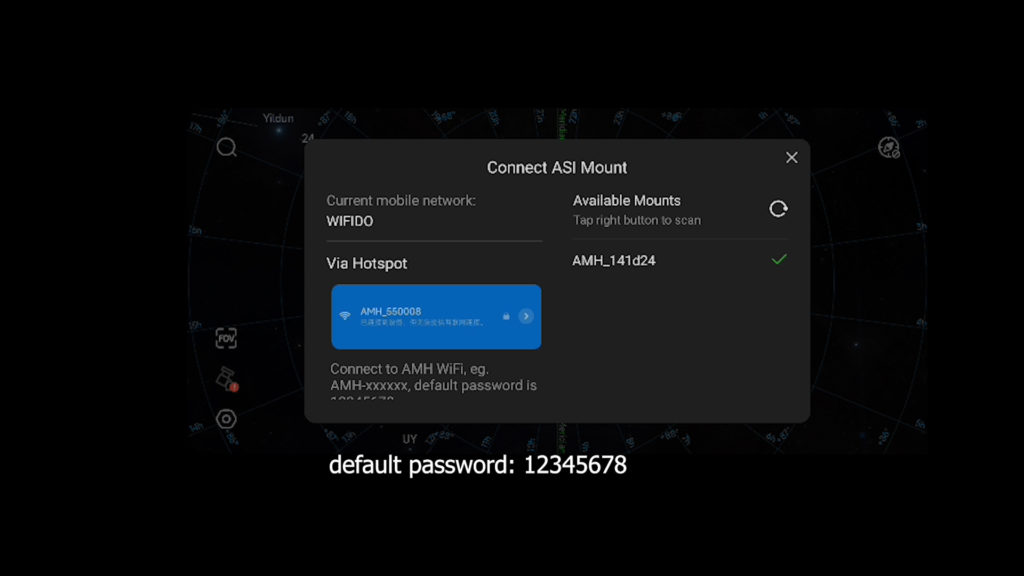
When you open the APP for the first time, it starts decompressing the APP which takes a few seconds. After that, it asks for permission to use the GPS data of your smartphone. Allowing this will enable the APP to use the GPS coordinates of your phone to show the correct virtual sky at your location in the APP. Interestingly, the APP also asked for permission to manage telephone calls. I’m not sure why, so I’ll contact ZWO and ask them why that is. After that’s done, the APP will show you a virtual planetarium of the sky at your location, and it will scan to find the WiFi signal of the ASI mount APP. The mount needs to be powered on and the hand controller needs to be connected to the mount to receive the WiFi signal of the mount on your smartphone or tablet. The WiFi signal of your mount will appear under “available mounts”, starting with AMH_ and then a specific figure for your mount. Select that WiFi signal to connect the APP to your smartphone. The default password of the WiFi signal is 12345678, so be sure to use that if you’re connecting the AM5 to the ASI Mount APP for the first time.
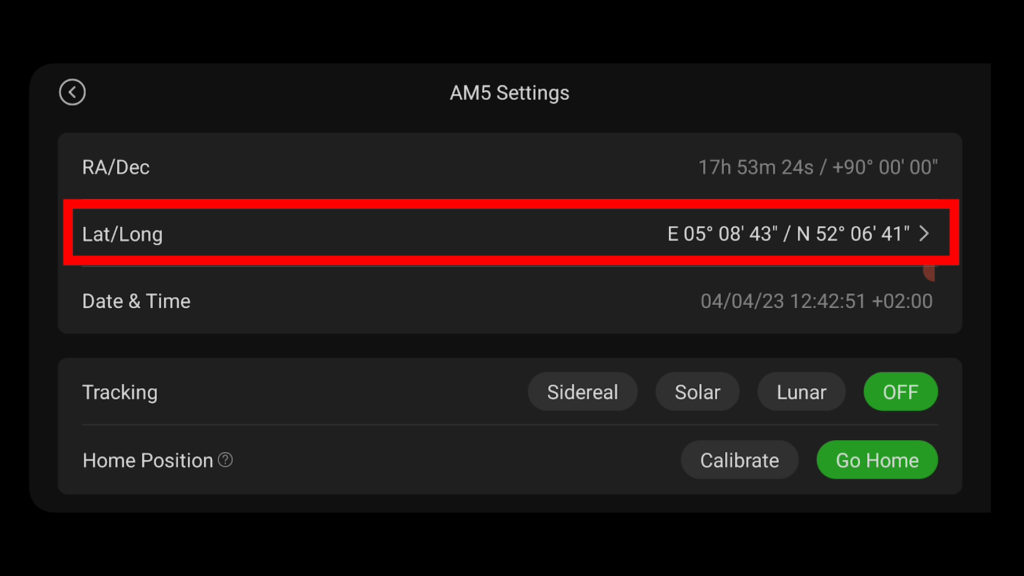
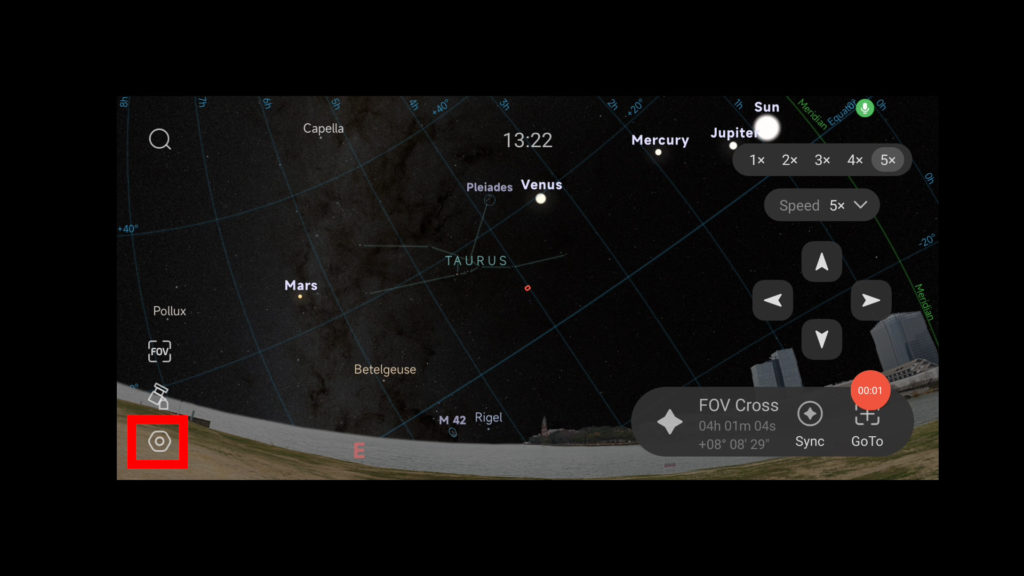
After you’ve connected the WiFi signal, The APP now shows a virtual planetarium, with various icons and options you can use to control your mount. It shows a magnifying glass icon at the top left to search for objects in the night sky, it shows a field of view icon, a mount icon, and a hexagonal icon on the bottom left. On the top right, it shows a compass icon, and we can also see the arrows and slew speeds available to control your AM5 mount. I’ll explain all the options for each of these icons, but the first thing I recommend you do is to check your latitude and longitude coordinates by clicking on the mount icon on the bottom left. This will bring you to the AM5 settings menu. When you scroll down, you see “Lat/Long” with the coordinates in latitude and longitude shown in degrees, arcminutes, and arcseconds. You can adjust these coordinates by clicking on the figures. This allows you to manually input your latitude and longitude coordinates. If you’re going to manually input your coordinates be sure to use the correct East/West setting for longitude and North/South setting for latitude, depending on your position on Earth. After this, you can also change the language to either English, Chinese, or system default if needed. Changing the language will prompt a message showing that you’ll have to restart the APP after changing the language.

The FoV menu

FOV menu
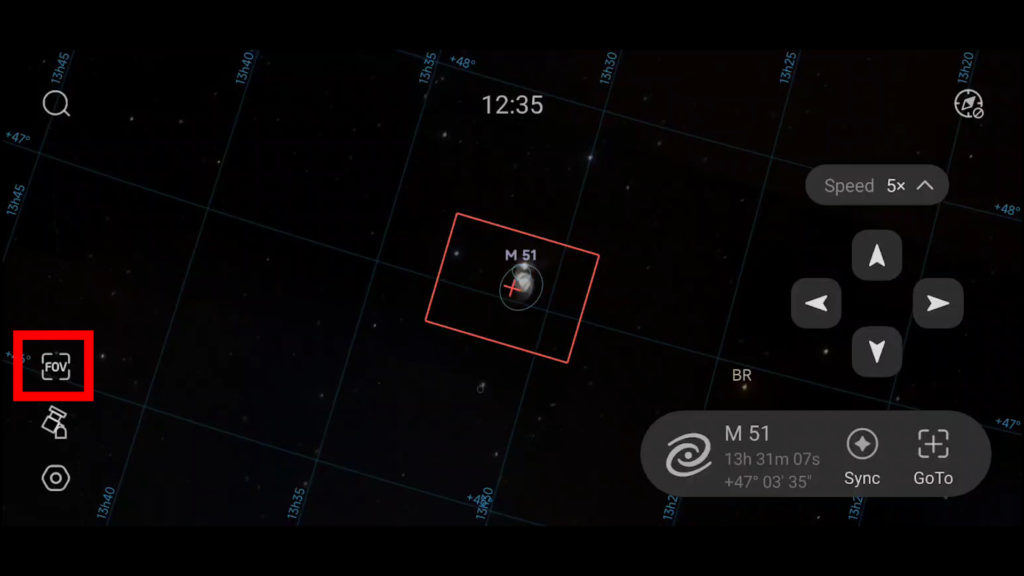
With the APP correctly set up, let’s return to the planetarium mode and explore the possibilities of the ASI mount APP. The FOV menu is useful when you’re going to photograph objects in the night sky, and want to know how big these objects will appear in your camera’s field of view. Clicking on the FoV icon will show you a menu, starting with the option to turn the field of view indicator on or off. When turned on, the planetarium will show a red rectangle that demonstrates the view you’ll be getting with a particular camera and telescope combination. In order to get the correct view, you need to input the camera sensors’ width and height, as well as the focal length of the telescope you’re using. The APP comes with pre-defined sensor sizes for all the cameras released by ZWO. You can click on “Choose camera” to select the ASI camera you’re using. If you’re using a camera of a different brand, you can select “custom camera”, and then you can manually input the correct width and height of your particular camera sensor. Unfortunately, I couldn’t find an option to select an eyepiece that would be useful for those of you who want to use the mount for visual observations. You can click on the scope focal length to input the focal length of the telescope you’re using. Finally, you can also select additional reducers or Barlow lenses if you’re using them, and you can adjust the camera rotation angle. So let me select my ASI1600MM Pro camera, my edge HD 8″ which has a native focal length of 2032mm, and my .7 reducer which is one of the setups I often use to photograph some of the smaller deep-sky objects in the night sky. When returning to planetarium mode, I can see a red rectangle that demonstrates the field of view I will be getting with this particular camera and telescope setup.
Magnifying glass menu
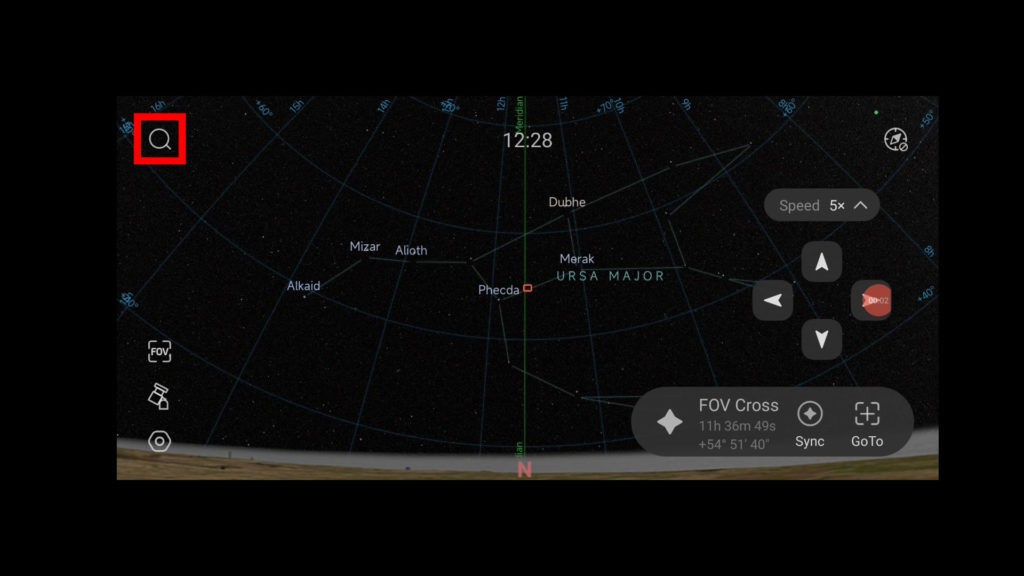
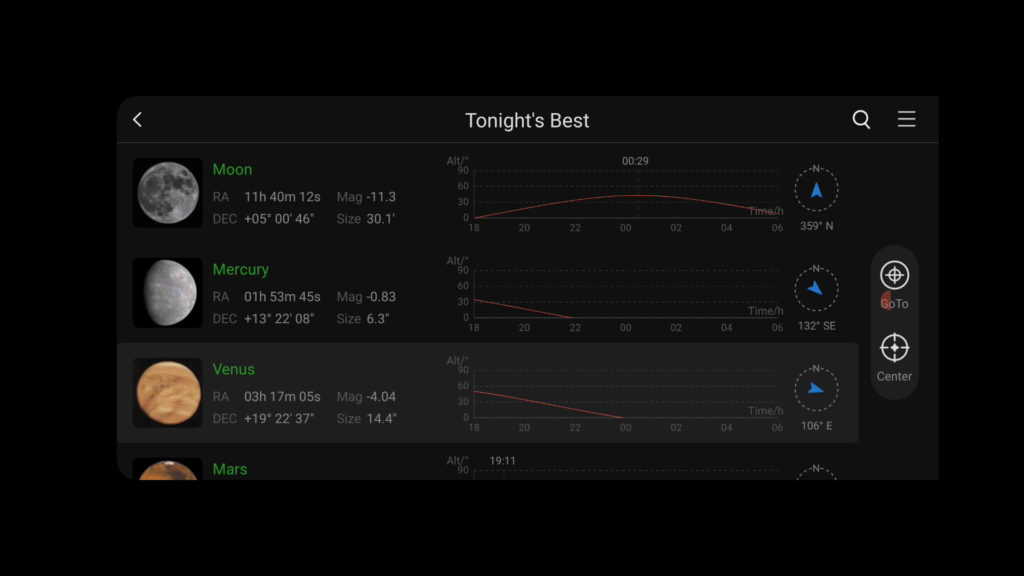
The magnifying glass menu is all about finding, selecting, and slewing to objects in the night sky. Clicking on the Magnifying glass on the top left in planetarium mode will show a very nice menu, with tonight’s best objects to observe or photograph. On the left, you can see the name of the suggested object with the RA and DEC coordinates in the sky, and the apparent magnitude and size of the object. On the right, you can see a graph that shows the position of the object in the sky at any given time. The y-axis of the graph demonstrates how high the object is in the night sky ranging from 0 degrees on the horizon to 90 degrees directly overhead in the zenith. The x-axis demonstrates a timeline from 6 pm in the evening until 6 am in the morning. The red line of the graph demonstrates how high the object is at any given time. Finally, the compass on the right shows the position of the object.
By clicking on one of the objects, you’ll get an option to select Goto or Center. When selecting GoTo, the mount will automatically slew to and start tracking the selected object in the sky. For example, when I select Venus and click “goto”, the mount will slew to Venus and will start tracking Venus automatically in sidereal mode. When I select Venus and click center, the virtual planetarium will show me the position of Venus in the sky at my location.
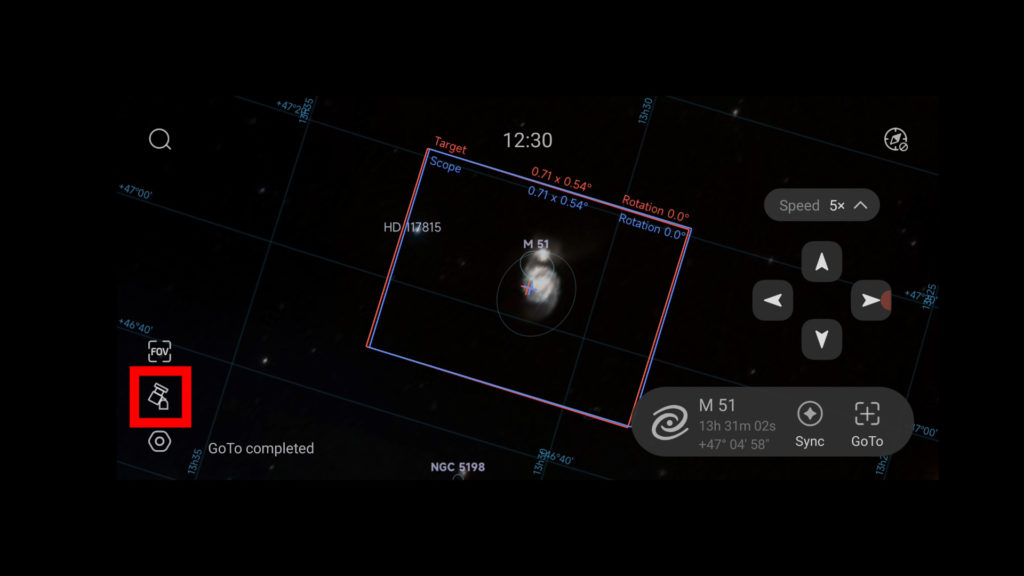
Finally, you can use a magnifying glass to search for a custom object of your choice. For example, when I’m searching M51, it shows the whirlpool galaxy with all the info I just mentioned. If I click on M51, the APP gives me the option to goto or center M51. Let me click on center. Now, the app will show me where M51 is in the night sky, and the red rectangle will show me how big this object will be when I photograph it using my asi1600MM Pro camera and my Celestron Edge HD 8″ telescope I’ve selected in the FoV menu. In planetarium mode, I can also click on the “goto” that will slew the AM5 mount to M51 in the sky, and it will start tracking that object. The blue rectangle shows the current position of the telescope in the sky.
AM5 Mount settings Menu
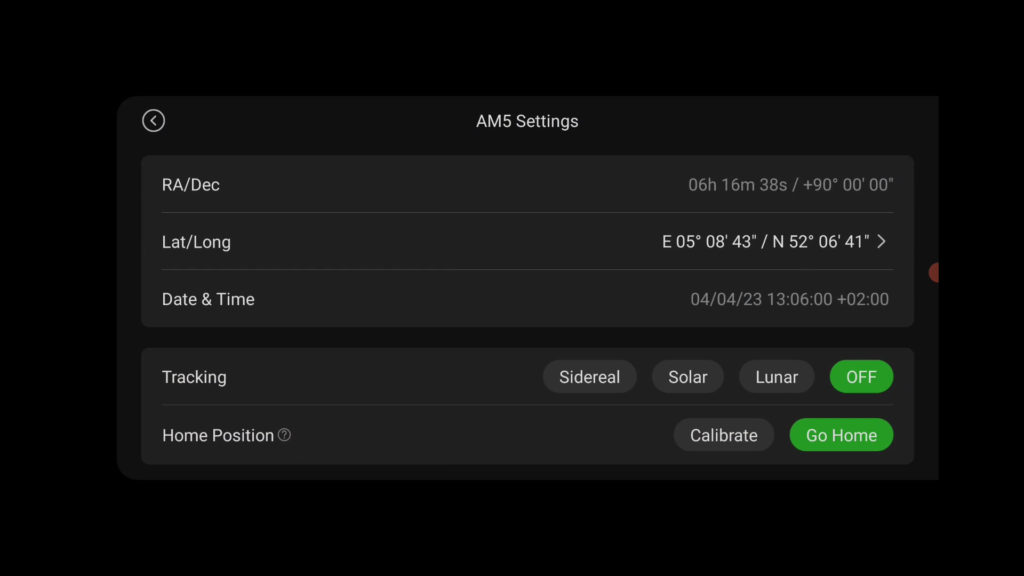
So let’s get back to the AM5 setting menu on the bottom left to see what kind of options we have. When the mount is fully connected, it shows the position of the mount in RA and DEC. Again, it is important that your mount is correctly aligned with the celestial pole so be sure to do that before using the mount. We already discussed the option to adjust your latitude and longitude position in lat/long by adjusting the figures. The menu also shows the date and time which are in sync with your smartphone or tablet. You can initiate tracking of the night sky by clicking on different tracking options. The sidereal mode can be used for almost all objects in the night sky, with the exception of the moon and the sun which have specific Lunar and Solar tracking speed options. When clicking on each of these options, the mount will start tracking the objects in the sky at the selected speed.
You can click on “Go home” to slew the mount back into the home position it was in after you finished your polar alignment. By clicking on “go home”, the mount will stop tracking objects in the sky and return to the home position. You can also calibrate that home position in the APP. clicking on calibrate shows you a menu where you can adjust and save the home position of your telescope. Personally, I wouldn’t recommend doing that. It would be better to redo your polar alignment procedure if you notice you’re tracking is off, rather than adjusting the home position here, but that’s just my opinion.
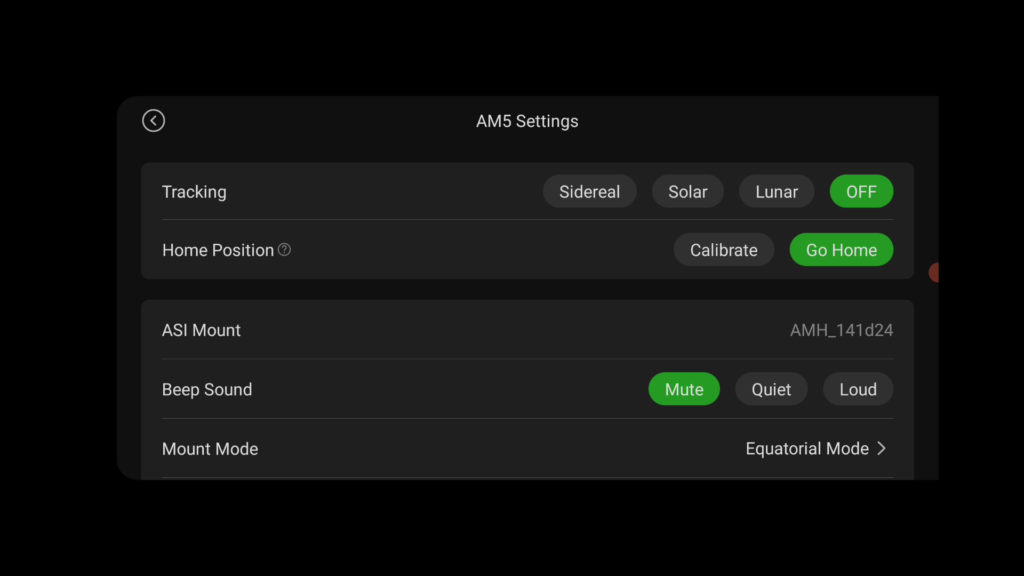
You can adjust the loudness of the beep sound, or even mute the sound of the AM5 by selecting these options. This is useful when don’t want the neighbors to get annoyed. You can also adjust the mount mode from equatorial to alt-az. I would recommend using the AM5 primarily in equatorial mode, especially when you’re going to use it for astrophotography. It would go to far to explain the alt-az mode and its potential benefits. If you want to learn more, check this v/blog.
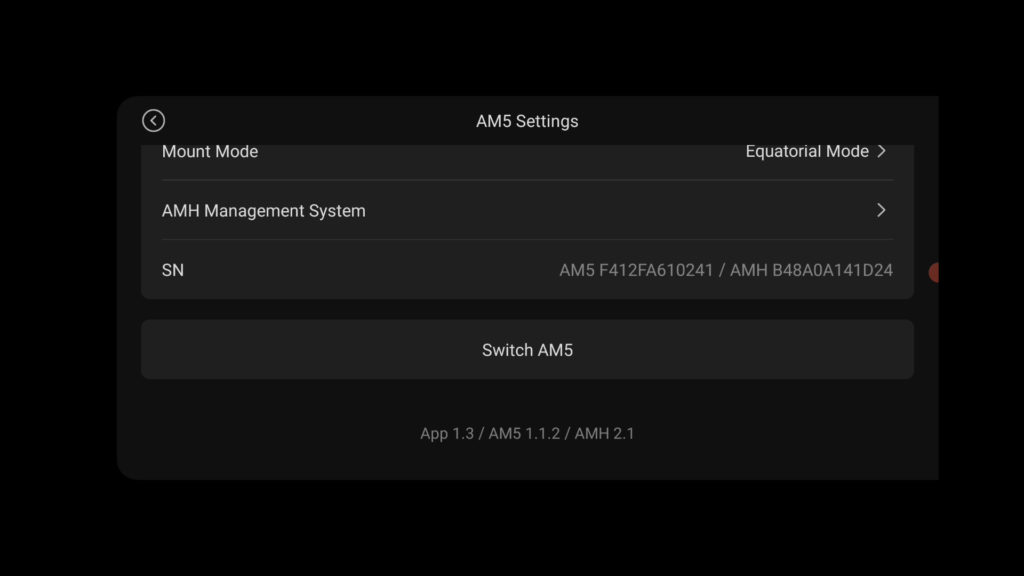
Finally, the AMH management system allows you to update your mount to the latest firmware. Just click on firmware and check if there’s an update available. I’m using version 1.1.2 in this video. When you click on network, you can select your home WiFi network and connect to it, so that the APP can use your home WiFi network. When you scroll down, you can adjust the WiFi Name and password of the hand controller of the mount by clicking on edit. I’m going to leave this at default for now. Finally, I’m not sure what switch AM5, means, but I think this might be an option when you have multiple AM5 mounts you want to control using this APP. As I have one AM5 mount, clicking on this option will generate a message that there are no other mounts available.
The hexagonal menu and compass

The hexagonal menu on the bottom left allows you to adjust the appearance of the virtual planetarium. You can switch on or off indicators like the meridian, celestial equator, and coordinates. You can also switch constellation drawings and the ground on or off.
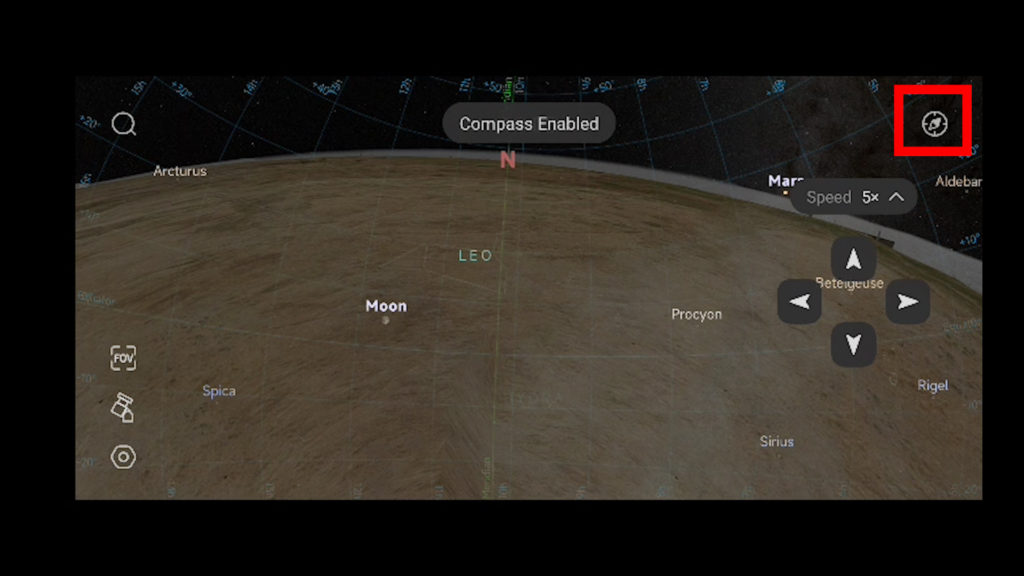
By clicking on the compass icon on the top right, you can point your smartphone toward the sky and the virtual planetarium will show you the part of the sky your smartphone is pointing to. This may be useful when you visually see an object in the sky and you want to point your telescope at that object.
Planetarium mode
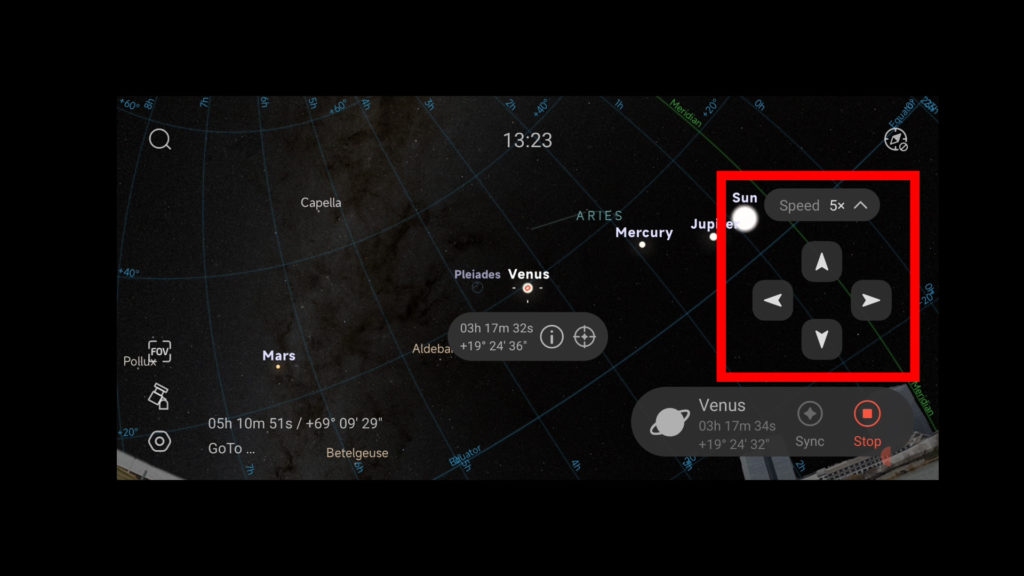
Finally, in the planetarium mode, you have the option to adjust your slew speed from 1 to 5, and you can move the mount around by using the arrow buttons in the direction you want. This can be useful. For example, you can slew to a planet in the sky, but you may find out that the planet is not exactly in the field of view. You can then use the arrow buttons to get the object you want to see in the telescope’s view, and after doing so, you can click on sync to sync the position of the telescope mount to the position of the object in the virtual planetarium.
All in all, the ASImount app is an impressive app that allows you to intuitively control your mount over WiFi using your smartphone or tablet.
Connecting the AM5 Mount via ASCOM to your favorite software
A third and one of my favorite options is to connect your mount via a USB cable to your PC or Laptop using the ASCOM driver that can be downloaded from the ZWO website. If you’re going to use the ASCOM connection, be sure to also download the ASCOM platform software first. First, download and install the platform and the driver before continuing this tutorial.

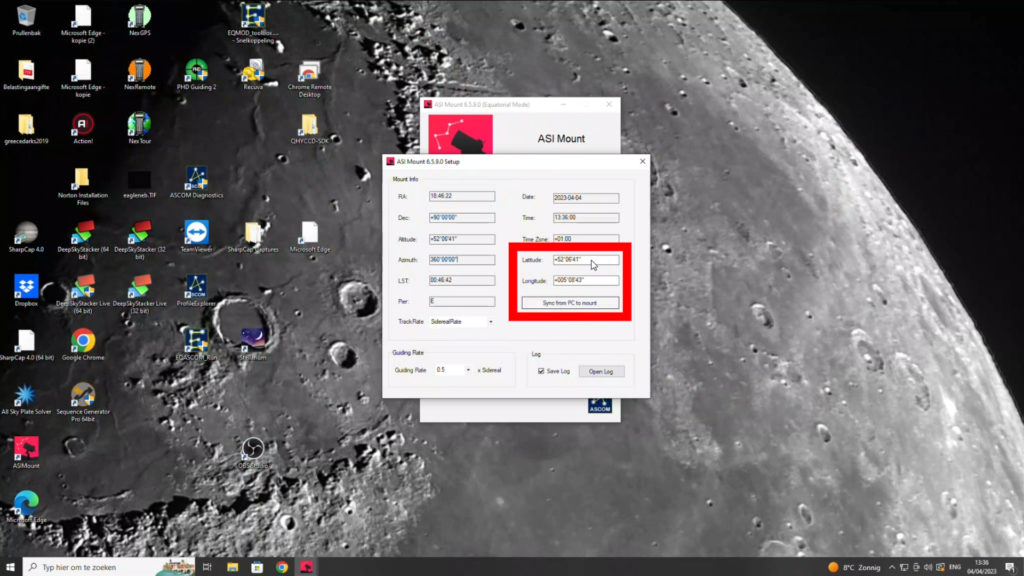
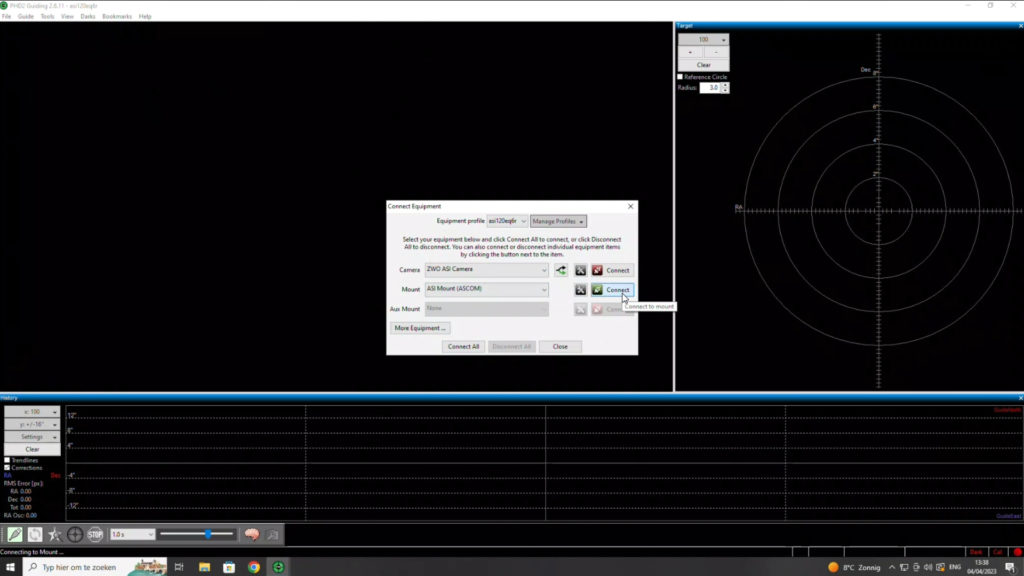
In order for ASCOM to work, you need to connect your mount to your computer or laptop via a USB cable. Connect the cable to the USB port on the AM5 and a USB port on your computer. After that, goto the device manager and check the USB port connections to see the exact COM port the AM5 is connected to. After that, you can launch the ASI Mount app, select the correct COM port, and press connect to initiate a connection between the mount and your computer. The ASImount APP is basic and very straightforward, which is fine. you can use the arrow keys to slew the mount, and you can adjust the slewing speed of the mount. Also, you can click on “firmware update” to check for new versions of this ASCOM driver. It is also important to click on advanced features and input the correct latitude and longitude position in degrees, arcminutes, and arcseconds. Also, press “sync from PC to mount” to sync the time and date of your computer with your AM5 mount. After this, the ASI ASCOM driver can be used by any astrophotography software that has the ASCOM standard. For example, in PHD2, you can select “ASImount” and connect to the mount. Be sure to disconnect the ASImount driver, before reconnecting the driver in PHD2.
I hope these tutorials are useful and I hope you have lots of fun with the AM5.
Clear skies!
Hi, I am curious about this mounts operation in AZ mode? Will it track and goto in AZ mode?
Thanks
M Sood
Yes, it can track and goto in alt-az mode. You’ll need to change your RA axis to 0.
This blogpost on controlling the ZWO AM5 Mount over WiFi, USB, and HC is a game-changer for astrophotography enthusiasts! The detailed guide provides a comprehensive walkthrough, unlocking the full potential of the ZWO AM5 Mount through multiple connectivity options. Whether it’s the convenience of WiFi, the reliability of USB, or the hands-on control with HC, this post caters to a range of preferences. Kudos to the author for simplifying the technicalities and making this advanced feature accessible to users at various skill levels. A must-read for anyone looking to elevate their astrophotography experience!
thanks!
Hi,
many thanks for the tutorial. It helps a lot.
But I have difficulties to do the polar alignment. I couldn’t find any helpful videos on the ZWO’s YouTube channel.
Have you a video to to the alignment only with the ASI Mount software? Or must I use an ASIAIR or NINA Software?
Kind regards
Christian
Hi Christian, the ASIAIR is ideal for polar aligning your AM5 (or AM3). It includes an easy to use polar alignment procedure.
Another way to go is to connect your AM5 via USB to a laptop/computer with polar align software. I have used Sharpcap Pro in the past, it also worked fine.
I have a 4 year old video about polar alignment (lol): https://astroforumspace.com/five-tips-to-polar-align-your-telescope-mount-like-a-pro/
I’ll consider making a new video about how to setup your AM5 with the ASIAIR. Cheers!