When I initially delved into my astrophotography hobby, one of my immediate aspirations was to point my telescope at the moon and planets in our very own solar system. I vividly remember those initial encounters, where I caught my first glimpses of the moon’s craters, observed the four Galilean moons orbiting Jupiter, and marveled at the magnificent cloud bands enveloping the planet, showcasing its incredible great red spot. The sheer beauty of Saturn’s rings left me in awe while exploring Mars allowed me to witness its intriguing surface features with vulcanoes and polar ice caps. And who could forget Venus, our closest planetary neighbor, showing its various phases while being mysteriously veiled by captivating clouds? These experiences grounded me, connecting me to the cosmic wonders that exist in our own cosmic backyard.
At one point, I decided to go beyond observations and image the planets in our solar system. Technically, this is not ‘astrophotography’ as ‘astro’ means star, so most people refer to it as planetary imaging. Below are two timelapse GIF files I’ve made of the rotation of Jupiter with its Great Red Spot and one of its four Galilean moons, IO, passing in front of the planet, and a four-hour rotation of planet Mars when it was near opposition – the closest point to Earth – in 2022. If you’re completely new to planetary imaging, I’d recommend you first read this blog where I explain how to perform planetary imaging. Also, I’d recommend that in addition to this post, you also take a look at the kind of telescopes best suited to image the planets. For these images, I used my trusted Celestron Edge HD 8″ telescope and a planetary camera called the ZWO ASI678MC. You can find a full list of my astrophotography gear here.
Planetary imaging: a short explanation
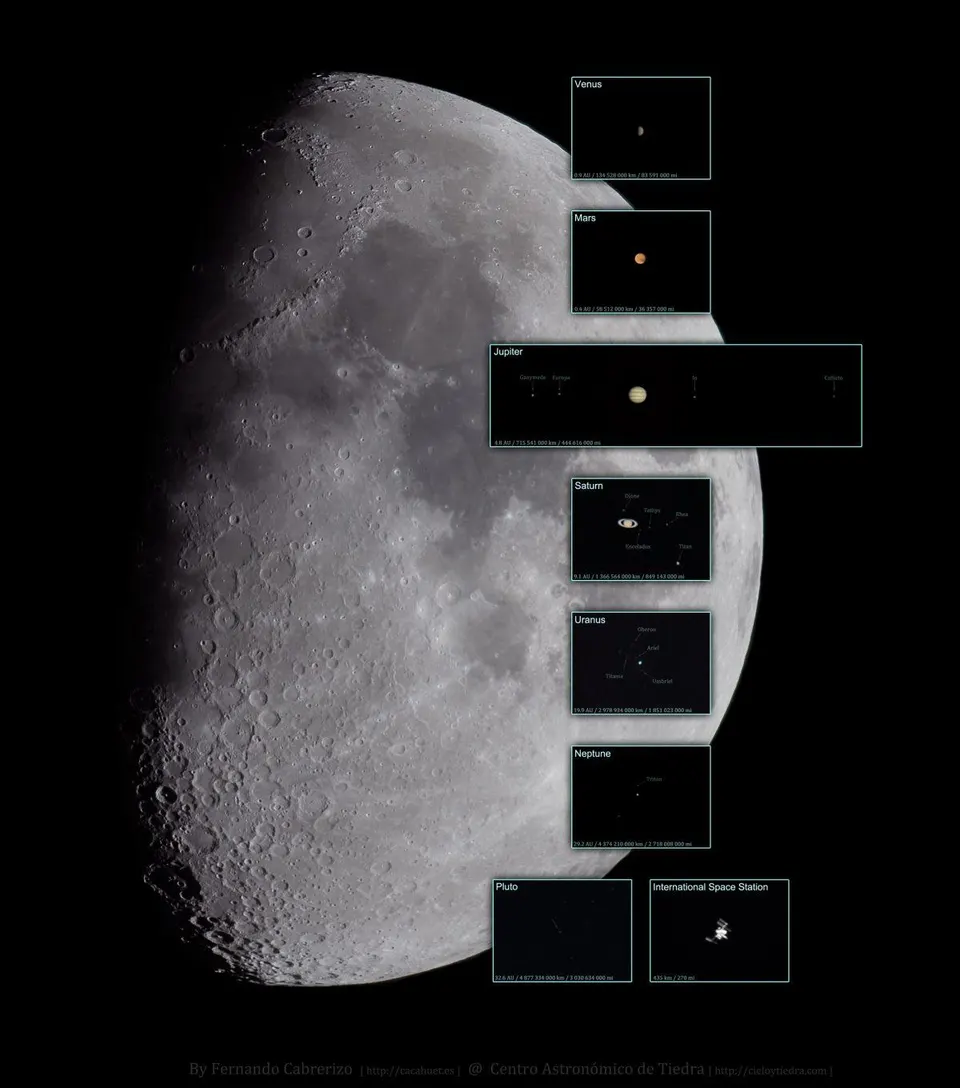
If your plan is to start with planetary imaging, you’ll need to know that the planets are among the smallest objects in the night sky. for a comparison in size between the planets and the moon, see the picture below and you’ll get the idea. Luckily, planets are also the brightest objects in the night sky, as they are illuminated by our own sun. Because of this, one of the best ways to capture the moon and the planets is by taking short videos, about one to five minutes long, depending on the rotation speed of the planet. Planetary imagers end up with many video files of a planet during a session, and they stack the best individual frames of those videos to create one picture of a planet.
What to look for in a good planetary camera?
Choosing the best planetary camera can be a challenging task due to the multitude of factors to consider. To ensure you make an informed decision, it’s crucial to understand and evaluate various aspects of the camera. Here, we’ll delve into the key factors to consider when selecting a planetary camera: resolution, framerate per second (FPS), mono or color camera, read noise, quantum efficiency, analog-to-digital converter (ADC), and full well capacity. Considering these factors and their interplay can help you make an informed decision when choosing a planetary camera that aligns with your specific imaging goals and requirements.
Resolution
As previously mentioned, planets appear as small objects in the night sky. To provide some perspective, the Moon spans about 30 arcminutes, which is roughly equivalent to half a degree or 1800 arcseconds. In comparison, when Jupiter is at its closest point to Earth in its orbit around the Sun, it covers approximately 51 arcseconds during opposition. Venus, during opposition, covers about 61 arcseconds, while Mars covers 25 arcseconds, and Saturn covers 21 arcseconds. Neptune and Uranus are even smaller in comparison. It’s worth exploring these planets with the addition of arcseconds to fully grasp why capturing high-quality images of them is challenging for amateur photographers. Let’s assume that each pixel on your planetary camera with a long focal length telescope corresponds to 0.25 arcseconds of the sky. This is achieved when using a planetary camera pixel size of about 2.5 microns at 2000mm focal length. With this scale in mind, it becomes evident that Jupiter would only occupy around 204 pixels (51/0.25) on your camera sensor, Venus 244 pixels, Mars 100 pixels, and Saturn 84 pixels. Therefore, even a modest one-megapixel camera sensor, with dimensions of 1200 x 900 pixels, is capable of capturing these planets easily. You can calculate your imaging scale by using the formula: (Pixel size camera (um) / focal length telescope (mm)) * 206.265. Here’s a great tool you can use to calculate your field of view and pixel size using different telescopes and cameras.
Frames Per Second (FPS)
Frames per second (FPS) refers to the number of images your camera captures each second in a video. In the context of planetary imaging, FPS plays a significant role. Put simply, a higher FPS allows you to capture more images per second. For instance, a camera with 25 FPS captures 1500 pictures in one minute, while a camera with 50 FPS captures 3000 frames in the same duration. Having twice as many frames provides you with a greater selection and the ability to stack only the highest-quality frames.
Consider a scenario where you are fortunate to experience 10 seconds of excellent astronomical seeing during a one-minute video. With an FPS of 50, you will obtain 500 high-quality frames of a planet, whereas an FPS of 100 will yield 1000 frames. Even if the astronomical seeing remains consistent throughout the entire video, having more images is advantageous. It enables you to stack up to twice as many frames, resulting in a final picture with an increased signal-to-noise ratio.
However, there is a limit to the benefits of higher FPS speeds. A shorter exposure time, which accompanies higher FPS, may necessitate increasing the camera’s gain, leading to more noise in the video. Nevertheless, it is preferable to have a planetary camera with a high FPS that can be adjusted to a lower speed when needed, rather than a camera with a lower FPS that cannot be increased.
Mono versus color camera
In the realm of both planetary and deep-sky astrophotography, the choice between a monochrome (mono) or color camera is a personal decision, each with its own advantages and disadvantages. Opting for a color camera offers the convenience of producing color images of the night sky without the added complexity associated with using a mono camera. However, experienced astrophotographers often prefer mono cameras for several reasons.
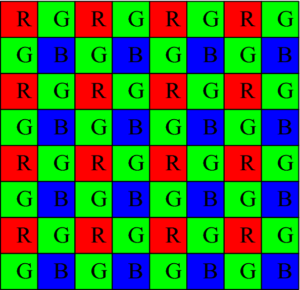
Color cameras employ a Bayer matrix in front of the sensor, comprising tiny red, green, and blue filters placed over each pixel. This pattern, known as RGGB, oversamples green and undersamples red and blue to replicate human vision, as we are more sensitive to green light and desire images that resemble what we see with our naked eye. Unfortunately, this arrangement causes photons in the red or blue part of the spectrum to be rejected by green filters and vice versa, limiting the collection of precious light in astrophotography.
Shooting in mono offers distinct advantages. Without a Bayer filter, one can capture black-and-white images, referred to as luminance frames, where nearly all photons, irrespective of their color, are registered on the sensor. This results in a highly dynamic monochrome representation of celestial objects. Additionally, using red, green, and blue broadband filters enables the collection of light from specific parts of the spectrum, which can later be combined to create natural-looking color images. The main drawback of mono imaging is the requirement for additional filters and a filter wheel to hold them in front of the camera sensor, introducing complexity and longer exposure times. However, the pursuit of higher-quality astrophotography justifies the additional effort, applicable to both deep-sky and planetary imaging.
For planetary imaging, I’d recommend starting with a color camera. Once you achieve proficiency in capturing planetary images, you can progress to the more intricate workflow involved in mono camera usage, opening the doors to enhanced results.
Read noise
Read noise pertains to the electronic noise inherent in your camera. During the readout process, a few extra electrons are randomly lost or gained, causing slight variations in the readout value compared to the actual captured signal. When it comes to faint signals, such as those encountered in deep-sky astrophotography, read noise has the most significant impact. Unlike other noise sources like dark current noise, read noise remains consistent regardless of factors like exposure time or cooling. This means that whether you have a short or long exposure time, or whether you employ cooling or not, you will experience a similar level of read noise.
In deep-sky astrophotography, increasing your exposure time serves as the most effective defense against read noise, as well as other forms of noise. Since the noise increases with the square root of the signal, longer exposures provide a higher probability for the weak photons from your deep-sky object to rise above the camera’s noise level. However, in planetary imaging, the objective is to use short-exposure videos to capture planetary details. Consequently, extending the exposure time is not a viable option, and the best approach is to acquire a higher-quality camera that exhibits reduced read noise.
Quantum Efficiency
Quantum efficiency (QE) refers to the efficiency with which an astro camera can detect and convert photons into a digital signal. In an ideal scenario, if 20 photons of light reach a single pixel on the camera sensor, the pixel’s readout would ideally be 20. QE is typically expressed as a percentage and is represented by QE graphs that illustrate the camera’s effectiveness in converting photons into electrons for various wavelengths of light.
For instance, if the average QE is only 50%, it means that the sensor converts only half of the incident photons that reach the camera sensor into a digital signal. On the other hand, high-end sensors often exhibit a QE of approximately 90%, indicating that these cameras are highly sensitive and convert nearly all photons into a digital signal. In general, a camera with a higher QE is considered superior, as it can capture a greater number of photons and produce a more accurate representation of the detected light.
Analog to Digital Converter & Full well capacity
The dynamic range of your camera is determined by the analog-to-digital converter (ADC) it employs. Let’s begin with a basic example using the lowest number of bits: 1 bit. In this case, the camera can only produce two variations: 0 (representing black) and 1 (representing white). With each additional bit, the number of variations from black to white doubles. For instance, a 2-bit ADC can produce 2×2 = 4 variations, while a 4-bit ADC can generate 2x2x2x2 = 16 variations. The highest-quality deep-sky astrophotography cameras currently available are 16-bit cameras, offering 65,535 variations from black to white (16 to the power of 2).
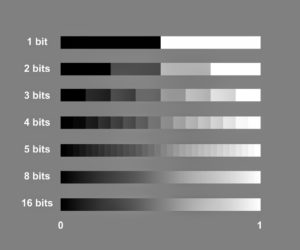
Having more bits in the ADC allows for subtler variations in tonal values, contributing to a larger dynamic range in the image. A greater dynamic range is advantageous when processing your images. However, a higher-bit ADC can slow down the video capture process, resulting in lower frames per second (FPS) and fewer frames captured. In planetary imaging, where short-exposure videos are captured, 10 to 12 bits are typically sufficient. Finding the right balance between a higher bit rate and higher FPS is often an experimental process to determine what works best for your specific setup.
Another element of dynamic range is the full well capacity of the camera sensor’s pixels. The full well capacity refers to the maximum charge a pixel can hold before reaching saturation, which can degrade the signal. This concern is less significant in planetary imaging since short-exposure videos are employed instead of long-exposure photographs commonly used in deep-sky astrophotography. Long exposures can cause a pixel’s charge to exceed its saturation level, leading to the charge spilling over into adjacent pixels—a phenomenon known as blooming.
In sum: what to look for in a planetary camera
When it comes to cameras, a one-megapixel sensor is sufficient for capturing the planets, even when using telescopes with long focal lengths. Planets are among the smallest objects in the night sky, so higher resolutions are not necessarily required. However, having a high framerate per second is beneficial for planetary imaging, as it allows for capturing short videos of the planets. This results in a larger number of frames available for post-processing, increasing the chances of obtaining higher-quality images.
In addition to framerate, other important factors to consider in a planetary camera are low read noise and high quantum efficiency. These features enable the camera to effectively detect and convert photons into a signal that is registered on the camera sensor. Lower read noise ensures cleaner image data, while higher quantum efficiency enhances the camera’s sensitivity to light, resulting in better image quality.
For beginners in planetary imaging, using a color camera is recommended. However, as you gain experience, you may want to explore using a mono camera in combination with RGB and UV/IR cut filters. This setup can significantly enhance the quality of your images by allowing you to capture and combine specific wavelengths of light.
great info! but I just have one question, on fire-capture, when setting my gain ,exposure and histogram level when imaging let’s say Jupiter, after I choose my ROI and capture times, do I want to leave the FPS box on MAX or should I lower the FPS to get less noise?
In general you want your FPS as fast as possible to capture more frames.
How is QE typically represented, and what does a QE graph show about a camera’s performance across different wavelengths?
you need to check the QE graph that companies like ZWO release with each of their cameras. It shows the QE for each of the wavelengths.